2023 CHEVROLET MALIBU light
[x] Cancel search: lightPage 2 of 332
Chevrolet Malibu Owner Manual (GMNA-Localizing-U.S./Canada-
16273584) - 2023 - CRC - 9/28/22
Contents
Introduction . . . . . . . . . . . . . . . . . . . . . . . . . . . . . . 1
Keys, Doors, and Windows . . . . . . . . . . . . . . . 6
Seats and Restraints . . . . . . . . . . . . . . . . . . . . . 27
Storage . . . . . . . . . . . . . . . . . . . . . . . . . . . . . . . . . . 72
Instruments and Controls . . . . . . . . . . . . . . . . 74
Lighting . . . . . . . . . . . . . . . . . . . . . . . . . . . . . . . . 102
Infotainment System . . . . . . . . . . . . . . . . . . . 109
Climate Controls . . . . . . . . . . . . . . . . . . . . . . . . 157
Driving and Operating . . . . . . . . . . . . . . . . . . 165
Vehicle Care . . . . . . . . . . . . . . . . . . . . . . . . . . . . 220
Service and Maintenance . . . . . . . . . . . . . . . 289
Technical Data . . . . . . . . . . . . . . . . . . . . . . . . . 297
Customer Information . . . . . . . . . . . . . . . . . 300
Reporting Safety Defects . . . . . . . . . . . . . . . 308
OnStar . . . . . . . . . . . . . . . . . . . . . . . . . . . . . . . . . . 312
Connected Services . . . . . . . . . . . . . . . . . . . . . 317
Index . . . . . . . . . . . . . . . . . . . . . . . . . . 320
Introduction
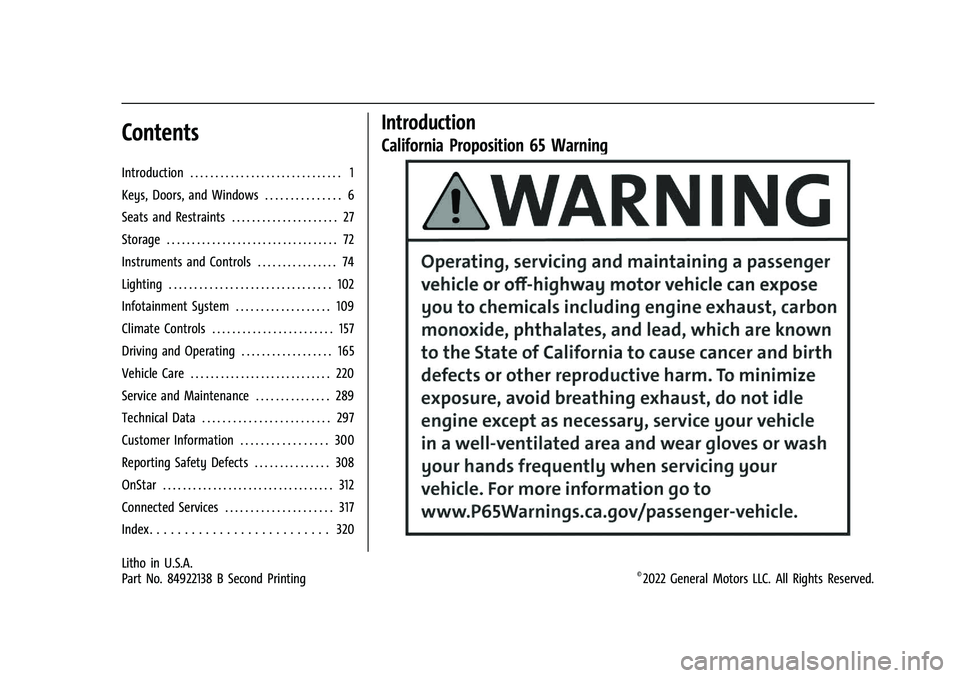
California Proposition 65 Warning
Litho in U.S.A.
Part No. 84922138 B Second Printing©2022 General Motors LLC. All Rights Reserved.
Page 4 of 332
Chevrolet Malibu Owner Manual (GMNA-Localizing-U.S./Canada-
16273584) - 2023 - CRC - 9/28/22
Introduction 3
A circle with a slash through it is a safety
symbol which means“Do not,” “Do not do
this,” or“Do not let this happen.”
Symbols
The vehicle has components and labels that
use symbols instead of text. Symbols are
shown along with the text describing the
operation or information relating to a
specific component, control, message, gauge,
or indicator.
M:Shown when the owner’s manual has
additional instructions or information.
*: Shown when the service manual has
additional instructions or information.
0: Shown when there is more information
on another page — “see page.”
Vehicle Symbol Chart
Here are some additional symbols that may
be found on the vehicle and what they
mean. See the features in this manual for
information.
u: Air Conditioning System
G:Air Conditioning Refrigerant Oil
9:Airbag Readiness Light
!:Antilock Brake System (ABS)
$:Brake System Warning Light
9:Dispose of Used Components Properly
P:Do Not Apply High Pressure Water
B:Engine Coolant Temperature
_:Flame/Fire Prohibited
H: Flammable
[:Forward Collision Alert
R:Fuse Block Cover Lock Location
+:Fuses
j:ISOFIX/LATCH System Child Restraints
Q:Keep Fuse Block Covers Properly
Installed
|: Lane Change Alert
@:Lane Departure Warning
A:Lane Keep Assist
*: Malfunction Indicator Lamp
::Oil Pressure
X:Park Assist
~:Pedestrian Ahead Indicator
O:Power
7:Rear Cross Traffic Alert
I:Registered Technician
/:Remote Vehicle Start
h:Risk of Electrical Fire
>:Seat Belt Reminders
I:Side Blind Zone Alert
h:Stop/Start
7:Tire Pressure Monitor
d:Traction Control/StabiliTrak/Electronic
Stability Control (ESC)
a: Under Pressure
k: Vehicle Ahead Indicator
Page 6 of 332
Chevrolet Malibu Owner Manual (GMNA-Localizing-U.S./Canada-
16273584) - 2023 - CRC - 9/28/22
Introduction 5
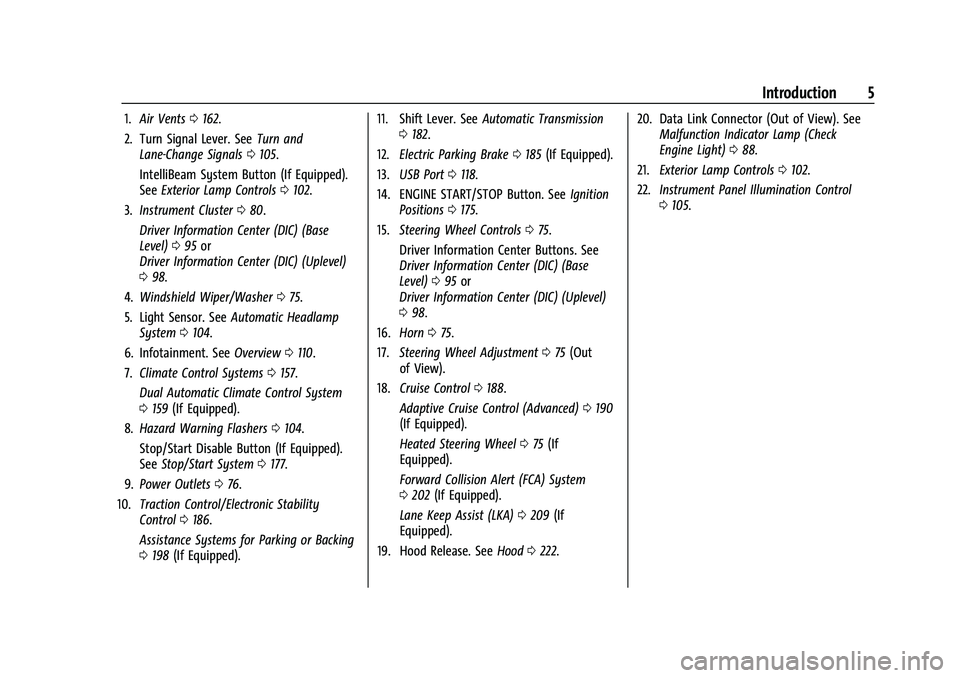
1.Air Vents 0162.
2. Turn Signal Lever. See Turn and
Lane-Change Signals 0105.
IntelliBeam System Button (If Equipped).
See Exterior Lamp Controls 0102.
3. Instrument Cluster 080.
Driver Information Center (DIC) (Base
Level) 095 or
Driver Information Center (DIC) (Uplevel)
0 98.
4. Windshield Wiper/Washer 075.
5. Light Sensor. See Automatic Headlamp
System 0104.
6. Infotainment. See Overview0110.
7. Climate Control Systems 0157.
Dual Automatic Climate Control System
0 159 (If Equipped).
8. Hazard Warning Flashers 0104.
Stop/Start Disable Button (If Equipped).
See Stop/Start System 0177.
9. Power Outlets 076.
10. Traction Control/Electronic Stability
Control 0186.
Assistance Systems for Parking or Backing
0 198 (If Equipped). 11. Shift Lever. See
Automatic Transmission
0 182.
12. Electric Parking Brake 0185 (If Equipped).
13. USB Port 0118.
14. ENGINE START/STOP Button. See Ignition
Positions 0175.
15. Steering Wheel Controls 075.
Driver Information Center Buttons. See
Driver Information Center (DIC) (Base
Level) 095 or
Driver Information Center (DIC) (Uplevel)
0 98.
16. Horn 075.
17. Steering Wheel Adjustment 075 (Out
of View).
18. Cruise Control 0188.
Adaptive Cruise Control (Advanced) 0190
(If Equipped).
Heated Steering Wheel 075 (If
Equipped).
Forward Collision Alert (FCA) System
0 202 (If Equipped).
Lane Keep Assist (LKA) 0209 (If
Equipped).
19. Hood Release. See Hood0222. 20. Data Link Connector (Out of View). See
Malfunction Indicator Lamp (Check
Engine Light) 088.
21. Exterior Lamp Controls 0102.
22. Instrument Panel Illumination Control
0105.
Page 14 of 332
Chevrolet Malibu Owner Manual (GMNA-Localizing-U.S./Canada-
16273584) - 2023 - CRC - 9/28/22
Keys, Doors, and Windows 13
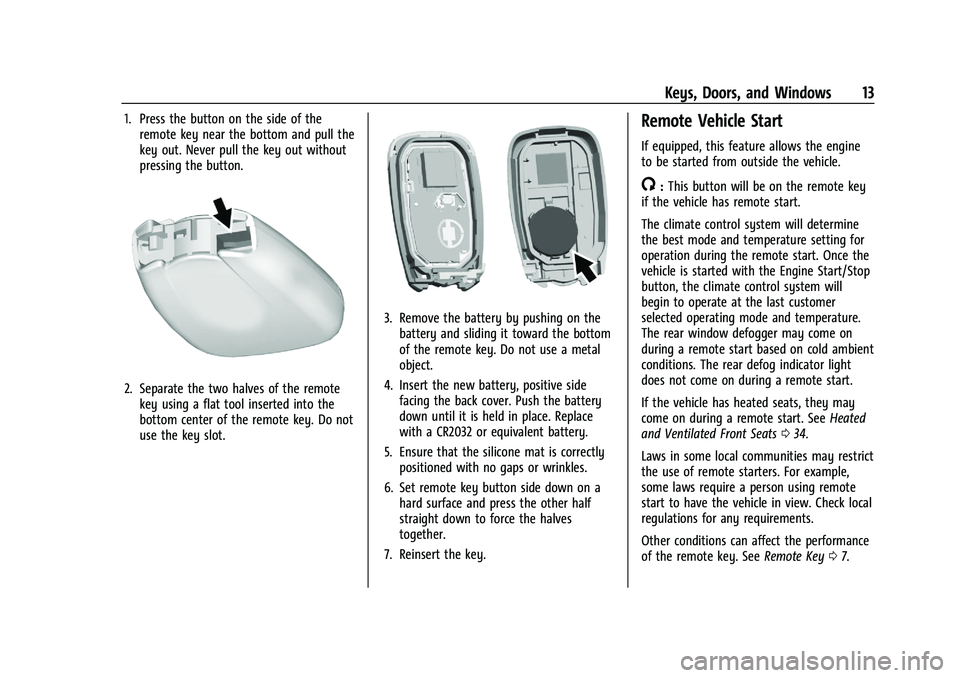
1. Press the button on the side of theremote key near the bottom and pull the
key out. Never pull the key out without
pressing the button.
2. Separate the two halves of the remotekey using a flat tool inserted into the
bottom center of the remote key. Do not
use the key slot.
3. Remove the battery by pushing on thebattery and sliding it toward the bottom
of the remote key. Do not use a metal
object.
4. Insert the new battery, positive side facing the back cover. Push the battery
down until it is held in place. Replace
with a CR2032 or equivalent battery.
5. Ensure that the silicone mat is correctly positioned with no gaps or wrinkles.
6. Set remote key button side down on a hard surface and press the other half
straight down to force the halves
together.
7. Reinsert the key.
Remote Vehicle Start
If equipped, this feature allows the engine
to be started from outside the vehicle.
/: This button will be on the remote key
if the vehicle has remote start.
The climate control system will determine
the best mode and temperature setting for
operation during the remote start. Once the
vehicle is started with the Engine Start/Stop
button, the climate control system will
begin to operate at the last customer
selected operating mode and temperature.
The rear window defogger may come on
during a remote start based on cold ambient
conditions. The rear defog indicator light
does not come on during a remote start.
If the vehicle has heated seats, they may
come on during a remote start. See Heated
and Ventilated Front Seats 034.
Laws in some local communities may restrict
the use of remote starters. For example,
some laws require a person using remote
start to have the vehicle in view. Check local
regulations for any requirements.
Other conditions can affect the performance
of the remote key. See Remote Key07.
Page 17 of 332
Chevrolet Malibu Owner Manual (GMNA-Localizing-U.S./Canada-
16273584) - 2023 - CRC - 9/28/22
16 Keys, Doors, and Windows
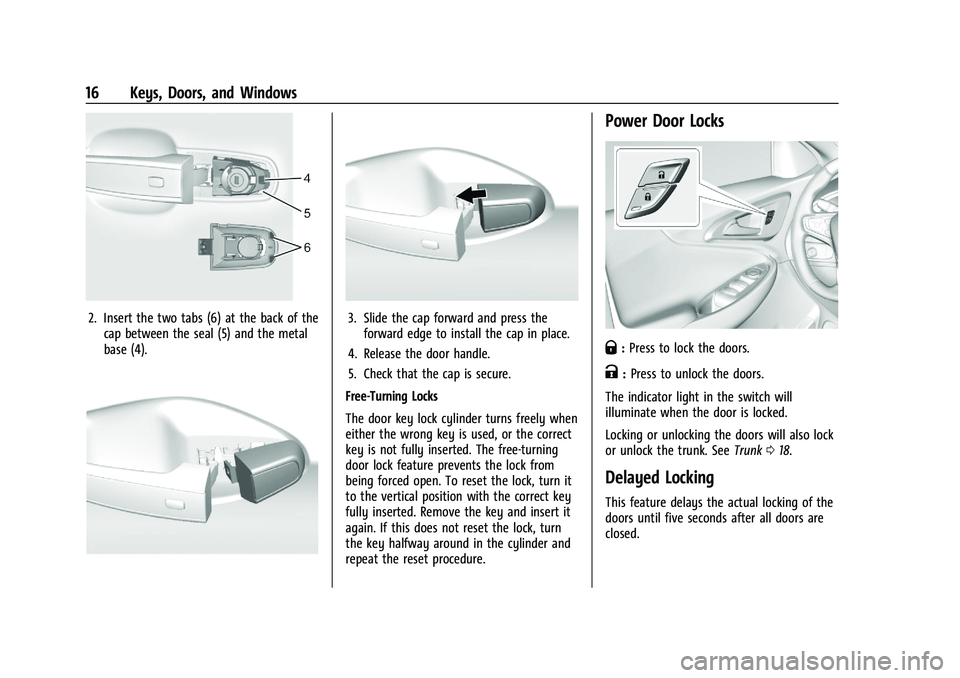
2. Insert the two tabs (6) at the back of thecap between the seal (5) and the metal
base (4).3. Slide the cap forward and press theforward edge to install the cap in place.
4. Release the door handle.
5. Check that the cap is secure.
Free-Turning Locks
The door key lock cylinder turns freely when
either the wrong key is used, or the correct
key is not fully inserted. The free-turning
door lock feature prevents the lock from
being forced open. To reset the lock, turn it
to the vertical position with the correct key
fully inserted. Remove the key and insert it
again. If this does not reset the lock, turn
the key halfway around in the cylinder and
repeat the reset procedure.
Power Door Locks
Q: Press to lock the doors.
K:Press to unlock the doors.
The indicator light in the switch will
illuminate when the door is locked.
Locking or unlocking the doors will also lock
or unlock the trunk. See Trunk018.
Delayed Locking
This feature delays the actual locking of the
doors until five seconds after all doors are
closed.
Page 20 of 332
Chevrolet Malibu Owner Manual (GMNA-Localizing-U.S./Canada-
16273584) - 2023 - CRC - 9/28/22
Keys, Doors, and Windows 19
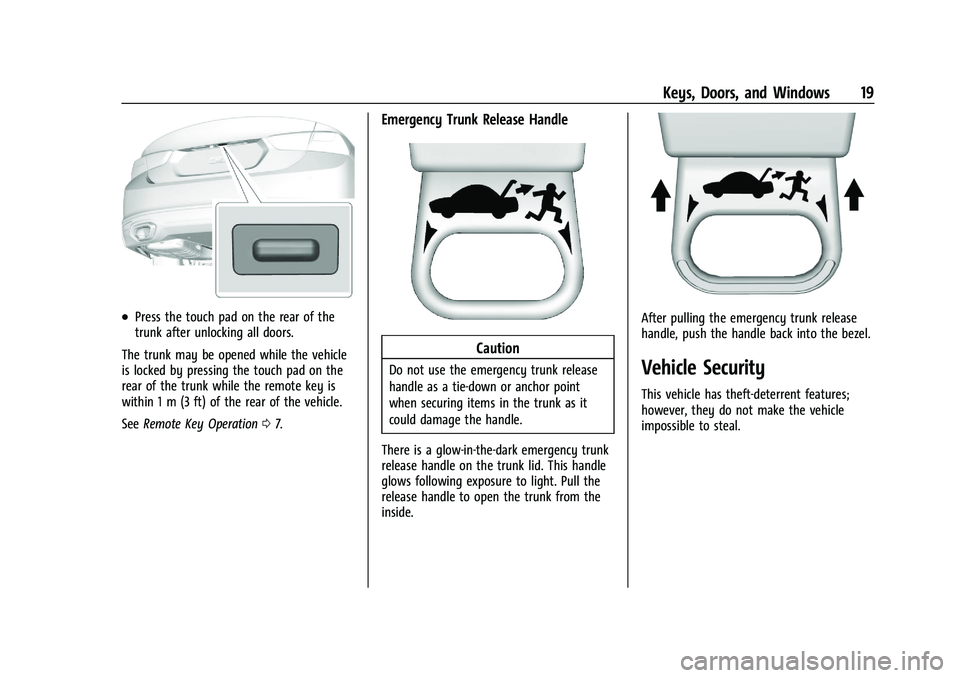
.Press the touch pad on the rear of the
trunk after unlocking all doors.
The trunk may be opened while the vehicle
is locked by pressing the touch pad on the
rear of the trunk while the remote key is
within 1 m (3 ft) of the rear of the vehicle.
See Remote Key Operation 07.
Emergency Trunk Release Handle
Caution
Do not use the emergency trunk release
handle as a tie-down or anchor point
when securing items in the trunk as it
could damage the handle.
There is a glow-in-the-dark emergency trunk
release handle on the trunk lid. This handle
glows following exposure to light. Pull the
release handle to open the trunk from the
inside.
After pulling the emergency trunk release
handle, push the handle back into the bezel.
Vehicle Security
This vehicle has theft-deterrent features;
however, they do not make the vehicle
impossible to steal.
Page 21 of 332
Chevrolet Malibu Owner Manual (GMNA-Localizing-U.S./Canada-
16273584) - 2023 - CRC - 9/28/22
20 Keys, Doors, and Windows
Vehicle Alarm System
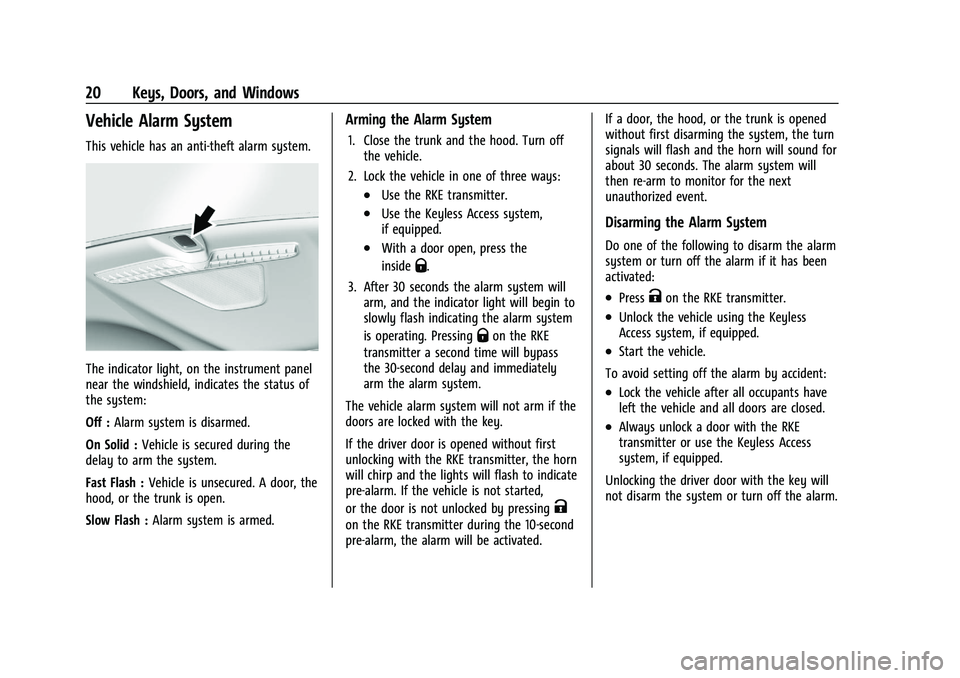
This vehicle has an anti-theft alarm system.
The indicator light, on the instrument panel
near the windshield, indicates the status of
the system:
Off :Alarm system is disarmed.
On Solid : Vehicle is secured during the
delay to arm the system.
Fast Flash : Vehicle is unsecured. A door, the
hood, or the trunk is open.
Slow Flash : Alarm system is armed.
Arming the Alarm System
1. Close the trunk and the hood. Turn off
the vehicle.
2. Lock the vehicle in one of three ways:
.Use the RKE transmitter.
.Use the Keyless Access system,
if equipped.
.With a door open, press the
inside
Q.
3. After 30 seconds the alarm system will arm, and the indicator light will begin to
slowly flash indicating the alarm system
is operating. Pressing
Qon the RKE
transmitter a second time will bypass
the 30-second delay and immediately
arm the alarm system.
The vehicle alarm system will not arm if the
doors are locked with the key.
If the driver door is opened without first
unlocking with the RKE transmitter, the horn
will chirp and the lights will flash to indicate
pre-alarm. If the vehicle is not started,
or the door is not unlocked by pressing
K
on the RKE transmitter during the 10-second
pre-alarm, the alarm will be activated. If a door, the hood, or the trunk is opened
without first disarming the system, the turn
signals will flash and the horn will sound for
about 30 seconds. The alarm system will
then re-arm to monitor for the next
unauthorized event.
Disarming the Alarm System
Do one of the following to disarm the alarm
system or turn off the alarm if it has been
activated:
.PressKon the RKE transmitter.
.Unlock the vehicle using the Keyless
Access system, if equipped.
.Start the vehicle.
To avoid setting off the alarm by accident:
.Lock the vehicle after all occupants have
left the vehicle and all doors are closed.
.Always unlock a door with the RKE
transmitter or use the Keyless Access
system, if equipped.
Unlocking the driver door with the key will
not disarm the system or turn off the alarm.
Page 22 of 332
Chevrolet Malibu Owner Manual (GMNA-Localizing-U.S./Canada-
16273584) - 2023 - CRC - 9/28/22
Keys, Doors, and Windows 21
How to Detect a Tamper Condition
IfKis pressed on the RKE transmitter and
the horn chirps and the lights flash three
times, an alarm occurred previously while
the alarm system was armed.
If the alarm has been activated, a message
will appear on the Driver Information
Center (DIC).
Immobilizer
See Radio Frequency Statement 0308.
Immobilizer Operation
This vehicle has a passive theft-deterrent
system.
The system does not have to be manually
armed or disarmed.
The vehicle is automatically immobilized
when the remote key leaves the vehicle.
The immobilization system is disarmed
when the ignition button is pushed in and a
valid remote key is in the vehicle.
The security light on the instrument cluster
comes on when there is a problem with
arming or disarming the theft-deterrent
system.
The system has one or more remote keys
matched to an immobilizer control unit in
the vehicle. Only a correctly matched
remote key will start the vehicle. If the
remote key is ever damaged, you may not
be able to start your vehicle.
When trying to start the vehicle, the
security light comes on briefly when the
ignition is turned on.
If the vehicle does not start and the security
light stays on, there is a problem with the
system. Turn the vehicle off and try again.
If the remote key appears to be undamaged,
try another remote key, or place the remote
key in the remote key pocket. See “Starting
the Vehicle with a Low Remote Key” under
Remote Key Operation 07. If the vehicle does not start with the other
remote key or when the remote key is in
the remote key pocket, the vehicle needs
service. See your dealer who can service the
theft-deterrent system and have a new
remote key programmed to the vehicle.
Do not leave the key or device that disarms
or deactivates the theft-deterrent system in
the vehicle.
Exterior Mirrors
Convex Mirrors
{Warning
A convex mirror can make things, like
other vehicles, look farther away than
they really are. If you cut too sharply
into the right lane, you could hit a
vehicle on the right. Check the inside
mirror or glance over your shoulder
before changing lanes.
The passenger side mirror is convex shaped.
A convex mirror surface is curved so more
can be seen from the driver seat.