2023 CHEVROLET MALIBU hood release
[x] Cancel search: hood releasePage 6 of 332
Chevrolet Malibu Owner Manual (GMNA-Localizing-U.S./Canada-
16273584) - 2023 - CRC - 9/28/22
Introduction 5
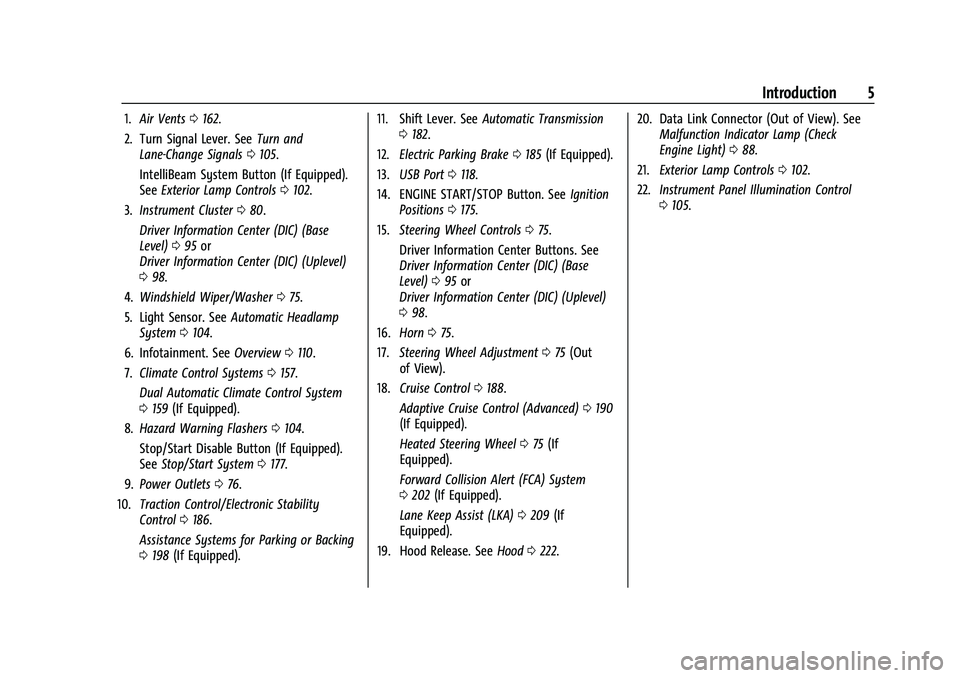
1.Air Vents 0162.
2. Turn Signal Lever. See Turn and
Lane-Change Signals 0105.
IntelliBeam System Button (If Equipped).
See Exterior Lamp Controls 0102.
3. Instrument Cluster 080.
Driver Information Center (DIC) (Base
Level) 095 or
Driver Information Center (DIC) (Uplevel)
0 98.
4. Windshield Wiper/Washer 075.
5. Light Sensor. See Automatic Headlamp
System 0104.
6. Infotainment. See Overview0110.
7. Climate Control Systems 0157.
Dual Automatic Climate Control System
0 159 (If Equipped).
8. Hazard Warning Flashers 0104.
Stop/Start Disable Button (If Equipped).
See Stop/Start System 0177.
9. Power Outlets 076.
10. Traction Control/Electronic Stability
Control 0186.
Assistance Systems for Parking or Backing
0 198 (If Equipped). 11. Shift Lever. See
Automatic Transmission
0 182.
12. Electric Parking Brake 0185 (If Equipped).
13. USB Port 0118.
14. ENGINE START/STOP Button. See Ignition
Positions 0175.
15. Steering Wheel Controls 075.
Driver Information Center Buttons. See
Driver Information Center (DIC) (Base
Level) 095 or
Driver Information Center (DIC) (Uplevel)
0 98.
16. Horn 075.
17. Steering Wheel Adjustment 075 (Out
of View).
18. Cruise Control 0188.
Adaptive Cruise Control (Advanced) 0190
(If Equipped).
Heated Steering Wheel 075 (If
Equipped).
Forward Collision Alert (FCA) System
0 202 (If Equipped).
Lane Keep Assist (LKA) 0209 (If
Equipped).
19. Hood Release. See Hood0222. 20. Data Link Connector (Out of View). See
Malfunction Indicator Lamp (Check
Engine Light) 088.
21. Exterior Lamp Controls 0102.
22. Instrument Panel Illumination Control
0105.
Page 15 of 332
Chevrolet Malibu Owner Manual (GMNA-Localizing-U.S./Canada-
16273584) - 2023 - CRC - 9/28/22
14 Keys, Doors, and Windows
If your vehicle is low on fuel, do not use the
remote start feature. The vehicle may run
out of fuel.
Starting the Engine Using Remote Start
To start the engine using the remote start
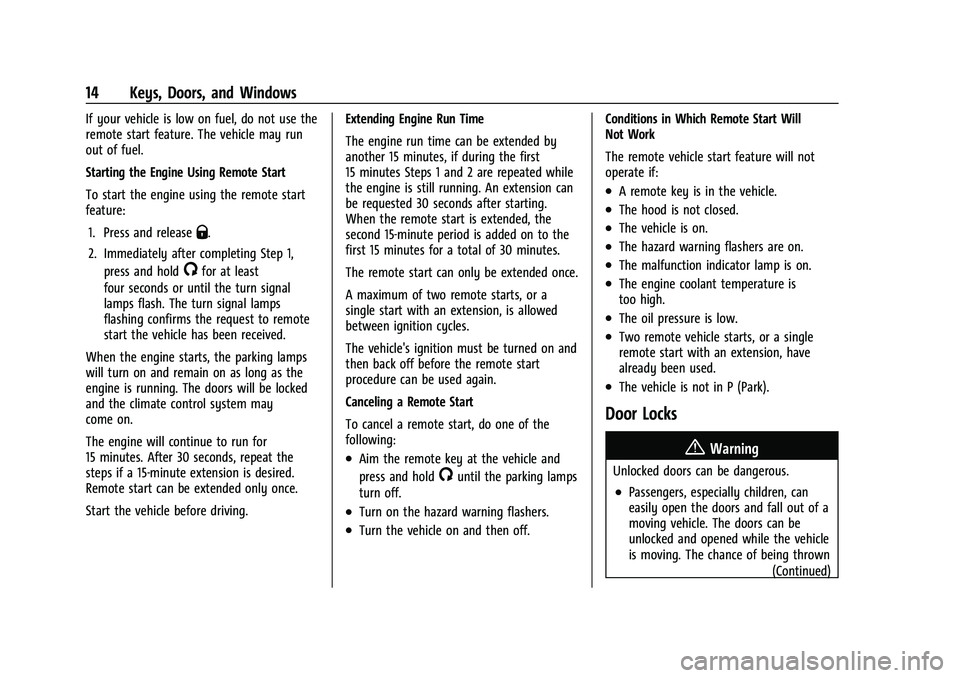
feature:1. Press and release
Q.
2. Immediately after completing Step 1, press and hold
/for at least
four seconds or until the turn signal
lamps flash. The turn signal lamps
flashing confirms the request to remote
start the vehicle has been received.
When the engine starts, the parking lamps
will turn on and remain on as long as the
engine is running. The doors will be locked
and the climate control system may
come on.
The engine will continue to run for
15 minutes. After 30 seconds, repeat the
steps if a 15-minute extension is desired.
Remote start can be extended only once.
Start the vehicle before driving. Extending Engine Run Time
The engine run time can be extended by
another 15 minutes, if during the first
15 minutes Steps 1 and 2 are repeated while
the engine is still running. An extension can
be requested 30 seconds after starting.
When the remote start is extended, the
second 15-minute period is added on to the
first 15 minutes for a total of 30 minutes.
The remote start can only be extended once.
A maximum of two remote starts, or a
single start with an extension, is allowed
between ignition cycles.
The vehicle's ignition must be turned on and
then back off before the remote start
procedure can be used again.
Canceling a Remote Start
To cancel a remote start, do one of the
following:
.Aim the remote key at the vehicle and
press and hold
/until the parking lamps
turn off.
.Turn on the hazard warning flashers.
.Turn the vehicle on and then off. Conditions in Which Remote Start Will
Not Work
The remote vehicle start feature will not
operate if:
.A remote key is in the vehicle.
.The hood is not closed.
.The vehicle is on.
.The hazard warning flashers are on.
.The malfunction indicator lamp is on.
.The engine coolant temperature is
too high.
.The oil pressure is low.
.Two remote vehicle starts, or a single
remote start with an extension, have
already been used.
.The vehicle is not in P (Park).
Door Locks
{Warning
Unlocked doors can be dangerous.
.Passengers, especially children, can
easily open the doors and fall out of a
moving vehicle. The doors can be
unlocked and opened while the vehicle
is moving. The chance of being thrown
(Continued)
Page 77 of 332

Chevrolet Malibu Owner Manual (GMNA-Localizing-U.S./Canada-
16273584) - 2023 - CRC - 9/28/22
76 Instruments and Controls
LO :Use for slow wipes.
INT : Move the lever up to INT for
intermittent wipes, then turn the band up
for more frequent wipes or down for less
frequent wipes.
OFF : Use to turn the wipers off.
1X : For a single wipe, briefly move the
lever down. For several wipes, hold the
lever down.
Clear snow and ice from the wiper blades
and windshield before using them. If frozen
to the windshield, carefully loosen or thaw
them. Damaged blades should be replaced.
See Wiper Blade Replacement 0237.
Heavy snow or ice can overload the wiper
motor. If the wiper motor overheats, the
windshield wipers will stop until the motor
cools and the wiper control is turned off.
See Electrical System Overload 0243.
{Warning
In freezing weather, do not use the
washer until the windshield is warmed.
Otherwise the washer fluid can form ice
on the windshield, blocking your vision.
{Warning
Before driving the vehicle, always clear
snow and ice from the hood, windshield,
washer nozzles, roof, and rear of the
vehicle, including all lamps and windows.
Reduced visibility from snow and ice
buildup could lead to a crash.
Wiper Parking
If the ignition is turned off while the wipers
are on LO, HI, or INT, they will
immediately stop.
If the windshield wiper lever is then moved
to OFF before the driver door is opened or
within 10 minutes, the wipers will restart
and move to the base of the windshield.
If the ignition is turned off while the wipers
are performing wipes due to windshield
washing, the wipers continue to run until
they reach the base of the windshield.
f: Pull the windshield wiper lever
toward you to spray windshield washer fluid
and activate the wipers. The wipers will
continue until the lever is released or the
maximum wash time is reached. When the
lever is released, additional wipes may occur
depending on how long the windshield
washer had been activated. See Washer
Fluid 0233 for information on filling the
windshield washer fluid reservoir.
Clock
Set the time and date using the
infotainment system. See "Time/Date" under
Settings 0144.
Power Outlets
Power Outlet 12-Volt Direct Current
The accessory power outlets can be used to
plug in electrical equipment, such as a cell
phone or MP3 player.
There are two accessory power outlets:
.One on the center stack below the
climate control system
.One on the rear of the center console
Page 164 of 332
Chevrolet Malibu Owner Manual (GMNA-Localizing-U.S./Canada-
16273584) - 2023 - CRC - 9/28/22
Climate Controls 163
Use the louvers on the air vents to change
the direction of the airflow.
On the center air vents, move the sliding
knob down to close off airflow.
On the side air vents, move the sliding knob
to the outboard side of the vehicle to close
off the airflow.
Operation Tips
.Keep all outlets open whenever possible
for best system performance.
.Keep the path under all seats clear of
objects to help circulate the air inside the
vehicle more effectively.
.Clear snow off the hood to improve
visibility and help decrease moisture
drawn into the vehicle, which may
improve long term system performance.
.Use of non-GM approved hood deflectors
can adversely affect the performance of
the system.
.Do not attach any devices to the air vent
slats; this restricts airflow and may cause
damage to the air vents.
Maintenance
Passenger Compartment Air Filter
The filter removes dust, pollen, and other
airborne irritants from outside air that is
pulled into the vehicle.
The filter should be replaced as part of
routine scheduled maintenance; see
Maintenance Schedule0290. To find out
what type of filter to use, see Maintenance
Replacement Parts 0295.
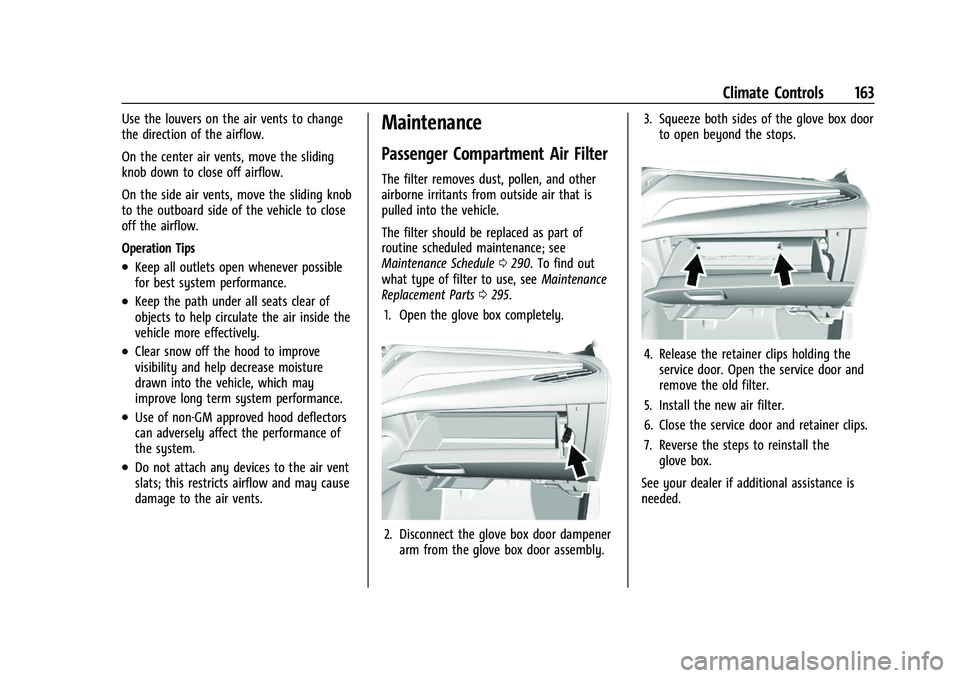
1. Open the glove box completely.
2. Disconnect the glove box door dampener arm from the glove box door assembly. 3. Squeeze both sides of the glove box door
to open beyond the stops.
4. Release the retainer clips holding theservice door. Open the service door and
remove the old filter.
5. Install the new air filter.
6. Close the service door and retainer clips.
7. Reverse the steps to reinstall the glove box.
See your dealer if additional assistance is
needed.
Page 179 of 332
Chevrolet Malibu Owner Manual (GMNA-Localizing-U.S./Canada-
16273584) - 2023 - CRC - 9/28/22
178 Driving and Operating
{Warning
The automatic engine Stop/Start feature
causes the engine to shut off while the
vehicle is still on. Do not exit the vehicle
before shifting to P (Park). The vehicle
may restart and move unexpectedly.
Always shift to P (Park), and then turn
the ignition off before exiting the vehicle.
Auto Engine Stop/Start
When the brakes are applied and the vehicle
is at a complete stop, the engine may turn
off. When stopped, the tachometer displays
AUTO STOP. See Tachometer083. When the
brake pedal is released or the accelerator
pedal is pressed, the engine will restart.
To maintain vehicle performance, other
conditions may cause the engine to
automatically restart before the brake pedal
is released.
Auto Stops may not occur and/or auto
restarts may occur because:
.The climate control settings require the
engine to be running to cool or heat the
vehicle interior.
.The vehicle battery needs to charge.
.The vehicle battery has recently been
disconnected.
.Minimum vehicle speed has not been
reached since the last Auto Stop.
.The accelerator pedal is pressed.
.The engine or transmission is not at the
required operating temperature.
.The outside temperature is not in the
required operating range.
.The vehicle transmission is shifted out of
D (Drive) to any gear other than P (Park).
.Certain driver modes have been selected.
.The vehicle is on a steep hill or grade.
.The driver door has been opened or driver
seat belt has been unbuckled.
.The hood has been opened.
.The Auto Stop has reached the maximum
allowed time. Auto Stop Disable Switch
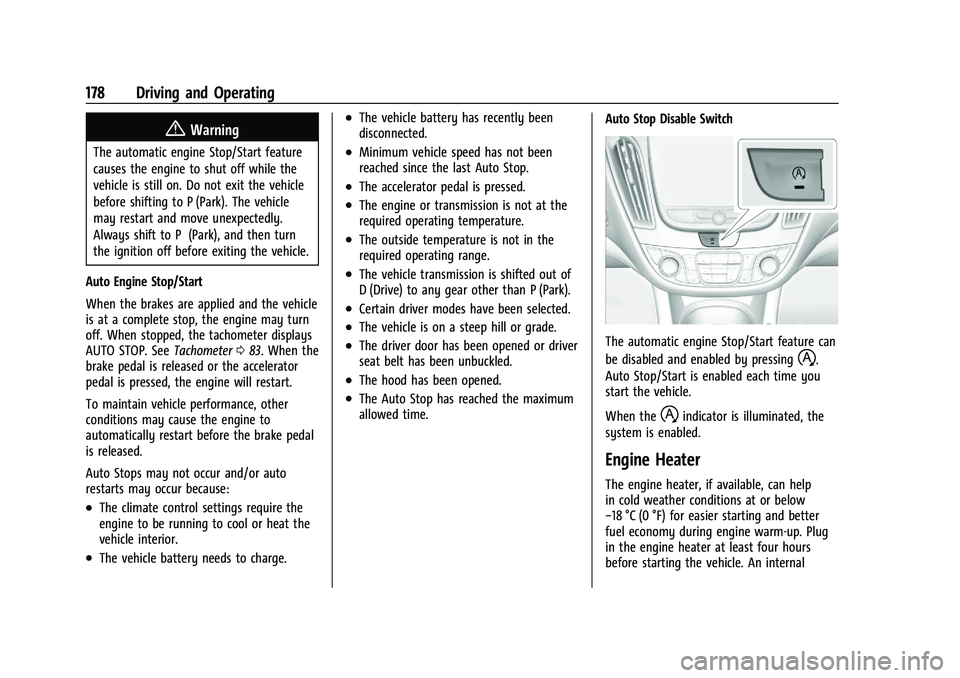
The automatic engine Stop/Start feature can
be disabled and enabled by pressing
h.
Auto Stop/Start is enabled each time you
start the vehicle.
When the
hindicator is illuminated, the
system is enabled.
Engine Heater
The engine heater, if available, can help
in cold weather conditions at or below
−18 °C (0 °F) for easier starting and better
fuel economy during engine warm-up. Plug
in the engine heater at least four hours
before starting the vehicle. An internal
Page 223 of 332
Chevrolet Malibu Owner Manual (GMNA-Localizing-U.S./Canada-
16273584) - 2023 - CRC - 9/28/22
222 Vehicle Care
Vehicle Checks
Doing Your Own Service Work
{Warning
It can be dangerous to work on your
vehicle if you do not have the proper
knowledge, service manual, tools,
or parts. Always follow owner’s manual
procedures and consult the service
manual for your vehicle before doing any
service work.
If doing some of your own service work, use
the proper service manual. It tells you much
more about how to service the vehicle than
this manual can. To order the proper service
manual, see Publication Ordering
Information 0308.
This vehicle has an airbag system. Before
attempting to do your own service work,
see Servicing the Airbag-Equipped Vehicle
0 53.
If equipped with remote vehicle start, open
the hood before performing any service
work to prevent remote starting the vehicle
accidentally. See Remote Vehicle Start 013. Keep a record with all parts receipts and list
the mileage and the date of any service
work performed. See
Maintenance Records
0 296.
Caution
Even small amounts of contamination can
cause damage to vehicle systems. Do not
allow contaminants to contact the fluids,
reservoir caps, or dipsticks.
Hood
{Warning
For vehicles with auto engine stop/start,
turn the vehicle off before opening the
hood. If the vehicle is on, the engine will
start when the hood is opened. You or
others could be injured.
{Warning
Components under the hood can get hot
from running the engine. To help avoid
the risk of burning unprotected skin,
never touch these components until they
have cooled, and always use a glove or
towel to avoid direct skin contact. Clear any snow from the hood before
opening.
To open the hood:
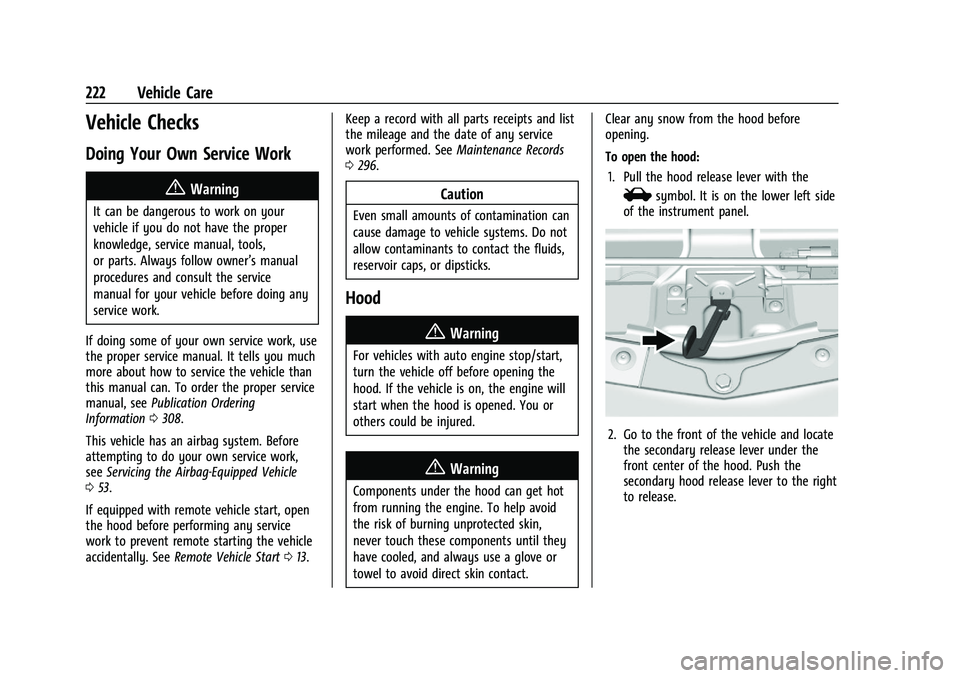
1. Pull the hood release lever with the
isymbol. It is on the lower left side
of the instrument panel.
2. Go to the front of the vehicle and locate the secondary release lever under the
front center of the hood. Push the
secondary hood release lever to the right
to release.
Page 224 of 332
Chevrolet Malibu Owner Manual (GMNA-Localizing-U.S./Canada-
16273584) - 2023 - CRC - 9/28/22
Vehicle Care 223
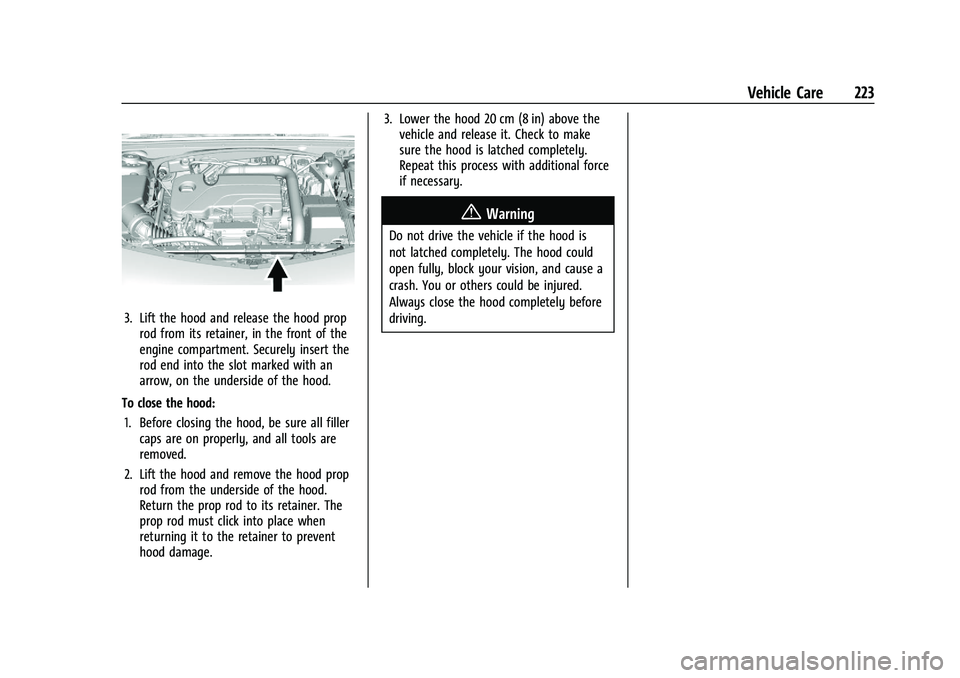
3. Lift the hood and release the hood proprod from its retainer, in the front of the
engine compartment. Securely insert the
rod end into the slot marked with an
arrow, on the underside of the hood.
To close the hood: 1. Before closing the hood, be sure all filler caps are on properly, and all tools are
removed.
2. Lift the hood and remove the hood prop rod from the underside of the hood.
Return the prop rod to its retainer. The
prop rod must click into place when
returning it to the retainer to prevent
hood damage. 3. Lower the hood 20 cm (8 in) above the
vehicle and release it. Check to make
sure the hood is latched completely.
Repeat this process with additional force
if necessary.
{Warning
Do not drive the vehicle if the hood is
not latched completely. The hood could
open fully, block your vision, and cause a
crash. You or others could be injured.
Always close the hood completely before
driving.
Page 295 of 332
Chevrolet Malibu Owner Manual (GMNA-Localizing-U.S./Canada-
16273584) - 2023 - CRC - 9/28/22
294 Service and Maintenance
Recommended Fluids, Lubricants, and Parts
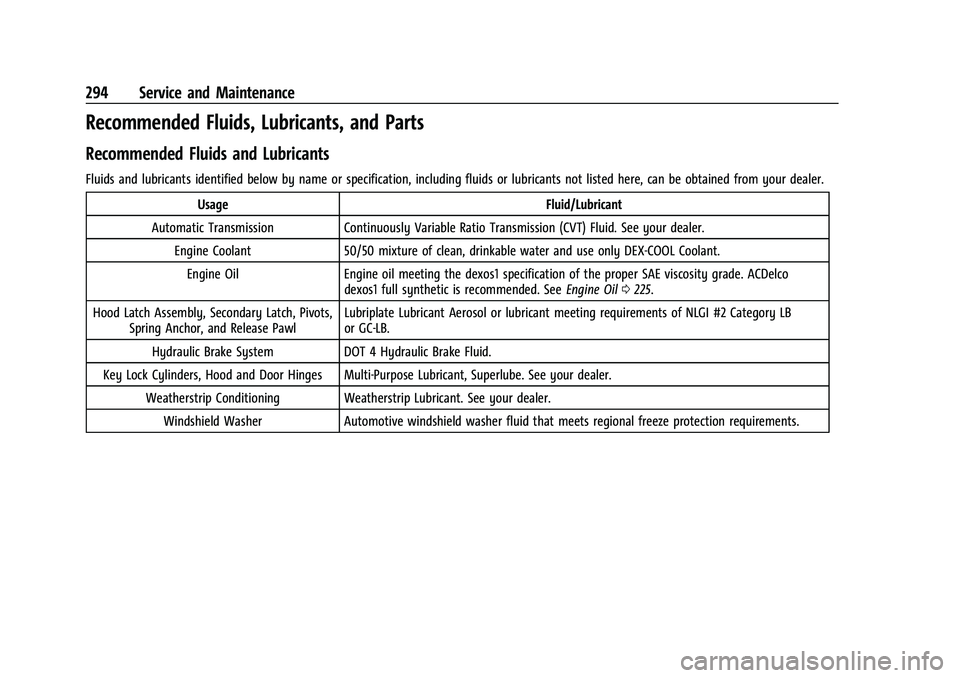
Recommended Fluids and Lubricants
Fluids and lubricants identified below by name or specification, including fluids or lubricants not listed here, can be obtained from your dealer.Usage Fluid/Lubricant
Automatic Transmission Continuously Variable Ratio Transmission (CVT) Fluid. See your dealer. Engine Coolant 50/50 mixture of clean, drinkable water and use only DEX-COOL Coolant.
Engine Oil Engine oil meeting the dexos1 specification of the proper SAE viscosity grade. ACDelco
dexos1 full synthetic is recommended. See Engine Oil0225.
Hood Latch Assembly, Secondary Latch, Pivots, Spring Anchor, and Release Pawl Lubriplate Lubricant Aerosol or lubricant meeting requirements of NLGI #2 Category LB
or GC-LB.
Hydraulic Brake System DOT 4 Hydraulic Brake Fluid.
Key Lock Cylinders, Hood and Door Hinges Multi-Purpose Lubricant, Superlube. See your dealer. Weatherstrip Conditioning Weatherstrip Lubricant. See your dealer.Windshield Washer Automotive windshield washer fluid that meets regional freeze protection requirements.