2023 CHEVROLET MALIBU buttons
[x] Cancel search: buttonsPage 6 of 332
Chevrolet Malibu Owner Manual (GMNA-Localizing-U.S./Canada-
16273584) - 2023 - CRC - 9/28/22
Introduction 5
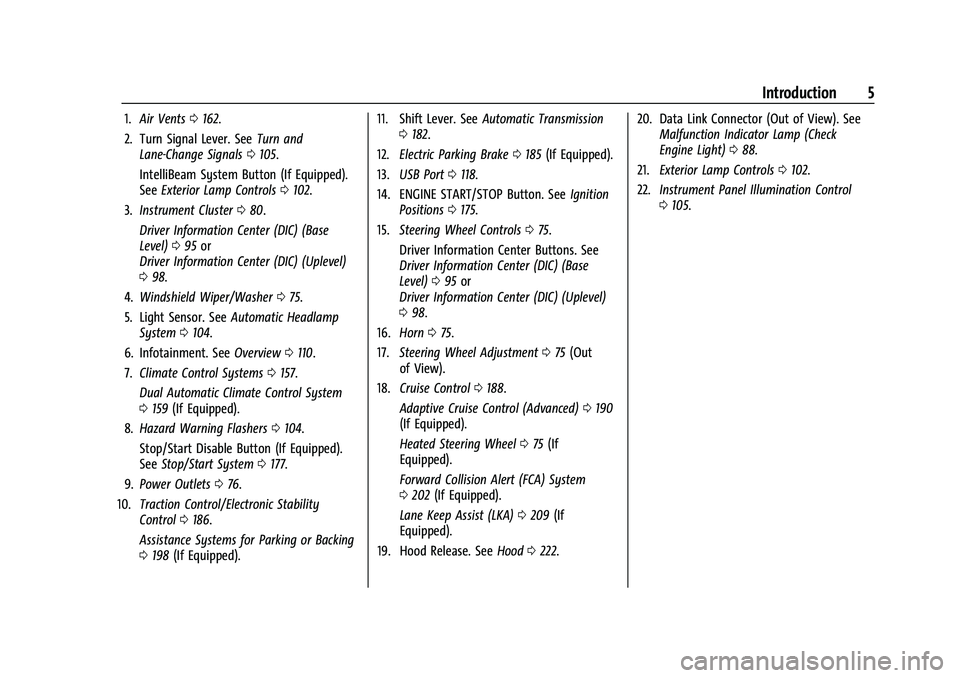
1.Air Vents 0162.
2. Turn Signal Lever. See Turn and
Lane-Change Signals 0105.
IntelliBeam System Button (If Equipped).
See Exterior Lamp Controls 0102.
3. Instrument Cluster 080.
Driver Information Center (DIC) (Base
Level) 095 or
Driver Information Center (DIC) (Uplevel)
0 98.
4. Windshield Wiper/Washer 075.
5. Light Sensor. See Automatic Headlamp
System 0104.
6. Infotainment. See Overview0110.
7. Climate Control Systems 0157.
Dual Automatic Climate Control System
0 159 (If Equipped).
8. Hazard Warning Flashers 0104.
Stop/Start Disable Button (If Equipped).
See Stop/Start System 0177.
9. Power Outlets 076.
10. Traction Control/Electronic Stability
Control 0186.
Assistance Systems for Parking or Backing
0 198 (If Equipped). 11. Shift Lever. See
Automatic Transmission
0 182.
12. Electric Parking Brake 0185 (If Equipped).
13. USB Port 0118.
14. ENGINE START/STOP Button. See Ignition
Positions 0175.
15. Steering Wheel Controls 075.
Driver Information Center Buttons. See
Driver Information Center (DIC) (Base
Level) 095 or
Driver Information Center (DIC) (Uplevel)
0 98.
16. Horn 075.
17. Steering Wheel Adjustment 075 (Out
of View).
18. Cruise Control 0188.
Adaptive Cruise Control (Advanced) 0190
(If Equipped).
Heated Steering Wheel 075 (If
Equipped).
Forward Collision Alert (FCA) System
0 202 (If Equipped).
Lane Keep Assist (LKA) 0209 (If
Equipped).
19. Hood Release. See Hood0222. 20. Data Link Connector (Out of View). See
Malfunction Indicator Lamp (Check
Engine Light) 088.
21. Exterior Lamp Controls 0102.
22. Instrument Panel Illumination Control
0105.
Page 9 of 332
Chevrolet Malibu Owner Manual (GMNA-Localizing-U.S./Canada-
16273584) - 2023 - CRC - 9/28/22
8 Keys, Doors, and Windows
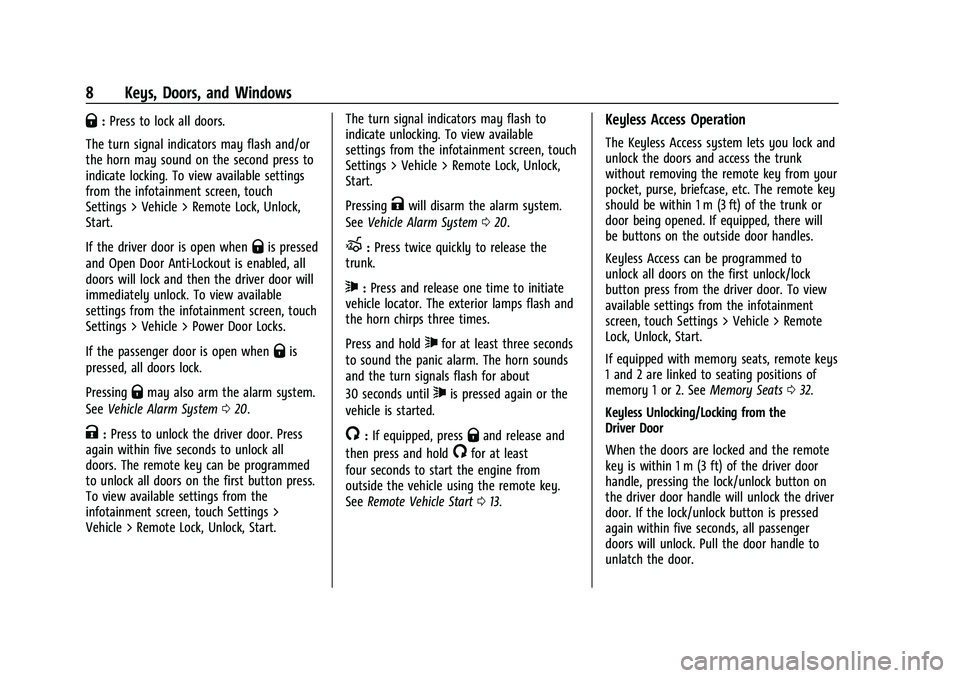
Q:Press to lock all doors.
The turn signal indicators may flash and/or
the horn may sound on the second press to
indicate locking. To view available settings
from the infotainment screen, touch
Settings > Vehicle > Remote Lock, Unlock,
Start.
If the driver door is open when
Qis pressed
and Open Door Anti-Lockout is enabled, all
doors will lock and then the driver door will
immediately unlock. To view available
settings from the infotainment screen, touch
Settings > Vehicle > Power Door Locks.
If the passenger door is open when
Qis
pressed, all doors lock.
Pressing
Qmay also arm the alarm system.
See Vehicle Alarm System 020.
K:Press to unlock the driver door. Press
again within five seconds to unlock all
doors. The remote key can be programmed
to unlock all doors on the first button press.
To view available settings from the
infotainment screen, touch Settings >
Vehicle > Remote Lock, Unlock, Start. The turn signal indicators may flash to
indicate unlocking. To view available
settings from the infotainment screen, touch
Settings > Vehicle > Remote Lock, Unlock,
Start.
Pressing
Kwill disarm the alarm system.
See Vehicle Alarm System 020.
X:Press twice quickly to release the
trunk.
7: Press and release one time to initiate
vehicle locator. The exterior lamps flash and
the horn chirps three times.
Press and hold
7for at least three seconds
to sound the panic alarm. The horn sounds
and the turn signals flash for about
30 seconds until
7is pressed again or the
vehicle is started.
/: If equipped, pressQand release and
then press and hold
/for at least
four seconds to start the engine from
outside the vehicle using the remote key.
See Remote Vehicle Start 013.
Keyless Access Operation
The Keyless Access system lets you lock and
unlock the doors and access the trunk
without removing the remote key from your
pocket, purse, briefcase, etc. The remote key
should be within 1 m (3 ft) of the trunk or
door being opened. If equipped, there will
be buttons on the outside door handles.
Keyless Access can be programmed to
unlock all doors on the first unlock/lock
button press from the driver door. To view
available settings from the infotainment
screen, touch Settings > Vehicle > Remote
Lock, Unlock, Start.
If equipped with memory seats, remote keys
1 and 2 are linked to seating positions of
memory 1 or 2. See Memory Seats032.
Keyless Unlocking/Locking from the
Driver Door
When the doors are locked and the remote
key is within 1 m (3 ft) of the driver door
handle, pressing the lock/unlock button on
the driver door handle will unlock the driver
door. If the lock/unlock button is pressed
again within five seconds, all passenger
doors will unlock. Pull the door handle to
unlatch the door.
Page 11 of 332
Chevrolet Malibu Owner Manual (GMNA-Localizing-U.S./Canada-
16273584) - 2023 - CRC - 9/28/22
10 Keys, Doors, and Windows
heard. Passive locking will then remain
disabled until
Qon the interior door is
pressed, or until the vehicle is turned on.
Remote Left In Vehicle Alert
When the vehicle is turned off and an
remote key is left in the vehicle, the horn
will chirp three times after all doors are
closed. To view available settings from the
infotainment screen, touch Settings >
Vehicle > Remote Lock, Unlock, Start.
Remote No Longer In Vehicle Alert
If the vehicle is on with a door open, and
then all doors are closed, the vehicle will
check for an remote key inside. If an remote
key is not detected, the Driver Information
Center (DIC) will display NO REMOTE
DETECTED and the horn will chirp three
times.
This occurs only once each time the vehicle
is driven. To view available settings from the
infotainment screen, touch Settings >
Vehicle > Remote Lock, Unlock, Start.
Keyless Trunk Opening
Press the touch pad on the rear of the trunk
to open it if the remote key is within 1 m
(3 ft) of the trunk.
Key Access
To access a vehicle with a weak remote key
battery, see Door Locks014.
Programming Remote Keys to the
Vehicle
Only remote keys programmed to the
vehicle will work. If a remote key is lost or
stolen, a replacement can be purchased and
programmed through your dealer. The
vehicle can be reprogrammed so that lost or
stolen remote keys no longer work. Any
remaining remote keys will need to be
reprogrammed. Each vehicle can have up to
eight remote keys matched to it.
Programming with Recognized Remote Keys
A new remote key can be programmed to
the vehicle when there are two recognized
remote keys. To program, the vehicle must
be off and all of the remote keys, both
currently recognized and new, must be
with you.
1. Place the two recognized remote keys in the cupholder.
2. Remove the key lock cylinder cap on the driver door handle. See Door Locks014.
Insert the vehicle key of the new remote
key into the key lock cylinder on the outside of the driver door and turn the
key counterclockwise five times within
10 seconds.
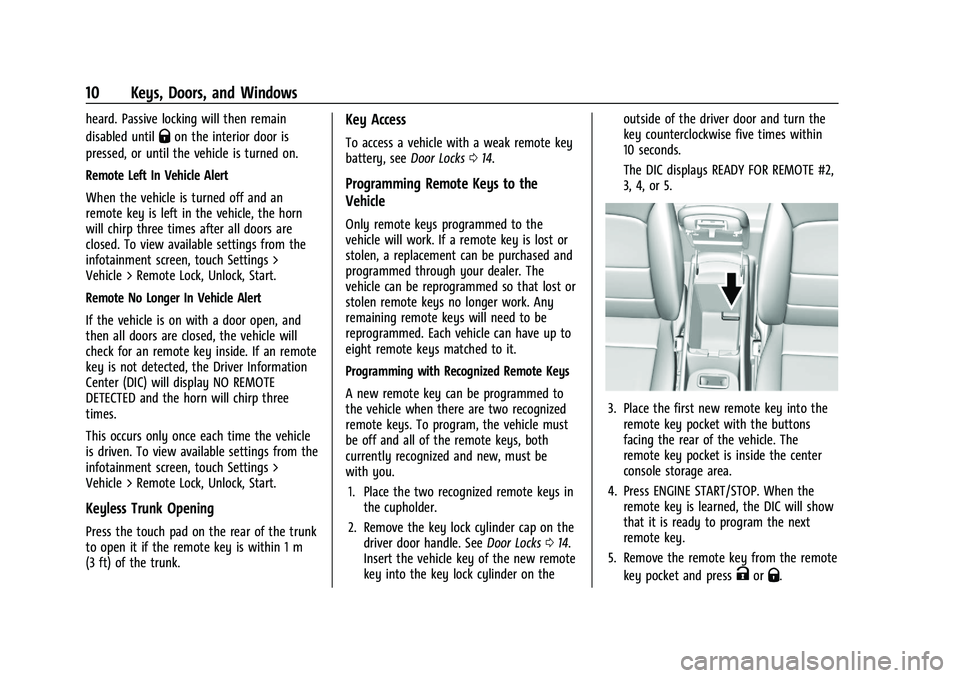
The DIC displays READY FOR REMOTE #2,
3, 4, or 5.
3. Place the first new remote key into the
remote key pocket with the buttons
facing the rear of the vehicle. The
remote key pocket is inside the center
console storage area.
4. Press ENGINE START/STOP. When the remote key is learned, the DIC will show
that it is ready to program the next
remote key.
5. Remove the remote key from the remote key pocket and press
KorQ.
Page 12 of 332
Chevrolet Malibu Owner Manual (GMNA-Localizing-U.S./Canada-
16273584) - 2023 - CRC - 9/28/22
Keys, Doors, and Windows 11
To program additional remote keys,
repeat Steps 3–5 for each new
remote key.
When all additional remote keys are
programmed, press and hold ENGINE
START/STOP for 12 seconds to exit
programming mode.
6. Put the key back into the remote key.
7. Replace the key lock cylinder cap. See Door Locks 014.
Programming without Recognized
Remote Keys
If two currently recognized remote keys are
not available, follow this procedure to
program up to eight remote keys. This
feature is not available in Canada. This
procedure will take approximately
30 minutes to complete. The vehicle must
be off and all of the remote keys to be
programmed must be with you. 1. Remove the key lock cylinder cap on the driver door handle. See Door Locks014.
Insert the vehicle key of the remote key
into the key lock cylinder on the outside
of the driver door and turn the key
counterclockwise five times within
10 seconds. The DIC displays REMOTE LEARN
PENDING, PLEASE WAIT.
2. Wait for 10 minutes until the DIC displays PRESS ENGINE START BUTTON TO
LEARN and then press ENGINE
START/STOP.
The DIC will again display REMOTE LEARN
PENDING, PLEASE WAIT.
3. Repeat Step 2 two additional times. After the third time, all previously known
remote keys will no longer work with
the vehicle. Remaining remote keys can
be relearned during the next steps.
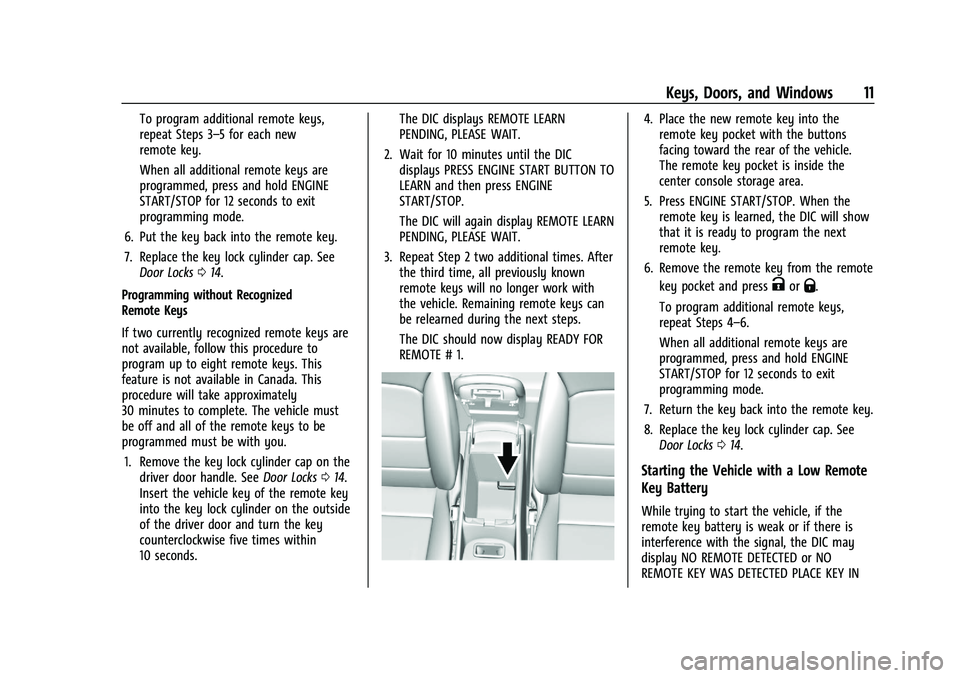
The DIC should now display READY FOR
REMOTE # 1.4. Place the new remote key into theremote key pocket with the buttons
facing toward the rear of the vehicle.
The remote key pocket is inside the
center console storage area.
5. Press ENGINE START/STOP. When the remote key is learned, the DIC will show
that it is ready to program the next
remote key.
6. Remove the remote key from the remote key pocket and press
KorQ.
To program additional remote keys,
repeat Steps 4–6.
When all additional remote keys are
programmed, press and hold ENGINE
START/STOP for 12 seconds to exit
programming mode.
7. Return the key back into the remote key.
8. Replace the key lock cylinder cap. See Door Locks 014.
Starting the Vehicle with a Low Remote
Key Battery
While trying to start the vehicle, if the
remote key battery is weak or if there is
interference with the signal, the DIC may
display NO REMOTE DETECTED or NO
REMOTE KEY WAS DETECTED PLACE KEY IN
Page 13 of 332
Chevrolet Malibu Owner Manual (GMNA-Localizing-U.S./Canada-
16273584) - 2023 - CRC - 9/28/22
12 Keys, Doors, and Windows
TRANSMITTER POCKET THEN START YOUR
VEHICLE. The DIC may also display REPLACE
BATTERY IN REMOTE KEY.
To start the vehicle:1. Open the center console and place the remote key in the remote key pocket
with the buttons facing the rear of the
vehicle.
2. With the vehicle in P (Park) or N (Neutral), press the brake pedal and
press ENGINE START/STOP. See Starting
the Engine 0177.
Replace the remote key battery as soon
as possible.
Battery Replacement
{Warning
Never allow children to play with the
remote key. The remote key contains a
small battery, which can be a choking
hazard. If swallowed, internal burns can
occur, resulting in severe injury or death.
Seek medical attention immediately if a
battery is swallowed.
{Warning
To avoid personal injury, do not touch
metal surfaces on the remote key when
it has been exposed to extreme heat.
These surfaces can be hot to the touch at
temperatures above 59 °C (138 °F).
Caution
When replacing the battery, do not touch
any of the circuitry on the remote key.
Static from your body could damage the
remote key.
Caution
Always replace the battery with the
correct type. Replacing the battery with
an incorrect type could potentially create
a risk of battery explosion. Dispose of
used batteries according to instructions
and local laws. Do not attempt to burn,
crush, or cut the used battery, and avoid
exposing the battery to environments
with extremely low air pressures or high
temperatures.
Caution
If the remote key is not reassembled
properly, liquids could enter the housing
and damage the circuitry, resulting in a
remote key malfunction and/or failure. To
prevent damage, always follow the steps
for remote key reassembly in this manual
to ensure the remote key is sealed
properly whenever the remote key is
opened.
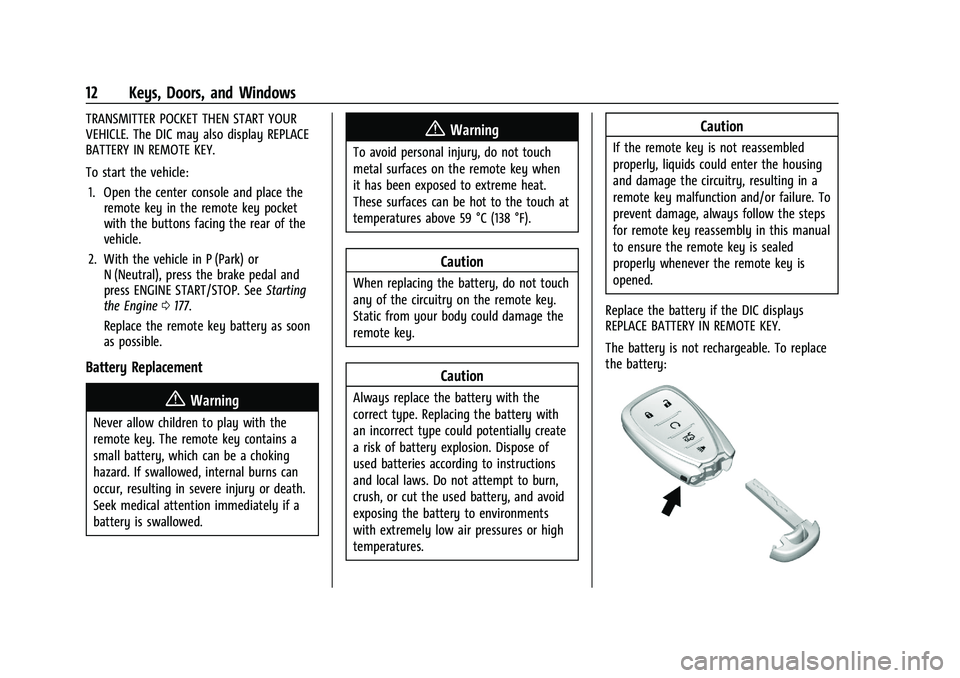
Replace the battery if the DIC displays
REPLACE BATTERY IN REMOTE KEY.
The battery is not rechargeable. To replace
the battery:
Page 29 of 332
Chevrolet Malibu Owner Manual (GMNA-Localizing-U.S./Canada-
16273584) - 2023 - CRC - 9/28/22
28 Seats and Restraints
Front Seat
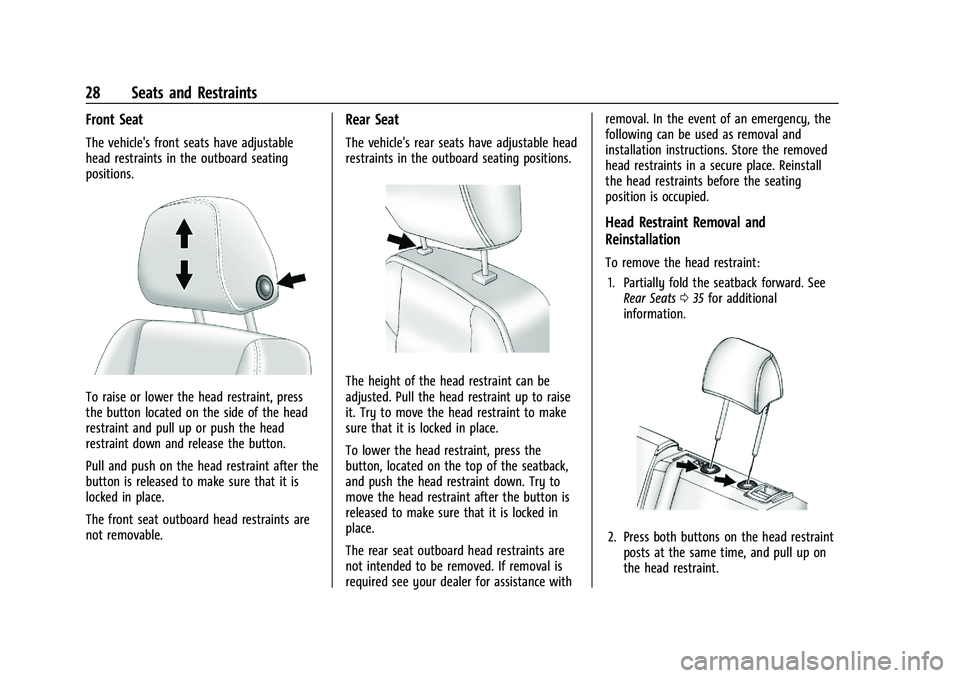
The vehicle's front seats have adjustable
head restraints in the outboard seating
positions.
To raise or lower the head restraint, press
the button located on the side of the head
restraint and pull up or push the head
restraint down and release the button.
Pull and push on the head restraint after the
button is released to make sure that it is
locked in place.
The front seat outboard head restraints are
not removable.
Rear Seat
The vehicle's rear seats have adjustable head
restraints in the outboard seating positions.
The height of the head restraint can be
adjusted. Pull the head restraint up to raise
it. Try to move the head restraint to make
sure that it is locked in place.
To lower the head restraint, press the
button, located on the top of the seatback,
and push the head restraint down. Try to
move the head restraint after the button is
released to make sure that it is locked in
place.
The rear seat outboard head restraints are
not intended to be removed. If removal is
required see your dealer for assistance withremoval. In the event of an emergency, the
following can be used as removal and
installation instructions. Store the removed
head restraints in a secure place. Reinstall
the head restraints before the seating
position is occupied.
Head Restraint Removal and
Reinstallation
To remove the head restraint:
1. Partially fold the seatback forward. See Rear Seats 035 for additional
information.
2. Press both buttons on the head restraint posts at the same time, and pull up on
the head restraint.
Page 34 of 332
Chevrolet Malibu Owner Manual (GMNA-Localizing-U.S./Canada-
16273584) - 2023 - CRC - 9/28/22
Seats and Restraints 33
3. Start the vehicle with the initial key orremote key. The DIC welcome message
should display the driver number of the
initial remote key.
Saving Seating Positions
Read these instructions completely before
saving memory positions.
To save preferred driving positions to
1 and 2: 1. Turn the vehicle on or to accessory mode. A DIC welcome message may
indicate the driver number of the current
remote key. See “Identifying Driver
Number” previously in this section.
2. Adjust all available memory features to the desired driving position.
3. Press and release SET; a beep will sound.
4. Immediately upon releasing SET, press and hold memory button 1 or 2 matching
the current Driver’s remote key number
until two beeps sound. If too much time
passes between releasing SET and
pressing 1 or 2, the two beeps will not
sound indicating memory position were
not saved. Repeat Steps 3 and 4 to try
again. 5. Repeat Steps 1–4 for the other remote
key 1 or 2 using the other 1 or 2 memory
button.
It is recommended to save the preferred
driving positions to both 1 and 2 if you are
the only driver.
To save the common exit seating position to
Bthat is used by all drivers for Manually
Recalling Seating Positions and Auto Seat
Exit Memory Recall features, repeat
Steps 1–4 using
B, the exit button.
Manually Recalling Seating Positions
Press and hold 1, 2, or
Bbutton until the
recall is complete, to recall the positions
previously saved to that button.
Manual Memory recall movement for 1, 2 or
Bbuttons may be initiated and will
complete to the saved memory position if
the vehicle is in or out of P (Park).
Enabling Automatic Recalls
.Seat Entry Memory moves the driver seat
to the selected 1 or 2 position when the
vehicle is started. Select Settings >
Vehicle > Seating Position > Seat Entry
Memory > ON or OFF. See “Auto Seat
Entry Memory Recall” later in this section.
.Seat Exit Memory moves the driver seat
to the preferred exit position of the
B
button when the vehicle is turned off and
the door is opened. Select Settings >
Vehicle > Seating Position > Seat Exit
Memory > Select ON or OFF. See “Auto
Seat Exit Memory Recall” later in this
section.
Auto Seat Entry Memory Recall
Seat Entry Memory will automatically begin
movement to the seating positions of the 1
or 2 button corresponding to the driver’s
remote key number 1 or 2 detected by the
vehicle when:
.The vehicle is turned ON.
.Seating positions have been previously
saved to the same 1 or 2 button. See
“Saving Seating Positions” previously in
this section.
.Seat Entry Memory is enabled. See
“Enabling Automatic Recalls” previously in
this section.
.The shift lever is in P (Park).
Seat Entry Memory Recall will continue if
the vehicle is shifted out of P (Park) prior to
reaching the saved memory position.
Page 35 of 332
Chevrolet Malibu Owner Manual (GMNA-Localizing-U.S./Canada-
16273584) - 2023 - CRC - 9/28/22
34 Seats and Restraints
If the saved memory seat position does not
automatically recall, verify the recall is
enabled. See“Enabling Automatic Recalls”
previously in this section.
If the memory seat recalls to the wrong
position, the driver’s remote key number 1
or 2 may not match the memory button
number positions they were saved to. Try
the other remote key or try saving the
positions to the other 1 or 2 memory
button. See “Saving Seating Positions”
previously in this section.
Automatic Seat Entry Memory recalls are
only available for driver’s remote key
numbers 1 and 2. Remote keys 3–8 will not
provide Seat Entry Memory recalls.
Auto Seat Exit Memory Recall
Seat Exit Memory will begin movement to
the seating position of the
B
button when:
.The vehicle is turned off and the driver
door is open or opened within a
short time.
.A seating position has been previously
been saved to the
Bmemory button.
See “Saving Seating Positions” previously
in this section.
.Seat Exit Memory is enabled. See
“Enabling Automatic Recalls” previously in
this section.
.The shift lever is in P (Park).
Seat Exit Memory recall will continue if the
vehicle is shifted out of P (Park) prior to
reaching the saved memory position.
Seat Exit Memory is not linked to the
driver’s remote key. The seating position
saved to
Bis used for all drivers.
Cancel Memory Seating Recalls
.During any memory recall:
Press a power seat control
Press SET memory button
.During Manual memory recall:
Release 1, 2, or
Bmemory button
.During Auto Seat Entry Memory Recall:
Turn vehicle off
Press SET, 1, 2, or
Bmemory buttons
.During Auto Seat Exit Memory Recall:
Press SET, 1, 2, or
Bmemory buttons Obstructions
If something has blocked the seat while
recalling a memory position, the recall may
stop. Remove the obstruction and try the
recall again. If the memory position still
does not recall, see your dealer.
Heated and Ventilated Front
Seats
{Warning
If temperature change or pain to the skin
cannot be felt, the seat heater may cause
burns. To reduce the risk of burns, use
care when using the seat heater,
especially for long periods of time. Do
not place anything on the seat that
insulates against heat, such as a blanket,
cushion, cover, or similar item. This may
cause the seat heater to overheat. An
overheated seat heater may cause a burn
or may damage the seat.