2023 CHEVROLET MALIBU four wheel drive
[x] Cancel search: four wheel drivePage 147 of 332
Chevrolet Malibu Owner Manual (GMNA-Localizing-U.S./Canada-
16273584) - 2023 - CRC - 9/28/22
146 Infotainment System
Apps
The menu may contain the following:
Android Auto
Allows interacting directly with a mobile
device on the infotainment display. See
Apple CarPlay and Android Auto0142.
Apple CarPlay
This feature allows you to interact directly
with your mobile device on the infotainment
display. See Apple CarPlay and Android Auto
0 142.
Apps
Shows app settings and information.
Audio
Adjusts different audio settings.
Climate
Adjusts different climate settings.
Navigation
Adjusts different navigation settings.
See Using the Navigation System 0122.
Phone
Adjusts different phone settings.
Vehicle
The menu may contain the following:
Rear Seat Reminder
Allows for a chime and a message when the
rear door has been opened before or during
operation of the vehicle.
Buckle to Drive
This feature can prevent shifting out of Park
when the driver, and if applicable the front
passenger, seat belt is not buckled. See
Buckle To Drive 038.
Climate and Air Quality
Adjusts different climate settings.
Collision/Detection Systems
Adjusts different driver assistance system
settings.
Comfort and Convenience
Adjusts different comfort and convenience
settings.
Lighting
Adjusts different lighting settings.
Power Door Locks
Adjusts different door lock settings. Remote Lock, Unlock, and Start
Adjusts different remote lock settings.
Seating Position
Adjusts different seat settings.
Teen Driver
See
Teen Driver 0147.
Valet Mode
This will lock the infotainment system and
steering wheel controls. It may also limit
access to vehicle storage locations,
if equipped.
To enable valet mode: 1. Enter a four-digit code on the keypad.
2. Select Enter to go to the confirmation screen.
3. Re-enter the four-digit code.
Touch Lock or Unlock to lock or unlock the
system. Touch Back to go back to the
previous menu.
Personal
If equipped, this menu allows adjustment of
different user profile settings. See “Users”in
Using the System 0112 for information on
setting up user profiles.
Page 191 of 332
Chevrolet Malibu Owner Manual (GMNA-Localizing-U.S./Canada-
16273584) - 2023 - CRC - 9/28/22
190 Driving and Operating
Ending Cruise Control
There are four ways to end cruise control:
.Step lightly on the brake pedal.
.Press*.
.Shift the transmission to N (Neutral).
.Press5to turn cruise control system off
completely.
Erasing Speed Memory
The cruise control set speed is erased from
memory if
5is pressed or if the vehicle is
turned off.
Adaptive Cruise Control
(Advanced)
If equipped with Adaptive Cruise Control
(ACC), it allows you to select the cruise
control set speed and following gap. Read
this entire section before using this system.
The following gap is the following time
between your vehicle and a vehicle detected
directly ahead in your path moving in the
same direction. If no vehicle is detected in
your path, ACC works like regular cruise
control. ACC uses camera and radar sensors.
See Radio Frequency Statement 0308. If a vehicle is detected in your path, ACC can
apply acceleration or limited, moderate
braking to maintain the selected following
gap. To disengage ACC, apply the brake.
If ACC is controlling your vehicle speed
when the Traction Control System (TCS) or
StabiliTrak/Electronic Stability Control (ESC)
system activates, the ACC may automatically
disengage. See
Traction Control/Electronic
Stability Control 0186. When road
conditions allow ACC to be safely used, the
ACC can be turned back on.
Disabling the TCS or StabiliTrak/ESC system
will disengage and prevent engagement
of ACC.
ACC can reduce the need for you to
frequently brake and accelerate, especially
when used on expressways, freeways, and
interstate highways. When used on other
roads, you may need to take over the
control of braking or acceleration more
often.
{Warning
ACC has limited braking ability and may
not have time to slow the vehicle down
enough to avoid a collision with another
vehicle you are following. This can occur
(Continued)
Warning (Continued)
when vehicles suddenly slow or stop
ahead, or enter your lane. Also see
“Alerting the Driver”in this section.
Complete attention is always required
while driving and you should be ready to
take action and apply the brakes. See
Defensive Driving 0166.
{Warning
ACC will not detect or brake for children,
pedestrians, animals, or other objects.
Do not use ACC when:
.On winding and hilly roads or when
the sensors are blocked by snow, ice,
or dirt. The system may not detect a
vehicle ahead. Keep the entire front of
the vehicle clean.
.Visibility is low, such as in fog, rain,
or snow conditions. ACC performance
is limited under these conditions.
.On slippery roads where fast changes
in tire traction can cause excessive
wheel slip.
Page 263 of 332
Chevrolet Malibu Owner Manual (GMNA-Localizing-U.S./Canada-
16273584) - 2023 - CRC - 9/28/22
262 Vehicle Care
If the turn signal lamp does not flash within
15 seconds after starting to inflate the tire,
the tire fill alert has not been activated or is
not working.
If the hazard warning flashers are on, the
tire fill alert visual feedback will not work
properly.
The TPMS will not activate the tire fill alert
properly under the following conditions:
.There is interference from an external
device or transmitter.
.The air pressure from the inflation device
is not sufficient to inflate the tire.
.There is a malfunction in the TPMS.
.There is a malfunction in the horn or turn
signal lamps.
.The identification code of the TPMS
sensor is not registered to the system.
.The battery of the TPMS sensor is low.
If the tire fill alert does not operate due to
TPMS interference, move the vehicle about
1 m (3 ft) back or forward and try again.
If the tire fill alert feature is not working,
use a tire pressure gauge.
TPMS Sensor Matching Process
Each TPMS sensor has a unique
identification code. The identification code
needs to be matched to a new tire/wheel
position after rotating the vehicle’s tires or
replacing one or more of the TPMS sensors.
The TPMS sensor matching process should
also be performed after replacing a spare
tire with a road tire containing the TPMS
sensor. The malfunction light and the DIC
message should go off at the next ignition
cycle. The sensors are matched to the
tire/wheel positions, using a TPMS relearn
tool, in the following order: driver side front
tire, passenger side front tire, passenger side
rear tire, and driver side rear. See your
dealer for service or to purchase a relearn
tool. A TPMS relearn tool can also be
purchased. See Tire Pressure Monitor Sensor
Activation Tool at
www.gmtoolsandequipment.com or call
1-800-GM TOOLS (1-800-468-6657).
There are two minutes to match the first
tire/wheel position, and five minutes overall
to match all four tire/wheel positions. If it
takes longer, the matching process stops
and must be restarted. The TPMS sensor matching process is:
1. Set the parking brake.
2. Place the vehicle in Service Mode. See Ignition Positions 0175.
3. Make sure the Tire Pressure info page option is turned on. The info pages on
the DIC can be turned on and off
through the Options menu. See Driver
Information Center (DIC) (Base Level)
0 95 or
Driver Information Center (DIC) (Uplevel)
0 98.
4. Use the DIC controls on the right side of the steering wheel to scroll to the Tire
Pressure screen under the DIC info page.
5. Press and hold
Vin the center of the
DIC controls.
The horn sounds twice to signal the
receiver is in relearn mode and the TIRE
LEARNING ACTIVE message displays on
the DIC screen.
6. Start with the driver side front tire.
7. Place the relearn tool against the tire sidewall, near the valve stem. Then press
the button to activate the TPMS sensor.
A horn chirp confirms that the sensor
identification code has been matched to
this tire and wheel position.
Page 264 of 332
Chevrolet Malibu Owner Manual (GMNA-Localizing-U.S./Canada-
16273584) - 2023 - CRC - 9/28/22
Vehicle Care 263
8. Proceed to the passenger side front tire,and repeat the procedure in Step 7.
9. Proceed to the passenger side rear tire, and repeat the procedure in Step 7.
10. Proceed to the driver side rear tire, and repeat the procedure in Step 7. The horn
sounds two times to indicate the sensor
identification code has been matched to
the driver side rear tire, and the TPMS
sensor matching process is no longer
active. The TIRE LEARNING ACTIVE
message on the DIC display screen
goes off.
11. Turn the vehicle off.
12. Set all four tires to the recommended air pressure level as indicated on the Tire
and Loading Information label.
Tire Inspection
We recommend that the tires, including
the spare tire, if the vehicle has one, be
inspected for signs of wear or damage
at least once a month.
Replace the tire if:
.The indicators at three or more
places around the tire can be seen.
.There is cord or fabric showing
through the tire's rubber.
.The tread or sidewall is cracked, cut,
or snagged deep enough to show
cord or fabric.
.The tire has a bump, bulge, or split.
.The tire has a puncture, cut, or other
damage that cannot be repaired well
because of the size or location of the
damage.
Tire Rotation
Tires should be rotated according to the
interval specified in the Maintenance
Schedule. See Maintenance Schedule
0 290.
Tires are rotated to achieve a more
uniform wear for all tires. The first
rotation is the most important.
Anytime unusual wear is noticed, rotate
the tires as soon as possible, check for
proper tire inflation pressure, and check
for damaged tires or wheels. If the
unusual wear continues after the
rotation, check the wheel alignment. See
When It Is Time for New Tires
0 264 and
Wheel Replacement 0268.
Use this rotation pattern when rotating
the tires.
Do not include the compact spare tire
in the tire rotation.
Adjust the front and rear tires to the
recommended inflation pressure on the
Tire and Loading Information label after
the tires have been rotated. See Tire
Pressure 0257 and
Vehicle Load Limits 0172.
Page 280 of 332
Chevrolet Malibu Owner Manual (GMNA-Localizing-U.S./Canada-
16273584) - 2023 - CRC - 9/28/22
Vehicle Care 279
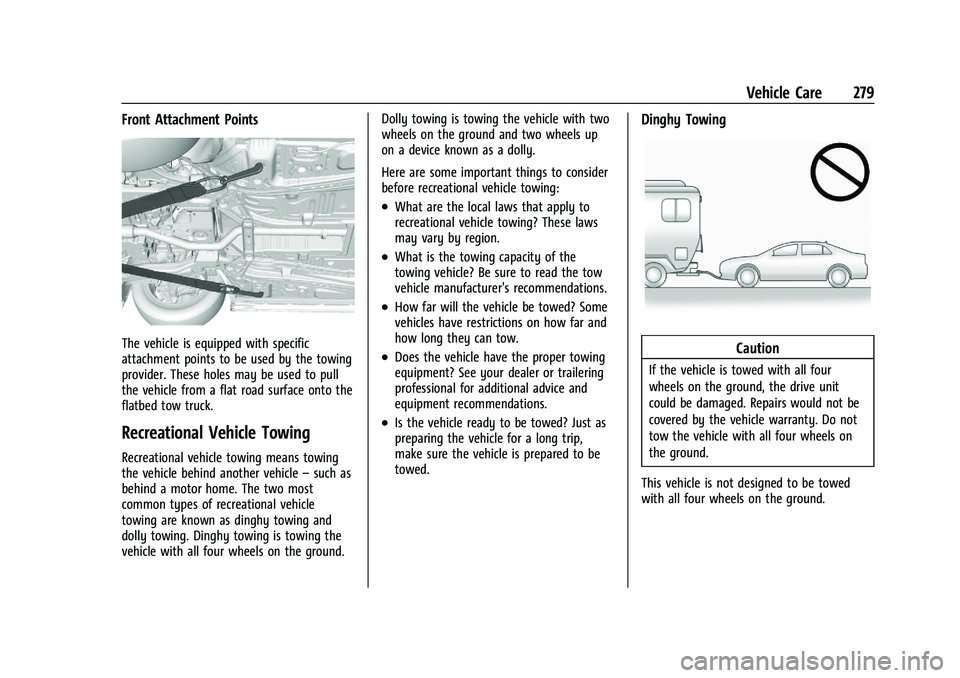
Front Attachment Points
The vehicle is equipped with specific
attachment points to be used by the towing
provider. These holes may be used to pull
the vehicle from a flat road surface onto the
flatbed tow truck.
Recreational Vehicle Towing
Recreational vehicle towing means towing
the vehicle behind another vehicle–such as
behind a motor home. The two most
common types of recreational vehicle
towing are known as dinghy towing and
dolly towing. Dinghy towing is towing the
vehicle with all four wheels on the ground. Dolly towing is towing the vehicle with two
wheels on the ground and two wheels up
on a device known as a dolly.
Here are some important things to consider
before recreational vehicle towing:
.What are the local laws that apply to
recreational vehicle towing? These laws
may vary by region.
.What is the towing capacity of the
towing vehicle? Be sure to read the tow
vehicle manufacturer's recommendations.
.How far will the vehicle be towed? Some
vehicles have restrictions on how far and
how long they can tow.
.Does the vehicle have the proper towing
equipment? See your dealer or trailering
professional for additional advice and
equipment recommendations.
.Is the vehicle ready to be towed? Just as
preparing the vehicle for a long trip,
make sure the vehicle is prepared to be
towed.
Dinghy Towing
Caution
If the vehicle is towed with all four
wheels on the ground, the drive unit
could be damaged. Repairs would not be
covered by the vehicle warranty. Do not
tow the vehicle with all four wheels on
the ground.
This vehicle is not designed to be towed
with all four wheels on the ground.
Page 292 of 332
Chevrolet Malibu Owner Manual (GMNA-Localizing-U.S./Canada-
16273584) - 2023 - CRC - 9/28/22
Service and Maintenance 291
Reset the oil life system when the oil is
changed. SeeEngine Oil Life System
0 227.
.When the REPLACE AT NEXT OIL CHANGE
message displays, the engine air filter
should be replaced at the next engine oil
change. When the REPLACE ENGINE AIR
FILTER SOON message displays, the
engine air filter should be replaced at the
earliest convenience. Reset the engine air
filter life system after the engine air filter
is replaced. See Engine Air Filter Life
System 0228.
Every 36 000 km (22,500 mi)
.Passenger compartment air filter
replacement (or every 24 months,
whichever occurs first). More frequent
replacement may be needed if the vehicle
is driven in areas with heavy traffic, poor
air quality, areas with high dust levels or
are sensitive to environmental allergens.
Filter replacement may also be needed if
you notice reduced airflow, windows
fogging up, or odors. Your local GM
Service location can help you determine
when it is the right time to replace your
filter. Every 96 000 km (60,000 mi)
.Replace spark plugs. Inspect spark plug
wires and/or boots.
Every 161 000 km (100,000 mi)
.Replace hood and/or body lift support gas
struts. Or every 10 years, whichever
comes first. See Gas Strut(s)0238.
Every 240 000 km (150,000 mi)
.Drain and fill engine cooling system. Or
every six years, whichever comes first.
See Cooling System 0229.
Severe Conditions Requiring More
Frequent Maintenance*
.Public service, military, or commercial use
vehicles to include the following:
‐ Ambulances, police cars, and
emergency rescue vehicles.
‐ Civilian vehicles such as light duty
pick-up trucks, SUVs, and passenger
cars that are used in military
applications.
‐ Recovery vehicles such as tow trucks
and flatbed single vehicle carriers or
any vehicle that is consistently used in
towing trailers or other loads. ‐
High use commercial vehicles such as
courier delivery vehicles, private
security patrol vehicles, or any vehicles
that operate on a 24–hour basis.
‐ Any vehicle consistently operated in a
high sand or dust environment such as
those used on oil pipelines and similar
applications.
.Vehicles that are regularly used for short
trips of 6 km (4 mi) or less.
The oil life indicator will show you when
to change the oil and filter. Under severe
conditions the indicator may come on
before 12 000 km (7,500 mi).
* Footnote: Under extreme driving
conditions listed above, it may be
necessary to replace your spark plugs at
more frequent intervals. For further
assistance in determining the most
suitable service maintenance intervals for
your vehicle, please contact your
authorized GM Dealer.
Extreme service is for vehicles mainly
driven off-road in four-wheel drive or used
in farming, mining, forestry, or snow
plowing.