2023 CHEVROLET CORVETTE change time
[x] Cancel search: change timePage 23 of 351

Chevrolet Corvette Owner Manual (GMNA-Localizing-U.S./Canada/Mexico-
16287457) - 2023 - CRC - 3/10/22
22 Keys, Doors, and Windows
Off :Alarm system is disarmed.
On Solid : Vehicle is secured during the
delay to arm the system.
Fast Flash : Vehicle is unsecured. A door, the
hood, or the hatch/trunk is open.
Slow Flash : Alarm system is armed.
Arming the Alarm System
1. Turn off the vehicle.
2. Lock the vehicle in one of three ways:
.Use the remote key.
.Use the Keyless Access system.
.With a door open, pressQon the
interior of the door.
3. After 30 seconds the alarm system will arm, and the indicator light will begin to
slowly flash indicating the alarm system
is operating. Pressing
Qon the remote
key a second time will bypass the
30-second delay and immediately arm
the alarm system.
The vehicle alarm system will not arm if the
doors are locked with the mechanical key.
If the driver door is opened without first
unlocking with the remote key, the horn will
chirp and the lights will flash to indicate
pre-alarm. If the vehicle is not started, or the door is not unlocked by pressing
K
on the remote key during the 10-second
pre-alarm, the alarm will be activated.
The alarm will also be activated if the
passenger door, the hatch/trunk, or the
hood is opened without first disarming the
system. When the alarm is activated, the
turn signals flash and the horn sounds for
about 30 seconds. The alarm system will
then re-arm to monitor for the next
unauthorized event.
Disarming the Alarm System
To disarm the alarm system or turn off the
alarm if it has been activated, do one of the
following:
.PressKon the remote key.
.Unlock the vehicle using the Keyless
Access system.
.Start the vehicle.
To avoid setting off the alarm by accident:
.Lock the vehicle after all occupants have
left the vehicle and both doors are closed.
.Always unlock a door with the remote
key or use the Keyless Access system.
Unlocking the driver door with the key will
not disarm the system or turn off the alarm.
How to Detect a Tamper Condition
IfKis pressed on the remote key and the
horn chirps and the lights flash three times,
a previous alarm occurred while the system
was armed.
If the alarm has been activated, a message
will appear on the DIC.
Inclination Sensor and Intrusion Sensor
In addition to the standard theft-deterrent
system features, this system may also have
an inclination sensor and intrusion sensor.
The inclination sensor can activate the alarm
if it senses movement of the vehicle, such
as a change in vehicle orientation.
The intrusion sensor monitors the vehicle
interior, and can activate the alarm if it
senses unauthorized entry into the vehicle’s
interior. Do not allow passengers or pets to
remain in the vehicle when the intrusion
sensor is activated.
Before arming the theft-deterrent system
and activating the intrusion sensor:
.Make sure both doors and windows are
completely closed.
.Secure any loose items such as
sunshades.
Page 44 of 351
Chevrolet Corvette Owner Manual (GMNA-Localizing-U.S./Canada/Mexico-
16287457) - 2023 - CRC - 3/10/22
Seats and Restraints 43
Obstructions
If something has blocked the seat while
recalling a memory position, the recall may
stop. Remove the obstruction and try the
recall again. If the memory position still
does not recall, see your dealer.
Heated and Ventilated Front
Seats
{Warning
If temperature change or pain to the skin
cannot be felt, the seat heater may cause
burns. To reduce the risk of burns, use
care when using the seat heater,
especially for long periods of time. Do
not place anything on the seat that
insulates against heat, such as a blanket,
cushion, cover, or similar item. This may
cause the seat heater to overheat. An
overheated seat heater may cause a burn
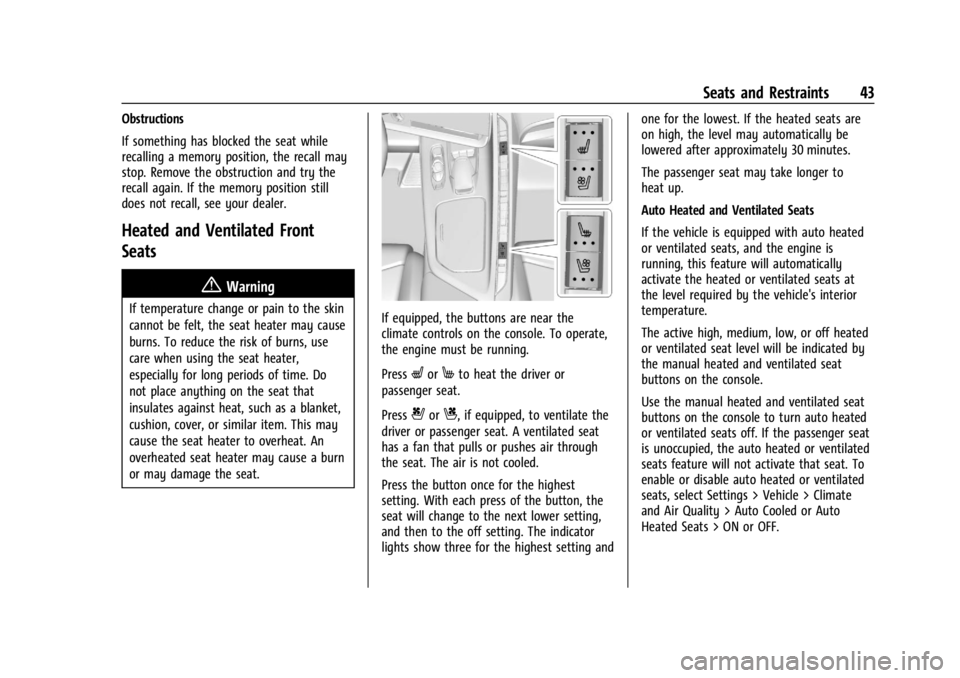
or may damage the seat.If equipped, the buttons are near the
climate controls on the console. To operate,
the engine must be running.
Press
LorMto heat the driver or
passenger seat.
Press
{orC, if equipped, to ventilate the
driver or passenger seat. A ventilated seat
has a fan that pulls or pushes air through
the seat. The air is not cooled.
Press the button once for the highest
setting. With each press of the button, the
seat will change to the next lower setting,
and then to the off setting. The indicator
lights show three for the highest setting and one for the lowest. If the heated seats are
on high, the level may automatically be
lowered after approximately 30 minutes.
The passenger seat may take longer to
heat up.
Auto Heated and Ventilated Seats
If the vehicle is equipped with auto heated
or ventilated seats, and the engine is
running, this feature will automatically
activate the heated or ventilated seats at
the level required by the vehicle's interior
temperature.
The active high, medium, low, or off heated
or ventilated seat level will be indicated by
the manual heated and ventilated seat
buttons on the console.
Use the manual heated and ventilated seat
buttons on the console to turn auto heated
or ventilated seats off. If the passenger seat
is unoccupied, the auto heated or ventilated
seats feature will not activate that seat. To
enable or disable auto heated or ventilated
seats, select Settings > Vehicle > Climate
and Air Quality > Auto Cooled or Auto
Heated Seats > ON or OFF.
Page 46 of 351
Chevrolet Corvette Owner Manual (GMNA-Localizing-U.S./Canada/Mexico-
16287457) - 2023 - CRC - 3/10/22
Seats and Restraints 45
Questions and Answers About Seat Belts
Q: Will I be trapped in the vehicle after acrash if I am wearing a seat belt?
A: You could be— whether you are
wearing a seat belt or not. Your chance
of being conscious during and after a
crash, so you canunbuckle and get out,
is much greater if you are belted.
Q: If my vehicle has airbags, why should I have to wear seat belts?
A: Airbags are supplemental systems only.
They work withseat belts —not instead
of them. Whether or not an airbag is
provided, all occupants still have to
buckle up to get the most protection.
Also, in nearly all states and in all
Canadian provinces, the law requires
wearing seat belts.
Buckle To Drive
If equipped, this feature prevents the vehicle
from shifting out of P (Park) when the driver
seat belt is not buckled. The Buckle to Drive
feature must be turned ON in the
infotainment system to work. To turn the
Buckle to Drive feature on or off, select
Settings > Vehicle > Buckle to Drive. See
Teen Driver 0153, if equipped. If the vehicle is on and the brake pedal is
pressed with the vehicle in P (Park) but the
driver seat belt is not buckled, a message
displays in the Driver Information
Center (DIC) and the vehicle will be
prevented from shifting out of P (Park).
Buckle the driver seat belt to clear the
message and shift out of P (Park). Shifting
from P (Park) will be prevented once for
each time the vehicle is started.
For some fleet vehicles, the feature is
always ON and cannot be turned OFF in the
infotainment system. The vehicle will be
prevented from shifting from P (Park) each
time the driver attempts to do so while the
driver seat belt is not buckled. Turning the
vehicle off then on will not change this
condition.
On some models, Buckle to Drive may also
prevent shifting out of P (Park) if a front
passenger seat belt is unbuckled. A message
displays in the DIC. Buckle the front
passenger seat belt to shift out of P (Park).
This feature may not allow the vehicle to
shift out of P (Park) if an object, such as a
briefcase, handbag, grocery bag, laptop,
or other electronic device, is on the front
passenger seat. If this happens, remove the
object from the seat or buckle the seat belt
to shift out of P (Park).
If the driver, or on some vehicles, the
present front passenger remains unbuckled,
the DIC message will turn off after several
seconds and the vehicle can be shifted out
of P (Park). See
“Seat Belts”and“Child
Restraints” in the Index for information
about the importance of proper
restraint use.
If the driver seat belt or the front passenger
seat belt is unbuckled when driving, the seat
belt reminder chime and light(s) will come
on. See Seat Belt Reminders 084. This
feature may not function properly if the
airbag readiness light is on. See Airbag
Readiness Light 084.
How to Wear Seat Belts Properly
Follow these rules for everyone's protection.
There are additional things to know about
seat belts and children, including smaller
children and infants. If a child will be riding
in the vehicle, see Older Children061 or
Infants and Young Children 062. Review
and follow the rules for children in addition
to the following rules.
Page 63 of 351
Chevrolet Corvette Owner Manual (GMNA-Localizing-U.S./Canada/Mexico-
16287457) - 2023 - CRC - 3/10/22
62 Seats and Restraints
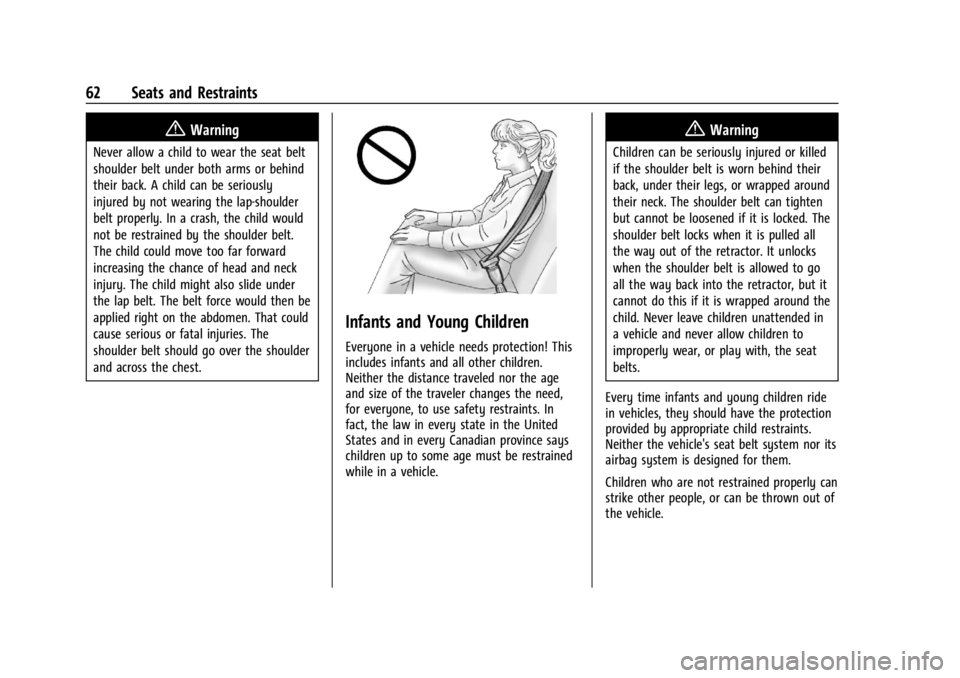
{Warning
Never allow a child to wear the seat belt
shoulder belt under both arms or behind
their back. A child can be seriously
injured by not wearing the lap-shoulder
belt properly. In a crash, the child would
not be restrained by the shoulder belt.
The child could move too far forward
increasing the chance of head and neck
injury. The child might also slide under
the lap belt. The belt force would then be
applied right on the abdomen. That could
cause serious or fatal injuries. The
shoulder belt should go over the shoulder
and across the chest.
Infants and Young Children
Everyone in a vehicle needs protection! This
includes infants and all other children.
Neither the distance traveled nor the age
and size of the traveler changes the need,
for everyone, to use safety restraints. In
fact, the law in every state in the United
States and in every Canadian province says
children up to some age must be restrained
while in a vehicle.
{Warning
Children can be seriously injured or killed
if the shoulder belt is worn behind their
back, under their legs, or wrapped around
their neck. The shoulder belt can tighten
but cannot be loosened if it is locked. The
shoulder belt locks when it is pulled all
the way out of the retractor. It unlocks
when the shoulder belt is allowed to go
all the way back into the retractor, but it
cannot do this if it is wrapped around the
child. Never leave children unattended in
a vehicle and never allow children to
improperly wear, or play with, the seat
belts.
Every time infants and young children ride
in vehicles, they should have the protection
provided by appropriate child restraints.
Neither the vehicle's seat belt system nor its
airbag system is designed for them.
Children who are not restrained properly can
strike other people, or can be thrown out of
the vehicle.
Page 81 of 351
Chevrolet Corvette Owner Manual (GMNA-Localizing-U.S./Canada/Mexico-
16287457) - 2023 - CRC - 3/10/22
80 Instruments and Controls
Performance
Press the thumbwheel to enter the
Performance menu. Scroll through the
available items.
G-force :Gives the driver an indication of
the vehicle performance in cornering. The
G-force gauge will show as an info tile on
the left side of the cluster, if selected.
Friction Bubble : A four quadrant visual
display, indicative of the four corners of the
car, with a “bubble”showing where the
most inertia is being exerted on the vehicle.
Launch Control : If equipped, the Launch
Control display allows the driver to adjust
the parameters of the Launch Control
System. See Track Events and Competitive
Driving 0172.
Performance Timer : Press the thumbwheel
to enter the setup menu, then select Set
Start Speed. Scroll to desired Start Speed,
then press the thumbwheel to save it. While
on this menu, to change the End Speed,
scroll to End Speed and use the thumbwheel
to scroll to desired End Speed. Press the
thumbwheel to save it. On the next
acceleration, the performance timer will record the time. Pressing the thumbwheel
while the timer is running will cancel the
timer if done before reaching the End Speed.
Lap Timer (without PDR) :
Press
Twhen
Lap Timer is displayed to start, stop, or reset
the lap timer. Press the thumbwheel while
the Lap Timer page is active to start the
timer. If the lap timer is active, pressing the
thumbwheel will stop the current lap timer
and start a new lap. Pressing the
thumbwheel within 10 seconds after
completing the last lap (Stop Lap Timer
option is displayed), the Lap Timer will stop.
Lap Timer (with PDR) : The lap times
recorded with the PDR system will
automatically be displayed in this window.
This only happens if a track has been
selected in the PDR system and a video
recording is started. See Performance Data
Recorder (PDR) 0138.
Oil Temperature : Shows the current oil
temperature in either degrees Celsius (°C) or
degrees Fahrenheit (°F).
Oil Pressure : Shows the current oil pressure
in either kilopascal (kPa) or in pounds per
square inch (psi).
Battery Voltage : Shows the current battery
voltage. Transmission Fluid Temperature :
Shows the
temperature of the transmission fluid in
either degrees Celsius (°C) or degrees
Fahrenheit (°F).
Tire Status : Shows individual tire pressures
and overall temperature as either Cold, Cool,
Normal, Warm, or Hot. Normal is typical for
normal driving while Warm is typical for
aggressive driving. Unknown may be
displayed if tire temperature information is
unavailable.
eLSD : If equipped, displays the amount of
rear differential coupling when the Electronic
Limited-Slip Differential (eLSD) is active and
functioning during vehicle operation.
A reading of 1% is an open differential and
100% is locked. It is normal for the value to
make small or large changes due to driving
conditions and driver inputs. See Limited-Slip
Differential (Stingray Models Without Z51
Performance Package) 0218 or
Limited-Slip Differential (Stingray With Z51
Performance Package and Z06 model) 0219.
Front Lift : During a driver requested Front
Lift (if equipped), the driver may
"remember" using the
S, or dismiss the
display by pressing the thumbwheel. When
the Front Lift is Raised due to location, the
Page 82 of 351
Chevrolet Corvette Owner Manual (GMNA-Localizing-U.S./Canada/Mexico-
16287457) - 2023 - CRC - 3/10/22
Instruments and Controls 81
driver may delete that stored location using
the
S, or dismiss the display by pressing
the thumbwheel.
See Front Lift System 0214.
Audio
Use the thumbwheel to scroll through audio
presets.
Options
Use the thumbwheel to scroll through items
in the Options menu.
Units
Press the thumbwheel while Units is
displayed to enter the Units menu. Choose
US or metric units by pressing the
thumbwheel while the desired item is
highlighted. A selected mark will be
displayed next to the selected item.
Display Themes
Press the thumbwheel to enter the Display
menu. There are seven instrument cluster
display configurations to choose from. Sport,
Tour, Track, Weather, My Mode, Z-Mode,
and Stealth. The style of the cluster will
change depending on the theme selected. Default is linked to Driver mode. Other
display themes can be set
If in Z-Mode or My Mode then those
displays plus HUD (if equipped) can be set.
Stealth Mode is enabled when the
Instrument Panel Illumination Control is set
to the minimum level. See
Instrument Panel
Illumination Control 0105.
.Sport/Z-Mode: Displays Coolant
Temperature, Fuel Gauge, Compass, Drive
Mode Indicator, Odometer, Speed,
Tachometer, Electronic Transmission
Range, Current Gear, Active Fuel
Management (AFM), Peak Performance,
Performance Shift Lights, Speed Limit, Info
Area, and Interaction Area.
.Tour/Weather/My Mode: Displays Coolant
Temperature, Fuel Gauge, Compass, Drive
Mode Indicator, Odometer, Speed,
Tachometer, Electronic Transmission
Range, Current Gear, Active Fuel
Management (AFM), Peak Performance,
Speed Limit, Info Area, and
Interaction Area.
.Track: Displays Coolant Temperature, Fuel
Gauge, Performance Traction
Management, Drive Mode Indicator, Speed, Tachometer, Electronic
Transmission Range, Current Gear, Info
Area, and Interactive Area.
.Stealth: Displays Coolant Temperature,
Fuel Gauge, and Digital Speed.
Preset info tiles shown on each layout:
Sport : G-Force, Oil Temperature
Track : Oil Pressure, Transmissions Fluid
Temperature, Tire Pressure & Tire
Temperature, Oil Temperature
Tour : Time & Outside Air Temperature, Oil
Pressure
Weather : Time & Outside Air Temperature,
Tire Status
Z-Mode : Oil Temperature, G-Force
My Mode : Economy Trend, Oil Pressure
Stealth : None
Head-Up Display (HUD) Rotation
Press the thumbwheel while Adjust Rotation
is highlighted to enter Adjust Mode. Scroll
to adjust the angle of the HUD display.
Press the thumbwheel to confirm and save
the setting. This feature may only be
available in P (Park).
Page 93 of 351

Chevrolet Corvette Owner Manual (GMNA-Localizing-U.S./Canada/Mexico-
16287457) - 2023 - CRC - 3/10/22
92 Instruments and Controls
The security light should come on briefly as
the engine is started. If it does not come on,
have the vehicle serviced by your dealer.
If the system is working normally, the
indicator light turns off.
If the light stays on and the engine does
not start, there could be a problem with the
theft-deterrent system. SeeImmobilizer
Operation 023.
High-Beam On Light
This light comes on when the high-beam
headlamps are in use.
See Headlamp High/Low-Beam Changer
0 102.
Lamps On Reminder
This light comes on when the exterior lamps
are in use, except when only the Daytime
Running Lamps (DRL) are active. See Exterior
Lamp Controls 0102.
Cruise Control Light
For vehicles with cruise control, the cruise
control light is white when the cruise
control is on and ready, and turns green
when the cruise control is set and active.
The light turns off when the cruise control is
turned off. See Cruise Control0219.
Door Ajar Light
This light comes on when a door is open or
not securely latched. Before driving, check
that all doors are properly closed.
Information Displays
Driver Information Center (DIC)
The Info application is only available when
the ignition is on. The displays show the
status of many vehicle systems.
Page 94 of 351
Chevrolet Corvette Owner Manual (GMNA-Localizing-U.S./Canada/Mexico-
16287457) - 2023 - CRC - 3/10/22
Instruments and Controls 93
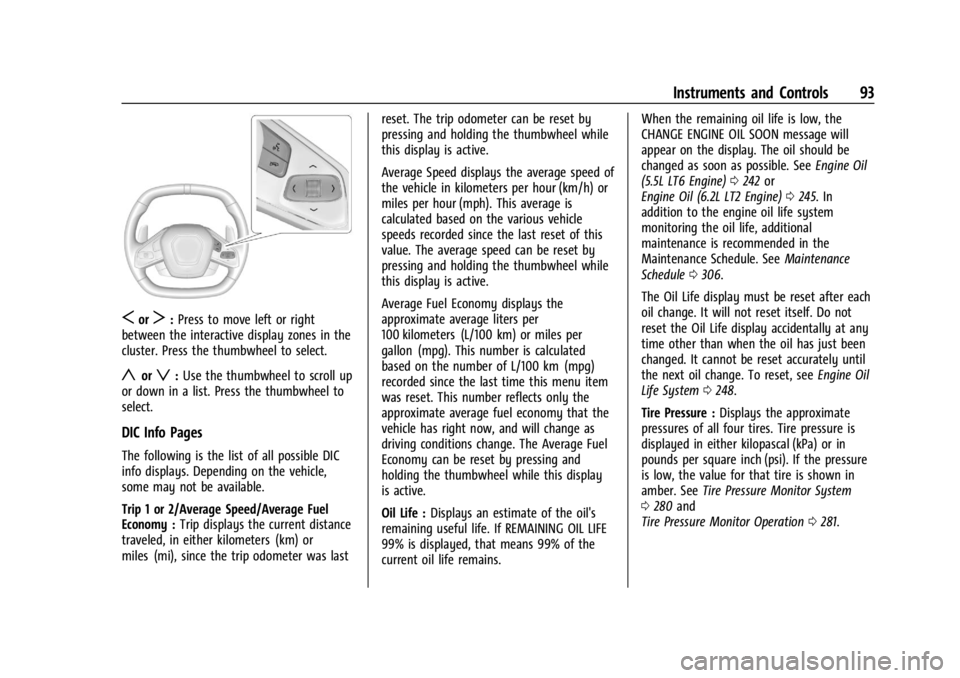
SorT:Press to move left or right
between the interactive display zones in the
cluster. Press the thumbwheel to select.
yorz: Use the thumbwheel to scroll up
or down in a list. Press the thumbwheel to
select.
DIC Info Pages
The following is the list of all possible DIC
info displays. Depending on the vehicle,
some may not be available.
Trip 1 or 2/Average Speed/Average Fuel
Economy : Trip displays the current distance
traveled, in either kilometers (km) or
miles (mi), since the trip odometer was last reset. The trip odometer can be reset by
pressing and holding the thumbwheel while
this display is active.
Average Speed displays the average speed of
the vehicle in kilometers per hour (km/h) or
miles per hour (mph). This average is
calculated based on the various vehicle
speeds recorded since the last reset of this
value. The average speed can be reset by
pressing and holding the thumbwheel while
this display is active.
Average Fuel Economy displays the
approximate average liters per
100 kilometers (L/100 km) or miles per
gallon (mpg). This number is calculated
based on the number of L/100 km (mpg)
recorded since the last time this menu item
was reset. This number reflects only the
approximate average fuel economy that the
vehicle has right now, and will change as
driving conditions change. The Average Fuel
Economy can be reset by pressing and
holding the thumbwheel while this display
is active.
Oil Life :
Displays an estimate of the oil's
remaining useful life. If REMAINING OIL LIFE
99% is displayed, that means 99% of the
current oil life remains. When the remaining oil life is low, the
CHANGE ENGINE OIL SOON message will
appear on the display. The oil should be
changed as soon as possible. See
Engine Oil
(5.5L LT6 Engine) 0242 or
Engine Oil (6.2L LT2 Engine) 0245. In
addition to the engine oil life system
monitoring the oil life, additional
maintenance is recommended in the
Maintenance Schedule. See Maintenance
Schedule 0306.
The Oil Life display must be reset after each
oil change. It will not reset itself. Do not
reset the Oil Life display accidentally at any
time other than when the oil has just been
changed. It cannot be reset accurately until
the next oil change. To reset, see Engine Oil
Life System 0248.
Tire Pressure : Displays the approximate
pressures of all four tires. Tire pressure is
displayed in either kilopascal (kPa) or in
pounds per square inch (psi). If the pressure
is low, the value for that tire is shown in
amber. See Tire Pressure Monitor System
0 280 and
Tire Pressure Monitor Operation 0281.