2023 CHEVROLET CORVETTE transmission
[x] Cancel search: transmissionPage 250 of 351

Chevrolet Corvette Owner Manual (GMNA-Localizing-U.S./Canada/Mexico-
16287457) - 2023 - CRC - 3/10/22
Vehicle Care 249
How to Reset the Engine Oil Life System
Reset the system whenever the engine oil is
changed so that the system can calculate
the next engine oil change. To reset the
system:1. Scroll through the DIC Info Pages menu until the remaining Engine Oil
percentage is displayed. See Driver
Information Center (DIC) 092.
2. Press and hold the thumbwheel on the DIC while the Oil Life display is active.
When prompted, confirm reset. The oil
life will change to 100%.
If the CHANGE ENGINE OIL SOON message
comes back on when the vehicle is started,
the engine oil life system has not reset.
Repeat the procedure.
Dual Clutch Transmission Fluid
How to Check Dual Clutch Transmission
Fluid
It is not necessary to check the transmission
fluid level. A transmission fluid leak is the
only reason for fluid loss. If a leak occurs,
take the vehicle to the dealer and have it
repaired as soon as possible. The vehicle is not equipped with a
transmission fluid level dipstick. There is a
special procedure for checking and changing
the transmission fluid. Because this
procedure is difficult, this should be done at
the dealer. Contact the dealer for additional
information or the procedure can be found
in the service manual. To purchase a service
manual, see
Publication Ordering
Information 0327.
Caution
Use of the incorrect transmission fluid
may damage the vehicle, and the
damage may not be covered by the
vehicle warranty. Always use the correct
transmission fluid. See Recommended
Fluids and Lubricants 0310.
Change the fluid and external canister filter
at the proper intervals. See Maintenance
Schedule 0306. Be sure to use the correct
fluid. See Recommended Fluids and
Lubricants 0310.
Dual Clutch Transmission Fluid Life
System
When to Change the Dual Clutch
Transmission Fluid
This vehicle has a computer that indicates
when to change the transmission fluid. This
is based on a combination of factors which
include temperature and miles driven. Based
on driving conditions, the mileage at which
a fluid change is indicated can vary
considerably. For the fluid life system to
work properly, the system must be reset
every time the fluid is changed. When the
system has calculated that fluid life has
been diminished, it indicates that a fluid
change is necessary. A CHANGE
TRANSMISSION FLUID SOON message comes
on. Change the fluid as soon as possible
within the next 1 000 km (600 mi). Failure
to change transmission fluid at required
intervals could lead to suboptimal
transmission performance. Your dealer has
trained service technicians who will change
the fluid and reset the system. If the system
is ever reset accidentally, the fluid must be
changed 72 000 km (45,000 mi) after the
last fluid change.
Page 251 of 351

Chevrolet Corvette Owner Manual (GMNA-Localizing-U.S./Canada/Mexico-
16287457) - 2023 - CRC - 3/10/22
250 Vehicle Care
When to Replace the Dual Clutch
Transmission Fluid Filter
This vehicle has a computer that indicates
when to change the transmission external
canister fluid filter. This is based on the
number of miles driven as outlined in the
Service and Maintenance section. For the
fluid filter life system to work properly, the
system must be reset every time the filter is
replaced. When the system has calculated
that the external canister filter is near the
mileage interval, a REPLACE TRANSMISSION
OIL FILTER SOON message comes on. Replace
the external canister filter before the
indicator reaches 0%.
Failure to replace the transmission filter at
required intervals could lead to suboptimal
transmission performance. Your dealer has
trained service technicians who will replace
the external canister filter and reset the
system. If the system is ever reset
accidentally, the filter should be replaced
according to the service intervals indicated
in the Service and Maintenance section until
the next filter change. If the next filter
change is the first, follow the service
interval until the second filter change,
resetting the filter life system at each filter
change.
How to Reset the Dual Clutch
Transmission Fluid and Filter Life System
Reset the respective system whenever the
transmission fluid or external canister filter
is replaced so that the system can calculate
the next service interval.
To reset:1. Place the vehicle in P (Park).
2. Select Transmission Fluid Life or Transmission Oil Filter Life on the DIC
menu. See Driver Information Center
(DIC) 092.
3. Press the thumbwheel to move to the Reset submenu. Select Reset
Transmission Fluid or Reset Transmission
Oil Filter. A confirmation page will be
displayed, press the thumbwheel again
to confirm the reset.
4. When the Transmission Fluid/Filter Life System is successfully reset, 100%
remaining life will be displayed.
Engine Air Filter Life System
If equipped, this feature provides the engine
air filter’s remaining life and best timing for
a change. The timing to change an engine
air filter depends on driving and
environmental conditions.
When to Change Engine Air Filter
When the Driver Information Center (DIC)
displays a message to replace the engine air
filter at the next oil change, follow this
timing.
When the DIC displays a message to replace
the engine air filter soon, replace the engine
air filter at the earliest convenience.
The system must be reset after the engine
air filter is changed.
If the DIC displays a message to check the
engine air filter system, see your dealer.
How to Reset Engine Air Filter Life
System
Reset the system whenever the engine air
filter is replaced so that the system can
calculate the next engine air filter change.
To reset:
1. Place the vehicle in P (Park).
2. Display the Air Filter Life on the DIC. See Driver Information Center (DIC) 092.
3. Press the thumbwheel on the steering wheel to move to the Reset/Disable
display area. Select Reset and press the
thumbwheel for several seconds.
4. Press the thumbwheel to confirm reset.
Page 263 of 351

Chevrolet Corvette Owner Manual (GMNA-Localizing-U.S./Canada/Mexico-
16287457) - 2023 - CRC - 3/10/22
262 Vehicle Care
Some vehicles have a battery maintainer
package. Follow the instructions provided
with the battery maintainer package to keep
the battery charged when the vehicle is not
in use. Plug the battery maintainer into the
underhood accessory power outlet only.
For vehicles without a battery maintainer,
see the following information:
Infrequent Usage: Remove the black,
negative (−) cable from the battery to keep
the battery from running down.
See“Window Indexing” underPower
Windows 028. Extended Storage: It is recommended that
the battery maintainer package be used.
However, if not, remove the black,
negative (−) cable from the battery. All
vehicle memory settings will need to be
reset when battery power is restored.
Park Brake and P (Park)
Mechanism Check
{Warning
When you are doing this check, the
vehicle could begin to move. You or
others could be injured and property
could be damaged. Make sure there is
room in front of the vehicle in case it
begins to roll. Be ready to apply the
regular brake at once should the vehicle
begin to move.
Park on a fairly steep hill, with the vehicle
facing downhill. Keeping your foot on the
regular brake, set the parking brake.
.To check the parking brake's holding
ability: With the engine running and the
transmission in N (Neutral), slowly remove
foot pressure from the regular brake
pedal. Do this until the vehicle is held by
the parking brake only.
.To check the P (Park) mechanism's holding
ability: With the engine running, shift to
P (Park). Then release the parking brake
followed by the regular brake.
Contact your dealer if service is required.
Wiper Blade Replacement
Windshield wiper blades should be inspected
for wear and cracking.
Replacement blades come in different types
and are removed in different ways. For
proper type and length, see Maintenance
Replacement Parts 0311.
To replace the windshield wiper blade: 1. Pull the windshield wiper assembly away from the windshield.
Page 270 of 351

Chevrolet Corvette Owner Manual (GMNA-Localizing-U.S./Canada/Mexico-
16287457) - 2023 - CRC - 3/10/22
Vehicle Care 269
To Access:1. Open top cover.
2. Remove the top cover by pushing inward on the latch.
3. Pull the cover upward.
To Install: 1. Insert the tabs on the back of the cover into the slots in the rear compartment.
2. Align the clip with the slots in the instrument panel.
3. Press the cover into place.
See your dealer if additional assistance is
needed.
The vehicle may not be equipped with all of
the fuses, relays, and features shown. Fuses Usage
1 Driver Memory Seat Module/Power Seat
2 Driver Heated Seat
3 Passenger Memory Seat Module/Power Seat
4 Passenger Heated Seat Fuses
Usage
5 Transmission Control Module
6 –
7 Power Sounder Module/ Pedestrian Friendly
Alert Function
8 Side Blind Zone Alert/ Rear Park Assist
9 –
Page 271 of 351

Chevrolet Corvette Owner Manual (GMNA-Localizing-U.S./Canada/Mexico-
16287457) - 2023 - CRC - 3/10/22
270 Vehicle Care
FusesUsage
10 Engine Control Module/ Air Conditioning
11 –
12 Lithium Ion Battery Module
13 Active Fuel Management
14 Seat Fan 15 –
16 Exterior Lighting Module
17 Instrument Panel Cluster/Shifter Interface
Board/Transmission
Control Module/
Electronic Brake Control
Module
18 Engine Control Module
19 –
20 Sensing and Diagnostic Module/Inside Rear
View Mirror
21 Exhaust Valve Solenoid Fuses
Usage
22 Fuel Pump/Fuel Tank Zone Module
23 Tonneau Left
24 Tonneau Right 25 Convertible Top Right
26 Convertible Top Left 27 Electronic Suspension Control
28 –
29 CGM
30 O2 Sensor 31 O2 Sensor/Engine Oil/ Canister Purge/Active
Fuel Management
32 Ignition Even
33 Ignition Odd
34 Engine Control Module 1 35 Engine Control Module/ Mass Air Flow Sensor/
O2 Sensor/Air
Conditioning
36 – Fuses
Usage
37 Canister Vent
38 Latch Control Module
39 Right Window Switch/ Door Lock
40 Left Window Switch/ Door Lock
41 –
42 Engine Control Module 2
43 –
44 Air Conditioning Clutch 45 –
46 –
47 –
48 –
49 Auxiliary Cooling Fan Right
50 –
51 –
52 –
53 Starter Solenoid
Page 292 of 351

Chevrolet Corvette Owner Manual (GMNA-Localizing-U.S./Canada/Mexico-
16287457) - 2023 - CRC - 3/10/22
Vehicle Care 291
{Warning
Batteries can hurt you. They can be
dangerous because:
.They contain acid that can burn you.
.They contain gas that can explode or
ignite.
.They contain enough electricity to
burn you.
Use eye protection when handling the
battery. If you do not follow these steps
exactly, some or all of these things can
hurt you.
Caution
Ignoring these steps could result in costly
damage to the vehicle that would not be
covered by the vehicle warranty. Trying
to start the vehicle by pushing or pulling
it will not work, and it could damage the
vehicle.
The battery is under a battery cover and
side extensions/shields in the underhood
compartment. To access the battery under the hood, the
right hand and left hand sight shields need
to be removed to be able to remove the
second cover assembly to access the battery.
The positive battery terminal is on the
driver side and the negative terminal is on
the passenger side.
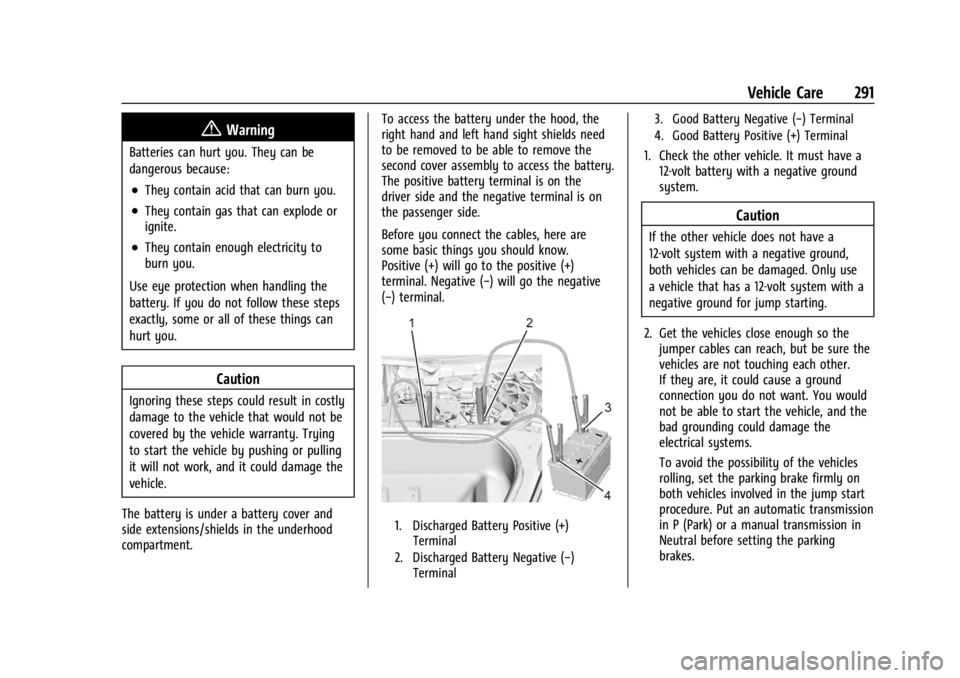
Before you connect the cables, here are
some basic things you should know.
Positive (+) will go to the positive (+)
terminal. Negative (−) will go the negative
(−) terminal.
1. Discharged Battery Positive (+)
Terminal
2. Discharged Battery Negative (−) Terminal 3. Good Battery Negative (−) Terminal
4. Good Battery Positive (+) Terminal
1. Check the other vehicle. It must have a
12-volt battery with a negative ground
system.
Caution
If the other vehicle does not have a
12-volt system with a negative ground,
both vehicles can be damaged. Only use
a vehicle that has a 12-volt system with a
negative ground for jump starting.
2. Get the vehicles close enough so the jumper cables can reach, but be sure the
vehicles are not touching each other.
If they are, it could cause a ground
connection you do not want. You would
not be able to start the vehicle, and the
bad grounding could damage the
electrical systems.
To avoid the possibility of the vehicles
rolling, set the parking brake firmly on
both vehicles involved in the jump start
procedure. Put an automatic transmission
in P (Park) or a manual transmission in
Neutral before setting the parking
brakes.
Page 295 of 351

Chevrolet Corvette Owner Manual (GMNA-Localizing-U.S./Canada/Mexico-
16287457) - 2023 - CRC - 3/10/22
294 Vehicle Care
The vehicle must be in N (Neutral) and the
electric parking brake must be released
when loading the vehicle onto a flatbed tow
truck.
If equipped, the Front Lift System can be
raised with the engine off. With the vehicle
in accessory mode and the doors closed,
press and hold the Front Lift System button
for 10 seconds. SeeFront Lift System0214.
After the vehicle is loaded, the front can be
lowered by pressing the Front Lift System
button again with the doors closed.
After the vehicle is loaded, the front can be
lowered by pressing the Front Lift System
button again with the doors closed.
.Place the vehicle in N (Neutral) and refer
to “Maintaining N (Neutral) with Engine
Off” under Dual Clutch Transmission
0 195.
.If the 12-volt battery is dead and/or the
engine will not start, the vehicle will not
move. Try to jump start the vehicle. Refer
to Jump Starting - North America 0290.
If the jump start is successful, retry the
“Maintaining N (Neutral) with Engine Off”
procedure.
.If jump starting is unsuccessful, the
vehicle will not move. Tire skates or
dollies must be used under the non-rolling
tires to prevent vehicle damage.
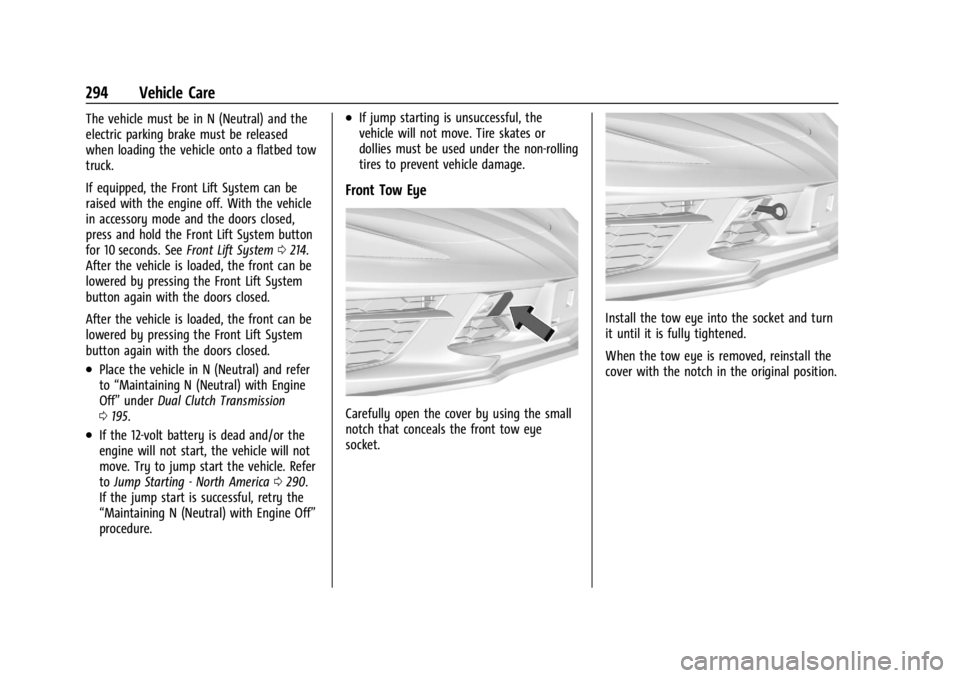
Front Tow Eye
Carefully open the cover by using the small
notch that conceals the front tow eye
socket.
Install the tow eye into the socket and turn
it until it is fully tightened.
When the tow eye is removed, reinstall the
cover with the notch in the original position.
Page 308 of 351

Chevrolet Corvette Owner Manual (GMNA-Localizing-U.S./Canada/Mexico-
16287457) - 2023 - CRC - 3/10/22
Service and Maintenance 307
.When the REPLACE AT NEXT OIL CHANGE
message displays, the engine air filter
should be replaced at the next engine oil
change. When the REPLACE ENGINE AIR
FILTER SOON message displays, the
engine air filter should be replaced at the
earliest convenience. Reset the engine air
filter life system after the engine air filter
is replaced. SeeEngine Air Filter Life
System 0250.
.The initial transmission external canister
filter change must be performed at
12 000 km (7,500 mi). This service can be
complex. See your dealer.
Caution
The transmission external canister filter
must be changed at 12 000 km
(7,500 mile) during the break-in period.
Failure to replace the external canister
filter can cause damage to the
transmission and potentially void any
warranty. Every 36 000 km (22,500 mi)
.Replace the passenger compartment air
filter. Or every 24 months, whichever
comes first. More frequent passenger
compartment air filter replacement may
be needed if driving in areas with heavy
traffic, poor air quality, high dust levels,
or environmental allergens. Passenger
compartment air filter replacement may
also be needed if there is reduced airflow,
window fogging, or odors. Your GM
dealer can help determine when to
replace the filter.
.Change the dual clutch transmission
external canister filter. Check the
transmission fluid life percentage.
If the percentage is less than 10%, replace
the fluid and external canister filter.
Change the external canister filter every
36 000 km (22,500 mi) thereafter. This
service can be complex. See your dealer.
Every 72 000 km (45,000 mi)
.Change the transmission fluid and
external canister filter. Change the
external canister filter every 36 000 km
(22,500 mi) thereafter. This service can be
complex. See your dealer.
Or when the CHANGE TRANSMISSION
FLUID SOON message displays, change the
fluid and external canister filter within
the next 1 000 km (620 mi). Failure to
change the transmission fluid at required
intervals can lead to reduced transmission
performance. The transmission fluid must
be changed at least every three years and
the Fluid Life System must be reset. Your
dealer has trained service technicians who
will change the fluid and reset the
system. If the system is ever reset
accidentally, the fluid must be changed at
72 000 km (45,000 mi) since the last fluid
change. See
Dual Clutch Transmission
Fluid Life System 0249.