2023 CHEVROLET CORVETTE ignition
[x] Cancel search: ignitionPage 6 of 351

Chevrolet Corvette Owner Manual (GMNA-Localizing-U.S./Canada/Mexico-
16287457) - 2023 - CRC - 3/10/22
Introduction 5
1.Air Vents 0166.
2. Turn Signal Lever. See Turn and
Lane-Change Signals 0104.
Exterior Lamp Controls 0102.
3. Manual Shift Paddles. See Manual Mode
0 198.
4. Instrument Cluster 079.
5. Windshield Wiper/Washer 073.
6. Near Field Communication Antenna (NFC). See Bluetooth (Overview) 0144 or
Bluetooth (Pairing and Using a Phone)
0 144.
7. Volume Control Knob and Infotainment Home Button. See Overview0109.
8. Infotainment. See Using the System
0 112.
9. Alarm System Indicator Light. See Vehicle
Alarm System 021.
Light Sensor. See Automatic Headlamp
System 0103.
10. Dual Automatic Climate Control System
0163.
Driver and Passenger Heated and
Ventilated Seat Controls (If Equipped).
See Heated and Ventilated Front Seats
0 43. 11.
Traction Control/Electronic Stability
Control 0206.
Curb View Camera (If Equipped). See
Assistance Systems for Parking or Backing
0 223.
Front Lift System Control (If Equipped).
See Front Lift System 0214.
12. Driver Mode Control 0208.
13. Shift Switches. See Dual Clutch
Transmission 0195.
14. Keyless Ignition. See Ignition Positions
0 190.
15. Driver Information Center (DIC) Controls. SeeDriver Information Center (DIC) 092.
16. Heated Steering Wheel 073 (If
Equipped).
17. Bluetooth Controls. See Steering Wheel
Controls 0111.
Voice Recognition Controls. See Steering
Wheel Controls 0111.
18. Volume Control Buttons. See Steering
Wheel Controls 0111.
19. Horn 073.
20. Favorites Select Buttons. Steering Wheel
Controls 0111.
21. Z-Mode Control. See Driver Mode Control
0 208. 22.
Cruise Control 0219.
23. Electric Parking Brake 0204.
24. Data Link Connector (DLC) (Out of View). SeeMalfunction Indicator Lamp (Check
Engine Light) 086.
25. Instrument Panel Illumination Control
0105.
26. Head-Up Display Controls (If Equipped). SeeHead-Up Display (HUD) 095.
Page 8 of 351
Chevrolet Corvette Owner Manual (GMNA-Localizing-U.S./Canada/Mexico-
16287457) - 2023 - CRC - 3/10/22
Keys, Doors, and Windows 7
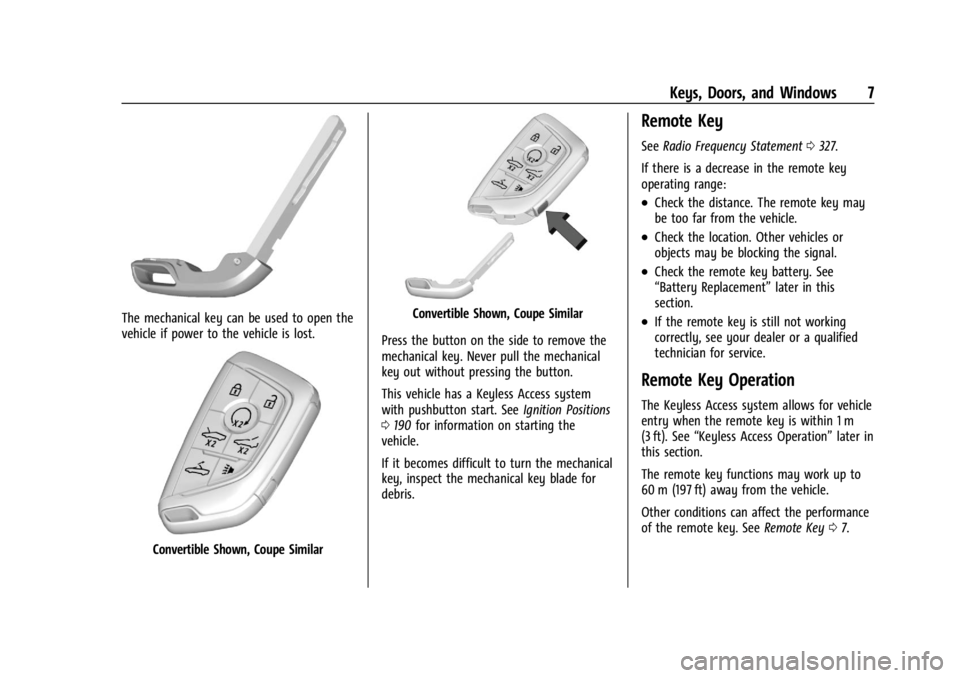
The mechanical key can be used to open the
vehicle if power to the vehicle is lost.
Convertible Shown, Coupe Similar
Convertible Shown, Coupe Similar
Press the button on the side to remove the
mechanical key. Never pull the mechanical
key out without pressing the button.
This vehicle has a Keyless Access system
with pushbutton start. See Ignition Positions
0 190 for information on starting the
vehicle.
If it becomes difficult to turn the mechanical
key, inspect the mechanical key blade for
debris.
Remote Key
See Radio Frequency Statement 0327.
If there is a decrease in the remote key
operating range:
.Check the distance. The remote key may
be too far from the vehicle.
.Check the location. Other vehicles or
objects may be blocking the signal.
.Check the remote key battery. See
“Battery Replacement” later in this
section.
.If the remote key is still not working
correctly, see your dealer or a qualified
technician for service.
Remote Key Operation
The Keyless Access system allows for vehicle
entry when the remote key is within 1 m
(3 ft). See “Keyless Access Operation” later in
this section.
The remote key functions may work up to
60 m (197 ft) away from the vehicle.
Other conditions can affect the performance
of the remote key. See Remote Key07.
Page 14 of 351
Chevrolet Corvette Owner Manual (GMNA-Localizing-U.S./Canada/Mexico-
16287457) - 2023 - CRC - 3/10/22
Keys, Doors, and Windows 13
If your vehicle is low on fuel, do not use the
remote start feature. The vehicle may run
out of fuel.
The remote key range may be shorter while
the vehicle is running.
Other conditions can affect the performance
of the remote key. SeeRemote Key07.
You have a total of 30 minutes of engine
running time. The maximum run time of a
single start is 15 minutes, and it will shut off
automatically. You could do three 10 minute
starts if you manually shut off after
10 minutes. The last 10 minute start would
shut off automatically as your total
30 minutes will have been used.
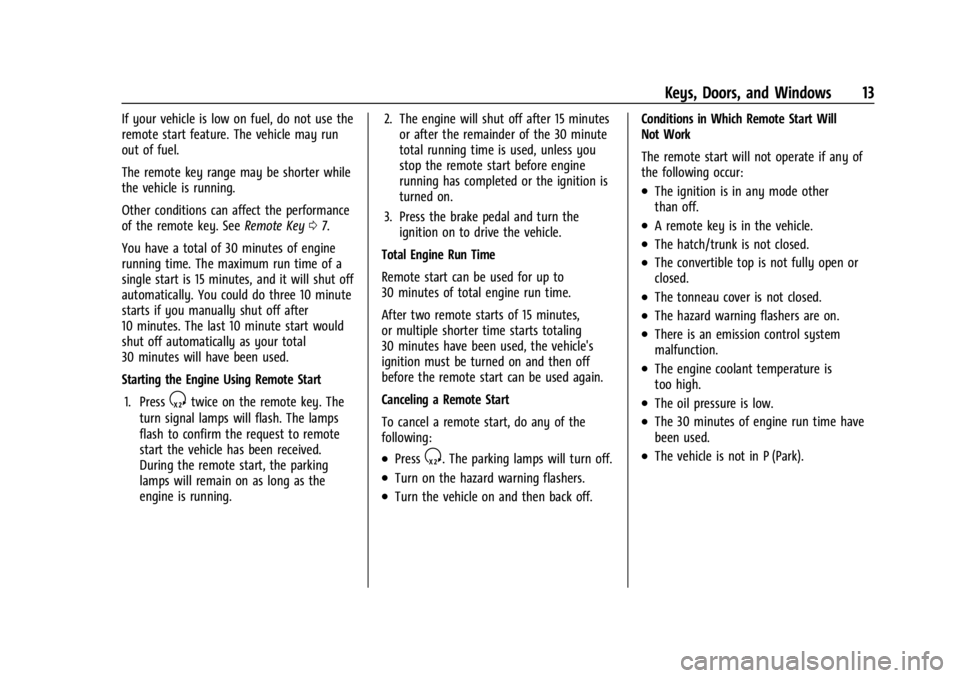
Starting the Engine Using Remote Start
1. Press
Stwice on the remote key. The
turn signal lamps will flash. The lamps
flash to confirm the request to remote
start the vehicle has been received.
During the remote start, the parking
lamps will remain on as long as the
engine is running. 2. The engine will shut off after 15 minutes
or after the remainder of the 30 minute
total running time is used, unless you
stop the remote start before engine
running has completed or the ignition is
turned on.
3. Press the brake pedal and turn the ignition on to drive the vehicle.
Total Engine Run Time
Remote start can be used for up to
30 minutes of total engine run time.
After two remote starts of 15 minutes,
or multiple shorter time starts totaling
30 minutes have been used, the vehicle's
ignition must be turned on and then off
before the remote start can be used again.
Canceling a Remote Start
To cancel a remote start, do any of the
following:
.PressS. The parking lamps will turn off.
.Turn on the hazard warning flashers.
.Turn the vehicle on and then back off. Conditions in Which Remote Start Will
Not Work
The remote start will not operate if any of
the following occur:
.The ignition is in any mode other
than off.
.A remote key is in the vehicle.
.The hatch/trunk is not closed.
.The convertible top is not fully open or
closed.
.The tonneau cover is not closed.
.The hazard warning flashers are on.
.There is an emission control system
malfunction.
.The engine coolant temperature is
too high.
.The oil pressure is low.
.The 30 minutes of engine run time have
been used.
.The vehicle is not in P (Park).
Page 17 of 351
Chevrolet Corvette Owner Manual (GMNA-Localizing-U.S./Canada/Mexico-
16287457) - 2023 - CRC - 3/10/22
16 Keys, Doors, and Windows
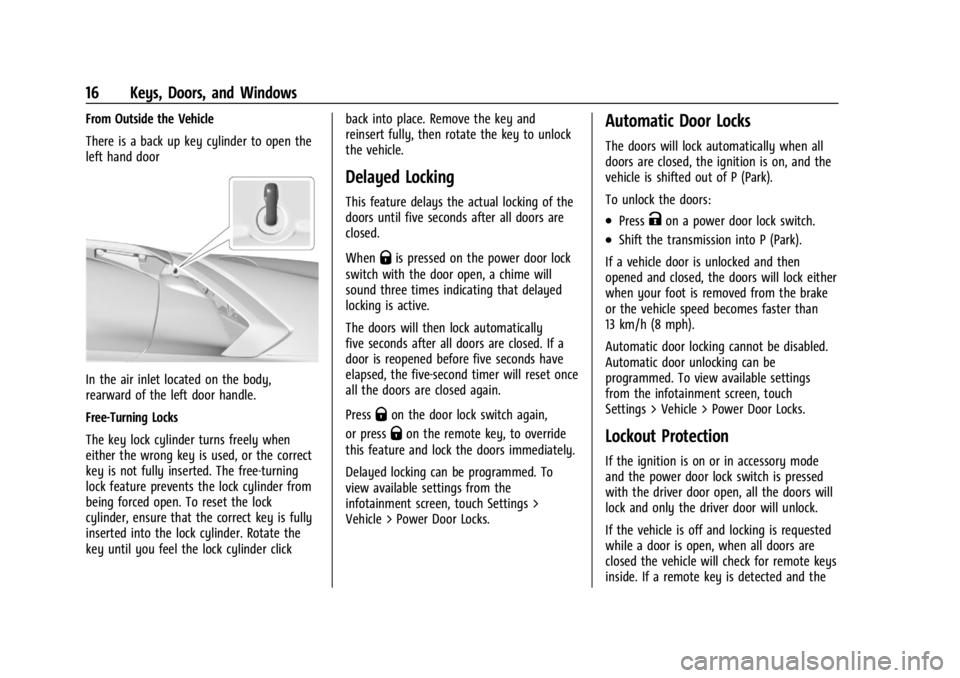
From Outside the Vehicle
There is a back up key cylinder to open the
left hand door
In the air inlet located on the body,
rearward of the left door handle.
Free-Turning Locks
The key lock cylinder turns freely when
either the wrong key is used, or the correct
key is not fully inserted. The free-turning
lock feature prevents the lock cylinder from
being forced open. To reset the lock
cylinder, ensure that the correct key is fully
inserted into the lock cylinder. Rotate the
key until you feel the lock cylinder clickback into place. Remove the key and
reinsert fully, then rotate the key to unlock
the vehicle.
Delayed Locking
This feature delays the actual locking of the
doors until five seconds after all doors are
closed.
When
Qis pressed on the power door lock
switch with the door open, a chime will
sound three times indicating that delayed
locking is active.
The doors will then lock automatically
five seconds after all doors are closed. If a
door is reopened before five seconds have
elapsed, the five-second timer will reset once
all the doors are closed again.
Press
Qon the door lock switch again,
or press
Qon the remote key, to override
this feature and lock the doors immediately.
Delayed locking can be programmed. To
view available settings from the
infotainment screen, touch Settings >
Vehicle > Power Door Locks.
Automatic Door Locks
The doors will lock automatically when all
doors are closed, the ignition is on, and the
vehicle is shifted out of P (Park).
To unlock the doors:
.PressKon a power door lock switch.
.Shift the transmission into P (Park).
If a vehicle door is unlocked and then
opened and closed, the doors will lock either
when your foot is removed from the brake
or the vehicle speed becomes faster than
13 km/h (8 mph).
Automatic door locking cannot be disabled.
Automatic door unlocking can be
programmed. To view available settings
from the infotainment screen, touch
Settings > Vehicle > Power Door Locks.
Lockout Protection
If the ignition is on or in accessory mode
and the power door lock switch is pressed
with the driver door open, all the doors will
lock and only the driver door will unlock.
If the vehicle is off and locking is requested
while a door is open, when all doors are
closed the vehicle will check for remote keys
inside. If a remote key is detected and the
Page 24 of 351

Chevrolet Corvette Owner Manual (GMNA-Localizing-U.S./Canada/Mexico-
16287457) - 2023 - CRC - 3/10/22
Keys, Doors, and Windows 23
.Make sure there are no obstructions
blocking the sensors.
Intrusion and Inclination Sensors Disable
Switch
It is recommended that the intrusion and
inclination sensors be deactivated if pets are
left in the vehicle or if the vehicle is being
transported.
When the roof panel is off, or the
convertible top is down, the intrusion
system is turned off.
With the vehicle turned off, press
oon the
overhead console, next to OnStar. The
indicator light will display momentarily,
indicating that these sensors have been
disabled until the next time the alarm
system is armed.
Immobilizer
See Radio Frequency Statement 0327.
Immobilizer Operation
The vehicle has a passive theft-deterrent
system.
The security light comes on in the
instrument cluster if there is a problem with
arming or disarming the theft-deterrent
system. This light also comes on briefly
when the engine is started.
The system is automatically armed when
the ignition is turned off.
The immobilization system is disarmed
when the ignition is turned on or placed in
accessory mode and a valid remote key is
found in the vehicle.
You do not have to manually arm or disarm
the system.
The system has one or more remote keys
that are matched to an immobilizer control
unit in the vehicle. Only a correctly matched
remote key starts the vehicle. The vehicle
may not start if the remote key is damaged. If the engine does not start and the security
light comes on, there may be a problem
with the immobilizer system. Try starting
the vehicle again.
If the vehicle does not start and the remote
key appears to be undamaged, try another
remote key. Or, place the remote key in the
cupholder backup location. See
Remote Key
Operation 07. If the engine still does not
start with the other remote key, or with the
remote key in the cupholder backup
location, the vehicle needs service. If the
engine does start, the first remote key may
be faulty. See your dealer or have a new
remote key programmed to the vehicle.
The immobilizer system can learn new or
replacement remote keys. Up to eight
remote keys can be programmed for the
vehicle. To program additional remote keys,
see “Programming Remote Keys to the
Vehicle” underRemote Key Operation 07.
Do not leave the remote key or device that
disarms or deactivates the theft-deterrent
system in the vehicle.
Page 30 of 351
Chevrolet Corvette Owner Manual (GMNA-Localizing-U.S./Canada/Mexico-
16287457) - 2023 - CRC - 3/10/22
Keys, Doors, and Windows 29
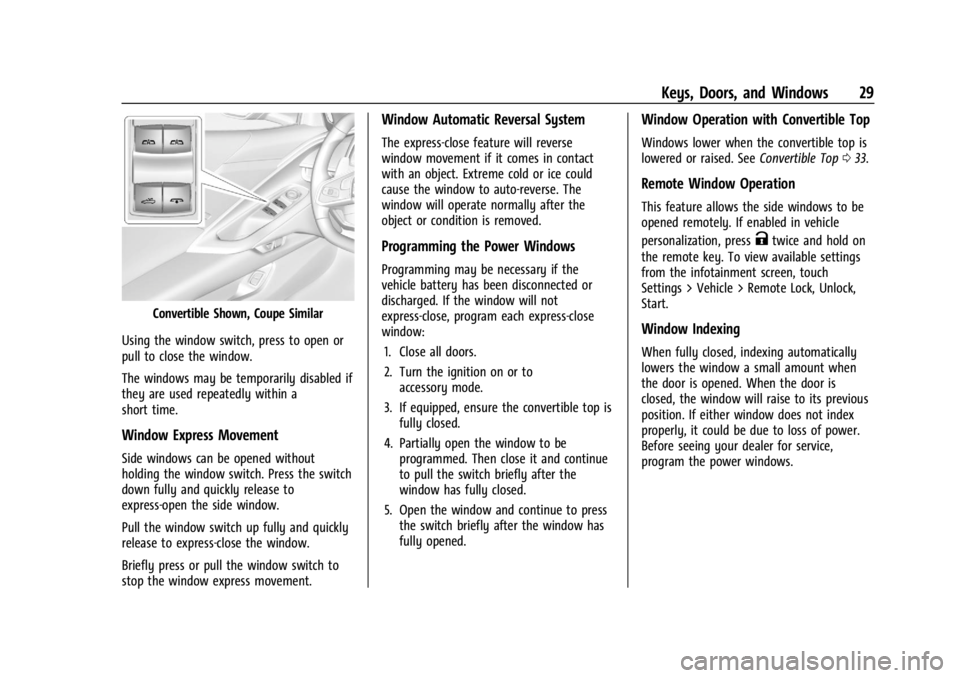
Convertible Shown, Coupe Similar
Using the window switch, press to open or
pull to close the window.
The windows may be temporarily disabled if
they are used repeatedly within a
short time.
Window Express Movement
Side windows can be opened without
holding the window switch. Press the switch
down fully and quickly release to
express-open the side window.
Pull the window switch up fully and quickly
release to express-close the window.
Briefly press or pull the window switch to
stop the window express movement.
Window Automatic Reversal System
The express-close feature will reverse
window movement if it comes in contact
with an object. Extreme cold or ice could
cause the window to auto-reverse. The
window will operate normally after the
object or condition is removed.
Programming the Power Windows
Programming may be necessary if the
vehicle battery has been disconnected or
discharged. If the window will not
express-close, program each express-close
window: 1. Close all doors.
2. Turn the ignition on or to accessory mode.
3. If equipped, ensure the convertible top is fully closed.
4. Partially open the window to be programmed. Then close it and continue
to pull the switch briefly after the
window has fully closed.
5. Open the window and continue to press the switch briefly after the window has
fully opened.
Window Operation with Convertible Top
Windows lower when the convertible top is
lowered or raised. See Convertible Top033.
Remote Window Operation
This feature allows the side windows to be
opened remotely. If enabled in vehicle
personalization, press
Ktwice and hold on
the remote key. To view available settings
from the infotainment screen, touch
Settings > Vehicle > Remote Lock, Unlock,
Start.
Window Indexing
When fully closed, indexing automatically
lowers the window a small amount when
the door is opened. When the door is
closed, the window will raise to its previous
position. If either window does not index
properly, it could be due to loss of power.
Before seeing your dealer for service,
program the power windows.
Page 32 of 351
Chevrolet Corvette Owner Manual (GMNA-Localizing-U.S./Canada/Mexico-
16287457) - 2023 - CRC - 3/10/22
Keys, Doors, and Windows 31
To remove:1. Shift transmission into P (Park).
2. Turn the ignition off and set the parking brake.
3. Lower both sun visors.
4. Open the rear hatch/trunk and remove any items that may interfere with proper
storage of the roof panel.
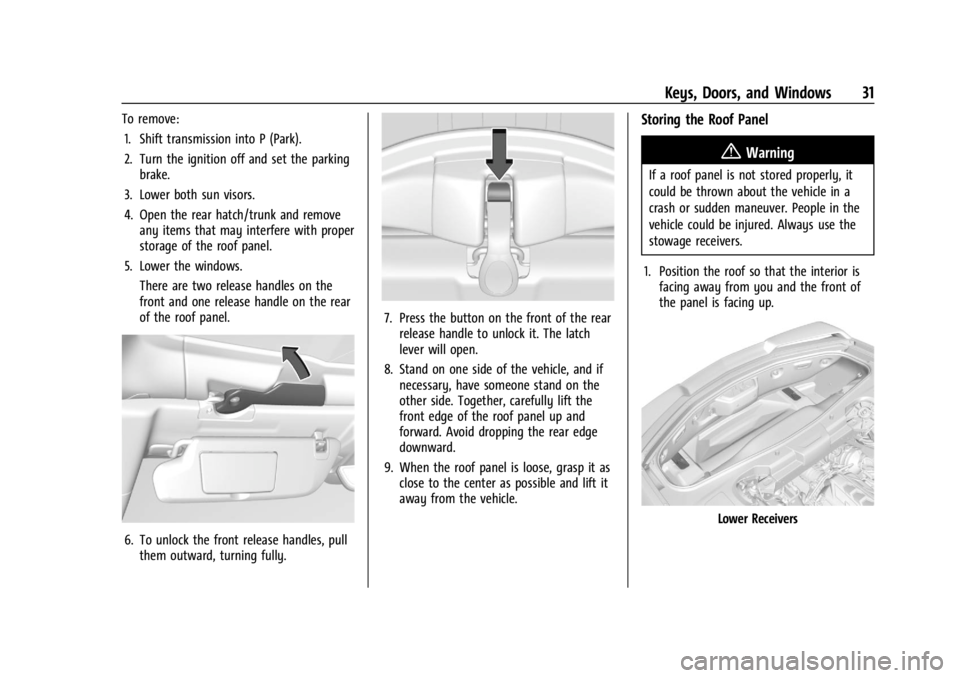
5. Lower the windows. There are two release handles on the
front and one release handle on the rear
of the roof panel.
6. To unlock the front release handles, pullthem outward, turning fully.
7. Press the button on the front of the rearrelease handle to unlock it. The latch
lever will open.
8. Stand on one side of the vehicle, and if necessary, have someone stand on the
other side. Together, carefully lift the
front edge of the roof panel up and
forward. Avoid dropping the rear edge
downward.
9. When the roof panel is loose, grasp it as close to the center as possible and lift it
away from the vehicle.
Storing the Roof Panel
{Warning
If a roof panel is not stored properly, it
could be thrown about the vehicle in a
crash or sudden maneuver. People in the
vehicle could be injured. Always use the
stowage receivers.
1. Position the roof so that the interior is facing away from you and the front of
the panel is facing up.
Lower Receivers
Page 33 of 351
Chevrolet Corvette Owner Manual (GMNA-Localizing-U.S./Canada/Mexico-
16287457) - 2023 - CRC - 3/10/22
32 Keys, Doors, and Windows
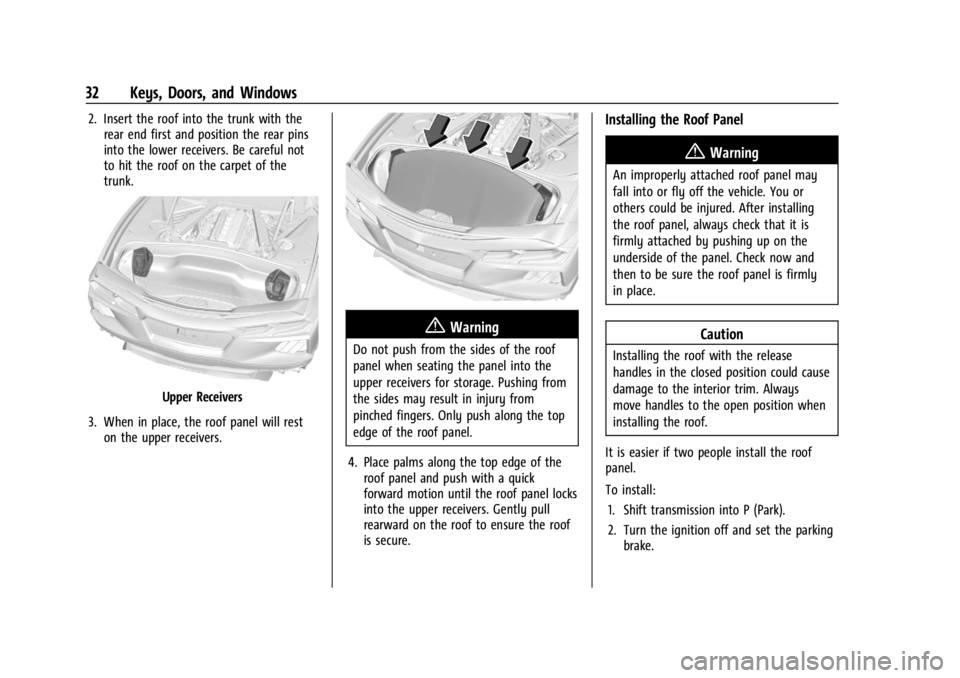
2. Insert the roof into the trunk with therear end first and position the rear pins
into the lower receivers. Be careful not
to hit the roof on the carpet of the
trunk.
Upper Receivers
3. When in place, the roof panel will rest on the upper receivers.
{Warning
Do not push from the sides of the roof
panel when seating the panel into the
upper receivers for storage. Pushing from
the sides may result in injury from
pinched fingers. Only push along the top
edge of the roof panel.
4. Place palms along the top edge of the roof panel and push with a quick
forward motion until the roof panel locks
into the upper receivers. Gently pull
rearward on the roof to ensure the roof
is secure.
Installing the Roof Panel
{Warning
An improperly attached roof panel may
fall into or fly off the vehicle. You or
others could be injured. After installing
the roof panel, always check that it is
firmly attached by pushing up on the
underside of the panel. Check now and
then to be sure the roof panel is firmly
in place.
Caution
Installing the roof with the release
handles in the closed position could cause
damage to the interior trim. Always
move handles to the open position when
installing the roof.
It is easier if two people install the roof
panel.
To install: 1. Shift transmission into P (Park).
2. Turn the ignition off and set the parking brake.