2023 CADILLAC LYRIC length
[x] Cancel search: lengthPage 74 of 424

Cadillac Lyriq Owner Manual (GMNA-Localizing-U.S./Canada-15644413) -
2023 - CRC - 2/23/22
Seats and Restraints 73
Warning (Continued)
resulting in serious injury or
even death. To help make
sure the airbag systems are
working properly after a
crash, have them inspected
and any necessary
replacements made as soon
as possible.
If an airbag inflates, you will
need to replace airbag system
parts. See your dealer for
service.
If the airbag readiness light
stays on after the vehicle is
started or comes on when you
are driving, the airbag system
may not work properly. Have
the vehicle serviced right
away. See Airbag Readiness
Light 0112.
Child Restraints
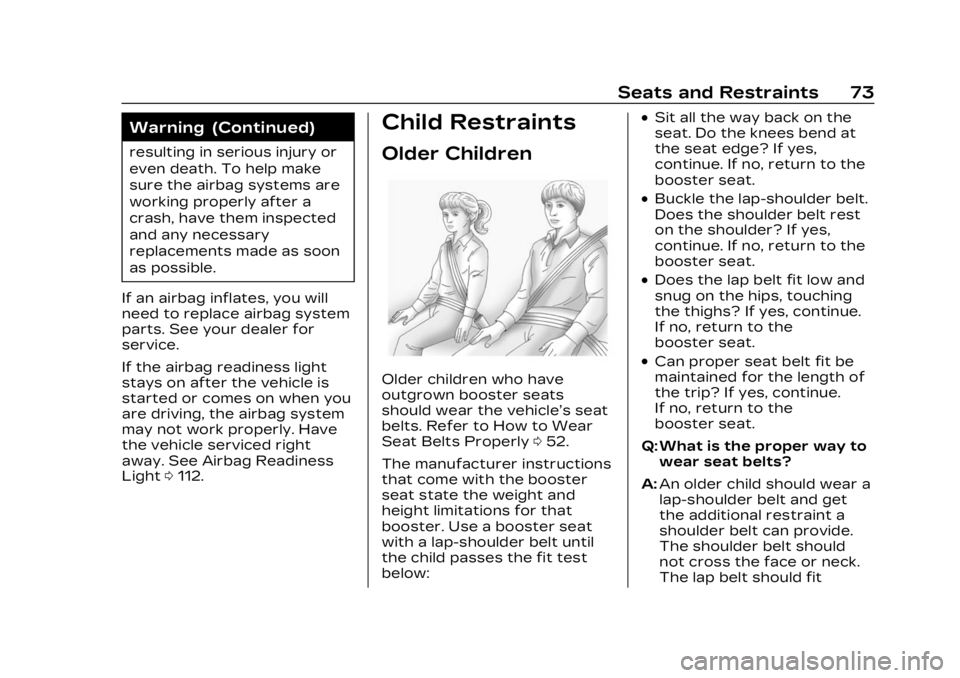
Older Children
Older children who have
outgrown booster seats
should wear the vehicle’s seat
belts. Refer to How to Wear
Seat Belts Properly 052.
The manufacturer instructions
that come with the booster
seat state the weight and
height limitations for that
booster. Use a booster seat
with a lap-shoulder belt until
the child passes the fit test
below:
.Sit all the way back on the
seat. Do the knees bend at
the seat edge? If yes,
continue. If no, return to the
booster seat.
.Buckle the lap-shoulder belt.
Does the shoulder belt rest
on the shoulder? If yes,
continue. If no, return to the
booster seat.
.Does the lap belt fit low and
snug on the hips, touching
the thighs? If yes, continue.
If no, return to the
booster seat.
.Can proper seat belt fit be
maintained for the length of
the trip? If yes, continue.
If no, return to the
booster seat.
Q: What is the proper way to wear seat belts?
A: An older child should wear a
lap-shoulder belt and get
the additional restraint a
shoulder belt can provide.
The shoulder belt should
not cross the face or neck.
The lap belt should fit
Page 87 of 424

Cadillac Lyriq Owner Manual (GMNA-Localizing-U.S./Canada-15644413) -
2023 - CRC - 2/23/22
86 Seats and Restraints
Warning (Continued)
Buckle any unused seat
belts behind the child
restraint so children cannot
reach them. Pull the
shoulder belt all the way out
of the retractor to set the
lock, and tighten the belt
behind the child restraint
after the child restraint has
been installed.
Caution
Do not let the LATCH
attachments rub against the
vehicle’s seat belts. This may
damage these parts.
If necessary, move buckled
seat belts to avoid rubbing
the LATCH attachments.
Do not fold the rear
seatback when the seat is
occupied. Do not fold the
empty rear seat with a seat
belt buckled. This could(Continued)
Caution (Continued)
damage the seat belt or the
seat. Unbuckle and return
the seat belt to its stowed
position, before folding
the seat.
If you need to secure more
than one child restraint in the
rear seat, see Where to Put
the Restraint 079.
1. Attach and tighten the lower attachments to the
lower anchors. If the child
restraint does not have
lower attachments or the
desired seating position
does not have lower
anchors, secure the child
restraint with the top tether
and the seat belt. Refer to
the child restraint
manufacturer instructions
and the instructions in this
manual.
1.1. Find the lower anchors for the desired seating
position. 1.2. Put the child restraint
on the seat.
1.3. Attach and tighten the lower attachments on
the child restraint to the
lower anchors.
2. If the child restraint manufacturer recommends
that the top tether be
attached, adjust the top
tether to its full length and
attach it to the anchor.
Refer to the child restraint
instructions and the
following steps:
2.1. Find the top tether anchor.
2.2. Route, attach and tighten the top tether
according to your child
restraint instructions
and the following
instructions:
Page 288 of 424

Cadillac Lyriq Owner Manual (GMNA-Localizing-U.S./Canada-15644413) -
2023 - CRC - 2/23/22
Driving and Operating 287
5. Plug in the AC charge cordinto the vehicle charge port.
Make sure the AC vehicle
plug is fully connected to
the AC charge port. If it is
not properly connected, the
vehicle may not be charged.
6. Verify that the charge status light turns on and an
audible chirp occurs. See
Charging Status Feedback
0289.
To End AC Charging 1. Unlock the charge cord from the vehicle by pressing
the button on the top of the
charge cord plug. Unplug
the charge cord from the
vehicle.
2. Close the charge port door by pressing firmly in the
center until it latches.
3. Unplug the charge cord from the electrical outlet.
4. Place the charge cord into the storage compartment.DC Charging
DC Charging Station
Hardware
The vehicle can be charged
using DC charging equipment
typically found at service
stations and other public
locations.
Check the charging station DC
vehicle plug for compatibility
with the DC charge port on
this vehicle. This vehicle is
compatible with a Combined
Charging System 1 (CCS1)
connector.
When recharging at a DC
charge station, the charging
cable connected to the vehicle
must be less than 10 m (33 ft)
in length to meet functionality
and regulatory requirements.
Follow the steps listed on the
charging station to perform a
DC vehicle charge.
If for any reason DC charging
does not begin or is
interrupted, check the DC
charging station display for messages. Unplug the cord to
restart the DC charging
process.
To Start DC Charging
1. Put the vehicle in P (Park).
2. Press the Electric Parking brake (EPB) switch. See
Electric Parking Brake 0217.
3. Push the rearward edge of
the charge port door and
release to open the door.
In cold weather conditions,
ice may form around the
charge port door. The
charge port door may not
open on the first attempt.
Page 295 of 424

Cadillac Lyriq Owner Manual (GMNA-Localizing-U.S./Canada-15644413) -
2023 - CRC - 2/23/22
294 Driving and Operating
Verify the charge cord status.
The charge cord uses a
combination of red, blue, and
yellow indicators to display the
status of the charge cord.
If the status indicator is not lit,
ensure the electrical outlet
has power.
Charge Level Selection
Charge level selection can be
made using the Charging tab
in the Energy Application on
the infotainment display. For
instructions to set cord limit
settings for a charge session,
see Charging0123.
{Warning
Using a charge level that
exceeds the electrical circuit
or electrical outlet capacity
may start a fire or damage
the electrical circuit. Use the
lowest charge level until a
qualified electrician inspects
the electrical circuit
capacity. Use the lowest
(Continued)
Warning (Continued)
charge level if the electrical
circuit or electrical outlet
capacity is not known.
Grounding Instructions
The charge circuit must be
grounded. If the charge circuit
should malfunction or break
down, grounding provides a
path of least resistance for
the electric current to reduce
the risk of electric shock. This
product is equipped with a
cord that has an equipment
grounding conductor and a
grounding plug. The plug must
be plugged into an appropriate
outlet that is properly installed
and grounded in accordance
with all local codes and
ordinances.
{Warning
Improper connection of the
charge cord ground may
cause electrical shock.(Continued)
Warning (Continued)
Check with a qualified
electrician if there is doubt
as to whether the charge
circuit is properly grounded.
Do not modify the plug
provided with the product.
If it will not fit the electrical
outlet, have a proper
electrical outlet installed by
a qualified electrician.
FCC Information
See Radio Frequency
Statement0395.
Utility Interruption of
Charging
This vehicle responds to
requests through the utility
company to limit or completely
block electrical power grid use.
This feature is inactive during
DC charging. A utility
interruption will lengthen the
vehicle charge time.
Page 320 of 424

Cadillac Lyriq Owner Manual (GMNA-Localizing-U.S./Canada-15644413) -
2023 - CRC - 2/23/22
Vehicle Care 319
facility could void
authorization to use this
equipment.
Vehicle Storage
The best way to store the
vehicle for any length of time
is to plug in the charge cord
and leave it plugged in. The
vehicle monitors and maintains
the 12-volt battery daily. It is
okay to leave the vehicle
plugged in for extended
periods of time. Once charged
to full, very little energy is
required to maintain the
12-volt battery and high
voltage battery.
If it is not possible to charge
the vehicle with the charge
cord left plugged in, be sure to
fully charge the high voltage
battery before storing. The
vehicle will stop maintenance
of the 12-volt battery if the
high voltage battery state of
charge gets too low.When storing the vehicle on a
long-term basis:
‐
Keep the high voltage
battery state of charge
at 30%.
‐ Attach an AGM/VRLA
compatible battery tender or
trickle charger to the 12-volt
battery.
‐ Keep the remote key more
than 3 m (10 ft) away from
the vehicle.
12–volt Battery
{Warning
Batteries have acid that can
burn you and gas that can
explode. You can be badly
hurt if you are not careful.
Always wear eye protection.
See Jump Starting - North
America 0356 for tips on
working around a battery
without getting hurt.
A trickle charger may be
attached to the 12-volt battery
terminals or trickle charge from the underhood remote
positive (+) and negative (–)
terminals. See Jump Starting -
North America
0356 for
location of these terminals.
Caution
The vehicle is equipped with
an AGM/VRLA 12-volt
battery, which can be
damaged by using the
incorrect type of trickle
charger. An AGM/
VRLA-compatible charger
must be used, with the
appropriate setting
selected. Follow the trickle
charger manufacturer
instructions.
With a trickle charger
connected to the 12-volt
battery, the vehicle will still
monitor the 12-volt battery
daily, but it will not use energy
from the high voltage battery
for maintenance.
Page 321 of 424

Cadillac Lyriq Owner Manual (GMNA-Localizing-U.S./Canada-15644413) -
2023 - CRC - 2/23/22
320 Vehicle Care
High Voltage Battery
After extended storage, it is
possible that the vehicle may
not operate. If this happens,
the high voltage battery may
need to be plugged in and
charged.
Park Brake and
P (Park) Mechanism
Check
{Warning
When you are doing this
check, the vehicle could
begin to move. You or
others could be injured and
property could be damaged.
Make sure there is room in
front of the vehicle in case it
begins to roll. Be ready to
apply the regular brake at
once should the vehicle
begin to move.Park on a fairly steep hill, with
the vehicle facing downhill.
Keeping your foot on the
regular brake, set the Electric
Parking Brake (EPB).
.To check the EPB's holding
ability: With the propulsion
system active and the
electric drive unit in
N (Neutral), slowly remove
foot pressure from the
regular brake pedal. Do this
until the vehicle is held by
the EPB only.
.To check the P (Park)
mechanism's holding ability:
With the propulsion system
active, shift to P (Park). Then
release the EPB and slowly
remove foot pressure from
the regular brake pedal.
Contact your dealer if service
is required.
Wiper Blade
Replacement
Windshield wiper blades
should be replaced
periodically. See the
Maintenance Schedule 0376.
Replacement blades come in
different types and are
removed in different ways. For
proper type and length, see
Maintenance Replacement
Parts 0380.
Caution
Allowing the wiper arm to
touch the windshield when
no wiper blade is installed
could damage the
windshield. Any damage that
occurs would not be
covered by the vehicle
warranty. Do not allow the
wiper arm to touch the
windshield.