2023 ALFA ROMEO STELVIO remove seats
[x] Cancel search: remove seatsPage 34 of 268
GETTING TO KNOW YOUR VEHICLE
32
Reclining The Seatback
To adjust the seatback, lift the recline lever
located on the outboard side of the seat, lean
back to the desired position and release the
lever. To return the seatback, lift the lever, lean
forward and release the lever.
SPLIT FOLDING REAR SEAT
The rear seat is a 40/20/40 seat that allows the
luggage compartment to be partially or totally
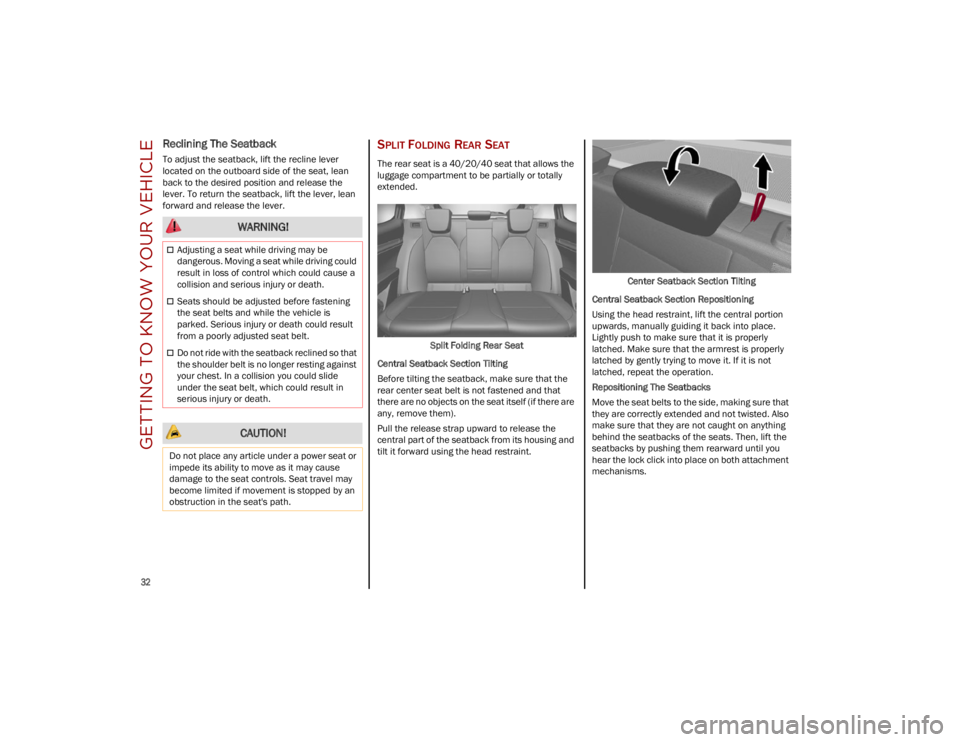
extended.Split Folding Rear Seat
Central Seatback Section Tilting
Before tilting the seatback, make sure that the
rear center seat belt is not fastened and that
there are no objects on the seat itself (if there are
any, remove them).
Pull the release strap upward to release the
central part of the seatback from its housing and
tilt it forward using the head restraint. Center Seatback Section Tilting
Central Seatback Section Repositioning
Using the head restraint, lift the central portion
upwards, manually guiding it back into place.
Lightly push to make sure that it is properly
latched. Make sure that the armrest is properly
latched by gently trying to move it. If it is not
latched, repeat the operation.
Repositioning The Seatbacks
Move the seat belts to the side, making sure that
they are correctly extended and not twisted. Also
make sure that they are not caught on anything
behind the seatbacks of the seats. Then, lift the
seatbacks by pushing them rearward until you
hear the lock click into place on both attachment
mechanisms.
WARNING!
Adjusting a seat while driving may be
dangerous. Moving a seat while driving could
result in loss of control which could cause a
collision and serious injury or death.
Seats should be adjusted before fastening
the seat belts and while the vehicle is
parked. Serious injury or death could result
from a poorly adjusted seat belt.
Do not ride with the seatback reclined so that
the shoulder belt is no longer resting against
your chest. In a collision you could slide
under the seat belt, which could result in
serious injury or death.
CAUTION!
Do not place any article under a power seat or
impede its ability to move as it may cause
damage to the seat controls. Seat travel may
become limited if movement is stopped by an
obstruction in the seat's path.
23_GU_OM_EN_USC_t.book Page 32
Page 38 of 268

GETTING TO KNOW YOUR VEHICLE
36
Rear Heated Seats — If Equipped
If equipped with rear heated seats, the
controls can be found on the rear of the
center console and will function the
same as the front heated seat controls.Rear Heated Seat Buttons
NOTE:
To preserve the battery charge, this function
cannot be activated when the engine is off.
HEAD RESTRAINTS
Head restraints are designed to reduce the risk of
injury by restricting head movement in the event
of a rear impact. Head restraints should be
adjusted so that the top of the head restraint is
located above the top of your ear.
Front Head Restraints
NOTE:
For Quadrifoglio vehicles equipped with Sparco
Racing Seats, the head restraints are not adjust -
able or removable. The front head restraints may be
height-adjustable.
To raise the head restraint, pull up on the head
restraint until it clicks into place.
To lower the head restraint, push in the
adjustment button and lower the head restraint
to the desired height while holding the button.
Then, release the adjustment button.
Front Head Restraint
NOTE:
To allow for maximum visibility for the driver,
if a seat is not occupied by a passenger, the
head restraint can be lowered to the fully
lowered position.
WARNING!
A loose head restraint thrown forward in a
collision or hard stop could cause serious
injury or death to occupants of the vehicle.
Always securely stow removed head
restraints in a location outside the occupant
compartment.
ALL the head restraints MUST be reinstalled
in the vehicle to properly protect the
occupants. Follow the reinstallation
instructions prior to operating the vehicle or
occupying a seat.
WARNING!
All occupants, including the driver, should
not operate a vehicle or sit in a vehicle’s seat
until the head restraints are placed in their
proper positions in order to minimize the risk
of neck injury in the event of a crash.
Head restraints should never be adjusted
while the vehicle is in motion. Driving a
vehicle with the head restraints improperly
adjusted or removed could cause serious
injury or death in the event of a collision.
1 — Release Button
2 — Adjustment Button
23_GU_OM_EN_USC_t.book Page 36
Page 68 of 268
GETTING TO KNOW YOUR VEHICLE
66
(Continued)
CARGO AREA FEATURES
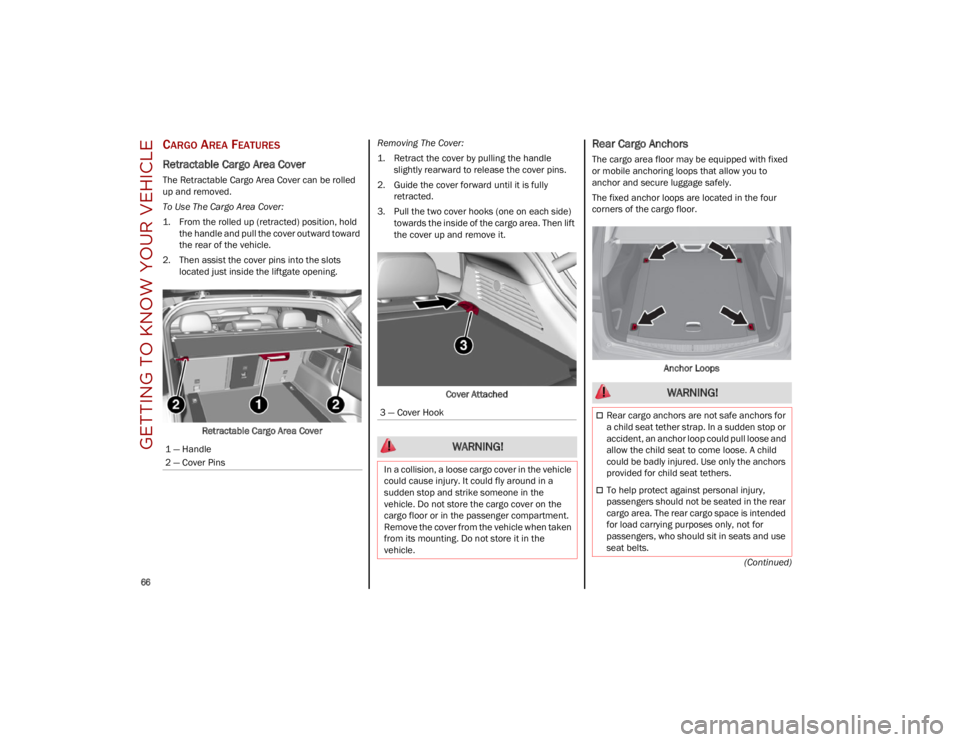
Retractable Cargo Area Cover
The Retractable Cargo Area Cover can be rolled
up and removed.
To Use The Cargo Area Cover:
1. From the rolled up (retracted) position, holdthe handle and pull the cover outward toward
the rear of the vehicle.
2. Then assist the cover pins into the slots located just inside the liftgate opening.
Retractable Cargo Area Cover Removing The Cover:
1. Retract the cover by pulling the handle
slightly rearward to release the cover pins.
2. Guide the cover forward until it is fully retracted.
3. Pull the two cover hooks (one on each side) towards the inside of the cargo area. Then lift
the cover up and remove it.
Cover Attached
Rear Cargo Anchors
The cargo area floor may be equipped with fixed
or mobile anchoring loops that allow you to
anchor and secure luggage safely.
The fixed anchor loops are located in the four
corners of the cargo floor. Anchor Loops
1 — Handle
2 — Cover Pins
3 — Cover Hook
WARNING!
In a collision, a loose cargo cover in the vehicle
could cause injury. It could fly around in a
sudden stop and strike someone in the
vehicle. Do not store the cargo cover on the
cargo floor or in the passenger compartment.
Remove the cover from the vehicle when taken
from its mounting. Do not store it in the
vehicle.
WARNING!
Rear cargo anchors are not safe anchors for
a child seat tether strap. In a sudden stop or
accident, an anchor loop could pull loose and
allow the child seat to come loose. A child
could be badly injured. Use only the anchors
provided for child seat tethers.
To help protect against personal injury,
passengers should not be seated in the rear
cargo area. The rear cargo space is intended
for load carrying purposes only, not for
passengers, who should sit in seats and use
seat belts.
23_GU_OM_EN_USC_t.book Page 66
Page 88 of 268

86
STARTING AND OPERATING
STARTING THE ENGINE
Before starting the engine, be sure to adjust the
seat, the interior rearview mirror, door mirrors,
and fasten the seat belt correctly.
Never press the accelerator pedal before starting
the engine.
If necessary, messages indicating the starting
procedure will be shown in the display.
STARTING PROCEDURE
Proceed as follows:
1. Apply the Electric Park Brake (EPB) and place the gear selector in PARK (P) or NEUTRAL (N).
2. Fully press the brake pedal without touching the accelerator.
3. Briefly push the ignition button.
4. If the engine doesn't start within a few seconds, you need to repeat the procedure.
If the problem persists, contact an authorized
dealer.
REMOTE STARTING SYSTEM
This system uses the key fob to start the engine
conveniently from outside the vehicle while still
maintaining security. The system has a range of
at least 300 feet (91 meters).
The remote starting system also activates the
climate control, the heated seats (if equipped),
and the heated steering wheel (if equipped),
depending on temperatures outside and inside of
the vehicle.
NOTE:
Obstructions between the vehicle and key fob
may reduce this range.
How To Use Remote Start
All of the following conditions must be met before
the engine will remote start:
Gear selector in PARK (P).
Doors closed.
Hood closed.
Liftgate closed.
Hazard switch off.
Brake switch inactive (brake pedal not
pressed).
Battery at an acceptable charge level.
WARNING!
When leaving the vehicle, always remove the
key fob from the vehicle and lock your
vehicle.
Never leave children alone in a vehicle, or
with access to an unlocked vehicle.
Allowing children to be in a vehicle
unattended is dangerous for a number of
reasons. A child or others could be seriously
or fatally injured. Children should be warned
not to touch the parking brake, brake pedal
or the transmission gear selector.
Do not leave the key fob in or near the
vehicle, or in a location accessible to
children. A child could operate power
windows, other controls, or move the vehicle.
Do not leave children or animals inside
parked vehicles in hot weather. Interior heat
buildup may cause serious injury or death.
WARNING!
Never pour fuel or other flammable liquid
into the throttle body air inlet opening in an
attempt to start the vehicle. This could result
in flash fire causing serious personal injury.
Do not attempt to push or tow your vehicle to
get it started. Vehicles equipped with an
automatic transmission cannot be started
this way. Unburned fuel could enter the
catalytic converter and once the engine has
started, ignite and damage the converter and
vehicle.
If the vehicle has a discharged battery,
booster cables may be used to obtain a start
from a booster battery or the battery in
another vehicle. This type of start can be
dangerous if done improperly
Ú
page 192.
CAUTION!
To prevent damage to the starter, do not
continuously crank the engine for more than
25 seconds at a time. Wait 60 seconds before
trying again.
23_GU_OM_EN_USC_t.book Page 86
Page 162 of 268
SAFETY
160
Lap/Shoulder Belt Operating Instructions
1. Enter the vehicle and close the door. Sit backand adjust the seat.
2. The seat belt latch plate is above the back of the front seat, and next to your arm in the
rear seat (for vehicles equipped with a rear
seat). Grab the latch plate and pull out the
seat belt. Slide the latch plate up the webbing
as far as necessary to allow the seat belt to
go around your lap.
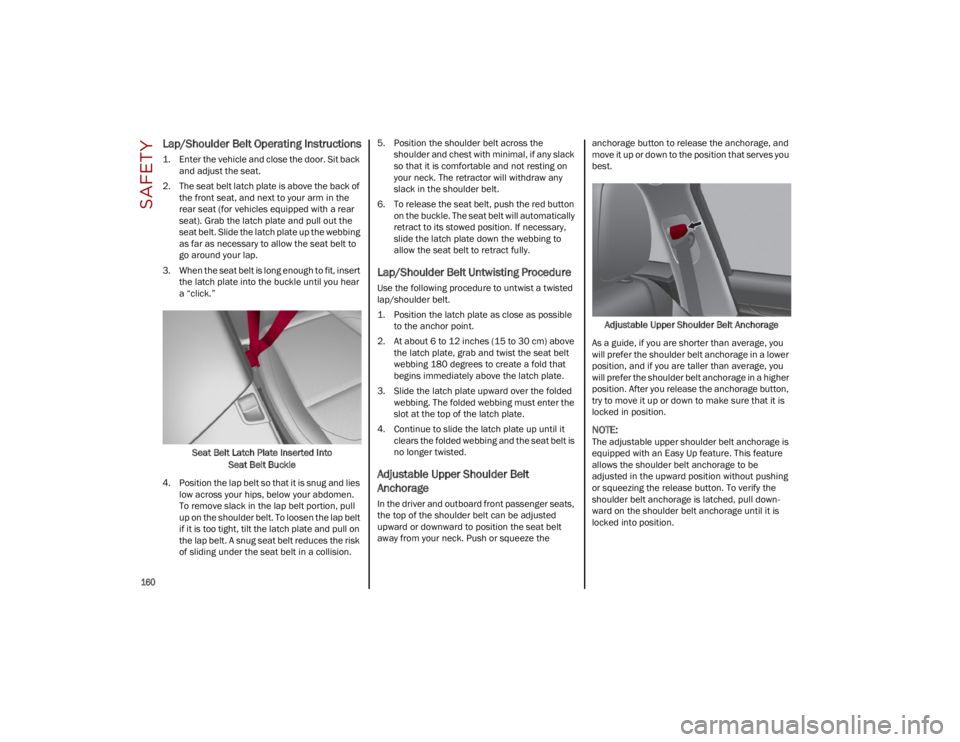
3. When the seat belt is long enough to fit, insert the latch plate into the buckle until you hear
a “click.”
Seat Belt Latch Plate Inserted Into Seat Belt Buckle
4. Position the lap belt so that it is snug and lies low across your hips, below your abdomen.
To remove slack in the lap belt portion, pull
up on the shoulder belt. To loosen the lap belt
if it is too tight, tilt the latch plate and pull on
the lap belt. A snug seat belt reduces the risk
of sliding under the seat belt in a collision. 5. Position the shoulder belt across the
shoulder and chest with minimal, if any slack
so that it is comfortable and not resting on
your neck. The retractor will withdraw any
slack in the shoulder belt.
6. To release the seat belt, push the red button on the buckle. The seat belt will automatically
retract to its stowed position. If necessary,
slide the latch plate down the webbing to
allow the seat belt to retract fully.
Lap/Shoulder Belt Untwisting Procedure
Use the following procedure to untwist a twisted
lap/shoulder belt.
1. Position the latch plate as close as possible to the anchor point.
2. At about 6 to 12 inches (15 to 30 cm) above the latch plate, grab and twist the seat belt
webbing 180 degrees to create a fold that
begins immediately above the latch plate.
3. Slide the latch plate upward over the folded webbing. The folded webbing must enter the
slot at the top of the latch plate.
4. Continue to slide the latch plate up until it clears the folded webbing and the seat belt is
no longer twisted.
Adjustable Upper Shoulder Belt
Anchorage
In the driver and outboard front passenger seats,
the top of the shoulder belt can be adjusted
upward or downward to position the seat belt
away from your neck. Push or squeeze the anchorage button to release the anchorage, and
move it up or down to the position that serves you
best.
Adjustable Upper Shoulder Belt Anchorage
As a guide, if you are shorter than average, you
will prefer the shoulder belt anchorage in a lower
position, and if you are taller than average, you
will prefer the shoulder belt anchorage in a higher
position. After you release the anchorage button,
try to move it up or down to make sure that it is
locked in position.
NOTE:
The adjustable upper shoulder belt anchorage is
equipped with an Easy Up feature. This feature
allows the shoulder belt anchorage to be
adjusted in the upward position without pushing
or squeezing the release button. To verify the
shoulder belt anchorage is latched, pull down -
ward on the shoulder belt anchorage until it is
locked into position.
23_GU_OM_EN_USC_t.book Page 160
Page 164 of 268

SAFETY
162
In Automatic Locking Mode, the shoulder belt is
automatically pre-locked. The seat belt will still
retract to remove any slack in the shoulder belt.
Use the Automatic Locking Mode anytime a child
restraint is installed in a seating position that has
a seat belt with this feature. Children 12 years old
and under should always be properly restrained
in the rear seat of a vehicle with a rear seat.
How To Engage The Automatic Locking Mode
1. Buckle the combination lap and shoulder belt.
2. Grab the shoulder portion and pull downward until the entire seat belt is extracted.
3. Allow the seat belt to retract. As the seat belt retracts, you will hear a clicking sound. This
indicates the seat belt is now in the Auto -
matic Locking Mode. How To Disengage The Automatic Locking Mode
Unbuckle the combination lap/shoulder belt and
allow it to retract completely to disengage the
Automatic Locking Mode and activate the vehicle
sensitive (emergency) locking mode.
SUPPLEMENTAL RESTRAINT SYSTEMS
(SRS)
Some of the safety features described in this
section may be standard equipment on some
models, or may be optional equipment on others.
If you are not sure, ask an authorized dealer.
The air bag system must be ready to protect you
in a collision. The Occupant Restraint Controller
(ORC) monitors the internal circuits and intercon -
necting wiring associated with the electrical Air Bag System Components. Your vehicle may be
equipped with the following Air Bag System
Components:
Air Bag System Components
Occupant Restraint Controller (ORC)
Air Bag Warning Light
Steering Wheel and Column
Instrument Panel
Knee Impact Bolsters
Driver and Front Passenger Air Bags
Seat Belt Buckle Switch
Supplemental Side Air Bags
Supplemental Knee Air Bags
Front and Side Impact Sensors
Seat Belt Pretensioners
Seat Track Position Sensors
Air Bag Warning Light
The Occupant Restraint Controller
(ORC) monitors the readiness of the
electronic parts of the air bag system
whenever the ignition switch is in the
START or ON/RUN position. If the ignition switch
is in the OFF position or in the ACC position, the
air bag system is not on and the air bags will not
inflate.
The ORC contains a backup power supply system
that may deploy the air bag system even if the
battery loses power or it becomes disconnected
prior to deployment.
WARNING!
Never place a rear-facing child restraint in
front of an air bag. A deploying passenger
front air bag can cause death or serious
injury to a child 12 years or younger,
including a child in a rear-facing child
restraint.
Never install a rear-facing child restraint in
the front seat of a vehicle. Only use a
rear-facing child restraint in the rear seat. If
the vehicle does not have a rear seat, do not
transport a rear-facing child restraint in that
vehicle.
WARNING!
The seat belt assembly must be replaced if
the switchable Automatic Locking Retractor
(ALR) feature or any other seat belt function
is not working properly when checked
according to the procedures in the Service
Manual.
Failure to replace the seat belt assembly
could increase the risk of injury in collisions.
Do not use the Automatic Locking Mode to
restrain occupants who are wearing the seat
belt or children who are using booster seats.
The locked mode is only used to install
rear-facing or forward-facing child restraints
that have a harness for restraining the child.
23_GU_OM_EN_USC_t.book Page 162
Page 174 of 268
SAFETY
172
(Continued)
Infant And Child Restraints
Safety experts recommend that children ride
rear-facing in the vehicle until they are two years
old or until they reach either the height or weight
limit of their rear-facing child restraint. Two types
of child restraints can be used rear-facing: infant
carriers and convertible child seats.
The infant carrier is only used rear-facing in the
vehicle. It is recommended for children from birth
until they reach the weight or height limit of the
infant carrier. Convertible child seats can be used
either rear-facing or forward-facing in the vehicle.
Convertible child seats often have a higher
weight limit in the rear-facing direction than
infant carriers do, so they can be used rear-facing
by children who have outgrown their infant carrier
but are still less than at least two years old.
Children should remain rear-facing until they
reach the highest weight or height allowed by
their convertible child seat.
Older Children And Child Restraints
Children who are two years old or who have
outgrown their rear-facing convertible child seat
can ride forward-facing in the vehicle.
Forward-facing child seats and convertible child
seats used in the forward-facing direction are for
children who are over two years old or who have
outgrown the rear-facing weight or height limit of
their rear-facing convertible child seat. Children
should remain in a forward-facing child seat with
a harness for as long as possible, up to the
highest weight or height allowed by the child seat.
All children whose weight or height is above the
forward-facing limit for the child seat should use
a belt-positioning booster seat until the vehicle’s
seat belts fit properly. If the child cannot sit with
knees bent over the vehicle’s seat cushion while
the child’s back is against the seatback, they
should use a belt-positioning booster seat. The
child and belt-positioning booster seat are held in
the vehicle by the seat belt.
WARNING!
Never place a rear-facing child restraint in
front of an air bag. A deploying passenger
front air bag can cause death or serious
injury to a child 12 years or younger,
including a child in a rear-facing child
restraint.
Never install a rear-facing child restraint in
the front seat of a vehicle. Only use a
rear-facing child restraint in the rear seat.
If the vehicle does not have a rear seat, do
not transport a rear-facing child restraint in
that vehicle.
WARNING! WARNING!
Improper installation can lead to failure of an
infant or child restraint. It could come loose
in a collision. The child could be badly injured
or killed. Follow the child restraint
manufacturer’s directions exactly when
installing an infant or child restraint.
After a child restraint is installed in the
vehicle, do not move the vehicle seat forward
or rearward because it can loosen the child
restraint attachments. Remove the child
restraint before adjusting the vehicle seat
position. When the vehicle seat has been
adjusted, reinstall the child restraint.
When your child restraint is not in use,
secure it in the vehicle with the seat belt or
LATCH anchorages, or remove it from the
vehicle. Do not leave it loose in the vehicle.
In a sudden stop or accident, it could strike
the occupants or seatbacks and cause
serious personal injury.
23_GU_OM_EN_USC_t.book Page 172
Page 177 of 268
175
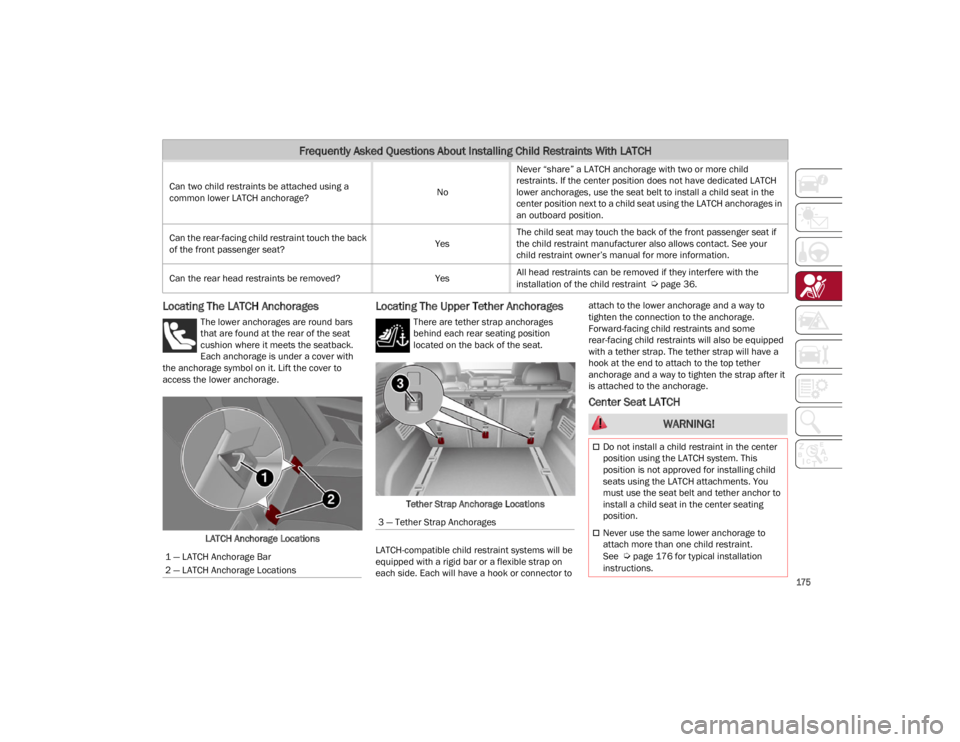
Locating The LATCH Anchorages
The lower anchorages are round bars
that are found at the rear of the seat
cushion where it meets the seatback.
Each anchorage is under a cover with
the anchorage symbol on it. Lift the cover to
access the lower anchorage.
LATCH Anchorage Locations
Locating The Upper Tether Anchorages
There are tether strap anchorages
behind each rear seating position
located on the back of the seat.
Tether Strap Anchorage Locations
LATCH-compatible child restraint systems will be
equipped with a rigid bar or a flexible strap on
each side. Each will have a hook or connector to attach to the lower anchorage and a way to
tighten the connection to the anchorage.
Forward-facing child restraints and some
rear-facing child restraints will also be equipped
with a tether strap. The tether strap will have a
hook at the end to attach to the top tether
anchorage and a way to tighten the strap after it
is attached to the anchorage.
Center Seat LATCH
Can two child restraints be attached using a
common lower LATCH anchorage? NoNever “share” a LATCH anchorage with two or more child
restraints. If the center position does not have dedicated LATCH
lower anchorages, use the seat belt to install a child seat in the
center position next to a child seat using the LATCH anchorages in
an outboard position.
Can the rear-facing child restraint touch the back
of the front passenger seat? YesThe child seat may touch the back of the front passenger seat if
the child restraint manufacturer also allows contact. See your
child restraint owner’s manual for more information.
Can the rear head restraints be removed? YesAll head restraints can be removed if they interfere with the
installation of the child restraint
Ú
page 36.
Frequently Asked Questions About Installing Child Restraints With LATCH
1 — LATCH Anchorage Bar
2 — LATCH Anchorage Locations
3 — Tether Strap Anchorages
WARNING!
Do not install a child restraint in the center
position using the LATCH system. This
position is not approved for installing child
seats using the LATCH attachments. You
must use the seat belt and tether anchor to
install a child seat in the center seating
position.
Never use the same lower anchorage to
attach more than one child restraint.
See
Ú
page 176 for typical installation
instructions.
23_GU_OM_EN_USC_t.book Page 175