2023 ALFA ROMEO STELVIO stop start
[x] Cancel search: stop startPage 193 of 268

191
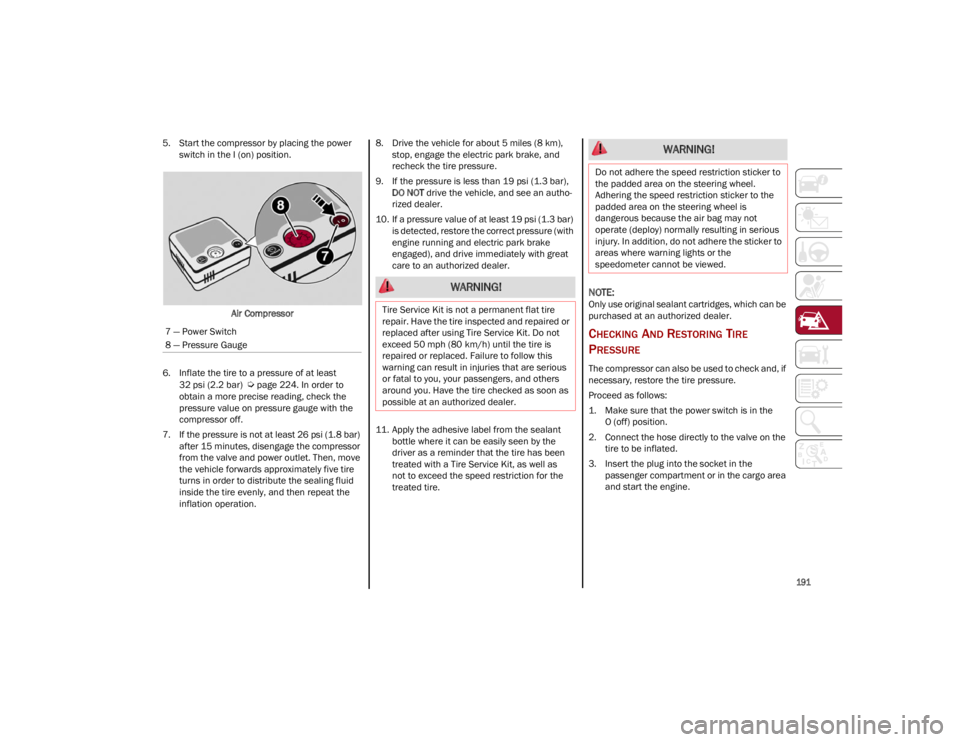
5. Start the compressor by placing the power switch in the I (on) position.
Air Compressor
6. Inflate the tire to a pressure of at least 32 psi (2.2 bar)
Ú
page 224. In order to
obtain a more precise reading, check the
pressure value on pressure gauge with the
compressor off.
7. If the pressure is not at least 26 psi (1.8 bar) after 15 minutes, disengage the compressor
from the valve and power outlet. Then, move
the vehicle forwards approximately five tire
turns in order to distribute the sealing fluid
inside the tire evenly, and then repeat the
inflation operation. 8. Drive the vehicle for about 5 miles (8 km),
stop, engage the electric park brake, and
recheck the tire pressure.
9. If the pressure is less than 19 psi (1.3 bar), DO NOT drive the vehicle, and see an autho -
rized dealer.
10. If a pressure value of at least 19 psi (1.3 bar) is detected, restore the correct pressure (with
engine running and electric park brake
engaged), and drive immediately with great
care to an authorized dealer.
11. Apply the adhesive label from the sealant bottle where it can be easily seen by the
driver as a reminder that the tire has been
treated with a Tire Service Kit, as well as
not to exceed the speed restriction for the
treated tire.
NOTE:
Only use original sealant cartridges, which can be
purchased at an authorized dealer.
CHECKING AND RESTORING TIRE
P
RESSURE
The compressor can also be used to check and, if
necessary, restore the tire pressure.
Proceed as follows:
1. Make sure that the power switch is in the
O (off) position.
2. Connect the hose directly to the valve on the tire to be inflated.
3. Insert the plug into the socket in the passenger compartment or in the cargo area
and start the engine.
7 — Power Switch
8 — Pressure Gauge
WARNING!
Tire Service Kit is not a permanent flat tire
repair. Have the tire inspected and repaired or
replaced after using Tire Service Kit. Do not
exceed 50 mph (80 km/h) until the tire is
repaired or replaced. Failure to follow this
warning can result in injuries that are serious
or fatal to you, your passengers, and others
around you. Have the tire checked as soon as
possible at an authorized dealer.
WARNING!
Do not adhere the speed restriction sticker to
the padded area on the steering wheel.
Adhering the speed restriction sticker to the
padded area on the steering wheel is
dangerous because the air bag may not
operate (deploy) normally resulting in serious
injury. In addition, do not adhere the sticker to
areas where warning lights or the
speedometer cannot be viewed.
23_GU_OM_EN_USC_t.book Page 191
Page 197 of 268

195
Cable Disconnection
1. Disconnect the negative (-) end of the jumper
cable from the remote negative (-) post of the
vehicle with the discharged battery.
2. Disconnect the opposite end of the negative (-) jumper cable from the negative (-) post of
the booster battery.
3. Disconnect the positive (+) end of the jumper
cable from the positive (+) post of the booster
battery.
4. Disconnect the opposite end of the positive (+)
jumper cable from the remote positive (+) post
of the vehicle with the discharged battery, and
reinstall the protective cap.
If frequent jump starting is required to start your
vehicle, you should have the battery and charging
system inspected at an authorized dealer.
BUMP STARTING
Never jump start the engine by pushing, towing or
coasting downhill.
NOTE:
You cannot start a vehicle with an automatic
transmission by pushing it.
ENGINE OVERHEATING
If your vehicle is overheating, it will need to be
serviced at an authorized dealer.
Engine overheating may occur in situations such
as (but not limited to) extreme environmental
temperatures or frequent engine stops/starts.
If the engine becomes overheated, the Engine
Temperature Warning Light in the instrument
cluster will illuminate along with a dedicated
message
Ú
page 80.
In any of the following situations, you can reduce
the potential for overheating by taking the
appropriate action.
On the highways — slow down.
In city traffic — while stopped, place the
transmission in NEUTRAL, but do not increase
engine idle speed.
NOTE:
There are steps that you can take to slow down an
impending overheat condition:
If your Air Conditioner (A/C) is on, turn it off.
The A/C system adds heat to the engine
cooling system and turning the A/C off can
help remove this heat.
You can also turn the temperature control to
maximum heat, the mode control to floor and
the blower control to high. This allows the
heater core to act as a supplement to the
radiator and aids in removing heat from the
engine cooling system.
NOTE:
If the cooling fan does not operate while the
engine is running, the engine temperature will
increase. Stop the engine and contact an
authorized dealer.
If the engine continues to overheat or
frequently overheats, have the cooling system
inspected. The engine could be seriously
damaged unless repairs are made. Contact an
authorized dealer.
CAUTION!
Accessories plugged into the vehicle power
outlets draw power from the vehicle’s battery,
even when not in use (i.e., cellular phones,
etc.). Eventually, if plugged in long enough
without engine operation, the vehicle’s battery
will discharge sufficiently to degrade battery
life and/or prevent the engine from starting.
WARNING!
You or others can be badly burned by hot
engine coolant (antifreeze) or steam from your
radiator. If you see or hear steam coming from
under the hood, do not open the hood until
the radiator has had time to cool. Never try to
open a cooling system pressure cap when the
radiator or coolant bottle is hot.
CAUTION!
Driving with a hot cooling system could
damage your vehicle. If temperature gauge
reads “H”, pull over and stop the vehicle. Idle
the vehicle with the air conditioner turned off
until the pointer drops back into the normal
range. If the pointer remains on the “H”, turn
the engine off immediately, and call for
service.
23_GU_OM_EN_USC_t.book Page 195
Page 211 of 268

209
3. Disconnect the black cable terminal of the battery charger and then the red cable
terminal.
4. Refit the protective cover of the positive terminal of the battery and the access cover
to the battery compartment.
NOTE:
If a "quick-type" battery charger is used with the
battery fitted on the vehicle, before connecting it
disconnect both cables of the battery itself. Do
not use a "quick-type" battery charger to provide
the starting voltage.
VEHICLE MAINTENANCE
The following pages contain instructions on the
required maintenance from the technical
personnel who designed the vehicle.
In addition to these specific maintenance
instructions specified for routine scheduled
servicing, there are other components which may
require periodic maintenance or replacement
over the vehicle’s life cycle.
ENGINE OIL
Engine Oil Level Check
To ensure correct engine lubrication, the oil must
always be kept at the prescribed level
Ú
page 204.
Check the oil level at regular intervals, for
example every 1,864 miles (3,000 km).
It must be checked about five minutes after
stopping the engine.
Full operating temperature must be reached. The
vehicle must also be parked on as level a surface
as possible. The engine oil level can be checked using the
Information and Entertainment system. To
access the function, activate the main menu
(MENU button) and select the following options in
sequence:
1. “Vehicle Information”
2. “Engine Oil”
Ensure that the oil level is within the interval on
the dipstick between the minimum and maximum
limits (Quadrifoglio only).
Changing The Engine Oil
For the correct servicing intervals
Ú
page 200.
Choice Of Engine Oil Type
To ensure optimal performance and maximum
protection in all operating conditions, it is advised
to use certified engine oils
Ú
page 252.
Additives For Engine Oil
It is strongly recommended not to use additives
(other than leak detection dyes) with the engine
oil.
The engine oil is a product designed especially for
the vehicle, and its performance may be deteri -
orated through the use of further additives.
Disposal Of Used Engine Oil And Filters
For the disposal of the engine oil and filters,
contact the appropriate body to determine local
regulations.
NOTE:
Incorrectly disposed used engine oil may seri -
ously harm the environment.
ENGINE OIL FILTER
Replacing the Engine Oil Filter
The engine oil filter must be replaced each time
the engine oil is changed. It is advised to replace
it with a genuine spare part, specifically designed
for this vehicle.
ENGINE AIR CLEANER FILTER
Replacing the Engine Air Cleaner Filter
For the correct servicing intervals
Ú
page 200. It
is advised to replace the engine air cleaner filter
with a genuine spare part, specifically designed
for this vehicle.
AIR CONDITIONING SYSTEM
M
AINTENANCE
To ensure the best possible performance, the air
conditioning system must be checked and
undergo maintenance at an authorized dealer at
the beginning of the summer.
CAUTION!
Do not use chemicals to clean the air
conditioning system, since the internal
components may be damaged. This kind of
damage is not covered by warranty.
23_GU_OM_EN_USC_t.book Page 209
Page 214 of 268

SERVICING AND MAINTENANCE
212
(Continued)
EXHAUST SYSTEM
Adequate maintenance of the engine exhaust
system represents the best protection against
leaks of carbon monoxide into the passenger
compartment.
If an unusual noise from the exhaust or the
presence of smoke in the passenger
compartment is identified, or if the underbody or
rear section of the vehicle have been damaged,
have the entire exhaust system and adjoining
bodywork areas checked at an authorized dealer
to identify any components which are broken,
damaged, worn or have moved from their correct
fitting position.
Open welding or loose connections may permit
exhaust gas to enter the passenger
compartment.
Have the exhaust system checked every time the
vehicle is raised. Replace the components where
necessary (for these operations, contact an
authorized dealer).
In normal operating conditions, the catalytic
converter does not require maintenance. To
ensure that it operates correctly, and prevent it
from getting damaged, it is extremely important
that the engine operates perfectly.
To minimize the risk of damaging the catalytic
converter, proceed as follows:
Do not stop the engine or deactivate the
ignition with gear engaged and vehicle in
motion.
Do not attempt to start the engine by bump
starting.
Do not use the vehicle if irregular idling or
operating conditions are experienced.
COOLING SYSTEM
Coolant Check
Your vehicle has two cooling systems and both
need to be checked to ensure they are at proper
fill levels
Ú
page 204.
Check the engine coolant and intercooler coolant
level every oil change or before long trips.
If there are impurities in the engine coolant, the
system must be drained, flushed and refilled:
contact an authorized dealer.
Check the front part of the condenser for any
build-up of insects, leaves or other debris. Should
it be dirty, clean by spraying delicately with water.
Check the hoses of the engine/intercooler
cooling system to ensure that the rubber has not
deteriorated and that there are no cracks, tears,
cuts or obstructions in the expansion tank side
and radiator side connectors. Should there be
any doubt regarding leaks from the system (e.g. if
frequent top ups are required), have the seal
checked at an authorized dealer.
With the engine off and at normal operating
temperature, check that the cooling system
radiator cap is closed properly.
WARNING!
Exhaust gases can injure or kill. They contain
Carbon Monoxide (CO), which is colorless
and odorless. Breathing it can make you
unconscious and can eventually poison you.
A hot exhaust system can start a fire if you
park over materials that can burn. Such
materials might be grass or leaves coming
into contact with your exhaust system. Do not
park or operate your vehicle in areas where
your exhaust system can contact anything
that can burn.
WARNING!
You or others can be badly burned by hot
engine coolant (antifreeze) or steam from
your radiator. If you see or hear steam
coming from under the hood, do not open the
hood until the radiator has had time to cool.
Never open a cooling system pressure cap
when the radiator or coolant bottle is hot.
Keep hands, tools, clothing, and jewelry away
from the radiator cooling fan when the hood
is raised. The fan starts automatically and
may start at any time, whether the engine is
running or not.
When working near the radiator cooling fan,
disconnect the fan motor lead or turn the
ignition to the OFF position. The fan is
temperature controlled and can start at any
time the ignition is in the ON position.
WARNING!
Do not open hot engine cooling system.
Never add engine coolant (antifreeze) when
the engine is overheated. Do not loosen or
remove the cap to cool an overheated
engine. Heat causes pressure to build up in
the cooling system. To prevent scalding or
injury, do not remove the pressure cap while
the system is hot or under pressure.
23_GU_OM_EN_USC_t.book Page 212
Page 242 of 268

SERVICING AND MAINTENANCE
240
Dry the less visible parts (e.g. door frames, hood,
headlight frames, etc.) with special care, as water
may stagnate more easily in these areas. Do not
wash the vehicle after it has been left in the sun
or with the hood hot: this may alter the shine of
the paintwork.
NOTE:
Avoid parking under trees; the resin dropped by
trees makes the paintwork go opaque and
increases the possibility of corrosion.
Exterior plastic parts must be cleaned in the
same way as the rest of the vehicle.
If washing the vehicle in a service that moves the
vehicle, for vehicles with automatic
transmissions, proceed with the following
directions:
Ensure that the vehicle is on a flat surface.
Disable the automatic engagement of the
parking brake
Ú
page 89.
With the vehicle stationary, the gear in
NEUTRAL (N) and the brake pedal pressed,
push the START button.
NOTE:
The vehicle will remain in NEUTRAL (N) for
15 minutes before PARK (P) will be engaged
automatically.Windows
Use specific detergents and clean cloths to
prevent scratching or altering the transparency.
Front Headlights
Use a soft cloth soaked in water and detergent for
washing vehicles.
NOTE:
Never use aromatic substances (e.g. gasoline)
or ketones (e.g. acetone) for cleaning the
plastic lenses of the headlights.
When cleaning with a pressure washer, keep
the pressure washer at least eight inches
(20 cm) away from the headlights.
Engine Compartment
At the end of every Winter, wash the engine
compartment thoroughly, taking care not to aim
the jet of water directly at the electronic control
units or at the windshield wiper motors. Have this
operation performed at a specialized workshop
Ú
page 208.
NOTE:
The washing should take place with the engine
cold and the ignition device in the STOP position.
After the washing operation, make sure that the
various protections (e.g. rubber caps and guards)
have not been removed or damaged.
INTERIORS
Periodically check the cleanliness of the interior,
beneath the mats, which could cause oxidation of
the sheet metal.
SEATS AND FABRIC PARTS
Remove dust with a soft brush or a vacuum
cleaner. It is advised to use a moist brush on
velvet upholstery. Rub the seats with a sponge
moistened with a solution of water and neutral
detergent.
Cleaning heat press images on seats —
if equipped:
Due to the color, opacity and wear-resistant
protection with which the heat press images on
some seats are made, they may be subject to
temporary scratching if they are touched by finger
nails, keys, or other hard objects. In such cases,
the visible signs do not impair the profiled
images, and can easily be removed by wiping the
affected area with a microfiber cloth moistened
with water (not dry) to restore the seat to its
original condition. The microfiber cloth must not
have been previously soaked in other substances
or detergents.
CAUTION!
Wipe the rear window inside gently with a
cloth following the direction of the filaments to
avoid damaging the heating device.
23_GU_OM_EN_USC_t.book Page 240
Page 266 of 268

264
INDEX
Stop/Start System ..................................... 100
StorageConsole ..................................................... 56
Suggestions For Driving .............................138
Sun Roof ................................................ 60, 61
Supplemental Restraint System –
Air Bag......................................................... 163
Suspension .................................................245
Symbol Glossary ........................................... 14
Symbols .......................................................... 6
System, Remote Starting ............................. 23
T
Telescoping Steering Column...................... 29
Tilt Steering Column..................................... 29
Tire And Loading Information Placard ......227
Tire Markings..............................................224
Tire Safety Information .............................. 224
Tire Service Kit ...........................................189
Tires .................................182, 230, 234, 238 Aging (Life Of Tires) ................................ 233Air Pressure ............................................ 230
Changing.................................................189
Compact Spare ...................................... 234
General Information......................230, 234
High Speed ............................................. 231
Inflation Pressure...................................230Life Of Tires ............................................ 233
Load Capacity................................227, 228Pressure Monitoring System (TPMS) ...... 77
Quality Grading....................................... 238
Radial......................................................232
Replacement ..........................................234 Safety ............................................ 224, 230
Sizes ....................................................... 225
Snow Tires ............................................. 236
Spare Tires.................................... 234, 235
Spinning ................................................. 233
Trailer Towing ........................................ 136
Tread Wear Indicators........................... 233
Tongue Weight/Trailer Weight .................. 135
Towing ............................................... 133, 134 Disabled Vehicle.................................... 196
Towing Eyes ............................................... 197
TPMS (Tire Pressure Monitoring
System) ...................................................... 155
Traction Control System (TCS) .................. 144
Traffic Jam Assist System ......................... 114
Traffic Sign Recognition System ............... 117
Trailer Towing............................................. 133 Hitches ................................................... 134
Minimum Requirements ....................... 135Tips ......................................................... 137
Trailer And Tongue Weight........... 134, 135
Wiring ..................................................... 136
Trailer Towing Guide.................................. 134
Trailer Weight............................................. 134
Transmission ............................................. 244
Transporting Pets ...................................... 180
Tread Wear Indicators ............................... 233
Turn Signals ........................................... 45, 78
U
Uconnect Settings Customer Programmable Features.........26
Passive Entry Programming.....................26
Uniform Tire Quality Grades...................... 238 Universal Garage Door Opener
(HomeLink®)
b.......................................... 40
Universal Transmitter .................................. 40
Untwisting Procedure, Seat Belt ............... 160
Use Of The Owner’s Manual........................... 5
V
Vehicle Changes/Alterations ......................... 4
Vehicle Identification Number .................. 242
Vehicle Loading ................................. 132, 228
W
Warning Lights
(Instrument Cluster Descriptions) .............. 76
Warnings, Roll Over ........................................ 3
Warranty Information ................................ 257
Washer Fluid For Windshield/
Headlights .................................................. 206
Washers, Windshield .............................47, 48
Weights ....................................................... 248
Wheel And Wheel Tire Care....................... 235
Wheel And Wheel Tire Trim ....................... 235
Wheels And Tires ....................................... 224
Wind Buffeting ............................................. 59
Windows Power........................................................ 59
Windows (Cleaning) ................................... 239
Windshield Defroster ................................. 180
Windshield Washers .................................... 48
Windshield Wiper Replacing Blades ................................... 211
Windshield Wipers ....................................... 47
Wipers, Rain Sensitive................................. 48
Wireless Charging Pad ................................ 58
23_GU_OM_EN_USC_t.book Page 264