2023 ALFA ROMEO GIULIA ESP
[x] Cancel search: ESPPage 87 of 248
85
In addition to engaging the EPB, along with
steering and positioning chocks in front of the
wheels (when on a steep slope), you must always
place the vehicle in the PARK (P) mode before
leaving.
Should the vehicle battery be faulty, the battery
must be replaced in order to unlock the EPB.
Engaging The EPB Manually
Briefly pull the switch located on the center
console to manually engage the EPB when the
vehicle is stationary.
Noise may be heard from the rear of the vehicle
when engaging the EPB.
A slight movement of the brake pedal may be
detected when engaging the EPB with the brake
pedal pressed.
With the EPB engaged, the Brake Warning Light
on the instrument panel and the switch will
illuminate.
If, under exceptional circumstances, the use of
the brake is required with the vehicle in motion,
keep the switch on the center console pulled as
long as the brake action is necessary.
The Brake Warning Light may turn on with the
hydraulic system temporarily unavailable; in this
case braking is controlled by the motors.The brake lights will also automatically turn on in
the same way as for normal braking with the use
of the brake pedal.
Release the switch on the center console to stop
the braking action with the vehicle in motion.
If, through this procedure, the vehicle is braked
until a speed below 1.9 mph (3 km/h) is reached
and the switch is kept pulled, the parking brake
will definitively engage.
Disengaging The EPB Manually
In order to manually release the parking brake,
the ignition should be in the ACC position. Press
the brake pedal, and then push the switch on the
center console briefly.
Noise may be heard from the rear of the vehicle,
and a slight movement of the brake pedal may be
detected during disengagement.
After disengaging the Electric Park Brake, the
Brake Warning Light on the instrument panel and
the light on the switch will turn off.
If the Brake Warning Light on the instrument
panel remains on with the EPB disengaged, this
indicates a fault: in this case, contact an
authorized dealer.
CAUTION!
With the EPB failure warning light on, some
functions of the EPB are deactivated. In this
case the driver is responsible for engaging the
EPB manually to ensure the vehicle is safely
and properly parked.
WARNING!
Driving the vehicle with the parking brake
engaged, or repeated use of the parking brake
to slow the vehicle may cause serious damage
to the brake system. Be sure the parking brake
is fully disengaged before driving; failure to do
so can lead to brake failure and a collision.
WARNING!
Never use the PARK position as a substitute
for the parking brake. Always apply the
parking brake fully when parked to guard
against vehicle movement and possible
injury or damage.
When exiting the vehicle, always turn the
ignition OFF, secure the key fob, and lock
your vehicle.
Never leave children alone in a vehicle, or
with access to an unlocked vehicle. Allowing
children to be in a vehicle unattended is
dangerous for a number of reasons. A child
or others could be seriously or fatally injured.
Children should be warned not to touch the
parking brake, brake pedal or the gear
selector.
Do not leave the key fob in or near the
vehicle, or in a location accessible to
children, and do not leave a vehicle
equipped with a keyless ignition system in
the ON/RUN position. A child could operate
power windows, other controls, or move the
vehicle.
Be sure the parking brake is fully disengaged
before driving; failure to do so can lead to
brake failure and a collision.
Always fully apply the parking brake when
leaving your vehicle, or it may roll and cause
damage or injury. Also be certain to leave the
transmission in PARK. Failure to do so may
allow the vehicle to roll and cause damage or
injury.
23_GA_OM_EN_USC_t.book Page 85
Page 89 of 248
87
DISPLAY
The following information is shown on the
dedicated area of the display:
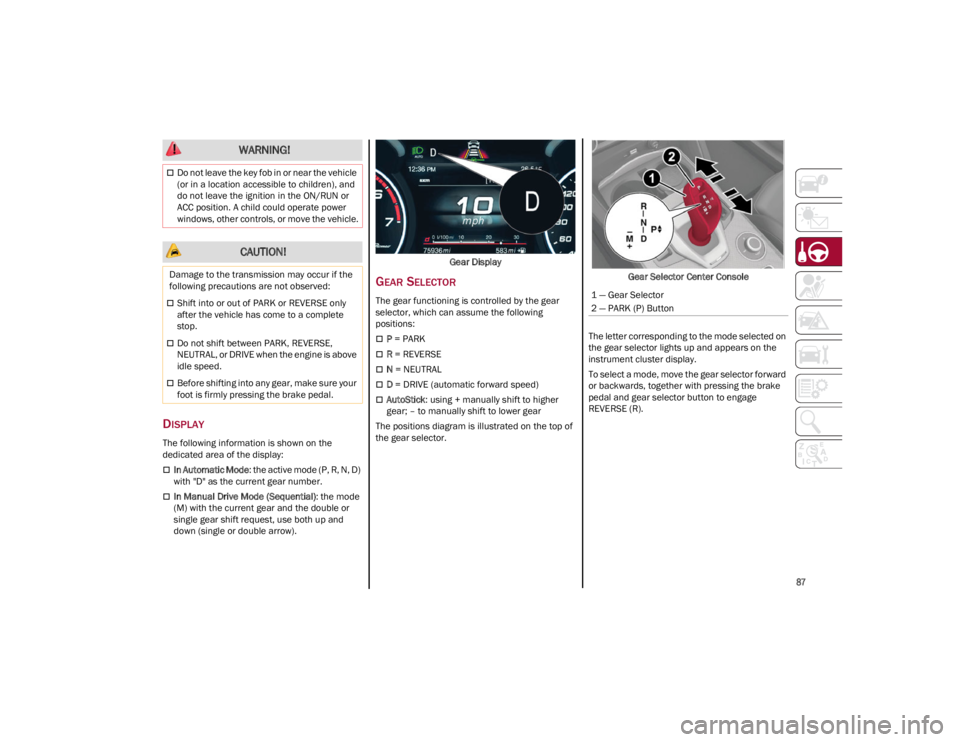
In Automatic Mode: the active mode (P, R, N, D)
with "D" as the current gear number.
In Manual Drive Mode (Sequential) : the mode
(M) with the current gear and the double or
single gear shift request, use both up and
down (single or double arrow). Gear Display
GEAR SELECTOR
The gear functioning is controlled by the gear
selector, which can assume the following
positions:
P
= PARK
R = REVERSE
N = NEUTRAL
D = DRIVE (automatic forward speed)
AutoStick : using + manually shift to higher
gear; – to manually shift to lower gear
The positions diagram is illustrated on the top of
the gear selector. Gear Selector Center Console
The letter corresponding to the mode selected on
the gear selector lights up and appears on the
instrument cluster display.
To select a mode, move the gear selector forward
or backwards, together with pressing the brake
pedal and gear selector button to engage
REVERSE (R).
Do not leave the key fob in or near the vehicle
(or in a location accessible to children), and
do not leave the ignition in the ON/RUN or
ACC position. A child could operate power
windows, other controls, or move the vehicle.
CAUTION!
Damage to the transmission may occur if the
following precautions are not observed:
Shift into or out of PARK or REVERSE only
after the vehicle has come to a complete
stop.
Do not shift between PARK, REVERSE,
NEUTRAL, or DRIVE when the engine is above
idle speed.
Before shifting into any gear, make sure your
foot is firmly pressing the brake pedal.
WARNING!
1 — Gear Selector
2 — PARK (P) Button
23_GA_OM_EN_USC_t.book Page 87
Page 91 of 248
89
REVERSE (R)
Select this mode only with the vehicle at a
standstill.
NEUTRAL (N)
Use this range when the vehicle is standing for
prolonged periods with the engine running. The
engine may be started in this range. Apply the Electric Park Brake and shift the transmission
into PARK (P) if you must leave the vehicle.
DRIVE (D)
Use this mode in normal driving conditions.
Shifting from DRIVE (D) to PARK (P) or REVERSE
(R) modes must take place only after releasing
the accelerator pedal, with vehicle at a standstill
and brake pedal pressed.
This mode ensures automatic engagement of the
most suitable gears for driving needs and
maximum fuel economy in terms of consumption.
In this position, the transmission shifts the gears
automatically, selecting the most suitable for
forward driving among those available as you go.
This ensures the vehicle's optimal driving charac
-
teristics are provided for all conditions.
AutoStick
In the case of frequent shifting (e.g. for sport
driving, when the vehicle is driven with a heavy
load or on slopes), it is recommended to use the
AutoStick (sequential shifting) mode to select and
keep a lower fixed ratio.
In these conditions, the use of a lower gear
improves vehicle performance, preventing
overheating. It is possible to shift from DRIVE (D) mode to
sequential mode regardless of vehicle speed.
Activation
Starting from DRIVE (D), move the selector to the
left (– and + indication of the trim) to activate the
sequential drive mode. The gear engaged will be
shown on the display.
Shifting is made by moving the gear selector
forwards, towards symbol – or backwards,
towards symbol +.
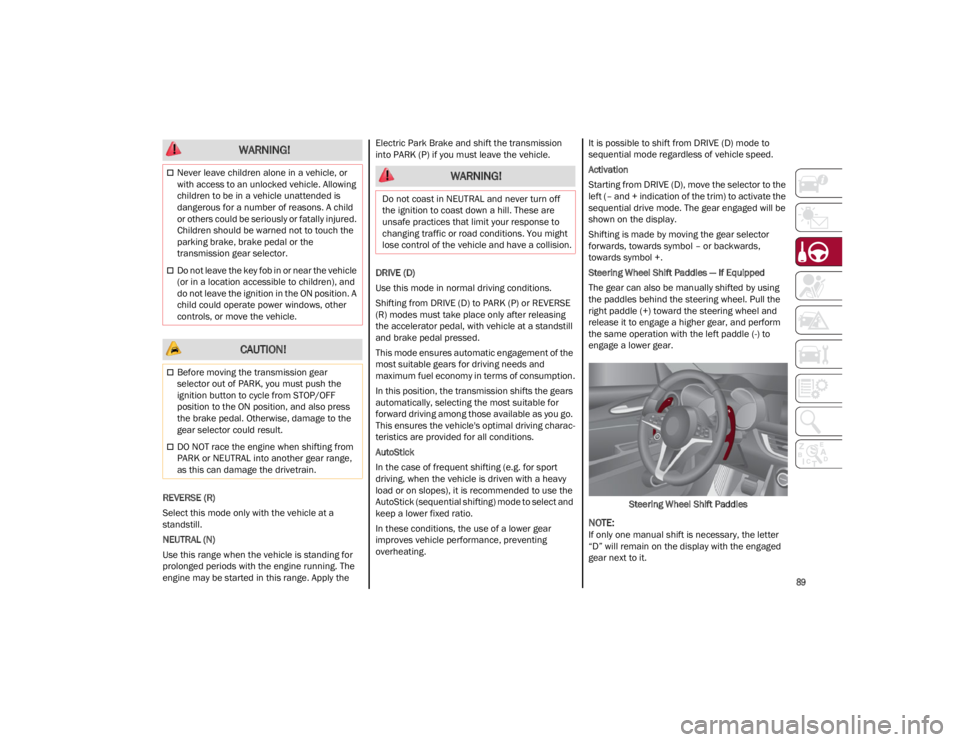
Steering Wheel Shift Paddles — If Equipped
The gear can also be manually shifted by using
the paddles behind the steering wheel. Pull the
right paddle (+) toward the steering wheel and
release it to engage a higher gear, and perform
the same operation with the left paddle (-) to
engage a lower gear.
Steering Wheel Shift Paddles
NOTE:
If only one manual shift is necessary, the letter
“D” will remain on the display with the engaged
gear next to it.
Never leave children alone in a vehicle, or
with access to an unlocked vehicle. Allowing
children to be in a vehicle unattended is
dangerous for a number of reasons. A child
or others could be seriously or fatally injured.
Children should be warned not to touch the
parking brake, brake pedal or the
transmission gear selector.
Do not leave the key fob in or near the vehicle
(or in a location accessible to children), and
do not leave the ignition in the ON position. A
child could operate power windows, other
controls, or move the vehicle.
CAUTION!
Before moving the transmission gear
selector out of PARK, you must push the
ignition button to cycle from STOP/OFF
position to the ON position, and also press
the brake pedal. Otherwise, damage to the
gear selector could result.
DO NOT race the engine when shifting from
PARK or NEUTRAL into another gear range,
as this can damage the drivetrain.
WARNING!
WARNING!
Do not coast in NEUTRAL and never turn off
the ignition to coast down a hill. These are
unsafe practices that limit your response to
changing traffic or road conditions. You might
lose control of the vehicle and have a collision.
23_GA_OM_EN_USC_t.book Page 89
Page 95 of 248
93
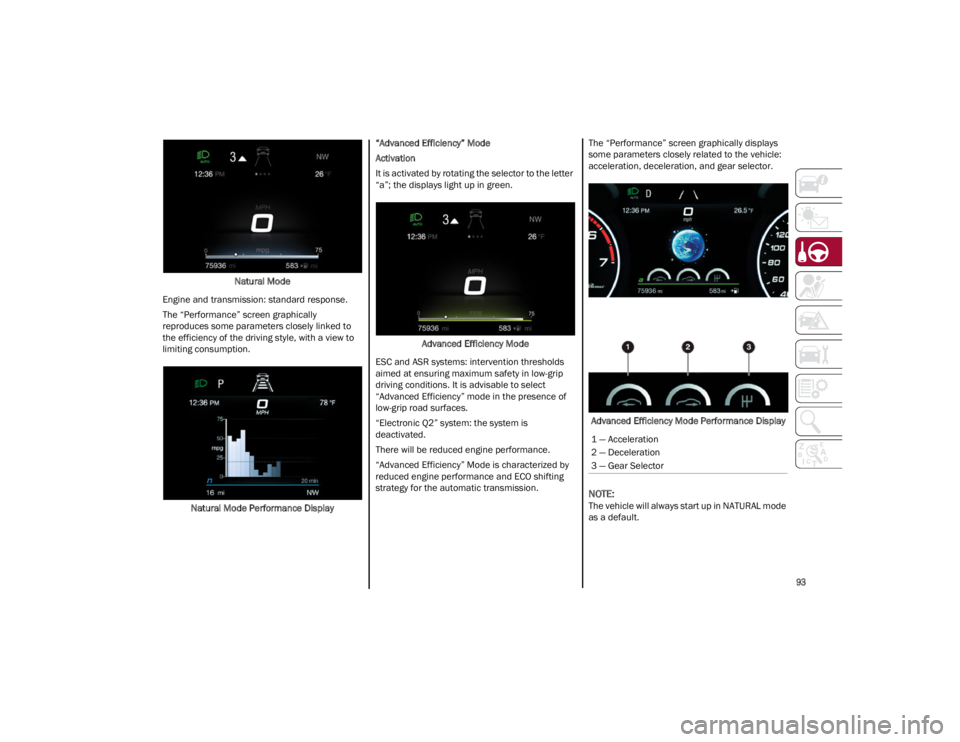
Natural Mode
Engine and transmission: standard response.
The “Performance” screen graphically
reproduces some parameters closely linked to
the efficiency of the driving style, with a view to
limiting consumption.
Natural Mode Performance Display “Advanced Efficiency” Mode
Activation
It is activated by rotating the selector to the letter
“a”; the displays light up in green.
Advanced Efficiency Mode
ESC and ASR systems: intervention thresholds
aimed at ensuring maximum safety in low-grip
driving conditions. It is advisable to select
“Advanced Efficiency” mode in the presence of
low-grip road surfaces.
“Electronic Q2” system: the system is
deactivated.
There will be reduced engine performance.
“Advanced Efficiency” Mode is characterized by
reduced engine performance and ECO shifting
strategy for the automatic transmission. The “Performance” screen graphically displays
some parameters closely related to the vehicle:
acceleration, deceleration, and gear selector.
Advanced Efficiency Mode Performance Display
NOTE:
The vehicle will always start up in NATURAL mode
as a default.
1 — Acceleration
2 — Deceleration
3 — Gear Selector
23_GA_OM_EN_USC_t.book Page 93
Page 97 of 248
95
OPERATING MODE
Stopping the Engine
With the vehicle at a standstill and brake pedal
pressed, the Stop/Start system shuts off the
engine if the gear selector is in a position other
than REVERSE (R).
The system does not operate when the gear
selector is in REVERSE (R), in order to make
parking maneuvers easier.
In the event of uphill stops, the Stop/Start system
is disabled to make the “Hill Start Assist” function
available (works only with running engine).
NOTE:
The engine can only be automatically stopped
after having run at about 6 mph (10 km/h). After
an automatic restart, the vehicle only needs to
exceed a speed of 0.3 mph (0.5 km/h) to stop the
engine.
Engine stopping is signaled by the symbol
lighting up on the instrument cluster display.
Restarting the Engine
To restart the engine, release the brake pedal or
turn the steering wheel slightly (if equipped).
With the brake pressed and the transmission in
automatic mode DRIVE (D), the engine will restart
by shifting to REVERSE (R), to PARK (P) or to
“AutoStick”.
With the brake pressed while the gear selector is
in “AutoStick” mode, the engine will restart by
shifting to PARK (P) or by moving the selector
to + or -.
SYSTEM MANUAL ACTIVATION/
D
EACTIVATION
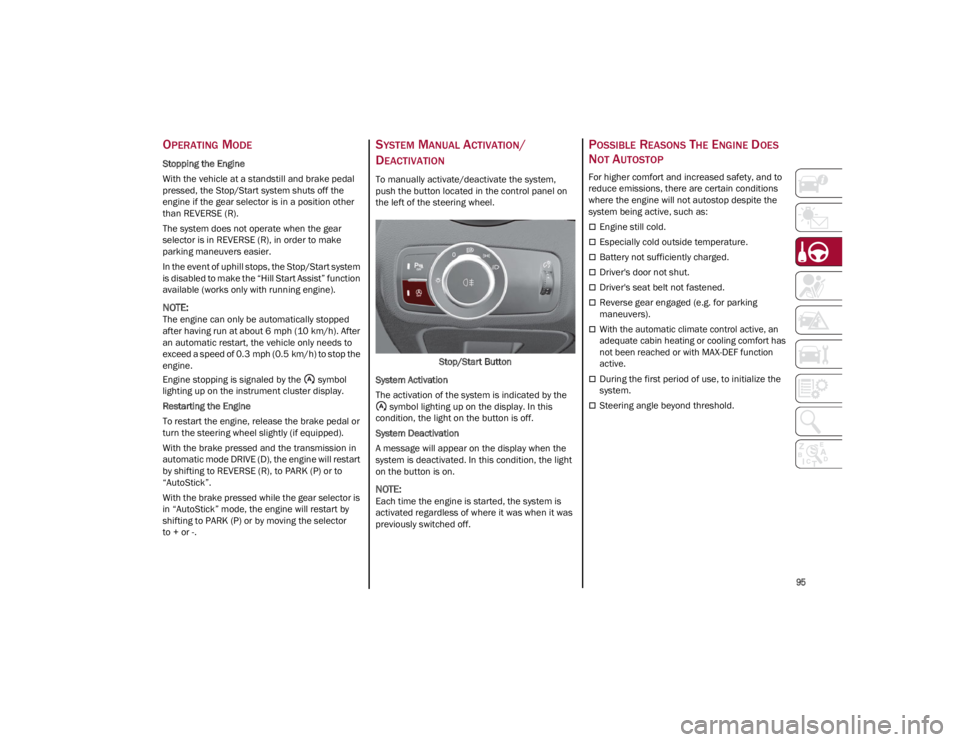
To manually activate/deactivate the system,
push the button located in the control panel on
the left of the steering wheel.
Stop/Start Button
System Activation
The activation of the system is indicated by the symbol lighting up on the display. In this
condition, the light on the button is off.
System Deactivation
A message will appear on the display when the
system is deactivated. In this condition, the light
on the button is on.
NOTE:
Each time the engine is started, the system is
activated regardless of where it was when it was
previously switched off.
POSSIBLE REASONS THE ENGINE DOES
N
OT AUTOSTOP
For higher comfort and increased safety, and to
reduce emissions, there are certain conditions
where the engine will not autostop despite the
system being active, such as:
Engine still cold.
Especially cold outside temperature.
Battery not sufficiently charged.
Driver's door not shut.
Driver's seat belt not fastened.
Reverse gear engaged (e.g. for parking
maneuvers).
With the automatic climate control active, an
adequate cabin heating or cooling comfort has
not been reached or with MAX-DEF function
active.
During the first period of use, to initialize the
system.
Steering angle beyond threshold.
23_GA_OM_EN_USC_t.book Page 95
Page 102 of 248

STARTING AND OPERATING
100
(Continued)
ADAPTIVE CRUISE CONTROL (ACC)
The Adaptive Cruise Control (ACC) is a driver
assist system that combines the Cruise Control
functions with controlling the distance from the
vehicle ahead. ACC will adjust the vehicle speed
up to the preset speed to maintain a distance
with the vehicle ahead. ACC increases the driving
convenience provided by Cruise Control while
traveling on highways and major roadways.
However, it is not a safety system and not
designed to prevent collisions. The Cruise Control
function performs differently
Ú
page 98.
ACC will allow you to keep Cruise Control engaged
in light to moderate traffic conditions without the
constant need to reset your Cruise Control. ACC
uses a radar sensor located behind the front
bumper and a camera located in the center/
upper part of the windshield, to detect the
presence of a vehicle close ahead.
The system sets and holds the vehicle at the
desired speed without needing to press the
accelerator. It also sets and holds a distance
from the vehicle ahead (these settings are set by
the driver). Front Bumper Radar Location
Windshield Camera Location
If the system detects a vehicle ahead, it will
automatically intervene by slightly braking or
accelerating in order to maintain the preset
distance. It will not exceed the original set speed
when adapting to the speed of the vehicle ahead.
NOTE:
Adaptive Cruise Control performance is not guar -
anteed under the following circumstances. You
should not utilize the ACC system when:
Driving in fog, heavy rain, sleet, or snow.
Driving in heavy traffic and complex driving
situations (e.g., in construction zones).
Driving on icy, snowy, slippery roads, roads
with steep inclines or downhill slopes, or roads
with numerous turns and bends.
Entering a turn lane or highway off-ramp.
When circumstances do not allow safe driving
at a constant speed
Ú
page 239.
WARNING!
Adaptive Cruise Control (ACC) is a
convenience system. It is not a substitute for
active driver involvement. It is always the
driver’s responsibility to be attentive of road,
traffic, and weather conditions, vehicle
speed, distance to the vehicle ahead and,
most importantly, brake operation to ensure
safe operation of the vehicle under all road
conditions. Your complete attention is
always required while driving to maintain
safe control of your vehicle. Failure to follow
these warnings can result in a collision and
death or serious personal injury.
The ACC system:
• Does not react to pedestrians, oncoming
vehicles, and stationary objects (e.g., a stopped vehicle in a traffic jam or a disabled vehicle).
23_GA_OM_EN_USC_t.book Page 100
Page 105 of 248

103
(Continued)
To Resume
Once the system has been canceled but not
deactivated, to resume a previously set speed,
simply push the RES/SET switch upward and
remove your foot from the accelerator to recall it.
The system will be set to the last stored speed.
Setting The Distance Between Vehicles
The distance between your vehicle and the
vehicle ahead may be set to one bar (short), two
bars (medium), three bars (long), or four bars
(maximum).Distance Icons The distances from the vehicle ahead are propor
-
tional to speed.
The interval of time with relation to the vehicle
ahead remains constant and varies from one
second (for the short distance one-bar setting) to
two seconds (for the maximum distance four-bar
setting).
The set distance is shown on the display by a
dedicated icon.
The setting is four bars (maximum) the first time
the system is used. After the distance has been
modified by the driver, the new distance will be
stored even if the system is deactivated and
reactivated.
To Decrease The Distance
Push and release the distance button to decrease
the distance setting. The distance setting
decreases by one bar (shorter) every time the
button is pushed.
Distance Button
The set speed is held if there are no vehicles
ahead. Once the shortest distance has been
selected, the next push of the button will set the
maximum distance. If a slower vehicle is detected in the same lane,
the vehicle icon on the display illuminates from
grey to white. The system automatically adjusts
the vehicle’s speed to keep the set distance,
independently of the set speed.
The vehicle holds the set distance until:
The vehicle ahead accelerates to a speed
higher than the set speed.
The vehicle ahead leaves the lane or the
detection field of the Adaptive Cruise Control
system sensor.
The distance setting is changed.
The Adaptive Cruise Control system is
deactivated/paused.
WARNING!
The Resume function should only be used if
traffic and road conditions permit. Resuming a
set speed that is too high or too low for
prevailing traffic and road conditions could
cause the vehicle to accelerate or decelerate
too sharply for safe operation. Failure to follow
these warnings can result in a collision and
death or serious personal injury.
WARNING!
The maximum braking applied by the system
is limited. The driver may apply the brakes in
all cases if needed.
If the system predicts that the braking level is
insufficient to hold the set distance, either
“BRAKE!” or a dedicated message is
displayed to warn the driver of approaching
the vehicle ahead. An acoustic signal is also
emitted. In this case, it is advised to brake
immediately as necessary to hold a safe
distance from the vehicle ahead.
The driver is responsible for ensuring that
there are no pedestrians, other vehicles or
objects along the direction of the vehicle.
Failure to comply with these precautions may
cause serious accidents and injuries.
23_GA_OM_EN_USC_t.book Page 103
Page 106 of 248

STARTING AND OPERATING
104
Overtake Aid
When driving with ACC engaged and following a
vehicle at a speed greater than 45 mph (70 km/h),
the system will provide an additional acceleration
up to the ACC set speed to assist in passing the
vehicle. This additional acceleration is triggered
when the driver utilizes the left turn signal and will
only be active when passing on the left hand side.
The system detects the direction of traffic
automatically when the vehicle passes from left
hand traffic to right hand traffic. In this case, the
overtaking assist function is only active when the
reference vehicle is overtaken on the right. The
additional acceleration is deactivated when the
driver uses the right direction indicator and
returns to the original lane.
Stop And Go Function
The Stop and Go operating strategy allows you to
maintain a safe distance from the vehicle ahead
until the vehicle has completely stopped.
In the event that the ACC system brings your
vehicle to a standstill while following the vehicle
in front, if the vehicle in front starts moving within
two seconds of your vehicle coming to a
standstill, your vehicle will resume motion
without the need for any driver action.If the vehicle in front does not start moving within
two seconds of your vehicle coming to a
standstill, the driver will have to push the RES/
SET switch upward to restart.
Deactivation
The system is deactivated and the set speed is
canceled if:
The on/off button is pushed (when the system
is on or paused)
The ignition is placed in the OFF position
RACE mode is activated (Quadrifoglio models)
The system is canceled (the set speed and
distance are stored):
When the system is paused
Ú
page 101
When the conditions shown in the “Activating
Adaptive Cruise Control (ACC)” section occur
Ú
page 101
Limited Operation Warning
If the dedicated message is shown on the display,
a condition limiting the Adaptive Cruise Control
operation may have occurred. This could be due to an obstruction of the
vehicle’s sensor or camera. It could also be due
to a fault in the system. If an obstruction is
detected, clean the area of the windshield
opposite the interior rearview mirror, where the
camera is located, as well as the area of the front
bumper where the sensor is located. Then check
that the message has disappeared.
When the conditions limiting the system
functions end, normal operation will resume.
Should the fault persist, contact an authorized
dealer.
Precautions While Driving With ACC
In certain driving situations, ACC may have
detection issues. In these cases, ACC may brake
late or unexpectedly. The driver needs to stay
alert and may need to intervene. The following
are examples of these types of situations:
Offset Driving
ACC may not detect a vehicle in the same lane
that is offset from your direct line of travel, or a
vehicle merging in from a side lane. There may
not be sufficient distance to the vehicle ahead.
The offset vehicle may move in and out of the line
of travel, which can cause your vehicle to brake or
accelerate unexpectedly.
Turns And Bends
When driving on a curve with ACC engaged, the
system may increase or decrease the vehicle
speed for stability, with no vehicle ahead
detected. Once the vehicle is out of the curve the
system will resume your original set speed. This is
a part of normal ACC system functionality.
The driver is fully responsible for holding a
safe distance from the vehicle ahead
respecting the highway code in force in the
respective country.
WARNING!
WARNING!
When the ACC system is resumed, the driver
must ensure that there are no pedestrians,
vehicles or objects in the path of the vehicle.
Failure to follow these warnings can result in a
collision and death or serious personal injury.
23_GA_OM_EN_USC_t.book Page 104