2023 ALFA ROMEO GIULIA trunk release
[x] Cancel search: trunk releasePage 63 of 248

61
CLOSING THE HOOD
To close, lower the hood to approximately
16 inches (40 cm) from the engine compartment
then let it drop. Make sure that the hood is
completely closed and fully latched.
NOTE:
Since the hood is equipped with a double locking
system, one for each side, check that it is closed
on both its sides.
TRUNK
The trunk unlocking is electrically operated and is
deactivated when the vehicle is in motion.
OPENING
Opening From The Outside
When unlocked, the trunk lid can be opened from
outside the vehicle using the exterior trunk lid
release button located between the plate lights.
Push the button until you hear a “click.” The trunk
lid can also be opened by quickly pushing the
trunk lid release button on the key fob twice.Exterior Trunk Lid Release Button
The turn signal indicators will blink and the
interior lights will turn on when the trunk lid is
opened. They turn off automatically when the
trunk lid is closed.
The interior lights turn off automatically after a
few minutes if the trunk lid is left open.
Opening From The Inside
When unlocked, the trunk lid can be opened from
inside the vehicle using the interior trunk lid
release button, located under the dashboard
near the engine hood opening lever. Push the
trunk lid release button until you hear a “click.” Interior Trunk Lid Release Button
Trunk Lid Emergency Release
In the event of an individual being locked inside
the trunk, the trunk can be opened by actuating a
glow-in-the-dark lever in the interior lock cover on
the trunk lid.
Emergency Release Button
Pull the lever in the direction indicated by the
arrow to open the trunk lid.
WARNING!
Be sure the hood is fully latched before driving
your vehicle. If the hood is not fully latched, it
could open when the vehicle is in motion and
block your vision. Failure to follow this warning
could result in serious injury or death.
23_GA_OM_EN_USC_t.book Page 61
Page 64 of 248

GETTING TO KNOW YOUR VEHICLE
62
CLOSING
Grip one of the trunk lid interior handles and pull
the trunk lid down until it is low enough to place
your hands on the exterior surface of the trunk.
Use your hands to then push the trunk lid down
until you hear the lock latch into place.Trunk Lid Interior Handles
NOTE:
It will not be possible to open the trunk lid with
the key fob or by pushing the interior trunk lid
release button when the battery is disconnected.
Always position the manual trunk lid opening
strap on the trunk lid lock before disconnecting
the battery
Ú
page 220.
Before closing the trunk lid, make sure your key
fob is not inside the trunk. If the key fob is
detected, the trunk lid will latch then automati -
cally unlock so that the key fob cannot be locked
in the trunk.
TRUNK RE-INITIALIZATION
NOTE:
If the battery is disconnected or the protection
fuse blows, the trunk lid opening/closing mecha -
nism must be re-initialized as follows:
1. Close all the doors and the trunk lid.
2. Push the lock button on the remote control.
3. Push the unlock button on the remote control.
TRUNK SPECIFICATIONS
Access To The Tire Service Kit (Quadrifoglio
Models)
To access the Tire Service Kit, lift the carpet in the
trunk
Ú
page 171.
Cargo Area (Quadrifoglio Models) Rear Cargo Tie–Downs — If Equipped
There are four hooks inside the trunk for
attaching the cargo net or cables which can
safely secure the cargo.
Rear Cargo Tie-Downs
NOTE:
Do not apply a load greater than 22 lb (10 kg) on
a single hook.
Cargo Net — If Equipped
This is useful for correctly arranging the cargo
and/or for transporting light materials.
23_GA_OM_EN_USC_t.book Page 62
Page 127 of 248

125
Opening The Fuel Filler Door
To refuel proceed as follows:
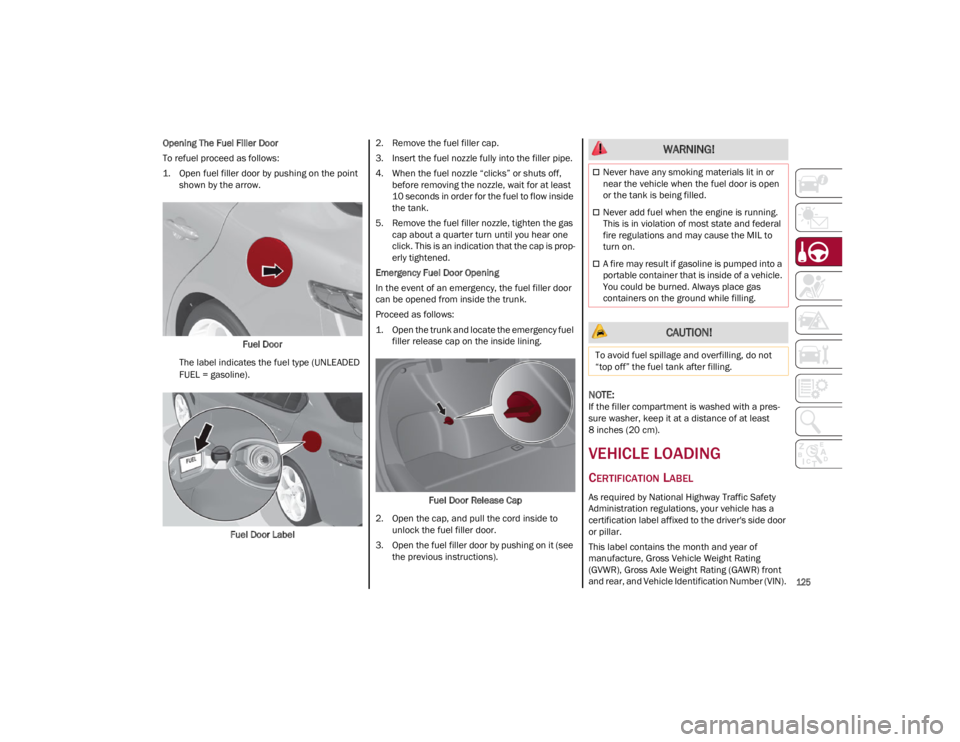
1. Open fuel filler door by pushing on the point shown by the arrow.
Fuel Door
The label indicates the fuel type (UNLEADED
FUEL = gasoline).
Fuel Door Label 2. Remove the fuel filler cap.
3. Insert the fuel nozzle fully into the filler pipe.
4. When the fuel nozzle “clicks” or shuts off,
before removing the nozzle, wait for at least
10 seconds in order for the fuel to flow inside
the tank.
5. Remove the fuel filler nozzle, tighten the gas cap about a quarter turn until you hear one
click. This is an indication that the cap is prop -
erly tightened.
Emergency Fuel Door Opening
In the event of an emergency, the fuel filler door
can be opened from inside the trunk.
Proceed as follows:
1. Open the trunk and locate the emergency fuel filler release cap on the inside lining.
Fuel Door Release Cap
2. Open the cap, and pull the cord inside to unlock the fuel filler door.
3. Open the fuel filler door by pushing on it (see the previous instructions).
NOTE:
If the filler compartment is washed with a pres -
sure washer, keep it at a distance of at least
8 inches (20 cm).
VEHICLE LOADING
CERTIFICATION LABEL
As required by National Highway Traffic Safety
Administration regulations, your vehicle has a
certification label affixed to the driver's side door
or pillar.
This label contains the month and year of
manufacture, Gross Vehicle Weight Rating
(GVWR), Gross Axle Weight Rating (GAWR) front
and rear, and Vehicle Identification Number (VIN).
WARNING!
Never have any smoking materials lit in or
near the vehicle when the fuel door is open
or the tank is being filled.
Never add fuel when the engine is running.
This is in violation of most state and federal
fire regulations and may cause the MIL to
turn on.
A fire may result if gasoline is pumped into a
portable container that is inside of a vehicle.
You could be burned. Always place gas
containers on the ground while filling.
CAUTION!
To avoid fuel spillage and overfilling, do not
“top off” the fuel tank after filling.
23_GA_OM_EN_USC_t.book Page 125
Page 195 of 248

193
LUBRICATING MOVING PARTS OF THE
B
ODYWORK
Ensure that the locks and bodywork junction
points, including components such as the seat
guides, door hinges (and rollers), trunk and hood
are periodically lubricated with lithium-based
grease to ensure correct, silent operation and to
protect them from rust and wear.
Thoroughly clean the components, eliminating
every trace of dirt and dust. After lubricating,
eliminate excess oil and grease. Also pay
particular attention to the hood closing devices,
to ensure correct operation. During operations on
the hood, to be carried out with the engine cold,
also remember to check, clean and lubricate the
locking, release and safety devices.
Lubricate the external lock barrels twice a year.
Apply a small amount of high-quality lubricant
directly into the lock barrel.
If necessary, contact an authorized dealer as
soon as possible.
WINDSHIELD WIPER
Periodically clean the windshield and rear window
and rubber profile of the windshield wiper blades,
using a sponge or a soft cloth and a non-abrasive
detergent. This eliminates the salt or impurities
accumulated when driving.
Prolonged operation of the windshield window
wipers with dry glass may cause the deterioration
of the blades, in addition to abrasion of the
surface of the glass. To eliminate the impurities
on the dry glass, always operate the windshield
washers. In the event of very low outdoor temperatures,
below 0°F (-17.8°C), ensure that the movement
of the rubber part in contact with the glass is not
obstructed. Use a suitable deicing product to
release it if required.
Avoid using the windshield wipers to remove frost
or ice.
Also avoid contact of the rubber profile of the
blades with petroleum derivatives such as engine
oil, gas, etc.
NOTE:
The life of the windshield wiper blades varies
according to the usage frequency. In any case, it
is advised to replace the blades approximately
once a year. When the blades are worn, noise,
marks on the glass or streaks of water may be
noticed. In the presence of these conditions,
clean the windshield wiper blades or, if neces
-
sary, replace them.
Raising The Windshield Wiper Blades (“Service
Position” Function)
The “service position” function allows the driver
to replace the windshield wiper blades more
easily. It is also recommended to activate this
function when it is snowing and to make it easier
to remove any dirt deposits in the area where the
blades are normally positioned, when washing. Activation Of The Function
To activate this function, disable the windshield
wiper before setting the ignition device to OFF.
This function can only be activated within two
minutes of placing the ignition in OFF.
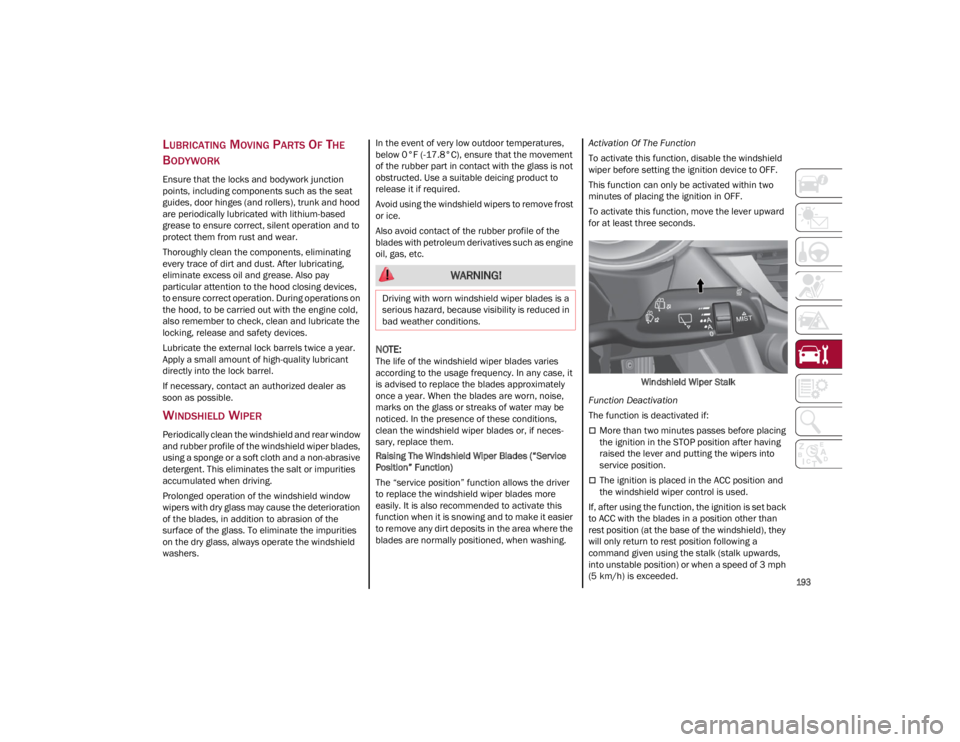
To activate this function, move the lever upward
for at least three seconds.
Windshield Wiper Stalk
Function Deactivation
The function is deactivated if:
More than two minutes passes before placing
the ignition in the STOP position after having
raised the lever and putting the wipers into
service position.
The ignition is placed in the ACC position and
the windshield wiper control is used.
If, after using the function, the ignition is set back
to ACC with the blades in a position other than
rest position (at the base of the windshield), they
will only return to rest position following a
command given using the stalk (stalk upwards,
into unstable position) or when a speed of 3 mph
(5 km/h) is exceeded.
WARNING!
Driving with worn windshield wiper blades is a
serious hazard, because visibility is reduced in
bad weather conditions.
23_GA_OM_EN_USC_t.book Page 193
Page 200 of 248

SERVICING AND MAINTENANCE
198
The pliers have two different ends, both of which
are specifically designed to remove the different
types of fuses present in the vehicle:Fuse Extracting Pliers
After use, return the pliers to their proper position
using the following procedure:
Grab the pliers from the upper tabs and insert
them into their housing.
Push downward on the pliers into their housing
until they click into place.
Fuse Location
The fuses, which can be replaced by the user, are
grouped in two boxes below the passenger side
foot board and inside the trunk.
Control Unit Under Passenger Side
Footboard
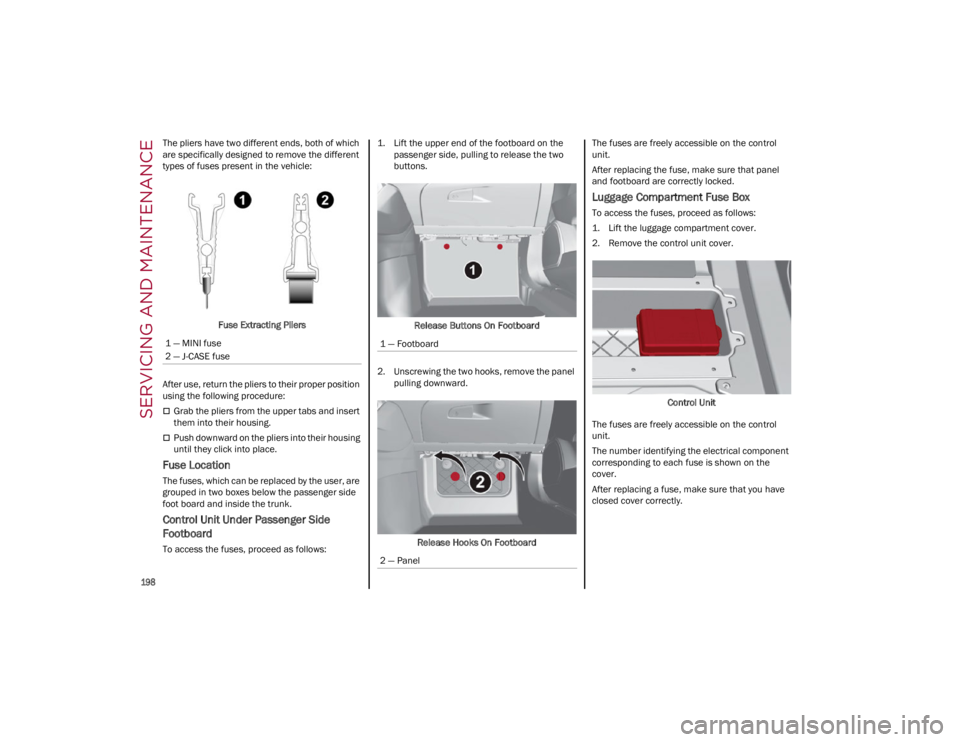
To access the fuses, proceed as follows: 1. Lift the upper end of the footboard on the
passenger side, pulling to release the two
buttons.
Release Buttons On Footboard
2. Unscrewing the two hooks, remove the panel pulling downward.
Release Hooks On Footboard The fuses are freely accessible on the control
unit.
After replacing the fuse, make sure that panel
and footboard are correctly locked.
Luggage Compartment Fuse Box
To access the fuses, proceed as follows:
1. Lift the luggage compartment cover.
2. Remove the control unit cover.
Control Unit
The fuses are freely accessible on the control
unit.
The number identifying the electrical component
corresponding to each fuse is shown on the
cover.
After replacing a fuse, make sure that you have
closed cover correctly.
1 — MINI fuse
2 — J-CASE fuse
1 — Footboard
2 — Panel
23_GA_OM_EN_USC_t.book Page 198
Page 223 of 248

221
Manual Trunk Opening Device
Proceed as follows if the battery needs to be
disconnected:
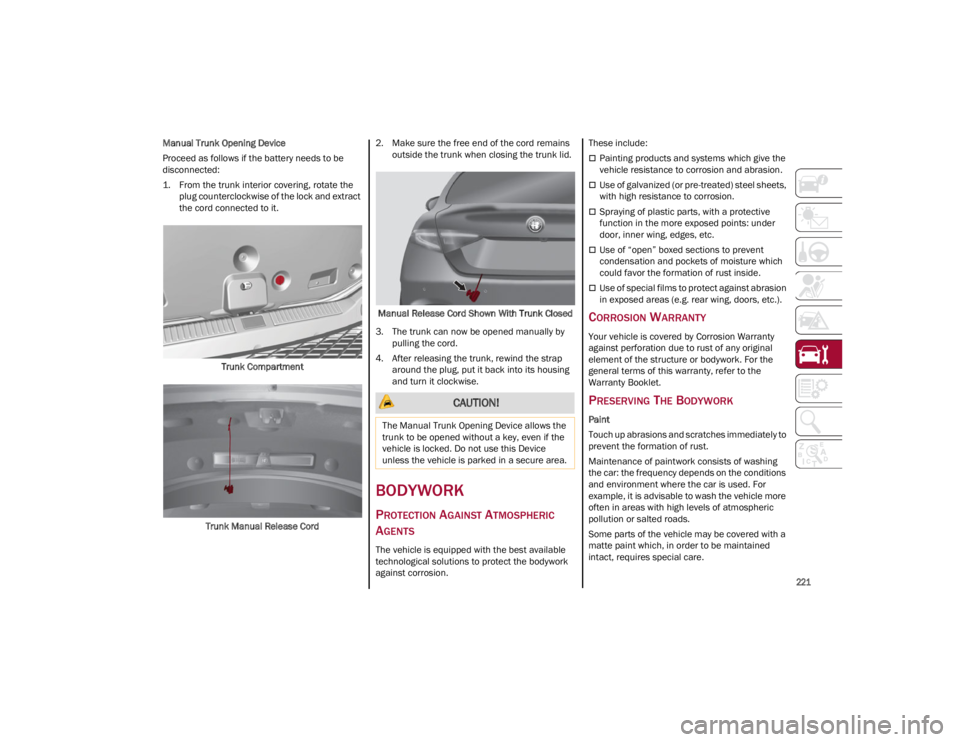
1. From the trunk interior covering, rotate the plug counterclockwise of the lock and extract
the cord connected to it.
Trunk Compartment
Trunk Manual Release Cord 2. Make sure the free end of the cord remains
outside the trunk when closing the trunk lid.
Manual Release Cord Shown With Trunk Closed
3. The trunk can now be opened manually by pulling the cord.
4. After releasing the trunk, rewind the strap around the plug, put it back into its housing
and turn it clockwise.
BODYWORK
PROTECTION AGAINST ATMOSPHERIC
A
GENTS
The vehicle is equipped with the best available
technological solutions to protect the bodywork
against corrosion. These include:
Painting products and systems which give the
vehicle resistance to corrosion and abrasion.
Use of galvanized (or pre-treated) steel sheets,
with high resistance to corrosion.
Spraying of plastic parts, with a protective
function in the more exposed points: under
door, inner wing, edges, etc.
Use of “open” boxed sections to prevent
condensation and pockets of moisture which
could favor the formation of rust inside.
Use of special films to protect against abrasion
in exposed areas (e.g. rear wing, doors, etc.).
CORROSION WARRANTY
Your vehicle is covered by Corrosion Warranty
against perforation due to rust of any original
element of the structure or bodywork. For the
general terms of this warranty, refer to the
Warranty Booklet.
PRESERVING THE BODYWORK
Paint
Touch up abrasions and scratches immediately to
prevent the formation of rust.
Maintenance of paintwork consists of washing
the car: the frequency depends on the conditions
and environment where the car is used. For
example, it is advisable to wash the vehicle more
often in areas with high levels of atmospheric
pollution or salted roads.
Some parts of the vehicle may be covered with a
matte paint which, in order to be maintained
intact, requires special care.
CAUTION!
The Manual Trunk Opening Device allows the
trunk to be opened without a key, even if the
vehicle is locked. Do not use this Device
unless the vehicle is parked in a secure area.
23_GA_OM_EN_USC_t.book Page 221
Page 245 of 248

243
Rear Cross Path .........................................132
Reformulated Gasoline .............................. 230
Refueling Procedure ..................................124
Refueling The Vehicle ................................ 124
Refuelling.................................................... 231
Reminder, Seat Belt ...................................145
Remote ControlStarting System........................................ 23
Remote Keyless Entry .................................. 19
Remote Starting Exit Remote Start Mode .......................... 23
Remote Starting System ....................... 23, 81
Remote Trunk Release ................................ 61
Replacement Bulbs..................202, 203, 204
Replacement Tires ..................................... 215
Reporting Safety Defects ...........................238
Restraints, Child .........................................158
Rims And Tires ...........................................206
Roll Over Warning........................................... 3
S
Safety Checks Inside Vehicle ....................167
Safety Checks Outside Vehicle.................. 168
Safety Defects, Reporting ..........................238
Safety Information, Tire .............................206
Safety Tips ..................................................166
Safety, Exhaust Gas ...................................168
Saving Fuel .................................................126
Scheduled Servicing ..................................182
Scheduled Servicing Program (2.0 T4
MAir Engine Versions) ................................ 183
Scheduled Servicing Program (2.9 V6
Gasoline Engine Versions) ......................... 185
Seat Belt Reminder ...................................... 71 Seat Belts.......................................... 144, 167
Child Restraints ..................................... 158
Energy Management Feature ............... 148
Front Seat ..................................... 144, 145
Inspection .............................................. 167
Lap/Shoulder Belt Untwisting .............. 147
Lap/Shoulder Belts ............................... 145
Pregnant Women................................... 148
Pretensioners ........................................ 148
Rear Seat ............................................... 145
Reminder ............................................... 145
Seat Belt Pretensioner .......................... 148
Untwisting Procedure ............................ 147
Seats ...................................................... 31, 34 Adjustment ........................................ 31, 34
Head Restraints .......................................36
Heated ...................................................... 35
Power ........................................................34
Security Alarm............................................... 24
Service Assistance .................................... 236
Service Contract ........................................ 237
Service Manuals ........................................ 238
Servicing Procedures ................................ 192
Shoulder Belts ........................................... 145
Signals, Turn ........................................74, 168
Snow Chains .............................................. 218
Snow Tires.................................................. 218
Spare Tires ................................................. 216
Speed Control Accel/Decel ..............................................99
Accel/Decel (ACC Only) ......................... 102Cancel .......................................................99
Distance Setting (ACC Only).................. 103
Resume .....................................................99
Set .............................................................98 Speed Control (Cruise Control) ................... 97
Speed Limiting System ................................ 96
Starting Button....................................................... 22Cold Weather ........................................... 82
Remote ..................................................... 23
Starting The Engine ..................................... 81
Steering Tilt Column ............................................... 29
Wheel, Heated ......................................... 30
Wheel, Tilt ................................................ 29
Steering System ......................................... 226
Stop/Start System ....................................... 94
Storage Console .................................................... 55
Glove Compartment ................................ 55
Suggestions For Driving............................. 126
Sun Roof .................................................58, 60
Sun Visor ...................................................... 38
Supplemental Restraint System –
Air Bag ........................................................ 150
Suspension ................................................ 226
Symbols ........................................................... 6
System, Remote Starting ............................ 23
T
Tie Down Hooks, Cargo ............................... 62
Tire And Loading Information Placard ...... 209
Tire Markings ............................................. 206
Tire Safety Information .............................. 206
Tire Service Kit ........................................... 171
23_GA_OM_EN_USC_t.book Page 243