Page 561 of 658

559
uuChecking and Maintaining Tires uDOT Tire Quality Grading (U.S. Vehicles)
Maintenance
The traction grades, from highest to lowest, are AA, A, B, and C.
Those grades represent the tire’s ability to stop on wet pavement
as measured under controlled conditions on specified
government test surfaces of asph alt and concrete. A tire marked
C may have poor traction performance.
The temperature grades are A (the highest), B, and C,
representing the tire’s resistance to the generation of heat and its
ability to dissipate heat when te sted under controlled conditions
on a specified indoor laboratory test wheel. Sustained high
temperature can cause the material of the tire to degenerate and
reduce tire life, and ex cessive temperature can lead to sudden tire
failure. The grade C corresponds to a level of performance which
all passenger car tires must meet under the Federal Motor Vehicle
Safety Standard No. 109. Grades B and A represent higher levels
of performance on the laboratory test wheel than the minimum
required by law.
■Traction
■Temperature
1 Traction
Warning: The traction grade
assigned to this tire is based on
straight-ahead braking traction tests,
and does not include acceleration,
cornering, hydroplaning, or peak
traction characteristics.
1Temperature
Warning: The temperature grade for
this tire is establishe d for a tire that is
properly inflated and not
overloaded. Excessive speed,
underinflation, or excessive loading,
either separately or in combination,
can cause heat buildup and possible
tire failure.
23 ACURA TLX-31TGV6200.book 559 ページ 2022年8月4日 木曜日 午後1時59分
Page 562 of 658

560
uuChecking and Maintaining Tires uWear Indicators
Maintenance
Wear Indicators
The groove where the wear indicator is
located is about 1/16 inch (about 1.6 mm)
shallower than elsewher e on the tire. If the
tread has worn so that the indicator is
exposed, replace the tire. Worn out tires
have poor traction on wet roads.
Tire Service Life
The life of your tires is dependent on many factors, including driving habits, road
conditions, vehicle loading, inflation pre ssure, maintenance history, speed, and
environmental conditions (even when the tires are not in use).
In addition to regular in spections and inflation pres sure maintenance, it is
recommended that you have annual inspecti ons performed once the tires reach five
years old. All tires, including the spare
*, should be removed from service after 10
years from the date of manufacture, regard less of their condition or state of wear.
1Checking Tires
High speed driving
We recommend that you do not drive faster than the
posted speed limits and conditions allow. If you drive
at sustained high speeds (over 132 mph or 213
km/h)
*1/(over 133 mph or 214 km/h)*2/(over 137 mph
or 220 km/h)*3, adjust the cold tire pressures as
shown below to avoid excessive heat buildup and
sudden tire failure.
*1: Models with 235/50R18 97V
*2: Models with 255/40R19 96W
*3: Models with 255/35R20 97Y
Tire Size235/50R18 97V
Pressure Front: 36 psi (250 kPa, 2.5 kgf/cm2)
Rear: 33 psi (230 kPa, 2.3 kgf/cm2)
Tire Size255/40R19 96W
Pressure Front: 38 psi (260 kPa, 2.6 kgf/cm2)
Rear: 35 psi (240 kPa, 2.4 kgf/cm2)
Tire Size255/35R20 97Y
Pressure Front: 41 psi (280 kPa, 2.8 kgf/cm2)
Rear: 36 psi (250 kPa, 2.5 kgf/cm2)
Example of a Wear
Indicator mark
* Not available on all models
23 ACURA TLX-31TGV6200.book 560 ページ 2022年8月4日 木曜日 午後1時59分
Page 567 of 658
Continued565
uuBattery uChecking the Battery
Maintenance
To access the battery terminals:
1. Pull up on the trunk floor lid strap until it is
completely open.
2. Remove the tool case.
2. Remove the tool case and spare tire.
2 Getting Ready to Replace the Flat Tire
P. 599
3. Remove the clips.
4. Flip the tab to unlock the cover.
5. Remove the battery cover.
1Battery
To remove the clip:
Insert a flat-tip screwdriver, lift and remove the center
pin to remove the clip.
To insert the clip:
Insert the clip with the center pin raised, and push
until it is flat.
Models with optional spare tire
Push until the pin
is flat.
Trunk Floor
Lid Strap
Models with temporary tire repair kit
Tool Case
Battery
Models with temporary tire repair kit
Models with optional spare tire
Tab
Battery Cover
BatteryClips
Models with optional spare tire
23 ACURA TLX-31TGV6200.book 565 ページ 2022年8月4日 木曜日 午後1時59分
Page 583 of 658

581
Handling the Unexpected
This chapter explains how to handle unexpected troubles.
Tools.................................................. 582
If a Tire Goes Flat
Temporarily Repairi ng a Flat Tire....... 583
Changing a Flat Tire ......................... 598
Engine Does Not Start
Checking the Engine ........................ 605
If the Keyless Remote Battery is Weak.. 606Emergency Engine Stop ................... 607
If the Battery Is Dead Jump Starting Procedure .................. 608
Overheating ...................................... 611
Indicator, Coming On/Blinking If the Engine Oil Pr essure Low Warning
Appears ......................................... 614 If the Charging System Indicator Comes
On ................................................. 615
If the Slow Down! Reduced Stopping Power Warning Appears ................ 615
If the Malfunction Indicator Lamp Comes
On or Blinks ..................................... 616
If the Brake System Indicator (Red) Comes On or Blinks ....................................... 617
If the Electric Power Steering (EPS) System Indicator Comes On ........................... 618
If the Brake System Indicator (Red) Comes On
or Blinks at the Same Time When the Brake
System Indicator (Amber) Comes On .. 619 If the Low Tire Pressure/TPMS Indicator
Comes On or Blinks ....................... 620
If the Transmission System Indicator Blinks along with the Warning Message ...... 621
Fuses .................................................. 622
Emergency Towing ........................... 629If You Cannot Unlock the Fuel Fill Door.. 630If You Cannot Open the Trunk ........ 631
Refueling
Refueling From a Portable Fuel Container ................................... 632
23 ACURA TLX-31TGV6200.book 581 ページ 2022年8月4日 木曜日 午後1時59分
Page 585 of 658
583Continued
Handling the Unexpected
If a Tire Goes Flat
Temporarily Repairing a Flat Tire
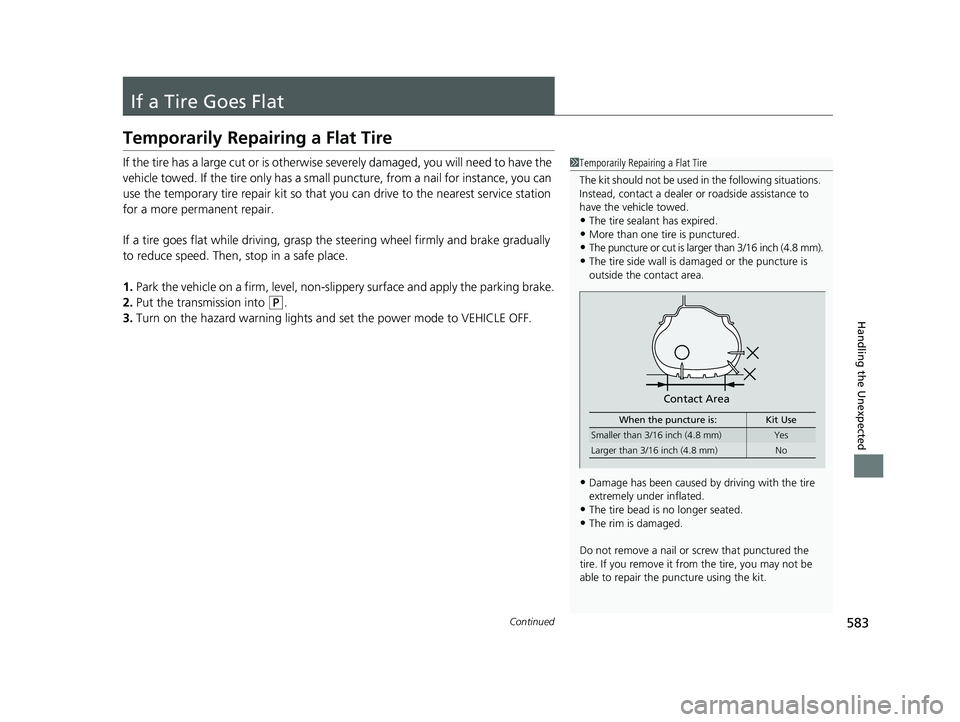
If the tire has a large cut or is otherwise severely damaged, you will need to have the
vehicle towed. If the tire only has a small puncture, from a nail for instance, you can
use the temporary tire repair kit so that you can drive to the nearest service station
for a more permanent repair.
If a tire goes flat while driving, grasp th e steering wheel firmly and brake gradually
to reduce speed. Then, stop in a safe place.
1. Park the vehicle on a firm, level, non-slippery surface and apply the parking brake.
2. Put the transmission into
(P.
3. Turn on the hazard warning lights an d set the power mode to VEHICLE OFF.
1Temporarily Repairing a Flat Tire
The kit should not be used in the following situations.
Instead, contact a dealer or roadside assistance to
have the vehicle towed.
•The tire sealant has expired.
•More than one tire is punctured.•The puncture or cut is larger than 3/16 inch (4.8 mm).
•The tire side wall is damaged or the puncture is
outside the contact area.
•Damage has been caused by driving with the tire
extremely under inflated.
•The tire bead is no longer seated.•The rim is damaged.
Do not remove a nail or screw that punctured the
tire. If you remove it from the tire, you may not be
able to repair the puncture using the kit.
When the puncture is: Kit Use
Smaller than 3/16 inch (4.8 mm)Yes
Larger than 3/16 inch (4.8 mm) No
Contact Area
23 ACURA TLX-31TGV6200.book 583 ページ 2022年8月4日 木曜日 午後1時59分
Page 586 of 658

uuIf a Tire Goes Flat uTemporarily Repairing a Flat Tire
584
Handling the Unexpected
*1: U.S. models
*2: Canadian models
■Getting Ready to Temporarily Repair the Flat Tire1Temporarily Repairing a Flat Tire
NOTICE
Do not use a puncture-repairing agent other than the
one provided in the kit that came with your vehicle. If
a different agent is used, you may permanently
damage the tire pressure sensor.
1 Getting Ready to Temporarily Repair the Flat Tire
Repair notificati on label and speed restriction label
are applied to the side of th e temporary tire repair kit.
When making a temporary repair, carefully read the
instruction manual provided with the kit.
Instruction Manual
Speed Restriction Label
Repair Notification Label Pressure Relief Button Inflator Switch
Selector Knob
REPAIR
*1,
SEALANT/AIR*2,
PRODUIT ANTIFUITE/AIR*2
Sealant/Air Hose
AIR
*1, AIR ONLY*2,
AIR SEULEMENT*2
Power Plug
Pressure Gauge
U.S. Canada
U.S. Canada
23 ACURA TLX-31TGV6200.book 584 ページ 2022年8月4日 木曜日 午後1時59分
Page 587 of 658
585
uuIf a Tire Goes Flat uTemporarily Repairing a Flat Tire
Continued
Handling the Unexpected
1. Pull up on the trunk floor lid strap until it is
completely open.
2. Take the kit out of the case.
3. Place the kit face up, on flat ground near
the flat tire, and away from traffic. Do not
place the kit on its side.
Trunk Floor
Lid Strap
Tire Repair Kit
23 ACURA TLX-31TGV6200.book 585 ページ 2022年8月4日 木曜日 午後1時59分
Page 588 of 658

uuIf a Tire Goes Flat uTemporarily Repairing a Flat Tire
586
Handling the Unexpected
1. Remove the valve cap from the tire valve
stem.
2. Remove the sealant/air hose from the
packaging.
3. Attach the sealant/air hose onto the tire
valve stem. Screw it until it is tight.
■Injecting Sealant and Air1Injecting Sealant and Air
In cold temperatures, the sealant may not flow easily.
In this situation, warm it up for five minutes before
using.
The sealant can permanentl y stain clothing and other
materials. Be careful duri ng handling and wipe away
any spills immediately.
3CAUTION
Tire sealant contains substances that are
harmful if inhaled, ingested or if contact is
made with the eyes or skin.
Always use in a well-ventilated area and
use gloves and safety glasses for protection;
do not ingest.
For skin or eye contact, flush with cool
water; if ingested, rinse mouth with water.
In all cases, seek medical attention if
necessary.
Tire Valve Stem
Valve Cap
Sealant/Air Hose
Tire Valve Stem
Sealant/Air Hose
23 ACURA TLX-31TGV6200.book 586 ページ 2022年8月4日 木曜日 午後1時59分

