Page 19 of 211
Key for ⇒ Fig. 15:Petrol engineNatural gas
engine
Width (4-dooryf1,645 mm
ⒸWidth (from one exterior mirror to the otheryf1,910 mm
Ⓓ
Height to the upper edge of the roof at kerb weight 1,478 mm1,480 mm
Hight at kerb weight to the upper edge of the
aerial base1,489 mm1,492 mm
ⒺHeight with open tailgate at kerb weight1,990 mm1,994 mm
ⒻGround clearance in road-ready state between
the axles144 mm145 mm
ⒼWheelbase2,407 mm2,413 mm
ⒽLength (from bumper to bumperyf3,543 mm
ⒾHeight with open bonnet and kerb weight1,622 mm
\f
Page 134 of 211
Opening and closing the bonnet
Fig. 119 A: release lever in the footwell on the driver side B: release lever on the bonnet
Fig. 120 C: release lever at the bonnet stay D: bonnet secured with the bonnet stay
First read and observe the introductoryinformation and safety warnings⇒
Introduction
Opening the bonnet
\f
Page 137 of 211

With the engine at operating temperature, park the vehicle on a level surface to ensure
that the engine oil reading is correct.
Switch off the engine and wait a few minutes for the engine oil to flow back into the sump.
Open the bonnet .
Identify the engine oil filler cap and oil dipstick. The engine oil filler opening bears the
symbol on the cap and the oil dipstick has a coloured handle. If you cannot find the cap
and dipstick please contact a qualified workshop.
Pull the dipstick out of the guide tube and wipe it off with a clean cloth.
Insert the oil dipstick into the guide tube again as far as it will go. If there is a marking on
the oil dipstick, this marking must fit in the corresponding groove at the top end of the
guide tube when inserting.
After reading the oil level, push the oil dipstick back into the guide tube as far as it will go.
Unscrew the engine oil filler opening cap .
Using only the engine oil approved by Volkswagen expressly for this engine, top up the oil
in small gradual amounts (no more than 0.5 lyf�.
To avoid overfilling, wait for approximately one minute after each pour to allow the engine
oil to flow into the oil sump up to the marking on the engine oil dipstick.
Read the engine oil level from the dipstick again before refilling with a further small
quantity of engine oil. Never overfill engine oil .
After the refilling procedure, the engine oil level should be at least in the centre of area Ⓑ,
but never above area Ⓐ .
After refilling, screw the engine oil filler cap back on correctly.
Reinsert the oil dipstick correctly into the guide tube as far as it will go.
Close the bonnet correctly .
Checklist
Carry out the steps in the specified order ⇒:
Pull the dipstick out again and read the engine oil level on the dipstick as follows: Ⓐ: do not
refill oil . Proceed to step 15. Ⓑ: oil can be refilled (approximately 0.5 lyf�����3�U�R�F�H�H�G���W�R���V�W�H�S�����
or 15. Ⓒ: oil must be refilled (approximately 1.0 lyf�����3�U�R�F�H�H�G���W�R���V�W�H�S�����.
The engine oil level must never be above area ⇒ Fig. 121Ⓐ. Otherwise oil can be drawn in
through the crankcase breather and escape into the atmosphere via the exhaust system.
Engine oil consumption
First read and observe the introductoryinformation and safety warnings⇒
Introduction
Engine oil consumption can vary from engine to engine and can change during the working life of
an engine.
Depending on how you drive and the conditions in which the car is used, oil consumption can be up
to 1.0 litre/2,000 km \f
Page 201 of 211

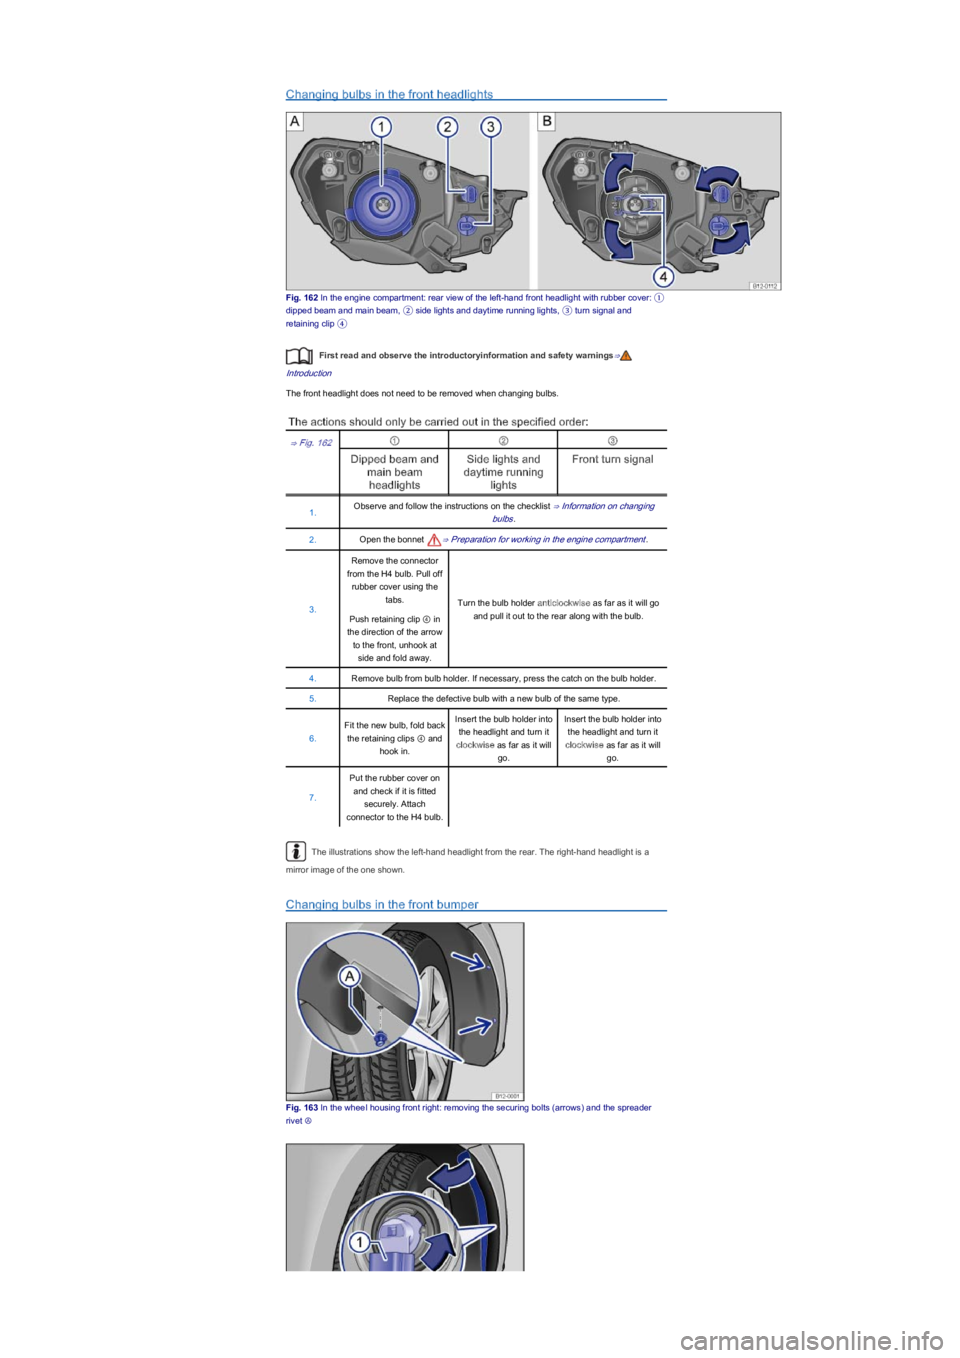
Changing bulbs in the front headlights
Fig. 162 In the engine compartment: rear view of the left-hand front headlight with rubber cover: ①
dipped beam and main beam, ② side lights and daytime running lights, ③ turn signal and
retaining clip �\b
First read and observe the introductoryinformation and safety warnings⇒
Introduction
The front headlight does not need to be removed when changing bulbs.
The actions should only be carried out in the specified order:
⇒ Fig. 162①②③
Dipped beam and
main beam
headlights
Side lights and
daytime running
lights
Front turn signal
1.Observe and follow the instructions on the checklist ⇒ Information on changing
bulbs.
2.Open the bonnet ⇒ Preparation for working in the engine compartment.
3.
Remove the connector
from the H4 bulb. Pull off
rubber cover using the
tabs.Turn the bulb holder anticlockwise as far as it will go
and pull it out to the rear along with the bulb.Push retaining clip ④ in
the direction of the arrow
to the front, unhook at
side and fold away.
4.Remove bulb from bulb holder. If necessary, press the catch on the bulb holder.
5.Replace the defective bulb with a new bulb of the same type.
6.
Fit the new bulb, fold back
the retaining clips ④ and
hook in.
Insert the bulb holder into
the headlight and turn it
clockwise as far as it will
go.
Insert the bulb holder into
the headlight and turn it
clockwise as far as it will
go.
7.
Put the rubber cover on
and check if it is fitted
securely. Attach
connector to the H4 bulb.
The illustrations show the left-hand headlight from the rear. The right-hand headlight is a
mirror image of the one shown.
Changing bulbs in the front bumper
Fig. 163 In the wheeI housing front right: removing the securing bolts (arrowsyf���D�Q�G���W�K�H���V�S�U�H�D�G�H�U�
rivet Ⓐ