2022 VOLKSWAGEN T-ROC check engine
[x] Cancel search: check enginePage 10 of 502

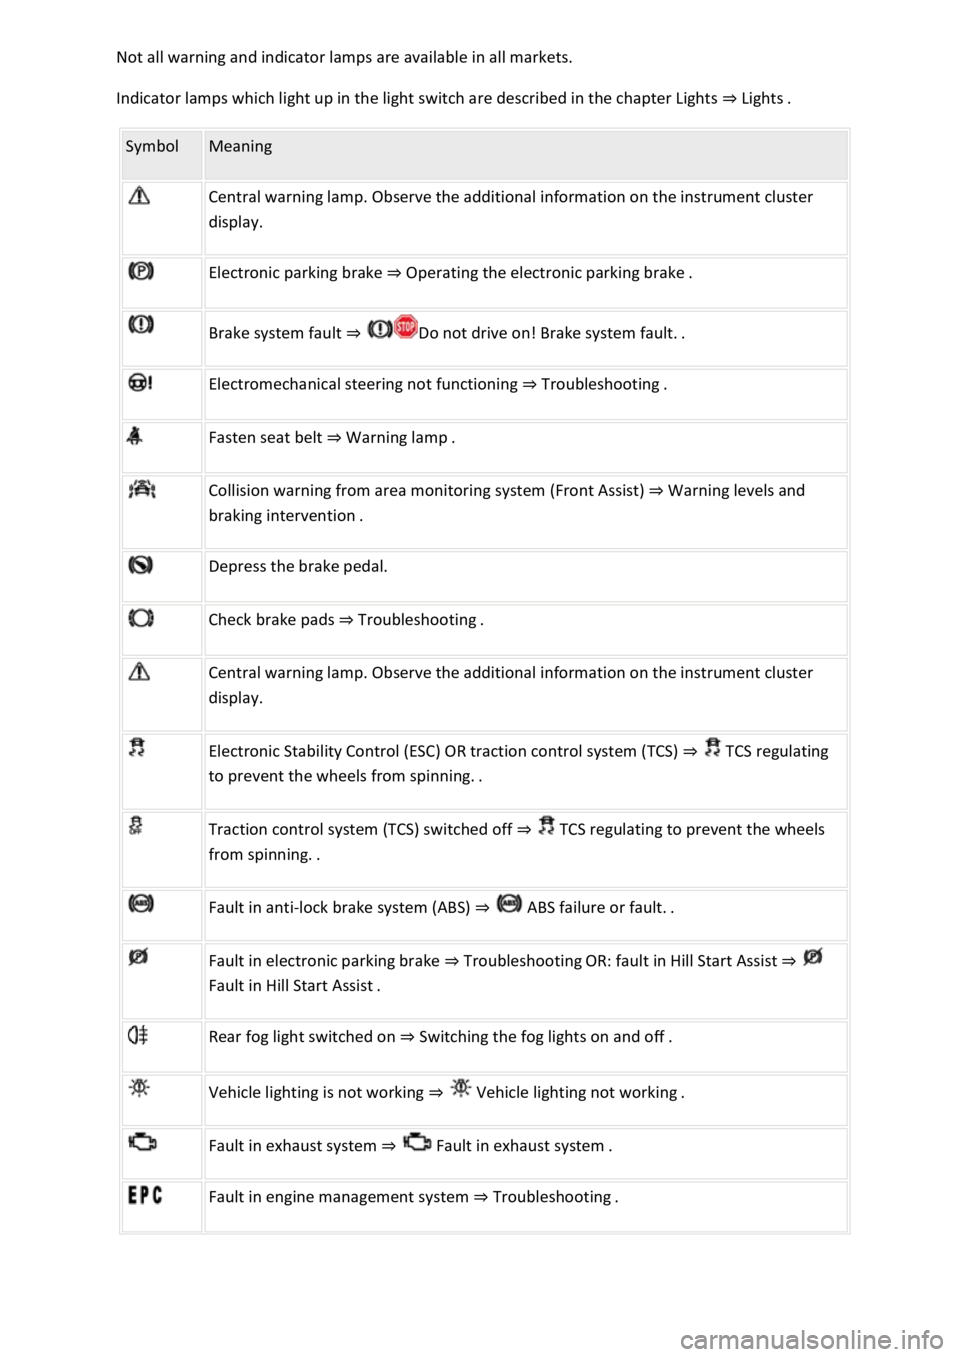
Indicator lamps which light up in the light switch are described in the chapter Lights Lig
Symbol Meaning
Central warning lamp. Observe the additional information on the instrument cluster
display.
Electronic parking brake Operating the electronic parking brake.
Brake system fault
Electromechanical steering not functioning Troubleshooting.
Fasten seat belt Warning lamp.
Collision warning from area monitoring system (Front Assist) Warning levels and
Depress the brake pedal.
Check brake pads Troubleshooting.
Central warning lamp. Observe the additional information on the instrument cluster
display.
Electronic Stability Control (ESC) OR traction control system (TCS) TCS regulating
to
Traction control system (TCS) switched off TCS regulating to prevent the wheels
Fault in anti-lock brake system (ABS)
Fault in electronic parking brake TroubleshootingOR: fault in Hill Start Assist
Rear fog light switched on Switching the fog lights on and off.
Vehicle lighting is not working
Fault in exhaust system Fault
Fault in engine management system Troubleshooting.
Page 14 of 502

Introduction
This chapter contains information on the followingsubjects:
Analogue instrument cluster
Rev counter
Digital instrument cluster (Active Info Display)
Displays
Instrument cluster menus
Service menu
Driving data display (multifunction display)
Warning and information messages
Driver Alert System (recommendation for rest breaks)
Dynamic Road Sign Display (Sign Assist)
Time
Lap timer
Fuel gauge
Coolant temperature display
Service interval display
The vehicle is equipped either with an analogue or a digital instrument cluster (Active Info Display).
When you start the engine after the 12-volt battery has been totally discharged or changed, you may
find that system settings (time, date, personal convenience settings and programming) have been
changed or deleted. Check and correct the settings as necessary once the 12-volt vehicle battery has
been sufficiently charged.
WARNING
Accidents and injuries can occur if the driver is distracted.
Never press the buttons on the instrument cluster while the vehicle is in motion.
Any settings for the instrument cluster display and displays in the Infotainment system should be
made only when the vehicle is stationary in order to reduce the risk of accidents and serious injuries.
Page 34 of 502

18 Coolant temperature gauge in the Active Info Display.
First read and observe the introductory information and safety warnings
Cold area. The engine has not yet reached operating temperature. Avoid high engine revs and
heavy engine loads until the engine is warm.
Normal area.
Warning area. The temperature may also rise to the hot area when the engine is working hard,
especially at high ambient temperatures.
Coolant
The indicator lamp lights up and the central warning lamp flashes red.
The coolant level is not correct or there is a fault in the coolant system.
Do not drive on!
Stop the vehicle, switch off the engine and allow it to cool down.
Check the coolant level Coolant
Seek expert assistance if the warning lamp does not go out although the coolant level is adequate.
Service interval display
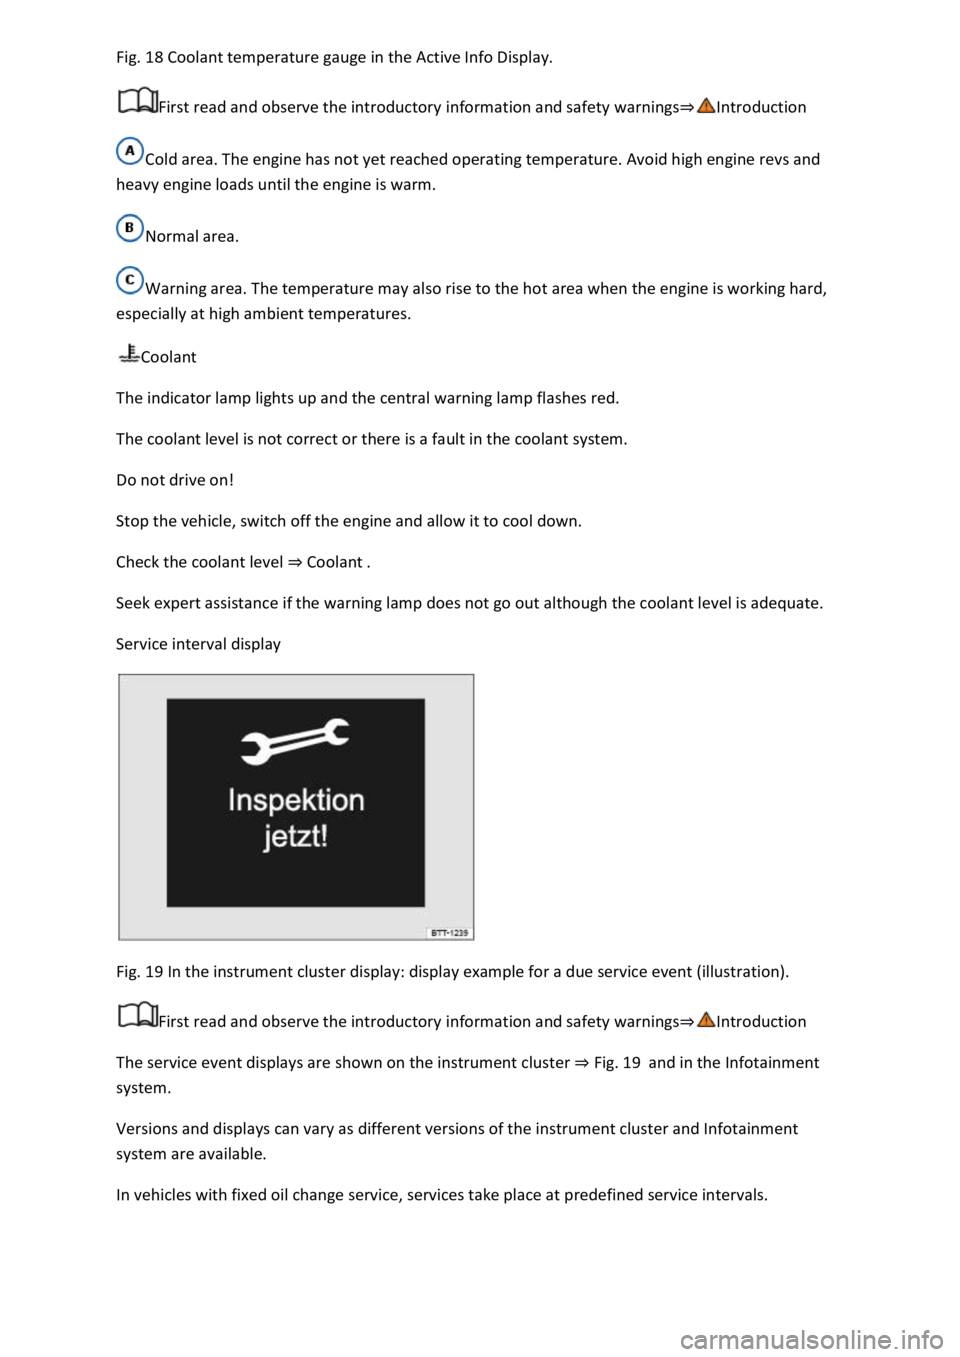
Fig. 19 In the instrument cluster display: display example for a due service event (illustration).
First read and observe the introductory information and safety warnings
The service event displays are shown on the instrument cluster Fig. 19and in the Infotainment
system.
Versions and displays can vary as different versions of the instrument cluster and Infotainment
system are available.
In vehicles with fixed oil change service, services take place at predefined service intervals.
Page 35 of 502

Technical progress has made it possible to considerably reduce servicing requirements. An oil change
service must only be carried out when required by the vehicle. The individual conditions in which the
vehicle is used and the driver's personal driving style are taken into account. The service reminder is
displayed 30 days before the service is due. The distance is rounded to the nearest 100 km and the
remaining time is rounded to full days.
Service alert
If a service or inspection is due soon, a service alert will appear the next time the ignition is switched
on.
The number of kilometres or amount of time shown correspond to the maximum number of
kilometres or maximum time that can still be driven before the next service.
Service event
In the event of a due service or a due inspection, a signal tone will be given when the ignition is
switched on and the spanner symbol will be displayed for several seconds on the instrument
cluster display. One of the following displays will also appear Fig. 19
Inspection now!
Oil service now!
Oil service and inspection now!
Checking service schedules
You can access the current scheduled service information when the ignition is switched on, the
engine is not running, and the vehicle is stationary:
Accessing the service schedule in the Infotainment system.
Press the button or function button.
Press the Vehicle and function buttons Infotainment system controls and displays
Select the Service menu option to display the service information.
Vehicles with analogue instrument cluster.
Press and hold the button in the instrument cluster Instrument clusteruntil the text Service
appears in the display.
Release the button. The current scheduled service will be shown in the display.
Vehicles with digital instrument cluster.
Information on the scheduled service can be accessed only via the Service menu Service menu
Resetting the service interval display
Page 41 of 502

When you start the engine after the 12-volt vehicle battery has been totally discharged or changed,
you may find that system settings (time, date, personal convenience settings and programming) and
user accounts have been changed or deleted. Check and correct the settings as necessary once the
12-volt vehicle battery has been sufficiently charged.
Vehicle settings menu
First read and observe the introductoryinformation and safety warnings
You can switch individual functions and systems on and off and make settings in the vehicle settings
of the Infotainment system.
Opening the Vehicle settings menu
Switch on the ignition.
Switch on Infotainment system if necessary.
Press the button or function button.
Touch the Vehicle and function buttons to open the Vehicle settings menu.
Touch the corresponding function buttons to open additional menus in the Vehicle settings menu or
to make settings in the menu options.
If the checkbox in the function button is ticked , the respective function is switched on.
Touch the function button to return to the previous menu.
Performance monitor
First read and observe the introductoryinformation and safety warnings
The performance monitor is a display for sporty driving. The digital instruments display real-time
values for engine power, temperature and acceleration that are determined by sensors on the
vehicle. This provides the driver with an overview of driving dynamics.
Fig. 23 On the Infotainment system display: performance monitor.
Page 49 of 502

Is fuel in the adequate quality available Fuel and emission control?
Are the correct service fluids that comply with Volkswagen specifications available in the destination
country Service fluids and consumables?
Will the navigation function in the factory-fitted Infotainment system work with the available
navigation data in the destination country?
Are special tyres necessary for travelling in the destination country?
Is a fire extinguisher a requirement in your destination country?
Which requirements must be observed regarding high-visibility waistcoats?
Checklist
Do not work on the engine and in the engine compartment unless you are familiar with the task, are
aware of the general safety procedures and have the correct equipment, service fluids and suitable
tools In the engine compartment
are uncertain. Make sure you check the following on a regular basis:
Washer fluid level Washer fluid
Engine oil level Engine oil
Coolant level Coolant
Brake fluid level Brake fluid
Tyre pressure Wheels and tyres
Page 99 of 502

Unlocking or locking the vehicle with Keyless Accessis not activated if the vehicle
was locked manually.
Things to note when unlocking manually
The alarm is triggered when the driver door is opened Anti-theft alarm
After unlocking, an emergency start must be carried out Starting and stopping the engine
Switch on the ignition to switch off the alarm.
The electronic immobiliser recognises a valid vehicle key.
The anti-theft alarm is not activated when the vehicle is locked manually using the key bit Anti-
theft alarm
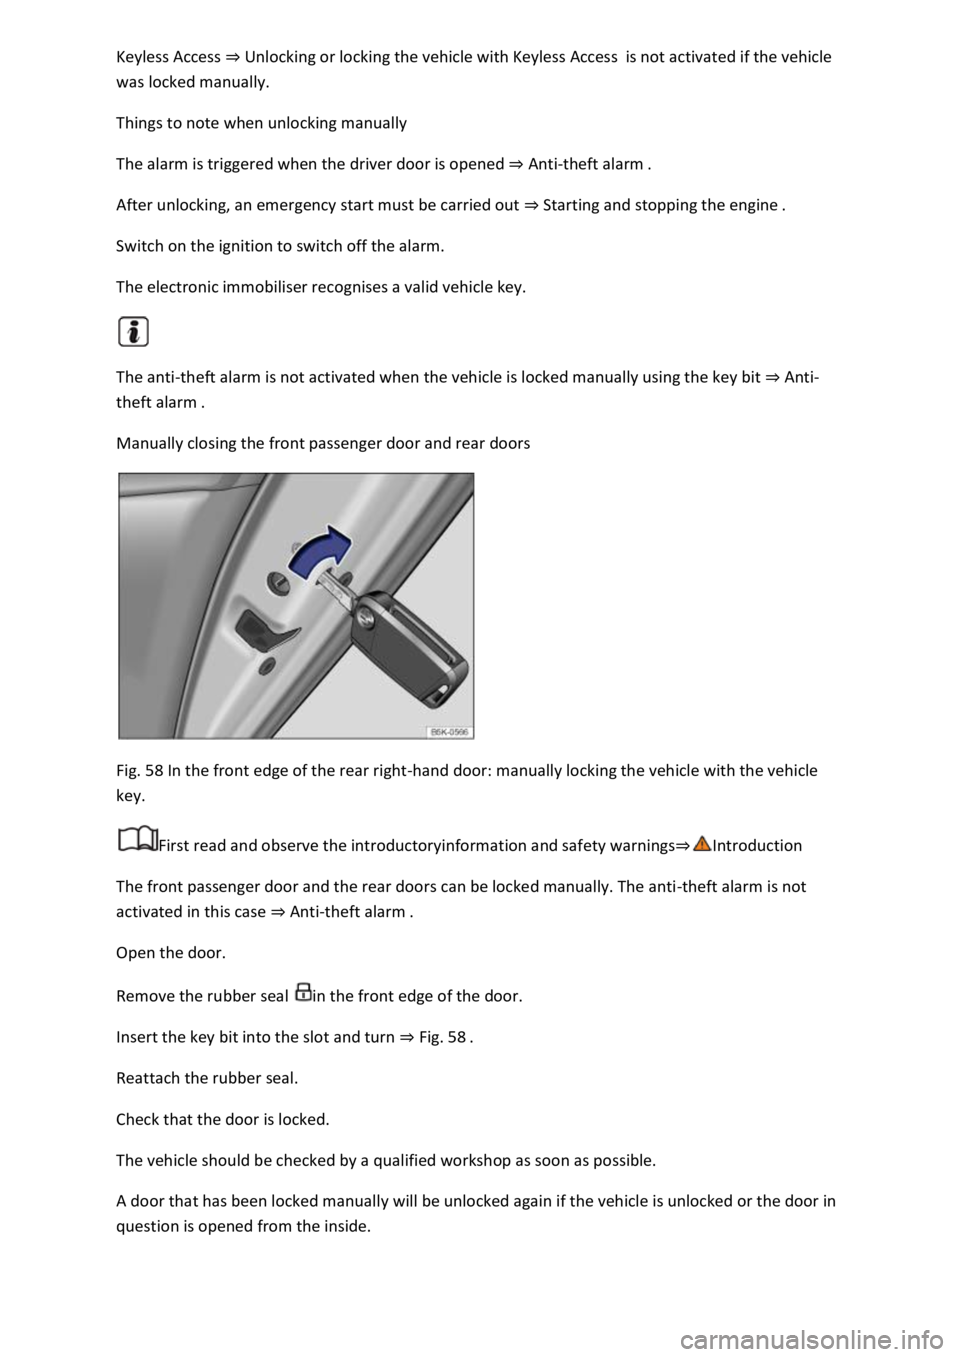
Manually closing the front passenger door and rear doors
Fig. 58 In the front edge of the rear right-hand door: manually locking the vehicle with the vehicle
key.
First read and observe the introductoryinformation and safety warnings
The front passenger door and the rear doors can be locked manually. The anti-theft alarm is not
activated in this case Anti-theft ala
Open the door.
Remove the rubber seal in the front edge of the door.
Insert the key bit into the slot and turn Fig. 58
Reattach the rubber seal.
Check that the door is locked.
The vehicle should be checked by a qualified workshop as soon as possible.
A door that has been locked manually will be unlocked again if the vehicle is unlocked or the door in
question is opened from the inside.
Page 175 of 502

nment system can
distract you from the road.
Always drive carefully and responsibly.
Information on the brakes
New brake pads cannot generate the full braking effect during the first 200 to 300 km and must first
be run in
pressure on the brake pedal. During the run-in period, the braking distance is longer for full or
emergency braking than when the brake pads have been run in. In the run-in period, full braking
should be avoided and also situations that create a heavy load on the brakes, e.g. when driving up
close to the vehicle ahead.
The wear of the brake pads depends to a great extent on the conditions under which the vehicle is
operated and the way the vehicle is driven. If the vehicle is used for regular urban trips, short
journeys, and is driven with a sporty driving style, the brake pads must be regularly checked by a
qualified workshop.
When driving with wet brakes, for example after driving through water, after heavy rainfall or after
washing the vehicle, the braking effect may be delayed as the brake discs will be wet, or possibly
iced up (in winter). The brakes must be dried as quickly as possible by careful braking at higher
speed. Please ensure that no following vehicle and no other road user is put at risk as a result of this
action
A layer of salt that accumulates on the discs and pads will reduce the braking effect and increase the
braking distance. If the vehicle has not been braked for a long time on roads which have been gritted
with salt, the layer of salt must be reduced through careful braking
Corrosion on the brake discs and dirt in the brake pads are facilitated through long standstill times,
low mileage and low load levels. If the brake pads have been hardly used or if they are corroded,
Volkswagen recommends that the brake discs and brake pads be cleaned by braking strongly several
times from high speed. Please ensure that no following vehicle and no other road user is put at risk
as a result of this action
Brake servo
The brake servo will function only when the engine is running and reinforces the pressure applied by
the driver on the brake pedal.
If the brake servo does not function or the vehicle is being towed, the brake pedal will have to be
depressed more forcefully as the braking distance will be increased due to the lack of assistance for
the brake system
WARNING
Driving with worn brake pads or with a faulty brake system can cause accidents and serious injuries.
If the warning lamp lights up either alone or together with a text message in the instrument
cluster display, go to a qualified workshop immediately to have the brake pads checked and the
worn brake pads replaced.