2022 TOYOTA VENZA HYBRID glove box
[x] Cancel search: glove boxPage 154 of 548

1533-2. Opening, closing and locking the doors
3
Before driving
●Bring the electronic key close to
either front door handle and oper-
ate the entry function.
●Operate the wireless remote con-
trol.
If the doors cannot be
locked/unlocked using the above
methods, use the mechanical key.
( P.132)
If the hybrid system cannot be
started using the smart key system,
refer to P.464.
■Note for the entry function
●Even when the electronic key is
within the effective range (detec-
tion areas), the system may not
operate properly in the following
cases:
• The electronic key is too close to the window or outside door han-
dle, near the ground, or in a high
place when the doors are locked
or unlocked.
• The electronic key is on the instru-
ment panel, luggage cover or
floor, or in the door pockets or
glove box when the hybrid system
is started or po wer switch modes
are changed.
●Do not leave the electronic key on
top of the instrument panel or near
the door pockets when exiting the
vehicle. Depending on the radio
wave reception conditions, it may
be detected by the antenna out-
side the cabin and the door will
become lockable from the outside,
possibly trapping the electronic
key inside the vehicle.
●As long as the electronic key is
within the effective range, the
doors may be locked or unlocked
by anyone. However, only the
doors detecting the electronic key
can be used to unl ock the vehicle.
●Even if the electronic key is not
inside the vehicle, it may be possi-
ble to start the hybrid system if the
electronic key is near the window.
●The doors may unlock if a large amount of water splashes on the
door handle, such as in the rain or
in a car wash when the electronic
key is within the effective range.
(The doors will au
tomatically be
locked after approximately 60 sec-
onds if the doors are not opened
and closed.)
●If the wireless remote control is
used to lock the doors when the
electronic key is near the vehicle,
there is a possib ility that the door
may not be unlocked by the entry
function. (Use the wireless remote
control to unlock the doors.)
●Touching the door lock sensor
while wearing gloves may delay or
prevent lock operation. Remove
the gloves and touch the lock sen-
sor again.
●When the lock operation is per-
formed using the lock sensor, rec-
ognition signals will be shown up
to two consecutive times. After
this, no recognition signals will be
given.
●If the door handle becomes wet
while the electronic key is within
the effective range, the door may
lock and unlock repeatedly. In that
case, follow the following correc-
tion procedures to wash the vehi-
cle:
• Place the electronic key in a loca- tion 6 ft. (2 m) or more away from
the vehicle. (Take care to ensure
that the key is not stolen.)
• Set the electronic key to battery-
saving mode to disable the smart
key system. ( P.152)
●If the electronic key is inside the
vehicle and a door handle
becomes wet during a car wash, a
message may be shown on the
multi-information display and a
buzzer will sound outside the vehi-
cle. To turn off th e alarm, lock all
the doors.
●The lock sensor may not work
properly if it comes into contact
with ice, snow, m ud, etc. Clean
the lock sensor and attempt to
Page 188 of 548
1884-1. Before driving
WARNING
■If you hear a squealing or
scraping noise (brake pad
wear limit indicators)
Have the brake pads checked and
replaced by your Toyota dealer as
soon as possible.
Rotor damage may result if the
pads are not replaced when
needed.
It is dangerous to drive the vehicle
when the wear limits of the brake
pads and/or those of the brake
discs are exceeded.
■When the vehicle is stopped
●Do not depress t he accelerator
pedal unnecessarily.
If the shift lever is in any posi-
tion other than P or N, the vehi-
cle may accelerate suddenly
and unexpectedly, causing an
accident.
●In order to prev ent accidents
due to the vehicle rolling away,
always keep depressing the
brake pedal while stopped with
the “READY” indicator is illumi-
nated, and apply the parking
brake as necessary.
●If the vehicle is stopped on an
incline, in order to prevent acci-
dents caused by the vehicle roll-
ing forward or backward, always
depress the brake pedal and
securely apply the parking
brake as needed.
●Avoid revving or racing the
engine.
Running the engine at high
speed while the vehicle is
stopped may cause the exhaust
system to overheat, which could
result in a fire if combustible
material is nearby.
■When the vehicle is parked
●Do not leave glasses, cigarette
lighters, spray cans, or soft
drink cans in the vehicle when it
is in the sun.
Doing so may result in the fol-
lowing:
• Gas may leak from a cigarette lighter or spray can, and may
lead to a fire.
• The temperature inside the vehicle may cause the plastic
lenses and plastic material of
glasses to deform or crack.
• Soft drink cans may fracture, causing the contents to spray
over the interior of the vehicle,
and may also cause a short cir-
cuit in the vehicle’s electrical
components.
●Do not leave cigarette lighters in
the vehicle. If a cigarette lighter
is in a place such as the glove
box or on the floor, it may be lit
accidentally when luggage is
loaded or the se at is adjusted,
causing a fire.
●Do not attach adhesive discs to
the windshield or windows. Do
not place containers such as air
fresheners on the instrument
panel or dashboard. Adhesive
discs or containers may act as
lenses, causing a fire in the
vehicle.
●Do not leave a door or window
open if the curved glass is
coated with a metallized film
such as a silver-colored one.
Reflected sunlight may cause
the glass to act a s a lens, caus-
ing a fire.
Page 337 of 548
3375-3. Using the storage features
5
Interior features
5-3.Using the storage features
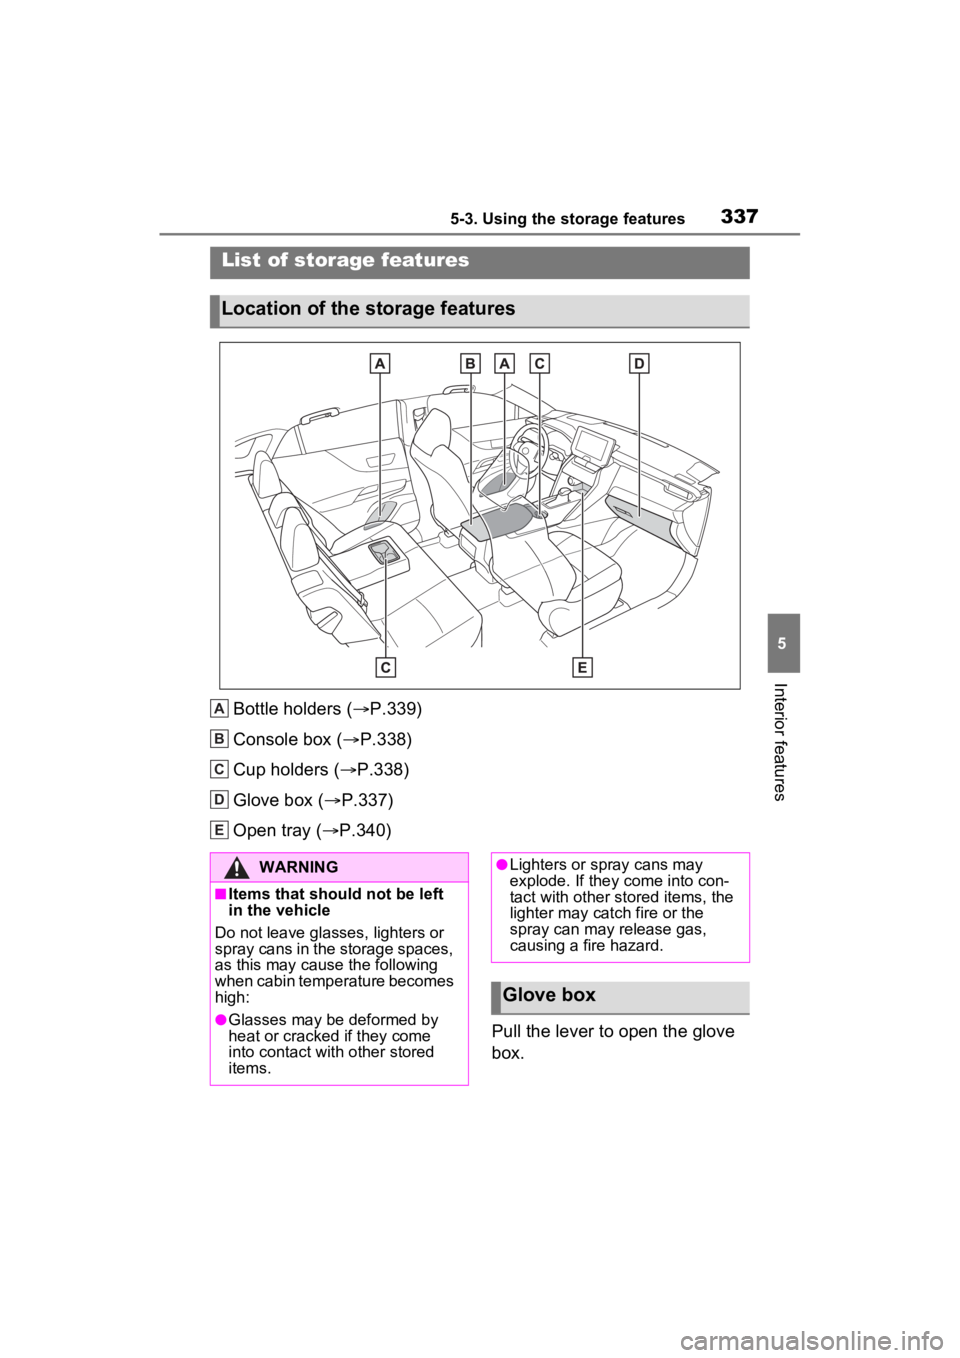
Bottle holders (P.339)
Console box ( P.338)
Cup holders ( P.338)
Glove box ( P.337)
Open tray ( P.340)
Pull the lever to open the glove
box.
List of storage features
Location of the storage features
A
B
C
D
E
�:�$�5�1�,�1�*
■Items that should not be left
in the vehicle
Do not leave glasses, lighters or
spray cans in the storage spaces,
as this may cau se the following
when cabin temperature becomes
high:
●Glasses may be deformed by
heat or cracked if they come
into contact with other stored
items.
●Lighters or spray cans may
explode. If they come into con-
tact with other stored items, the
lighter may catch fire or the
spray can may release gas,
causing a fire hazard.
Glove box
Page 338 of 548
3385-3. Using the storage features
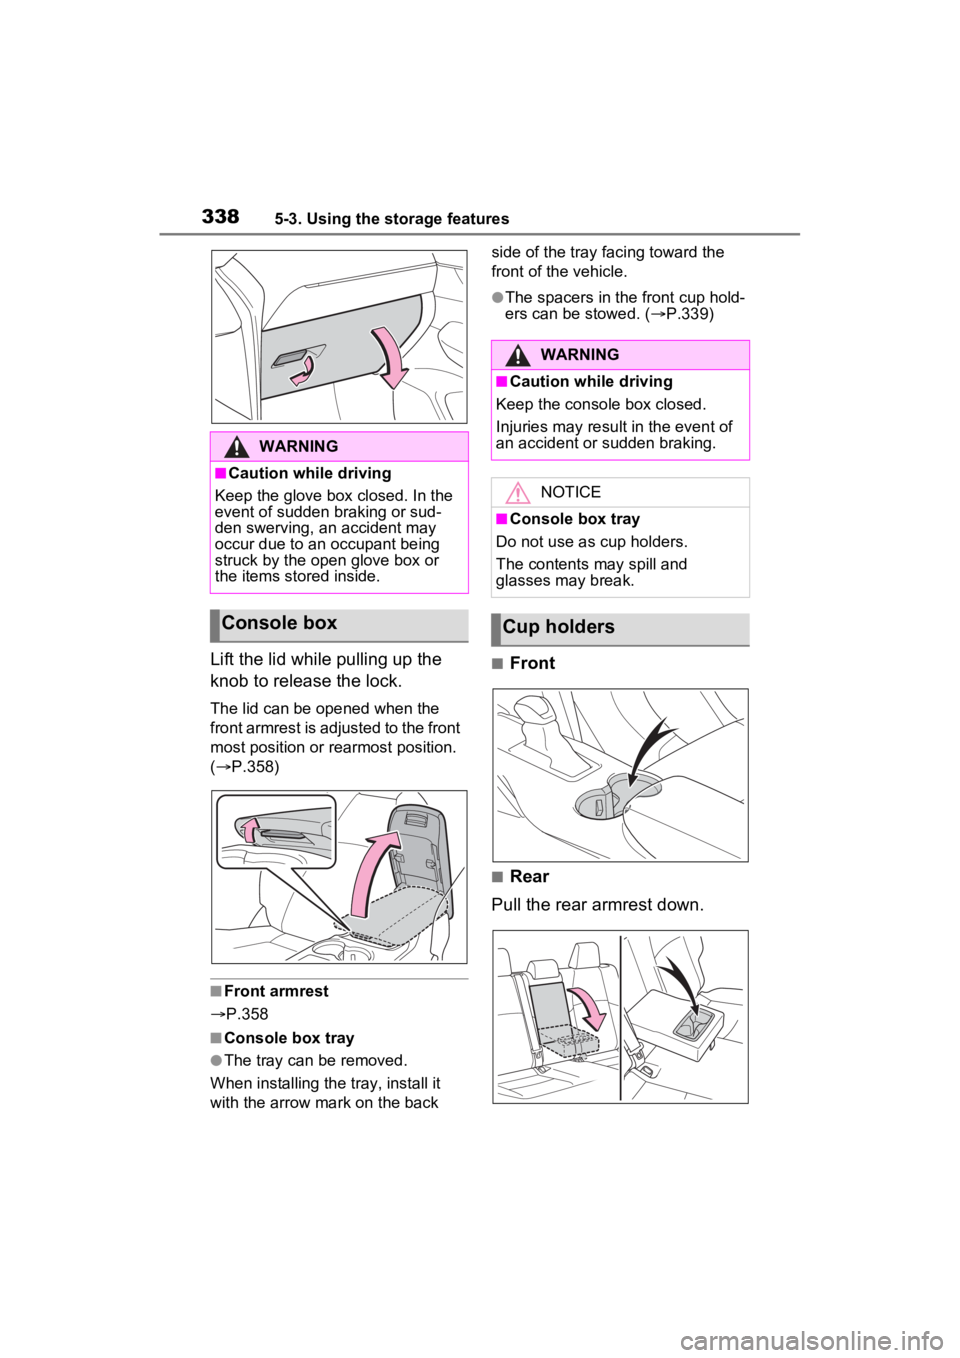
Lift the lid while pulling up the
knob to release the lock.
The lid can be opened when the
front armrest is adjusted to the front
most position or rearmost position.
( P.358)
■Front armrest
P.358
■Console box tray
●The tray can be removed.
When installing the tray, install it
with the arrow mark on the back side of the tray facing toward the
front of the vehicle.
●The spacers in the front cup hold-
ers can be stowed. (
P.339)
■Front
■Rear
Pull the rear armrest down.
WARNING
■Caution while driving
Keep the glove box closed. In the
event of sudden braking or sud-
den swerving, an accident may
occur due to an occupant being
struck by the open glove box or
the items stored inside.
Console box
WARNING
■Caution while driving
Keep the console box closed.
Injuries may resul t in the event of
an accident or sudden braking.
NOTICE
■Console box tray
Do not use as cup holders.
The contents may spill and
glasses may break.
Cup holders
Page 413 of 548
4136-3. Do-it-yourself maintenance
6
Maintenance and care
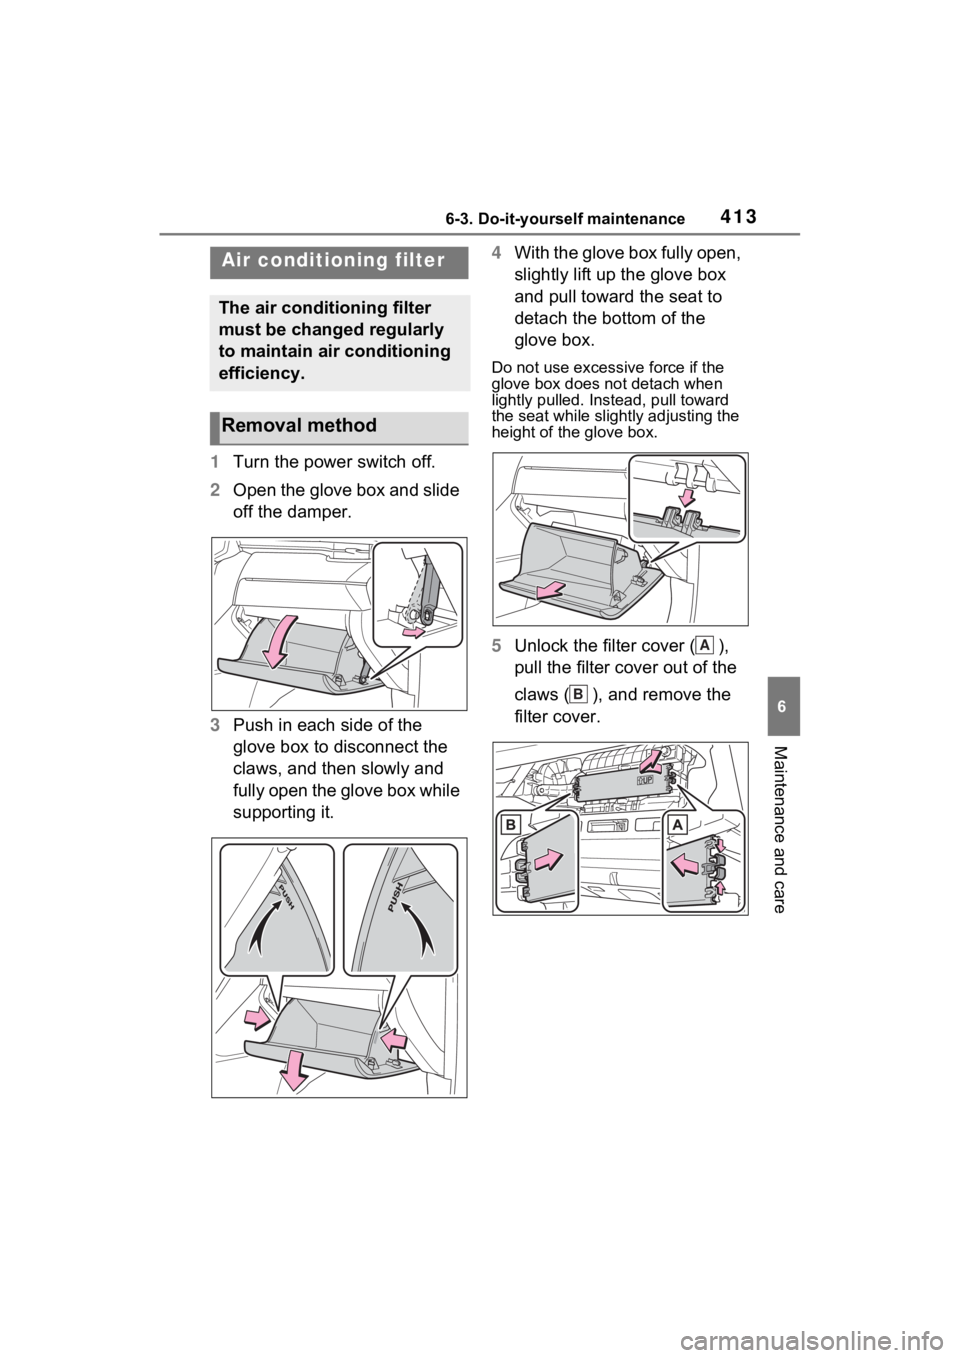
1Turn the power switch off.
2 Open the glove box and slide
off the damper.
3 Push in each side of the
glove box to disconnect the
claws, and then slowly and
fully open the glove box while
supporting it. 4
With the glove box fully open,
slightly lift up the glove box
and pull toward the seat to
detach the bottom of the
glove box.
Do not use excessi ve force if the
glove box does not detach when
lightly pulled. Ins tead, pull toward
the seat while slightly adjusting the
height of the glove box.
5 Unlock the filter cover ( ),
pull the filter cover out of the
claws ( ), and remove the
filter cover.
Air condition ing filter
The air conditioning filter
must be changed regularly
to maintain air conditioning
efficiency.
Removal method
A
B
Page 414 of 548
4146-3. Do-it-yourself maintenance
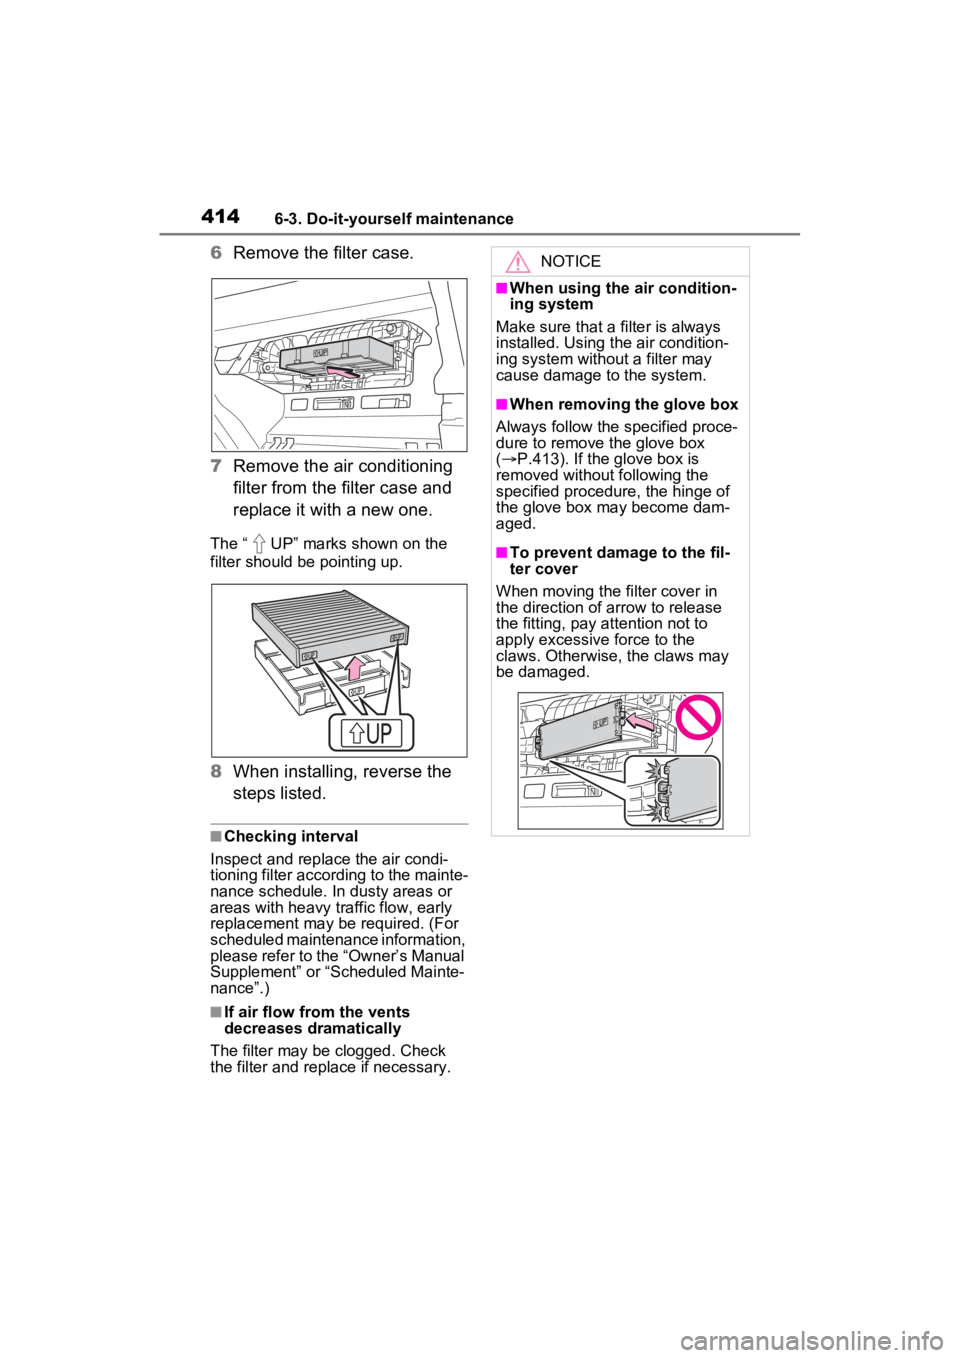
6Remove the filter case.
7 Remove the air conditioning
filter from the filter case and
replace it with a new one.
The “ UP” marks shown on the
filter should be pointing up.
8When installing, reverse the
steps listed.
■Checking interval
Inspect and replace the air condi-
tioning filter according to the mainte-
nance schedule. In dusty areas or
areas with heavy traffic flow, early
replacement may be required. (For
scheduled maintenance information,
please refer to the “Owner’s Manual
Supplement” or “Scheduled Mainte-
nance”.)
■If air flow from the vents
decreases dramatically
The filter may be clogged. Check
the filter and replace if necessary.
NOTICE
■When using the air condition-
ing system
Make sure that a filter is always
installed. Using the air condition-
ing system without a filter may
cause damage to the system.
■When removing the glove box
Always follow the specified proce-
dure to remove the glove box
( P.413). If the glove box is
removed without following the
specified procedure, the hinge of
the glove box may become dam-
aged.
■To prevent damage to the fil-
ter cover
When moving the filter cover in
the direction of arrow to release
the fitting, pay attention not to
apply excessive force to the
claws. Otherwise, the claws may
be damaged.
Page 533 of 548

Alphabetical Index533
Event data recorder (EDR)......... 8
EV indicator .............................. 71
EV Ratio .................................. 100
F
Flat tire .................................... 453Tire pressure warning system........................................... 399
Floor mats ................................. 26
Fluid Brake ............................ 392, 481
Hybrid transmission.............. 480
Rear differential .................... 480
Washer ................................. 393
Fog lights Switch................................... 221
Footwell lights ..... ................... 333
Front passenger’s seat belt reminder light ....................... 445
Front passenger occupant clas- sification system .................... 43
Front position lights Light switch .......................... 215
Front seat heaters .................. 329
Front seats .............................. 155 Adjustment ........................... 155
Cleaning ............................... 373
Correct driving posture ........... 27
Driving position memory....... 158
Head restraints ..................... 162
Memory recall function ......... 160
Power easy access system .. 158
Seat heaters ......................... 329
Seat position memory .......... 158
Seat ventilators .................... 329
Front side marker lights ........ 215 Light switch .......................... 215
Replacing light bulbs ............ 428
Front turn signal lights Replacing light bulbs ............ 428
Turn signal lever................... 208
Fuel Capacity ...............................477
Fuel gauge .......................89, 93
Gas station information ........548
Information .........
..................486
Refueling ..............................227
Type .............................477, 486
Warning light ........................444
Fuel filler door.........................228 If the fuel filler door cannot be opened ...............................462
Refueling ..............................227
Fuel gauge...........................89, 93
Fuses .......................................424
G
Garage door opene r ...............360
Gas station information .........548
Gauges ................................89, 93
Glove box ................................337
H
Headlights ...............................215 Automatic High Beam system...........................................218
Light switch...........................215
Replacing light bulbs ............428
Headlights aim ........................427
Head restraints .......................162
Head-up display ......................118 Driving position memory .......159
Driving support system display area ....................................120
HUD (Head-up display) switch ...........................................119
Hybrid System Indicator .......121
Memory recall function .........160
Navigation system-linked display ...........................................118
Outside temperature display 122
Pop-up display......................120
Settings ................................119