2022 TOYOTA VENZA HYBRID driver seat adjustment
[x] Cancel search: driver seat adjustmentPage 28 of 548
281-1. For safe use
Make sure that all occupants are
wearing their seat belts before
driving the vehicle. (P.30)
Use a child restraint system
appropriate for the child until the
child becomes large enough to properly wear the vehicle’s seat
belt. (
P.50)
Make sure that you can see
backward clearly by adjusting
the inside rear view mirror (if
equipped), Digital Rear-view
Mirror (if equipped) and outside
rear view mirrors properly.
( P.165, 166, 177)
WARNING
Observe the following precau-
tions.
Failure to do so m ay result in
death or serious injury.
●Do not adjust the position of the
driver’s seat while driving.
Doing so could cause the driver
to lose control of the vehicle.
●Do not place a cushion between
the driver or passenger and the
seatback. A cushion may pre-
vent correct pos ture from being
achieved, and reduce the effec-
tiveness of the seat belt and
head restraint.
●Do not place anything under the
front seats.
Objects placed under the front
seats may become jammed in
the seat tracks and stop the
seat from locking in place. This
may lead to an accident and the
adjustment mechanism may
also be damaged.
●Always observe the legal speed
limit when driving on public
roads.
●When driving over long dis-
tances, take regular breaks
before you start to feel tired.
Also, if you feel tired or sleepy
while driving, do not force your-
self to continue driving and take
a break immediately.
Correct use of the seat
belts
Adjusting the mirrors
Page 104 of 548
1042-1. Instrument cluster
Select to change the RCTA buzzer
volume.
■ RSA (Road Sign
Assist) (if equipped)
( P.254)
Select to set up the following
items.
Road Sign Assist on/off
Select to enable/disable the RSA
(Road Sign Assist).
“Notification method”
Select to change e ach notification
method used to notify the driver
when the system recognizes
excess speed and Do Not Enter
sign.
“Notification Level”
Select to change e ach notification
level used to notify the driver when
the system recognizes a speed limit
sign.
■Vehicle Settings
PBD (Power Back Door)
( P.139)
Select to set up the following items.
• System settings
Select to enable/disable the power
back door system.
• “Hands Free” (if equipped)
Select to enable/disable the Hands
Free Power Back Door operation.
• “Opening Adjustment”
Select the open position when
power back door is fully open.
•“Volume”
Select to set the volume of the
buzzer which sounds when the power back door system operates.
“TPWS setting” (Tire Pres-
sure Warning System)
( P.399)
• “Setting Pressure”
Select to initialize the tire pressure
warning system.
• “Identify Wheel”
Select to change the tire pressure
warning system sen sor ID code set.
To enable this function, a second
set of tire pressure warning system
sensor ID codes must be registered
by a Toyota dealer. For information
regarding changing the registered
ID code set, contact your Toyota
dealer.
• “Setting Unit”
Select to change the units of mea-
sure displayed.
Rear Seat Reminder
( P.135)
Select to enable/disable the rear
seat reminder function.
“Scheduled Maintenance”
( P.378)
Select to reset the scheduled main-
tenance information (message indi-
cating maintenance is required and
distance until the next mainte-
nance) after all ma intenance is per-
formed.
Oil Maintenance
Select to reset the Oil maintenance.
( P.390)
■ Settings
“Language”
Select to change the language on
Page 115 of 548
1152-1. Instrument cluster
2
Vehicle status information and indicators
Parking Support Brake function.
■HUD (Head-up display) (if
equipped) (P.119)
Select to change the head-up
display setting.
■ RSA (Road Sign
Assist) (if equipped)
( P.254)
Select to set up the following
items.
Road Sign Assist on/off
Select to enable/disable the RSA
(Road Sign Assist).
“Notification method”
Select to change e ach notification
method used to notify the driver
when the system recognizes
excess speed and Do Not Enter
sign.
“Notification Level”
Select to change e ach notification
level used to notify the driver when
the system recognizes a speed limit
sign.
■ Vehicle Settings
PBD (Power Back Door)
( P.139)
Select to set up the following items.
• System settings
Select to enable/disable the power
back door system.
• “Hands Free” (if equipped)
Select to enable/disable the Hands
Free Power Back Door operation.
• “Opening Adjustment”
Select the open position when power back door is fully open.
•“Volume”
Select to set the volume of the
buzzer which sounds when the
power back door system operates.
“TPWS setting” (Tire Pres-
sure Warning System)
( P.399)
• “Setting Pressure”
Select to initialize the tire pressure
warning system.
• “Identify Wheel”
Select to change the tire pressure
warning system sen sor ID code set.
To enable this function, a second
set of tire pressure warning system
sensor ID codes must be registered
by a Toyota dealer. For information
regarding changing the registered
ID code set, contact your Toyota
dealer.
• “Setting Unit”
Select to change the units of mea-
sure displayed.
Rear Seat Reminder
( P.135)
Select to enable/disable the rear
seat reminder function.
“Scheduled Maintenance”
( P.378)
Select to reset the scheduled main-
tenance information (message indi-
cating maintenance is required and
distance until the next mainte-
nance) after all ma intenance is per-
formed.
Oil Maintenance
Select to reset the Oil maintenance.
( P.390)
Page 156 of 548
1553-3. Adjusting the seats
3
Before driving
3-3.Adjusting the seats
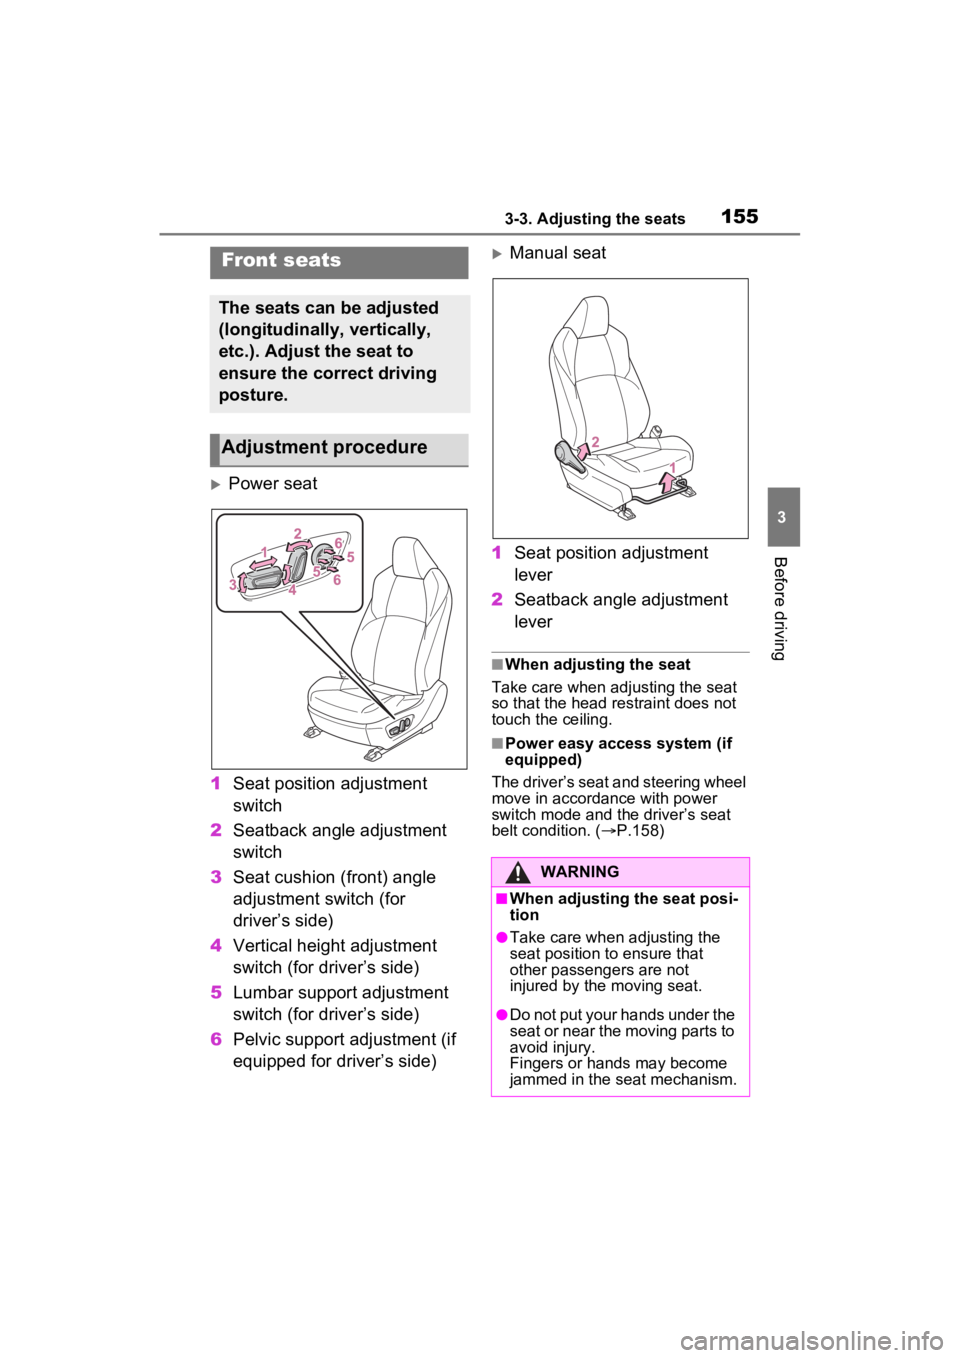
Power seat
1 Seat position adjustment
switch
2 Seatback angle adjustment
switch
3 Seat cushion (front) angle
adjustment switch (for
driver’s side)
4 Vertical height adjustment
switch (for driver’s side)
5 Lumbar support adjustment
switch (for driver’s side)
6 Pelvic support adjustment (if
equipped for driver’s side)
Manual seat
1 Seat position adjustment
lever
2 Seatback angle adjustment
lever
■When adjusting the seat
Take care when adjusting the seat
so that the head restraint does not
touch the ceiling.
■Power easy access system (if
equipped)
The driver’s seat and steering wheel
move in accordance with power
switch mode and th e driver’s seat
belt condition. ( P.158)
Front seats
The seats can be adjusted
(longitudinally, vertically,
etc.). Adjust the seat to
ensure the correct driving
posture.
Adjustment procedure
WARNING
■When adjusting the seat posi-
tion
●Take care when adjusting the
seat position to ensure that
other passengers are not
injured by the moving seat.
●Do not put your hands under the
seat or near the moving parts to
avoid injury.
Fingers or hands may become
jammed in the seat mechanism.
Page 157 of 548
1563-3. Adjusting the seats
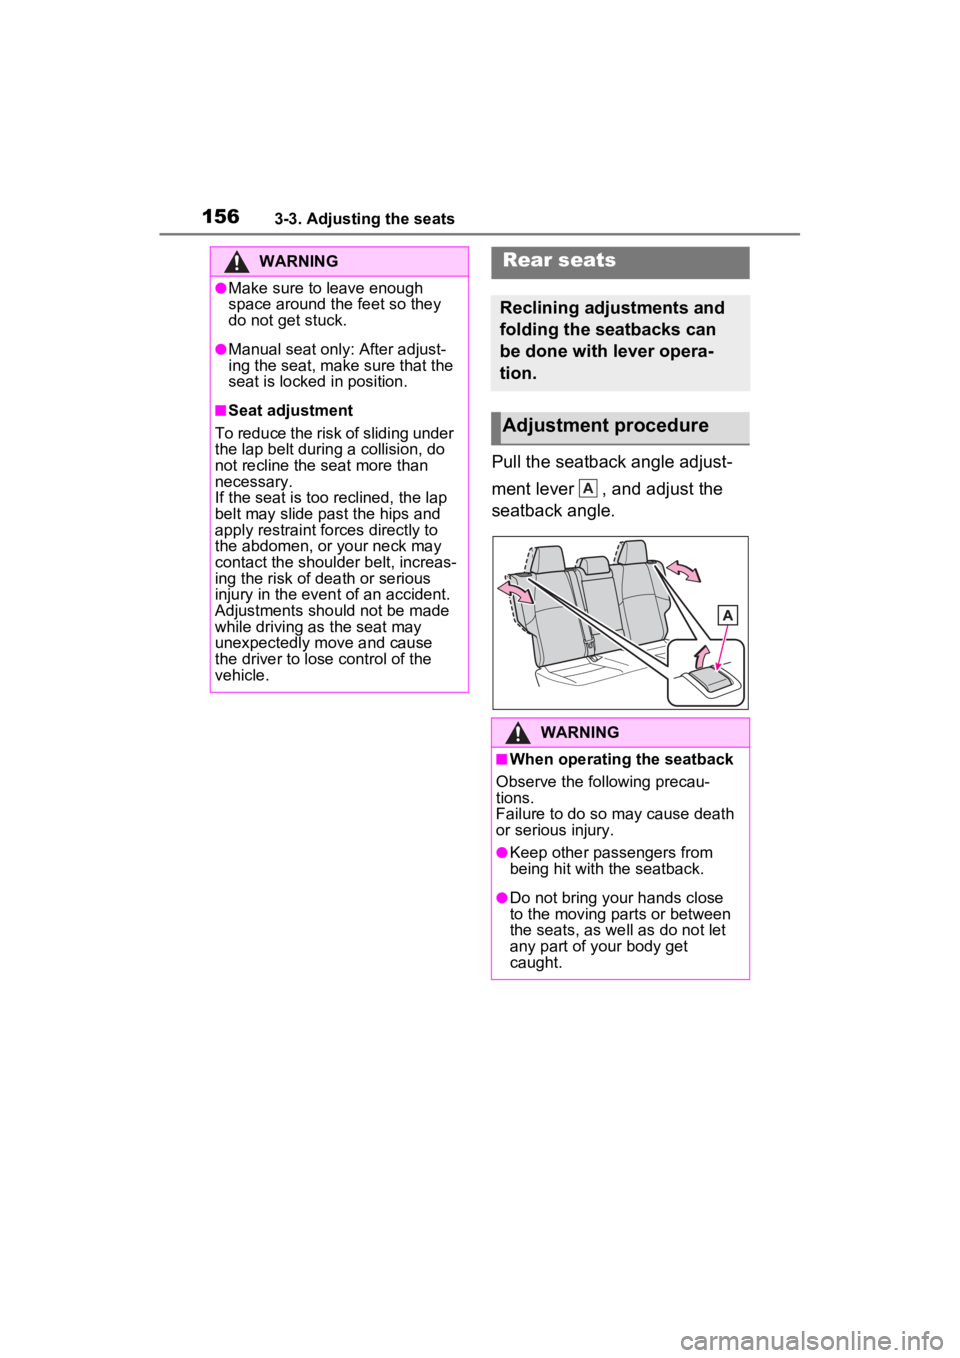
Pull the seatback angle adjust-
ment lever , and adjust the
seatback angle.
WARNING
●Make sure to leave enough
space around the feet so they
do not get stuck.
●Manual seat only: After adjust-
ing the seat, make sure that the
seat is locked in position.
■Seat adjustment
To reduce the risk of sliding under
the lap belt during a collision, do
not recline the seat more than
necessary.
If the seat is too reclined, the lap
belt may slide past the hips and
apply restraint forces directly to
the abdomen, or your neck may
contact the shoulder belt, increas-
ing the risk of death or serious
injury in the event of an accident.
Adjustments should not be made
while driving as the seat may
unexpectedly move and cause
the driver to lose control of the
vehicle.
Rear seats
Reclining adjustments and
folding the seatbacks can
be done with lever opera-
tion.
Adjustment procedure
WARNING
■When operating the seatback
Observe the following precau-
tions.
Failure to do so may cause death
or serious injury.
●Keep other passengers from
being hit with the seatback.
●Do not bring your hands close
to the moving parts or between
the seats, as we ll as do not let
any part of your body get
caught.
A
Page 161 of 548
1603-3. Adjusting the seats
●Operate the tilt and telescopic
steering control switch (only can-
cels steering wheel position
recall).
■Seat positions that can be
memorized (P.155)
The positions adjusted by the fol-
lowing procedure can be recorded:
●Seat position adjustment
●Seatback angle adjustment
●Seat cushion (front) angle adjust-
ment
●Vertical height adjustment
■Operating the driving position
memory after turning the power
switch to OFF
Recorded seat positions can be
activated up to 1 80 seconds after
the driver’s door is opened and
another 60 seconds after it is closed
again.
■In order to correctly use the
driving position memory func-
tion
If a seat position is already in the
furthest possible position and the
seat is operated in the same direc-
tion, the recorded position may be
slightly different w hen it is recalled.
■When recalling the driving posi-
tion
Take care when recalling the driving
position so that the head restraint
does not touch the ceiling.
■When the recorded seat posi-
tion cannot be recalled
The seat position may not be
recalled in some situations when the
seat position is recorded in a certain
range. For details, contact your
Toyota dealer.
■Registering procedure
Record your driving position to
button “1” or “2” before perform-
ing the following:
Carry only the key you want to
register, and then close the
driver’s door.
If 2 or more keys are in the vehi-
cle, the driving position cannot
be recorded properly.
1 Check that the shift lever is in
P.
2 Turn the power switch to ON.
3 Recall the driving position
that you want to record.
4 While pressing the recalled
button, press and hold the
door lock switch (either lock
or unlock) until the buzzer
sounds.
If the button could not be regis-
tered, the buzzer sounds continu-
WARNING
■Seat adjustment caution
Take care during seat adjustment
so that the seat does not strike
the rear passenger or squeeze
your body against the steering
wheel.
Registering/recall/cancel-
ing a driving position to
an electronic key (mem-
ory recall function)
Page 165 of 548
1643-4. Adjusting the steering wheel and mirrors
3-4.Adjusting the steering wheel and mirrors
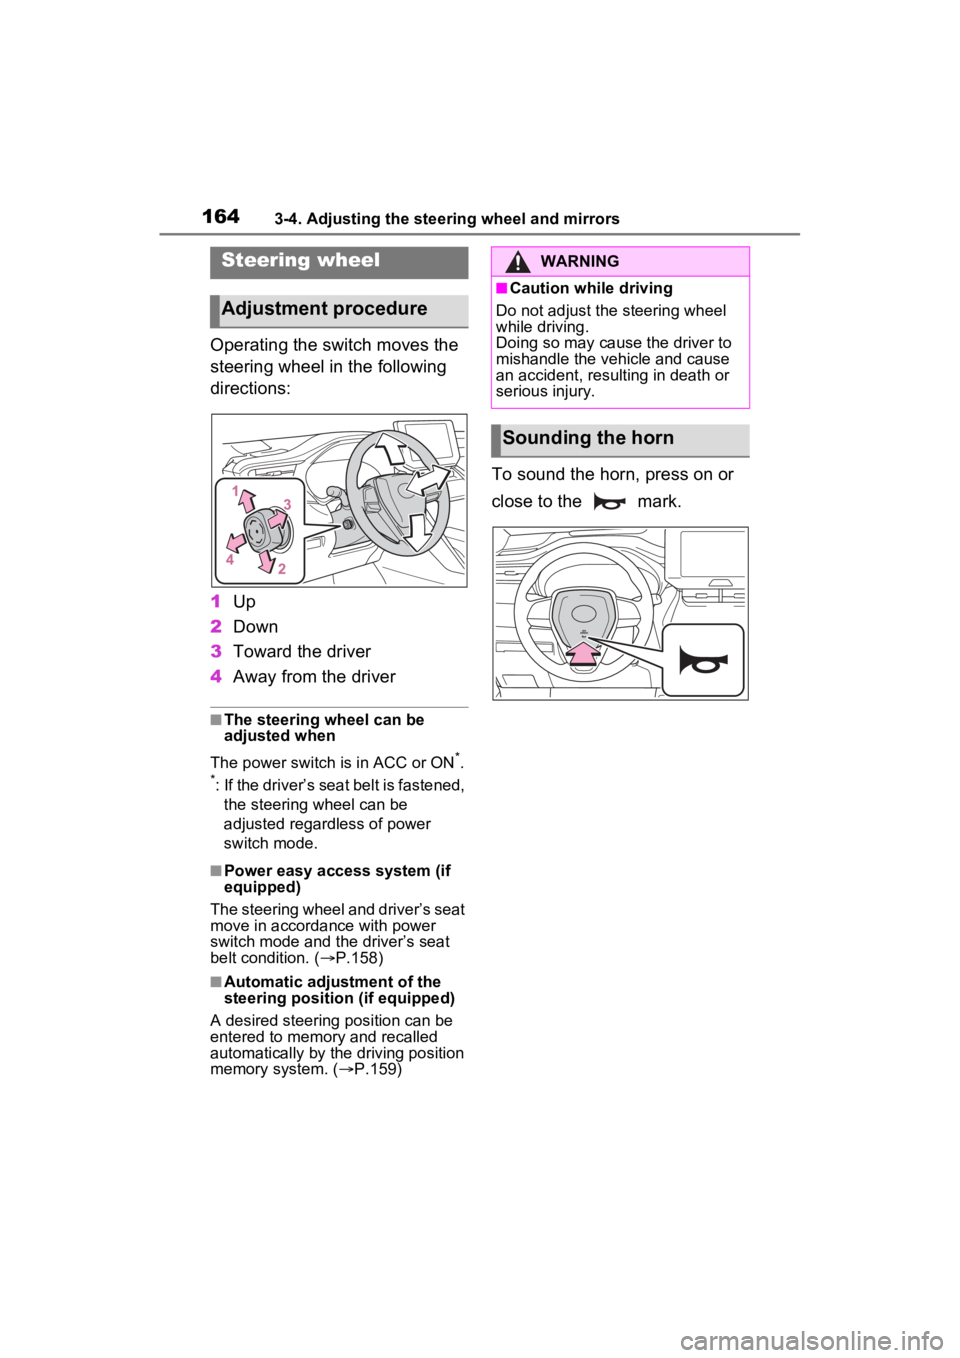
Operating the switch moves the
steering wheel in the following
directions:
1Up
2 Down
3 Toward the driver
4 Away from the driver
■The steering wheel can be
adjusted when
The power switch is in ACC or ON
*.
*: If the driver’s seat belt is fastened,
the steering wheel can be
adjusted regardless of power
switch mode.
■Power easy access system (if
equipped)
The steering wheel and driver’s seat
move in accordance with power
switch mode and the driver’s seat
belt condition. ( P.158)
■Automatic adjustment of the
steering position (if equipped)
A desired steering position can be
entered to memory and recalled
automatically by the driving position
memory system. ( P.159)
To sound the horn, press on or
close to the mark.
Steering wheel
Adjustment procedure
WARNING
■Caution while driving
Do not adjust the steering wheel
while driving.
Doing so may cause the driver to
mishandle the vehicle and cause
an accident, resulting in death or
serious injury.
Sounding the horn
Page 327 of 548
3275-1. Using the air conditioning system and defogger
5
Interior features
in the rear seats
The windshield defogger is
not operating
While operating, illuminates.
■Manually turning front seat
concentrated airflow mode
on/off
In front seat concentrated air-
flow mode, directing airflow to
the front seats only and to the all
seats can be switched via switch
operation. When the mode has
been switched manually, auto-
matic airflow control stops oper-
ating.
Select on the option control
screen of the air conditioning
control screen and switch the
airflow.
Indicator illuminated: Airflow
to the front seats only
Indicator off: Airflow to the all
seats
■Operation of automatic airflow
control
●In order to maintain a comfortable
interior, airflow may be directed to
seats without pa ssengers immedi-
ately after the hybrid system is
started and at other times depend-
ing on the outside temperature.
●After the hybrid system is started,
if passengers move around inside
or enter/exit the vehicle, the sys-
tem cannot accurately detect the
presence of passengers and auto-
matic airflow cont rol will not oper-
ate.
■Operation of manual airflow
control
Even if the funct ion is manually
switched to directing airflow to only
the front seats, w hen a rear seat is
occupied, it may automatically direct
airflow to all seats.
■To return to automatic airflow
control
1 With the indicator off, turn the
power switch to OFF.
2 After 60 minutes or more elapse,
turn the power switch to ON.
■Front seat concentrated airflow
mode
When using front seat concentrated
airflow mode to direct airflow to the
driver side only, the passenger-side
temperature cannot be adjusted
using the air conditioner control
screen in Toyota m ulti-operation
touch.
Operation is possible at this time
using the passenger-side tempera-
ture adjustment switch on the air
conditioning control panel.
This feature is used to prevent
ice from building up on the wind-
shield and wiper blades.
Press the switch to turn the sys-
tem on/off.
The indicator comes on when the
system is on.
The windshield wiper de-icer will
automatically turn off after approxi-
mately 15 minutes.
Windshield wiper de-icer
(if equipped)