2022 TOYOTA VENZA HYBRID steering wheel
[x] Cancel search: steering wheelPage 330 of 548
3305-1. Using the air conditioning system and defogger
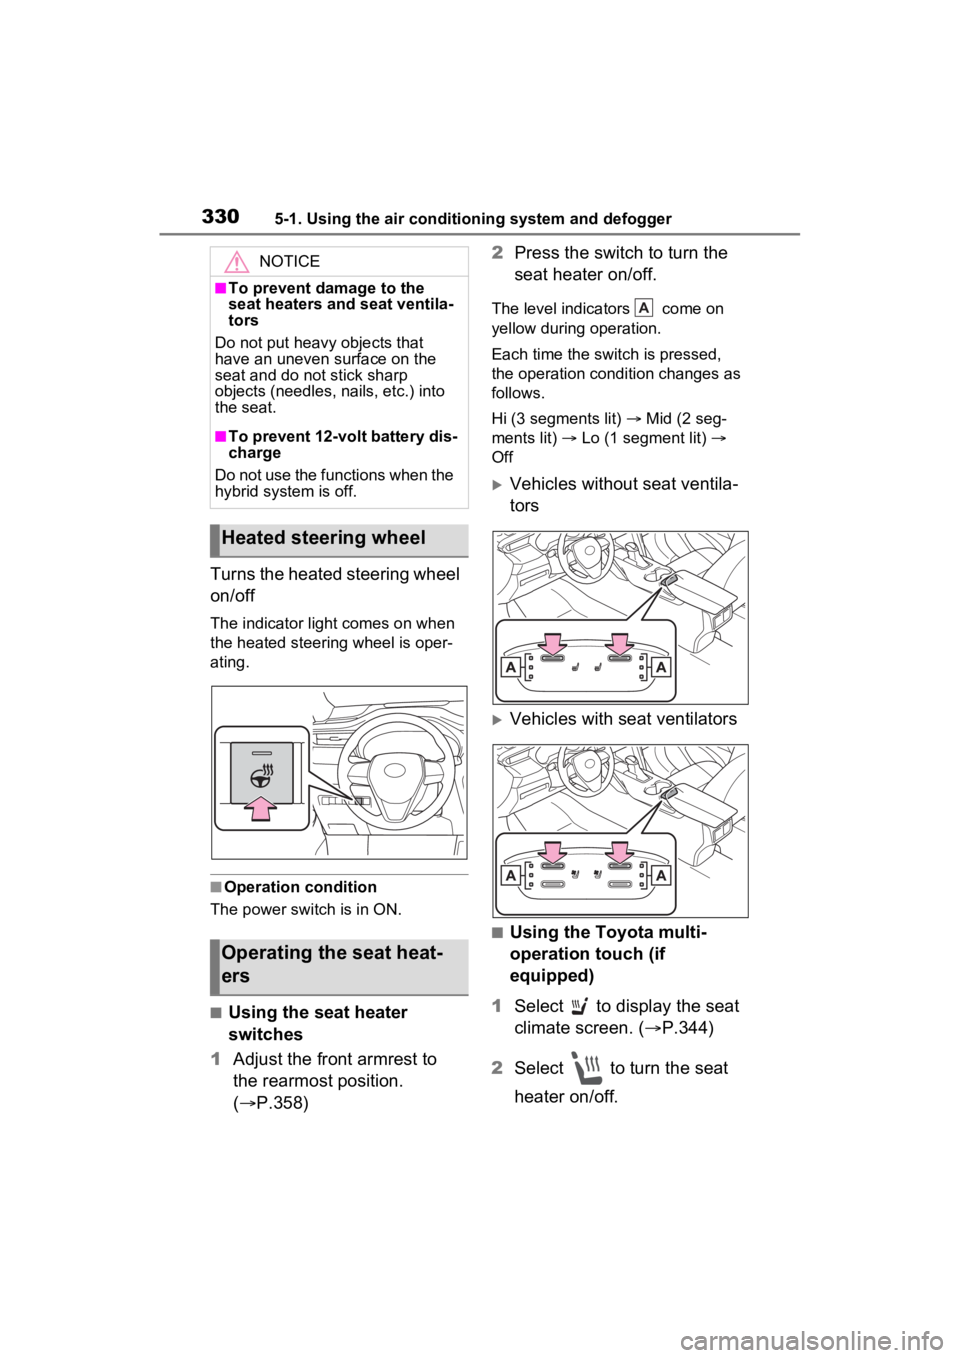
Turns the heated steering wheel
on/off
The indicator light comes on when
the heated steering wheel is oper-
ating.
■Operation condition
The power swit ch is in ON.
■Using the seat heater
switches
1 Adjust the front armrest to
the rearmost position.
( P.358) 2
Press the switch to turn the
seat heater on/off.
The level indica tors come on
yellow during operation.
Each time the switch is pressed,
the operation condition changes as
follows.
Hi (3 segments lit) Mid (2 seg-
ments lit) Lo (1 segment lit)
Off
Vehicles without seat ventila-
tors
Vehicles with seat ventilators
■Using the Toyota multi-
operation touch (if
equipped)
1 Select to display the seat
climate screen. ( P.344)
2 Select to turn the seat
heater on/off.
NOTICE
■To prevent damage to the
seat heaters and seat ventila-
tors
Do not put heavy objects that
have an uneven surface on the
seat and do not stick sharp
objects (needles, nails, etc.) into
the seat.
■To prevent 12-volt battery dis-
charge
Do not use the functions when the
hybrid system is off.
Heated steering wheel
Operating the seat heat-
ers
A
Page 378 of 548

3786-2. Maintenance
■Resetting the message indicat-
ing maintenance is required
After the required maintenance is
performed according to the mainte-
nance schedule, please reset the
reminder light or message.
To reset the reminder light or mes-
sage, follow the procedure
described below:
Vehicles with 4.2-inch display
1 Press or of the meter
control switches and select
on the multi-information display.
2 Press or of the meter
control switches and select
“Vehicle Settings”. Then press
.
3 Press or of the meter
control switches and select
“Scheduled Maintenance”. Then
press .
4 Select “Yes” and press .
Vehicles with 7-inch display
1 Press or of the meter
control switches on the steering
wheel and select .
2 Press or of the meter
control switches and select
“ Vehicle Settings”.
Then press and hold .
3 Press or of the meter
control switches and select
“Scheduled Maintenance”, and
then press .
4 Select “Yes” and press .
You can perform some mainte-
nance procedures by yourself.
Please be aware that do-it-your-
self maintenance may affect
warranty coverage.
The use of Toyota Repair Manuals
is recommended.
For details about warranty cover-
age, refer to the separate “Owner’s
Warranty Informat ion Booklet” or
“Owner’s Manual Supplement”.
Do-it-yourself mainte-
nance
Page 380 of 548
3806-2. Maintenance
Brake pedal
• Does the brake pedal move
smoothly?
• Does the brake pedal have
appropriate
clearance from
the floor?
• Does the brake pedal have the
correct amount
of free play?
Brakes
• The vehicle should not pull to
one side when
the brakes are
applied.
• The brakes should work
effectively.
• The brake pedal should not feel
spongy.
• The brake pedal should not get
too close to the
floor when the
brakes are
applied.
Head
restraints
• Do the head restraints move
smoothly and
lock securely?
Indica-
tors/buzzers
• Do the indica-tors and buzzers
function prop-
erly?
ItemsCheck points
Lights
• Do all the lights come on?
• Are the head- lights aimed cor-
rectly?( P.427)
Parking brake
• Does the park-
ing brake oper-
ate normally?
• When parked on a slope and the
parking brake is
on, is the vehicle
securely
stopped?
Seat belts
• Do the seat belts operate
smoothly?
• The seat belts should not be
damaged.
Seats
• Do the seat con-trols operate
properly?
Steering wheel
• Does the steer-ing wheel rotate
smoothly?
• Does the steer- ing wheel have
the correct
amount of free
play?
• There should not be any strange
sounds coming
from the steer-
ing wheel.
ItemsCheck points
Page 431 of 548
4317-1. Essential information
7
When trouble arises
1Steadily step on the brake
pedal with both feet and
firmly depress it.
Do not pump the brake pedal
repeatedly as this will increase the
effort required to slow the vehicle.
2Shift the shift lever to N.
If the shift lever is shifted to N
3 After slowing down, stop the
vehicle in a safe place by the
road.
4 Stop the hybrid system.
If the shift lever cannot be
shifted to N
3 Keep depressing the brake
pedal with both feet to reduce
vehicle speed as much as
possible.
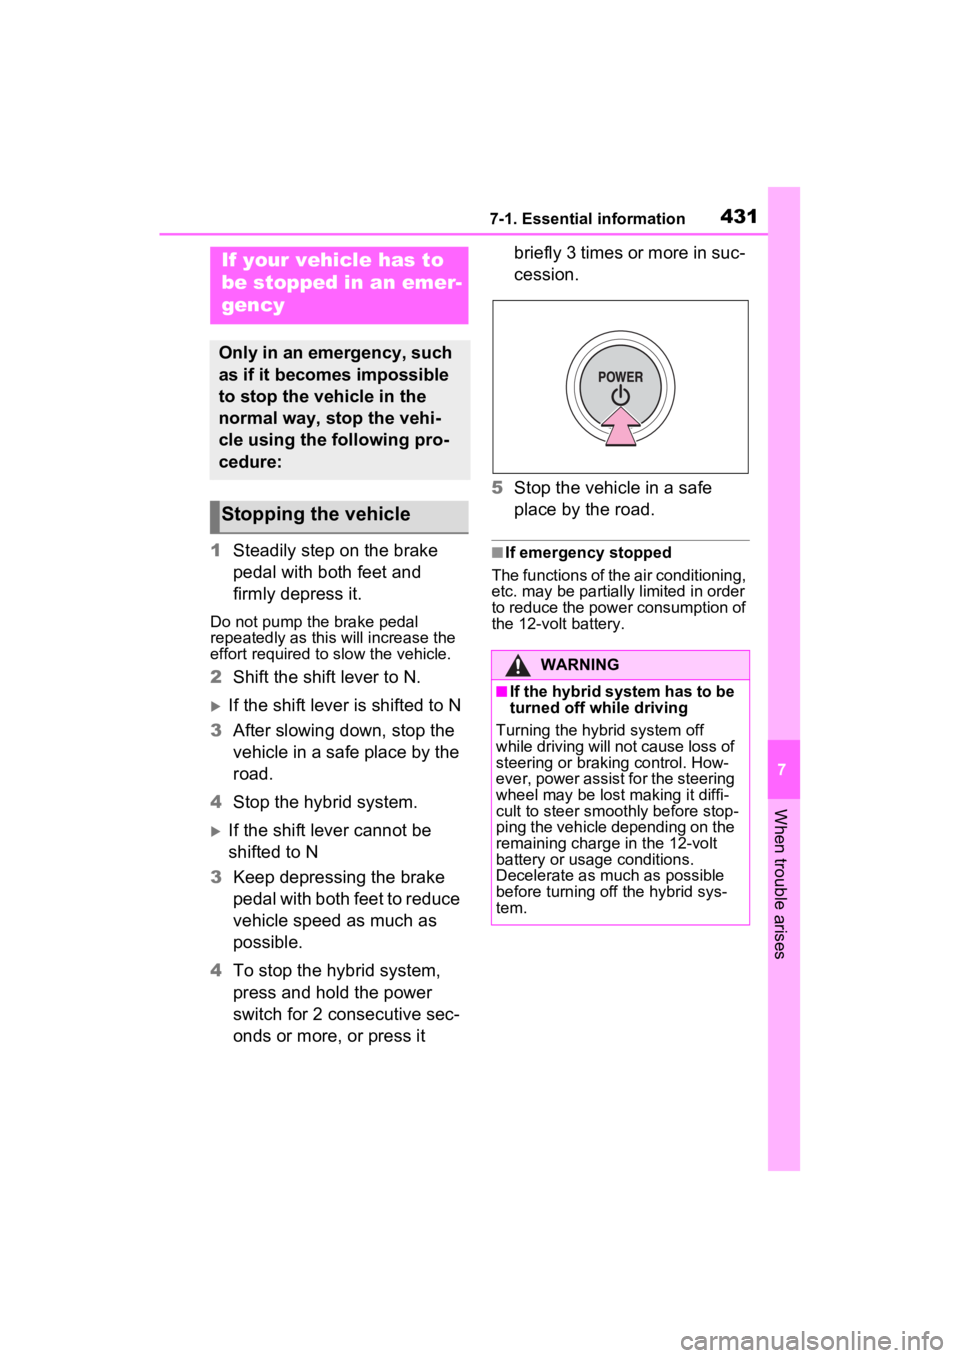
4 To stop the hybrid system,
press and hold the power
switch for 2 consecutive sec-
onds or more, or press it briefly 3 times or more in suc-
cession.
5 Stop the vehicle in a safe
place by the road.
■If emergency stopped
The functions of the air conditioning,
etc. may be partially limited in order
to reduce the power consumption of
the 12-volt battery.
If your vehicle has to
be stopped in an emer-
gency
Only in an emergency, such
as if it becomes impossible
to stop the vehicle in the
normal way, stop the vehi-
cle using the following pro-
cedure:
Stopping the vehicle
WARNING
■If the hybrid system has to be
turned off while driving
Turning the hybrid system off
while driving will not cause loss of
steering or braking control. How-
ever, power assist for the steering
wheel may be lost making it diffi-
cult to steer smoothly before stop-
ping the vehicle depending on the
remaining charge in the 12-volt
battery or usage conditions.
Decelerate as mu ch as possible
before turning off the hybrid sys-
tem.
Page 435 of 548
4357-2. Steps to take in an emergency
7
When trouble arises
When using a flat-bed truck to
transport the vehicle, use tire
strapping belts. Refer to the
owner’s manual of the flat-bed
truck for the tire strapping
method.
In order to suppress vehicle move-
ment during transportation, set the
parking brake and turn the power
switch off.
If a tow truck is not available in
an emergency, your vehicle may
be temporarily towed using
cables or chains secured to the
emergency towing eyelets.
This should only be attempted
on hard surfaced roads for short
distances at under 18 mph (30
km/h).
A driver must be in the vehicle to
steer and operate the brakes.
The vehicle’s wheels, drive
train, axles, steering and brakes
must be in good condition.
To have your vehicle towed by
another vehicle, the towing eye-
let must be installed to your
vehicle. Install the towing eyelet
using the following procedure. 1
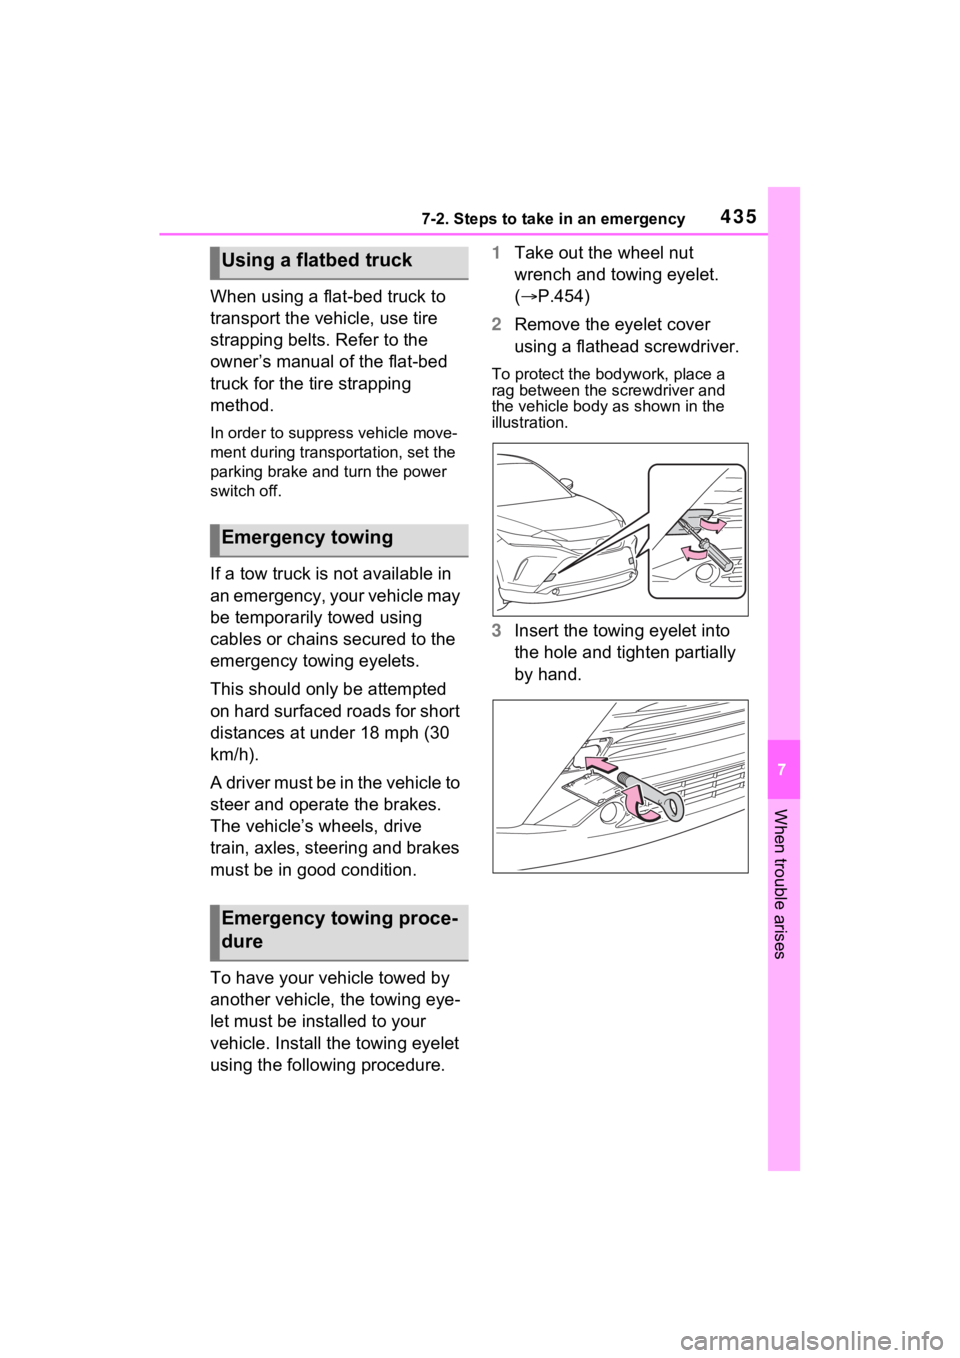
Take out the wheel nut
wrench and towing eyelet.
( P.454)
2 Remove the eyelet cover
using a flathead screwdriver.
To protect the bod ywork, place a
rag between the screwdriver and
the vehicle body as shown in the
illustration.
3 Insert the towing eyelet into
the hole and tighten partially
by hand.
Using a flatbed truck
Emergency towing
Emergency towing proce-
dure
Page 436 of 548
4367-2. Steps to take in an emergency
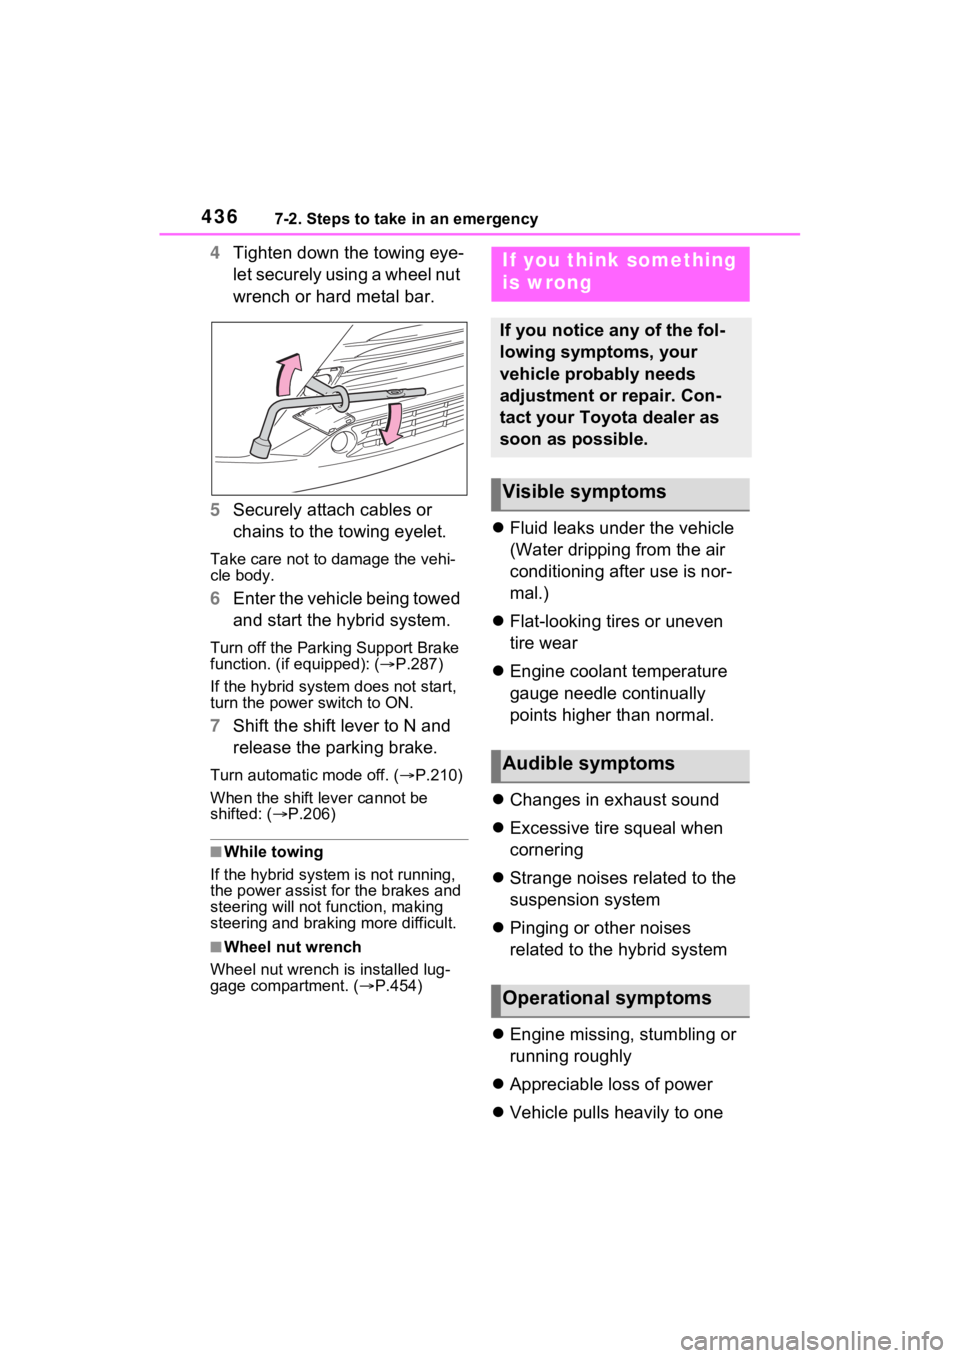
4Tighten down the towing eye-
let securely using a wheel nut
wrench or hard metal bar.
5 Securely attach cables or
chains to the towing eyelet.
Take care not to damage the vehi-
cle body.
6Enter the vehicle being towed
and start the hybrid system.
Turn off the Parkin g Support Brake
function. (if equipped): ( P.287)
If the hybrid system does not start,
turn the power switch to ON.
7 Shift the shift lever to N and
release the parking brake.
Turn automatic mode off. ( P.210)
When the shift le ver cannot be
shifted: ( P.206)
■While towing
If the hybrid system is not running,
the power assist for the brakes and
steering will not function, making
steering and braking more difficult.
■Wheel nut wrench
Wheel nut wrench is installed lug-
gage compartment. ( P.454)
Fluid leaks under the vehicle
(Water dripping from the air
conditioning after use is nor-
mal.)
Flat-looking tires or uneven
tire wear
Engine coolant temperature
gauge needle continually
points higher than normal.
Changes in exhaust sound
Excessive tire squeal when
cornering
Strange noises related to the
suspension system
Pinging or other noises
related to the hybrid system
Engine missing, stumbling or
running roughly
Appreciable loss of power
Vehicle pulls heavily to one
If you think something
is wrong
If you notice any of the fol-
lowing symptoms, your
vehicle probably needs
adjustment or repair. Con-
tact your Toyota dealer as
soon as possible.
Visible symptoms
Audible symptoms
Operational symptoms
Page 447 of 548
4477-2. Steps to take in an emergency
7
When trouble arises
■When a tire is replaced with a
compact spare tire
The compact spare tire is not
equipped with a tire pressure warn-
ing valve and transmitter. If a tire
goes flat, the tire pressure warning
light will not turn o ff even though the
flat tire has been replaced with the
spare tire. Replace the spare tire
with the standard tire and adjust the
tire inflation pressure. The tire pres-
sure warning light will go off after a
few minutes.
■Conditions that the tire pres-
sure warning system may not
function properly
P.400
WARNING
■If a warning light comes on or
a warning buzzer sounds
when a warning message is
shown on the multi-informa-
tion display
*
Check and follow the message
shown on the multi-information
display.
Failure to do so m ay result in
death or serious injury.
*: Warning lights illuminate in red
or yellow and the warning
buzzer beeps on ce or sounds
continuously.
■When the electric power
steering system warning light
comes on
When the light comes on yellow,
the assist to the power steering is
restricted. When the light comes
on red, the assist to the power
steering is lost and handling oper-
ations of the steering wheel
become extremely heavy.
If the steering wheel becomes
heavier than usual when operat-
ing, hold firmly and operate using
more force than usual.
■If the tire pr essure warning
light comes on
Be sure to observe the following
precautions. Failure to do so
could cause a loss of vehicle con-
trol and result in death or serious
injury.
●Stop your vehicle in a safe
place as soon as possible.
Adjust the tire inflation pressure
immediately.
●If the tire pressure warning light
comes on even after tire infla-
tion pressure adjustment, it is
probable that you have a flat
tire. Check the tires. If a tire is
flat, change it with the spare tire
and have the flat tire repaired by
the nearest Toyota dealer.
●Avoid abrupt maneuvering and
braking. If the vehicle tires dete-
riorate, you could lose control of
the steering wheel or the
brakes.
■If a blowout or sudden air
leakage should occur
The tire pressure warning system
may not activate immediately.
■Maintenance of the tires
Each tire, includi ng the spare (if
provided), should be checked
monthly when cold and inflated to
the inflation pressure recom-
mended by the vehicle manufac-
turer on the vehicle placard or tire
inflation pressure label (tire and
load information label). (If your
vehicle has tires of a different size
than the size indicated on the
vehicle placard or tire inflation
pressure label [tire and load infor-
mation label], you should deter-
mine the proper tire inflation
pressure for those tires.)
Page 492 of 548
4928-1. Specifications
■Temperature A, B, C
The temperature grades are A
(the highest), B, and C, repre-
senting the tire’s resistance to
the generation of heat and its
ability to dissipate heat when
tested under controlled condi-
tions on a specified indoor labo-
ratory test wheel.
Sustained high temperature can
cause the material of the tire to
degenerate and reduce tire life, and
excessive temperature can lead to
sudden tire failure.
Grade C corresponds to a level of performance which all passenger
car tires must meet under the Fed-
eral Motor Vehicle Safety Standard
No. 109.
Grades B and A represent higher
levels of performance on the labo-
ratory test wheel than the minimum
required by law.
Warning: The temperature grades
of a tire assume tha
t it is properly
inflated and not overloaded.
Excessive speed, underinflation, or
excessive loading, either sepa-
rately or in combination, can cause
heat buildup and possible tire fail-
ure.
Glossary of tire terminology
Tire related termMeaning
Cold tire inflation pres-
sureTire pressure when the vehicle has been parked
for three hours or more, or has not been driven
more than 1 mile or 1.5 km under that condition
Maximum inflation pres-
sureThe maximum cold inflated pressure to which a
tire may be inflated, shown on the sidewall of
the tire
Recommended inflation
pressureCold tire inflation pressure recommended by a
manufacturer
Accessory weight
The combined weight (in excess of those stan-
dard items which may be replaced) of hybrid
transmission, power steering, power brakes,
power windows, power seats, radio and heater,
to the extent that these items are available as
factory-installed equipment (whether installed or
not)
Curb weight
The weight of a motor vehicle with standard
equipment, including th e maximum capacity of
fuel, oil and coolant, and if so equipped, air con-
ditioning and additional weight optional engine