2022 TOYOTA VENZA HYBRID air conditioning
[x] Cancel search: air conditioningPage 344 of 548
3445-4. Using the other interior features
5-4.Using the other interior features
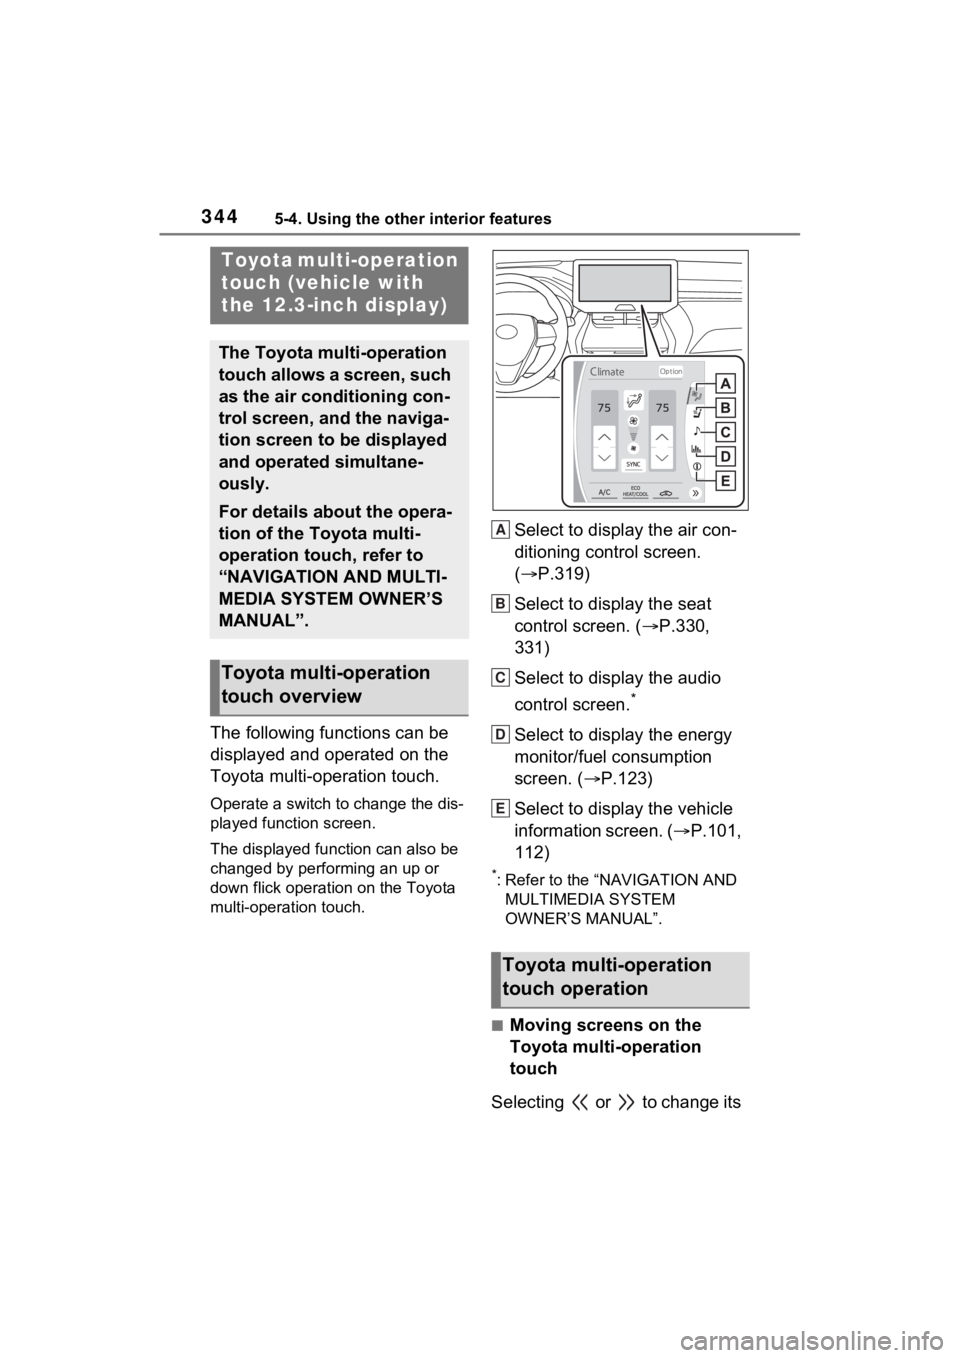
The following functions can be
displayed and operated on the
Toyota multi-operation touch.
Operate a switch to change the dis-
played function screen.
The displayed function can also be
changed by performing an up or
down flick operation on the Toyota
multi-operation touch.
Select to display the air con-
ditioning control screen.
( P.319)
Select to display the seat
control screen. ( P.330,
331)
Select to display the audio
control screen.
*
Select to display the energy
monitor/fuel consumption
screen. ( P.123)
Select to display the vehicle
information screen. ( P.101,
112)
*: Refer to the “NAVIGATION AND MULTIMEDIA SYSTEM
OWNER’S MANUAL”.
■Moving screens on the
Toyota multi-operation
touch
Selecting or to change its
Toyota multi-operation
touch (vehicle with
the 12.3-inch display)
The Toyota multi-operation
touch allows a screen, such
as the air conditioning con-
trol screen, and the naviga-
tion screen to be displayed
and operated simultane-
ously.
For details about the opera-
tion of the Toyota multi-
operation touch, refer to
“NAVIGATION AND MULTI-
MEDIA SYSTEM OWNER’S
MANUAL”.
Toyota multi-operation
touch overview
Toyota multi-operation
touch operation
A
B
C
D
E
Page 369 of 548
369
6
6
Maintenance and care
Maintenance and care
6-1. Maintenance and careCleaning and protecting the vehicle exterior .......... 370
Cleaning and protecting the vehicle interior ........... 373
6-2. Maintenance Maintenance requirements.................................. 377
General maintenance.. 379
Emission inspection and maintenance (I/M) pro-
grams ........................ 381
6-3. Do-it-yourself mainte- nance
Do-it-yourself service pre- cautions ..................... 383
Hood ........................... 385
Positioning a floor jack 386
Engine compartment ... 388
12-volt battery ............. 394
Tires ............................ 397
Tire inflation pressure . 409
Wheels ......... ...............411
Air conditioning filter .... 413
Cleaning the hybrid battery (traction battery) air intake
vent and filter............. 415
Wiper insert replacement .................................. 419
Electronic key battery.. 422
Checking and replacing fuses.......................... 424Headlight aim ..............
427
Exterior lights .............. 428
Page 373 of 548
3736-1. Maintenance and care
6
Maintenance and care
Remove dirt and dust using a
vacuum cleaner. Wipe dirty
surfaces with a cloth damp-
ened with lukewarm water.
If dirt cannot be removed,
wipe it off with a soft cloth
dampened with neutral deter-
gent diluted to approximately
1%.
Wring out any excess water
from the cloth and thoroughly
wipe off remaining traces of
detergent and water.
■Shampooing the carpets
There are several commercial foam-
ing-type cleaners available. Use a
sponge or brush to apply the foam.
Rub in overlapping circles. Do not
use water. Wipe dirty surfaces and
let them dry. Exce llent results are
obtained by keeping the carpet as
dry as possible.
■Handling the seat belts
Clean with mild soap and lukewarm
water using a clot h or sponge. Also
check the belts periodically for
excessive wear, fraying or cuts.
■Front side wi ndows with UV
protective coating
The front side windows have UV
protective coating. To prevent any
NOTICE
■When using a high pressure
car wash
●When washing the vehicle, do
not spray the came ra or its sur-
rounding area directly with a
high pressure washer. Shock
applied from high pressure
water may cause the device to
not operate normally.
●Do not spray water directly on
the radar which is equipped
behind the emblem. Otherwise
it may cause the device to be
damaged.
●Do not bring the nozzle tip close
to boots (rubber or resin manu-
factured cover), connectors or
the following parts. The parts
may be damaged if they come
into contact with high-pressure
water.
• Traction related parts
• Steering parts
• Suspension parts
• Brake parts
●Keep the cleaning nozzle at
least 11.9 in. (30 cm) away from
the vehicle body. Otherwise
resin section, such as moldings
and bumpers, may be deformed
and damaged. Also, do not con-
tinuously hold the nozzle in the
same place.
●Do not spray the lower part of
the windshield continuously. If
water enters the air conditioning
system intake located near the
lower part of the windshield, the
air conditioning system may not
operate correctly.
●Do not wash the underside of
the vehicle usin g a high pres-
sure car washer.
Cleaning and protect-
ing the vehicle interior
Perform cleaning in a man-
ner appropriate to each
component and its material.
Protecting the vehicle
interior
Page 413 of 548
4136-3. Do-it-yourself maintenance
6
Maintenance and care
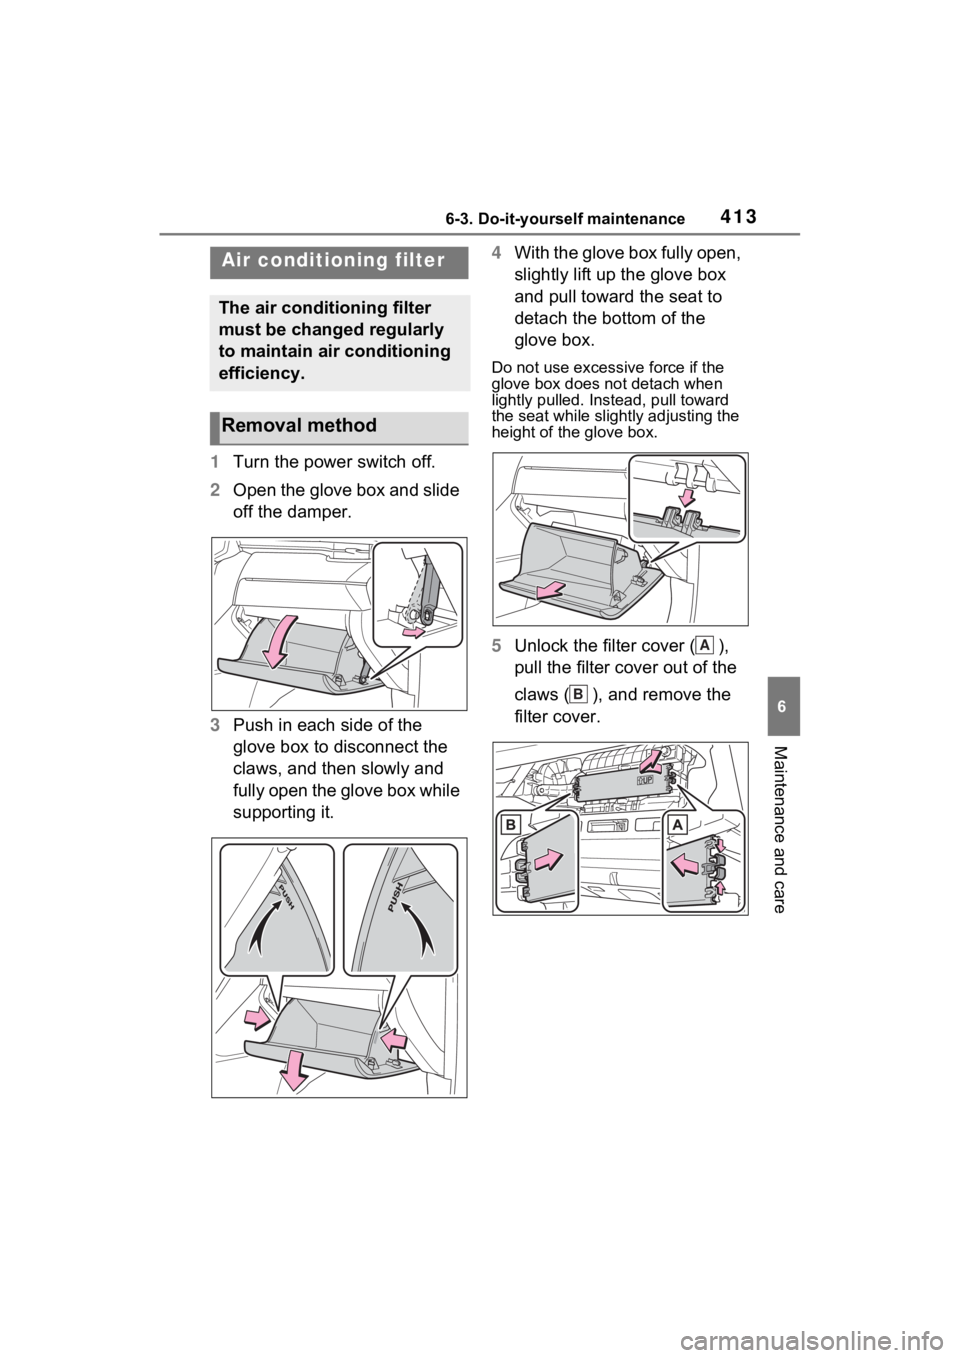
1Turn the power switch off.
2 Open the glove box and slide
off the damper.
3 Push in each side of the
glove box to disconnect the
claws, and then slowly and
fully open the glove box while
supporting it. 4
With the glove box fully open,
slightly lift up the glove box
and pull toward the seat to
detach the bottom of the
glove box.
Do not use excessi ve force if the
glove box does not detach when
lightly pulled. Ins tead, pull toward
the seat while slightly adjusting the
height of the glove box.
5 Unlock the filter cover ( ),
pull the filter cover out of the
claws ( ), and remove the
filter cover.
Air condition ing filter
The air conditioning filter
must be changed regularly
to maintain air conditioning
efficiency.
Removal method
A
B
Page 414 of 548
4146-3. Do-it-yourself maintenance
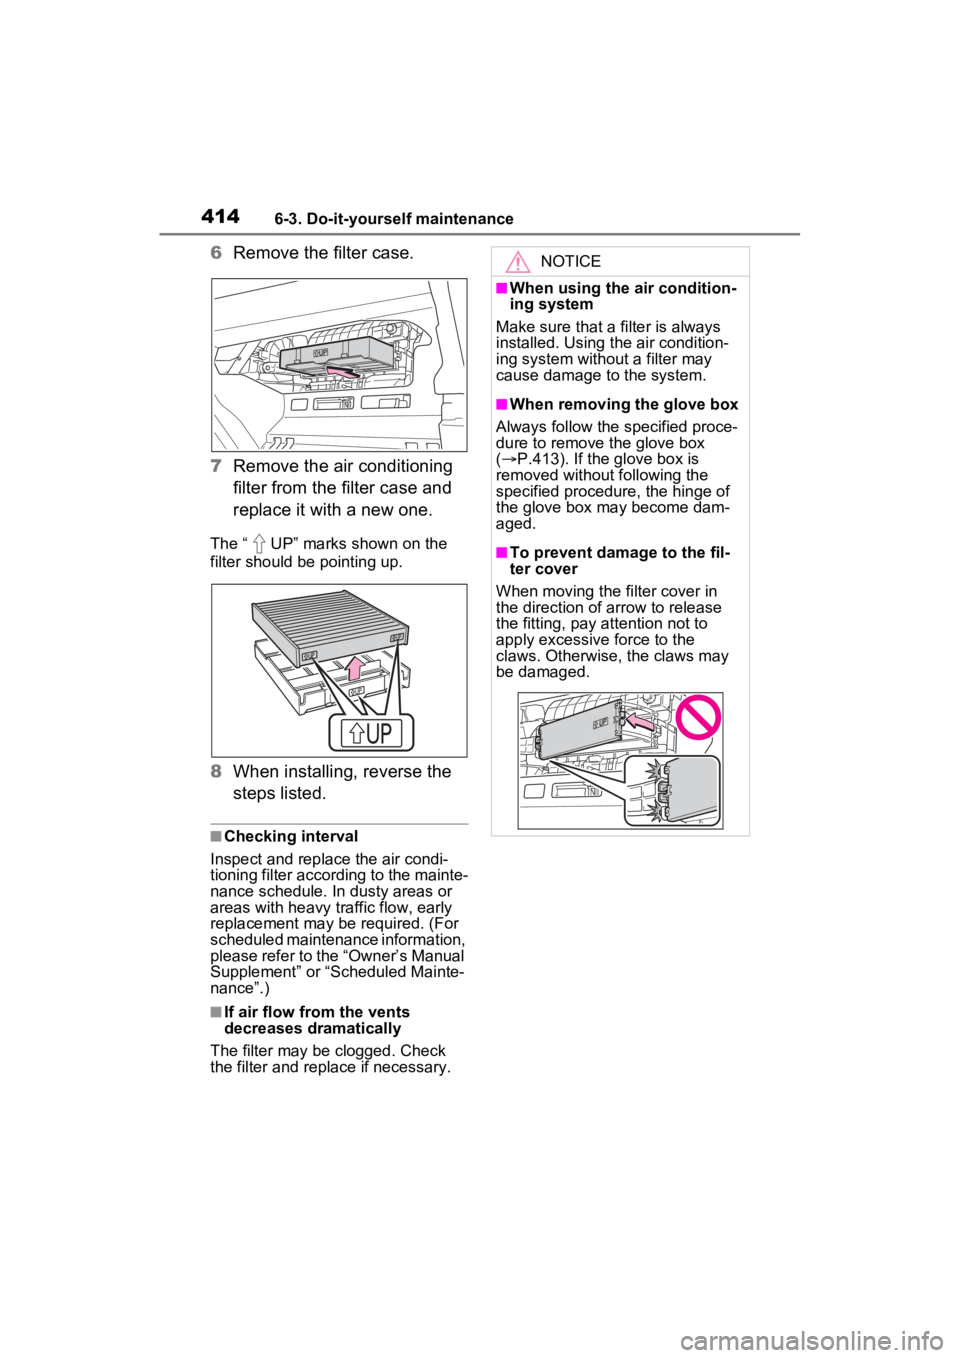
6Remove the filter case.
7 Remove the air conditioning
filter from the filter case and
replace it with a new one.
The “ UP” marks shown on the
filter should be pointing up.
8When installing, reverse the
steps listed.
■Checking interval
Inspect and replace the air condi-
tioning filter according to the mainte-
nance schedule. In dusty areas or
areas with heavy traffic flow, early
replacement may be required. (For
scheduled maintenance information,
please refer to the “Owner’s Manual
Supplement” or “Scheduled Mainte-
nance”.)
■If air flow from the vents
decreases dramatically
The filter may be clogged. Check
the filter and replace if necessary.
NOTICE
■When using the air condition-
ing system
Make sure that a filter is always
installed. Using the air condition-
ing system without a filter may
cause damage to the system.
■When removing the glove box
Always follow the specified proce-
dure to remove the glove box
( P.413). If the glove box is
removed without following the
specified procedure, the hinge of
the glove box may become dam-
aged.
■To prevent damage to the fil-
ter cover
When moving the filter cover in
the direction of arrow to release
the fitting, pay attention not to
apply excessive force to the
claws. Otherwise, the claws may
be damaged.
Page 431 of 548
4317-1. Essential information
7
When trouble arises
1Steadily step on the brake
pedal with both feet and
firmly depress it.
Do not pump the brake pedal
repeatedly as this will increase the
effort required to slow the vehicle.
2Shift the shift lever to N.
If the shift lever is shifted to N
3 After slowing down, stop the
vehicle in a safe place by the
road.
4 Stop the hybrid system.
If the shift lever cannot be
shifted to N
3 Keep depressing the brake
pedal with both feet to reduce
vehicle speed as much as
possible.
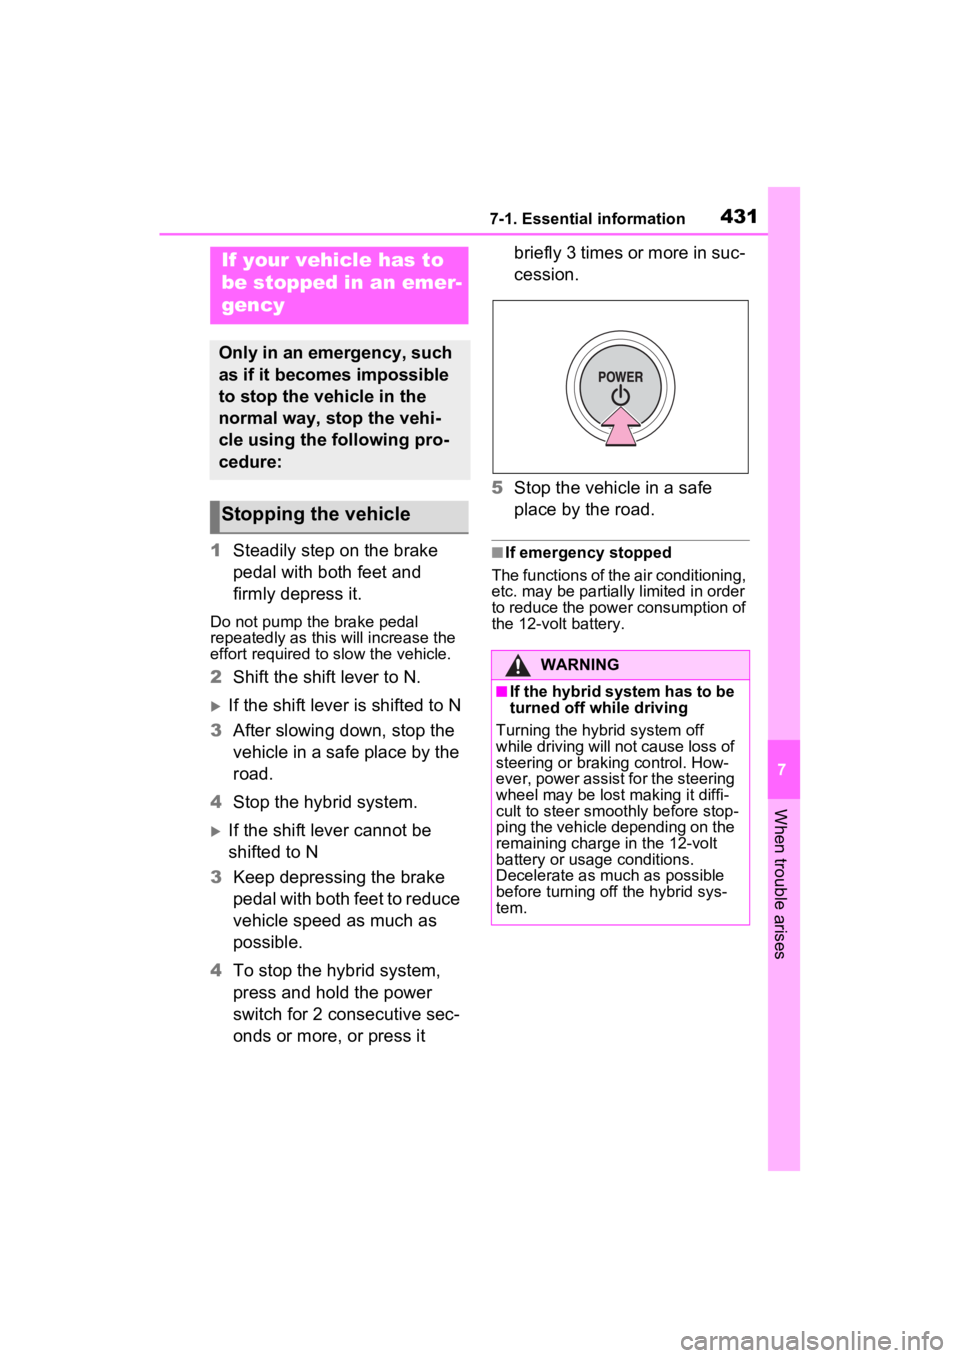
4 To stop the hybrid system,
press and hold the power
switch for 2 consecutive sec-
onds or more, or press it briefly 3 times or more in suc-
cession.
5 Stop the vehicle in a safe
place by the road.
■If emergency stopped
The functions of the air conditioning,
etc. may be partially limited in order
to reduce the power consumption of
the 12-volt battery.
If your vehicle has to
be stopped in an emer-
gency
Only in an emergency, such
as if it becomes impossible
to stop the vehicle in the
normal way, stop the vehi-
cle using the following pro-
cedure:
Stopping the vehicle
WARNING
■If the hybrid system has to be
turned off while driving
Turning the hybrid system off
while driving will not cause loss of
steering or braking control. How-
ever, power assist for the steering
wheel may be lost making it diffi-
cult to steer smoothly before stop-
ping the vehicle depending on the
remaining charge in the 12-volt
battery or usage conditions.
Decelerate as mu ch as possible
before turning off the hybrid sys-
tem.
Page 436 of 548
4367-2. Steps to take in an emergency
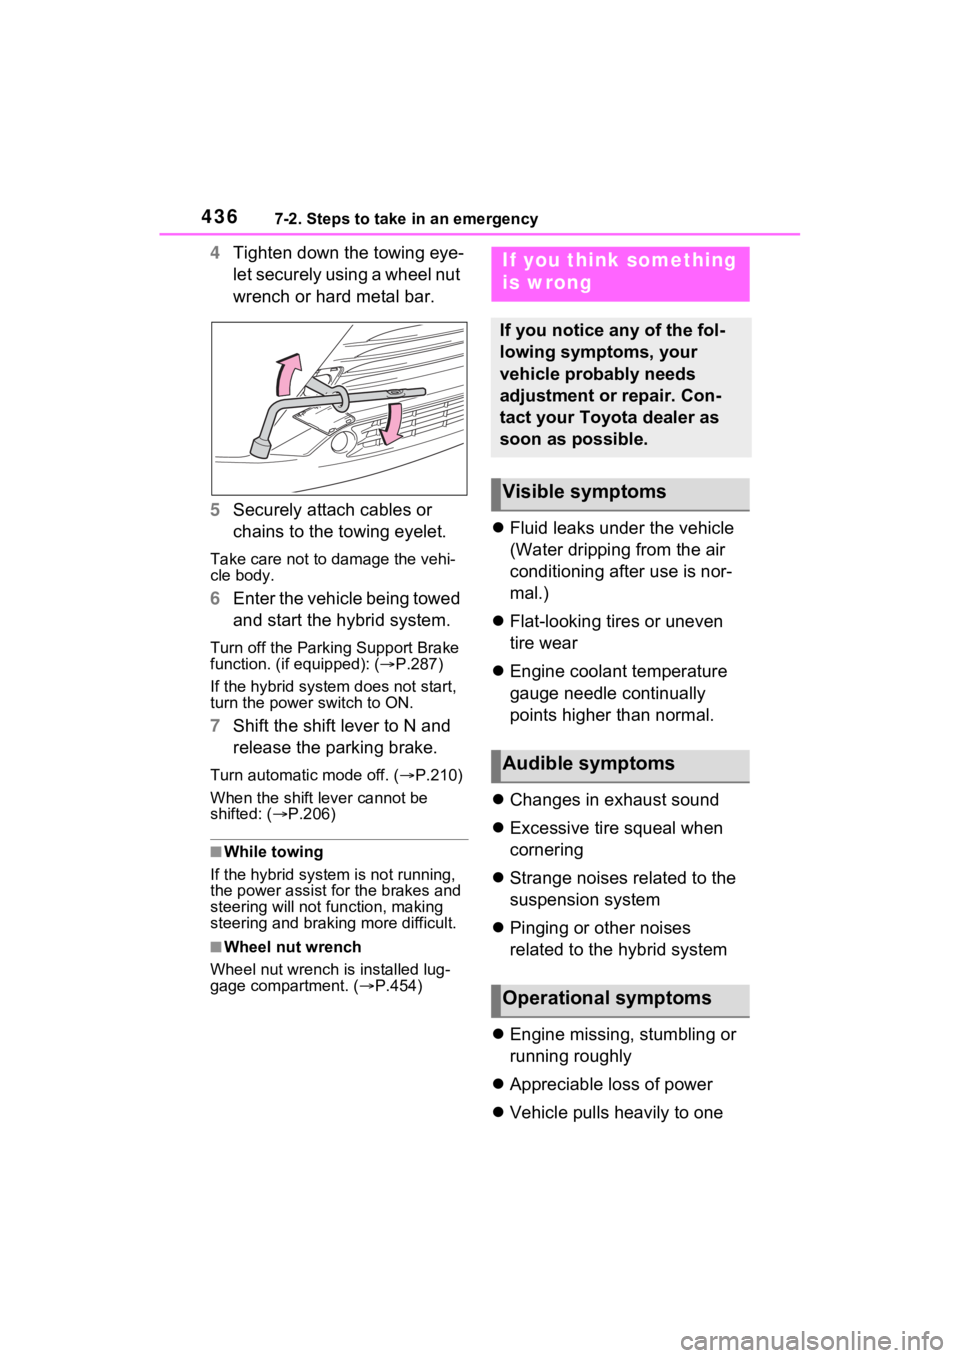
4Tighten down the towing eye-
let securely using a wheel nut
wrench or hard metal bar.
5 Securely attach cables or
chains to the towing eyelet.
Take care not to damage the vehi-
cle body.
6Enter the vehicle being towed
and start the hybrid system.
Turn off the Parkin g Support Brake
function. (if equipped): ( P.287)
If the hybrid system does not start,
turn the power switch to ON.
7 Shift the shift lever to N and
release the parking brake.
Turn automatic mode off. ( P.210)
When the shift le ver cannot be
shifted: ( P.206)
■While towing
If the hybrid system is not running,
the power assist for the brakes and
steering will not function, making
steering and braking more difficult.
■Wheel nut wrench
Wheel nut wrench is installed lug-
gage compartment. ( P.454)
Fluid leaks under the vehicle
(Water dripping from the air
conditioning after use is nor-
mal.)
Flat-looking tires or uneven
tire wear
Engine coolant temperature
gauge needle continually
points higher than normal.
Changes in exhaust sound
Excessive tire squeal when
cornering
Strange noises related to the
suspension system
Pinging or other noises
related to the hybrid system
Engine missing, stumbling or
running roughly
Appreciable loss of power
Vehicle pulls heavily to one
If you think something
is wrong
If you notice any of the fol-
lowing symptoms, your
vehicle probably needs
adjustment or repair. Con-
tact your Toyota dealer as
soon as possible.
Visible symptoms
Audible symptoms
Operational symptoms
Page 446 of 548

4467-2. Steps to take in an emergency
■Front passenger detection sen-
sor, seat belt reminder and
warning buzzer
●If luggage is placed on the front
passenger seat, the front passen-
ger detection sensor may cause
the warning light to flash and the
warning buzzer to sound even if a
passenger is not sitting in the
seat.
●If a cushion is placed on the seat,
the sensor may n ot detect a pas-
senger, and the warning light may
not operate properly.
■SRS warning light
This warning light system monitors
the airbag sensor assembly, front
impact sensors, side impact sensors
(front door), side impact sensors
(front), side impact sensors (rear),
driver’s seat position sensor, front
passenger occupant classification
sensors, “AIR BAG ON” indicator
light, “AIR BAG OFF” indicator light,
front passenger’s seat belt buckle
switch, driver’s seat belt preten-
sioner, front passenger’s seat belt
pretensioner and force limiter, out-
board rear seat belt pretensioners,
airbags, interconnecting wiring and
power sources. ( P.34)
■If the malfunction indicator
lamp comes on while driving
First check the following:
●Is the fuel t ank empty?
If it is, fill the fuel tank immediately.
●Is the fuel tank cap loose?
If it is, tighten it securely.
The light will go o ff after several
driving trips.
If the light does not go off even after
several trips, contact your Toyota
dealer as soon as possible.
■Electric power steering system
warning light (warning buzzer)
When the 12-volt battery charge
becomes insufficien t or the voltage
temporarily drops, the electric power steering system warning light may
come on and the warning buzzer
may sound.
At this time, the functions of the air
conditioning, etc. may be partially
limited in order to reduce the power
consumption of the
12-volt battery.
■When the tire pressure warning
light comes on
Inspect the tires to check if a tire is
punctured.
If a tire is punctured: P.453
If none of the tires are punctured:
Turn the power switch to OFF then
turn it to ON.
Check if the tire pressure warning
light comes on or blinks.
If the tire pressur e warning light
blinks for approximately 1 minute
then stays on
There may be a malfunction in the
tire pressure warning system. Have
the vehicle inspected by your
Toyota dealer immediately.
If the tire pressur e warning light
comes on
1 After the temperature of the tires
has lowered sufficiently, check
the inflation pressure of each tire
and adjust them to the specified
level.
2 If the warning light does not turn
off even after several minutes
have elapsed, check that the
inflation pressure of each tire is
at the specified level and perform
initialization. ( P.403)
■The tire pressure warning light
may come on due to natural
causes
The tire pressure warning light may
come on due to natural causes such
as natural air leaks and tire inflation
pressure changes caused by tem-
perature. In this ca se, adjusting the
tire inflation pressure will turn off the
warning ligh t (after a few minutes).