2022 TOYOTA VENZA HYBRID instrument panel
[x] Cancel search: instrument panelPage 96 of 548
962-1. Instrument cluster
■Pop-up display
Distance until the next engine oil
change will be displayed when a
warning message indicating that
oil maintenance is required or
should be performed soon is
displayed.
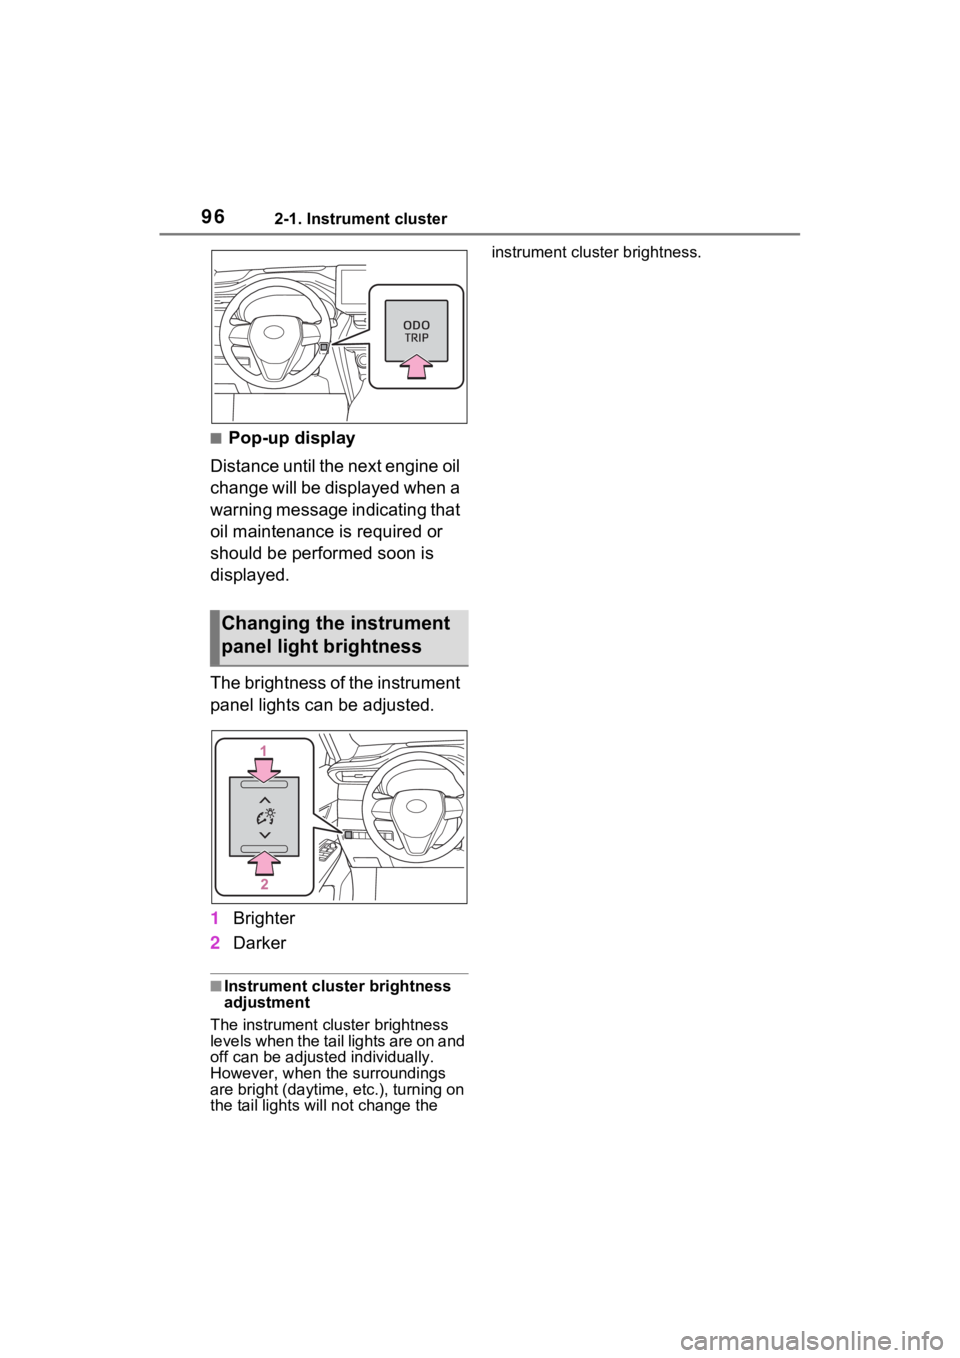
The brightness of the instrument
panel lights can be adjusted.
1 Brighter
2 Darker
■Instrument cluster brightness
adjustment
The instrument cluster brightness
levels when the tail lights are on and
off can be adjusted individually.
However, when the surroundings
are bright (daytime, etc.), turning on
the tail lights will not chan ge the instrument cluster brightness.
Changing the instrument
panel light brightness
Page 106 of 548
1062-1. Instrument cluster
temporarily suspended.
• When a warning message appears on the multi-information
display
• When the vehicle begins to move
●Settings for functions not
equipped to the vehicle are not
displayed.
●When a function is turned off, the
related settings for that function
are not selectable.
Select to display warning mes-
sages and measures to be
taken if a malfunction is
detected. ( P.449)
Displays suggestions to the
driver in the following situations.
To select a response to a dis- played suggestion, use the
meter control switches.
■Suggestion to enable the
power back door
If the power back door system is
disabled (setting on set to
off) and the power back door
switch on the instrument panel
is operated, a suggestion mes-
sage will be displayed asking if
you wish to enable the power
back door system. To enable
the power back door system,
select “Yes”.
After enabling the power back door
system, press the power back door
switch again to op en or close the
power back door.
■Suggestion to turn on the
headlights
If the headlight turn off, and the
vehicle speed is 3 mph (5 km/h)
or higher for a certain amount of
time when the surroundings are
dark, a suggestion message will
be displayed.
■Suggestion to turn off the
headlights
If the headlights are left on for a
certain amount of time after the
power switch has been turned
off, a suggestion message will
be displayed.
When the headlight switch is in
the AUTO position: The mes-
sage asking if you wish to turn
the headlights off is displayed.
To turn the headlights off, select
WARNING
■Cautions during setting up
the display
As the hybrid system needs to be
operating during setting up the
display, ensure that the vehicle is
parked in a place with adequate
ventilation. In a closed area such
as a garage, exhaust gases
including harmful carbon monox-
ide (CO) may collect and enter
the vehicle. This may lead to
death or a seri ous health hazard.
NOTICE
■During setting up the display
To prevent 12-vo lt battery dis-
charge, ensure that the hybrid
system is operating while setting
up the display features.
Warning message display
Suggestion function
Page 117 of 548
1172-1. Instrument cluster
2
Vehicle status information and indicators
Select to display warning mes-
sages and measures to be
taken if a malfunction is
detected. (P.449)
Displays suggestions to the
driver in the following situations.
To select a response to a dis-
played suggestion, use the
meter control switches.
■Suggestion to enable the
power back door
If the power back door system is
disabled (setting on set to
off) and the power back door
switch on the instrument panel
is operated, a suggestion mes- sage will be displayed asking if
you wish to enable the power
back door system. To enable
the power back door system,
select “Yes”.
After enabling the power back door
system, press the power back door
switch again to op
en or close the
power back door.
■Suggestion to turn on the
headlights
If the headlight turn off, and the
vehicle speed is 3 mph (5 km/h)
or higher for a certain amount of
time when the surroundings are
dark, a suggestion message will
be displayed.
■Suggestion to turn off the
headlights
If the headlights are left on for a
certain amount of time after the
power switch has been turned
off, a suggestion message will
be displayed.
When the headlight switch is in
the AUTO position: The mes-
sage asking if you wish to turn
the headlights off is displayed.
To turn the headlights off, select
“Yes”.
If the driver’s door is opened after
the power switch is turned off, this
suggestion message will not be dis-
played.
■Suggestion to close the
power windows (Driving at
high speeds)
If the vehicle speed exceeds a
WARNING
■Cautions during setting up
the display
As the hybrid system needs to be
operating during setting up the
display, ensure that the vehicle is
parked in a place with adequate
ventilation. In a closed area such
as a garage, exhaust gases
including harmful carbon monox-
ide (CO) may collect and enter
the vehicle. This may lead to
death or a seri ous health hazard.
NOTICE
■During setting up the display
To prevent 12-vo lt battery dis-
charge, ensure that the hybrid
system is operating while setting
up the display features.
Warning message display
Suggestion function
Page 141 of 548
1403-2. Opening, closing and locking the doors
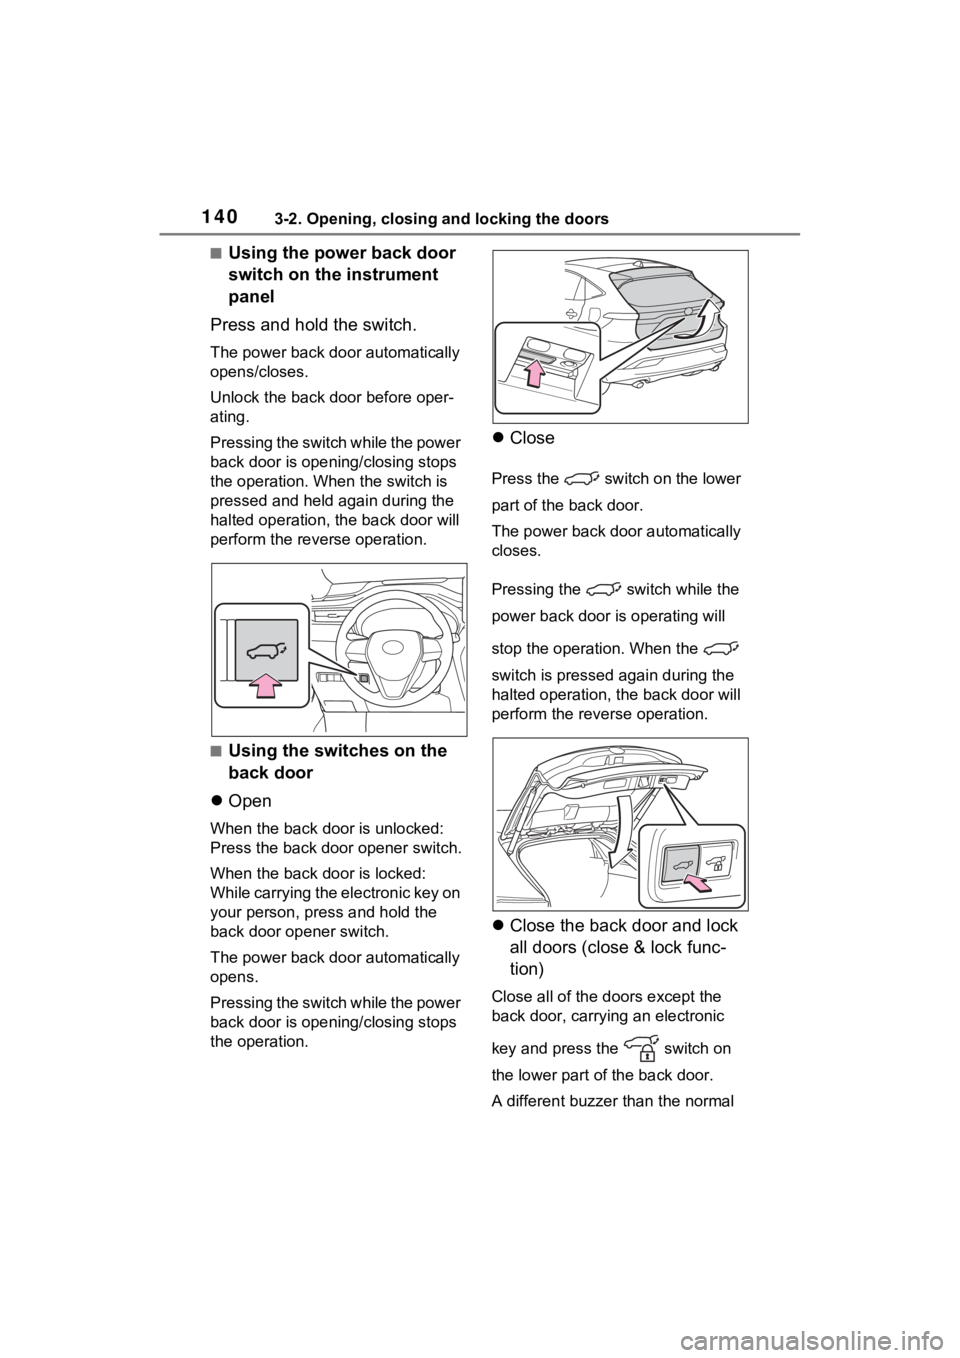
■Using the power back door
switch on the instrument
panel
Press and hold the switch.
The power back door automatically
opens/closes.
Unlock the back door before oper-
ating.
P r e s s i n g t h e s w i t c h w h i l e t h e p o w e r
back door is opening/closing stops
the operation. When the switch is
pressed and held again during the
halted operation, the back door will
perform the reverse operation.
■Using the switches on the
back door
Open
When the back door is unlocked:
Press the back door opener switch.
When the back door is locked:
While carrying the electronic key on
your person, press and hold the
back door opener switch.
The power back door automatically
opens.
P r e s s i n g t h e s w i t c h w h i l e t h e p o w e r
back door is opening/closing stops
the operation.
Close
Press the switch on the lower
part of the back door.
The power back door automatically
closes.
Pressing the switch while the
power back door is operating will
stop the operation. When the
switch is pressed again during the
halted operation, t he back door will
perform the reve rse operation.
Close the back door and lock
all doors (close & lock func-
tion)
Close all of the d oors except the
back door, carrying an electronic
key and press the switch on
the lower part of the back door.
A different buzzer than the normal
Page 154 of 548

1533-2. Opening, closing and locking the doors
3
Before driving
●Bring the electronic key close to
either front door handle and oper-
ate the entry function.
●Operate the wireless remote con-
trol.
If the doors cannot be
locked/unlocked using the above
methods, use the mechanical key.
( P.132)
If the hybrid system cannot be
started using the smart key system,
refer to P.464.
■Note for the entry function
●Even when the electronic key is
within the effective range (detec-
tion areas), the system may not
operate properly in the following
cases:
• The electronic key is too close to the window or outside door han-
dle, near the ground, or in a high
place when the doors are locked
or unlocked.
• The electronic key is on the instru-
ment panel, luggage cover or
floor, or in the door pockets or
glove box when the hybrid system
is started or po wer switch modes
are changed.
●Do not leave the electronic key on
top of the instrument panel or near
the door pockets when exiting the
vehicle. Depending on the radio
wave reception conditions, it may
be detected by the antenna out-
side the cabin and the door will
become lockable from the outside,
possibly trapping the electronic
key inside the vehicle.
●As long as the electronic key is
within the effective range, the
doors may be locked or unlocked
by anyone. However, only the
doors detecting the electronic key
can be used to unl ock the vehicle.
●Even if the electronic key is not
inside the vehicle, it may be possi-
ble to start the hybrid system if the
electronic key is near the window.
●The doors may unlock if a large amount of water splashes on the
door handle, such as in the rain or
in a car wash when the electronic
key is within the effective range.
(The doors will au
tomatically be
locked after approximately 60 sec-
onds if the doors are not opened
and closed.)
●If the wireless remote control is
used to lock the doors when the
electronic key is near the vehicle,
there is a possib ility that the door
may not be unlocked by the entry
function. (Use the wireless remote
control to unlock the doors.)
●Touching the door lock sensor
while wearing gloves may delay or
prevent lock operation. Remove
the gloves and touch the lock sen-
sor again.
●When the lock operation is per-
formed using the lock sensor, rec-
ognition signals will be shown up
to two consecutive times. After
this, no recognition signals will be
given.
●If the door handle becomes wet
while the electronic key is within
the effective range, the door may
lock and unlock repeatedly. In that
case, follow the following correc-
tion procedures to wash the vehi-
cle:
• Place the electronic key in a loca- tion 6 ft. (2 m) or more away from
the vehicle. (Take care to ensure
that the key is not stolen.)
• Set the electronic key to battery-
saving mode to disable the smart
key system. ( P.152)
●If the electronic key is inside the
vehicle and a door handle
becomes wet during a car wash, a
message may be shown on the
multi-information display and a
buzzer will sound outside the vehi-
cle. To turn off th e alarm, lock all
the doors.
●The lock sensor may not work
properly if it comes into contact
with ice, snow, m ud, etc. Clean
the lock sensor and attempt to
Page 188 of 548
1884-1. Before driving
WARNING
■If you hear a squealing or
scraping noise (brake pad
wear limit indicators)
Have the brake pads checked and
replaced by your Toyota dealer as
soon as possible.
Rotor damage may result if the
pads are not replaced when
needed.
It is dangerous to drive the vehicle
when the wear limits of the brake
pads and/or those of the brake
discs are exceeded.
■When the vehicle is stopped
●Do not depress t he accelerator
pedal unnecessarily.
If the shift lever is in any posi-
tion other than P or N, the vehi-
cle may accelerate suddenly
and unexpectedly, causing an
accident.
●In order to prev ent accidents
due to the vehicle rolling away,
always keep depressing the
brake pedal while stopped with
the “READY” indicator is illumi-
nated, and apply the parking
brake as necessary.
●If the vehicle is stopped on an
incline, in order to prevent acci-
dents caused by the vehicle roll-
ing forward or backward, always
depress the brake pedal and
securely apply the parking
brake as needed.
●Avoid revving or racing the
engine.
Running the engine at high
speed while the vehicle is
stopped may cause the exhaust
system to overheat, which could
result in a fire if combustible
material is nearby.
■When the vehicle is parked
●Do not leave glasses, cigarette
lighters, spray cans, or soft
drink cans in the vehicle when it
is in the sun.
Doing so may result in the fol-
lowing:
• Gas may leak from a cigarette lighter or spray can, and may
lead to a fire.
• The temperature inside the vehicle may cause the plastic
lenses and plastic material of
glasses to deform or crack.
• Soft drink cans may fracture, causing the contents to spray
over the interior of the vehicle,
and may also cause a short cir-
cuit in the vehicle’s electrical
components.
●Do not leave cigarette lighters in
the vehicle. If a cigarette lighter
is in a place such as the glove
box or on the floor, it may be lit
accidentally when luggage is
loaded or the se at is adjusted,
causing a fire.
●Do not attach adhesive discs to
the windshield or windows. Do
not place containers such as air
fresheners on the instrument
panel or dashboard. Adhesive
discs or containers may act as
lenses, causing a fire in the
vehicle.
●Do not leave a door or window
open if the curved glass is
coated with a metallized film
such as a silver-colored one.
Reflected sunlight may cause
the glass to act a s a lens, caus-
ing a fire.
Page 192 of 548
1924-1. Before driving
Cargo capacity depends on the
total weight of the occupants.
(Cargo capacity) = (Total load
capacity) - (Total weight of occu-
pants)
Steps for Determining Correct
Load Limit
(1) Locate the statement “The
combined weight of occupants
and cargo should never exceed
XXX kg or XXX lbs.” on your
vehicle’s placard.
(2) Determine the combined
weight of the driver and passen-
gers that will be riding in your
vehicle.
(3) Subtract the combined
weight of the driver and passen-
gers from XXX kg or XXX lbs.
(4) The resulting figure equals
the available amount of cargo
and luggage load capacity.
For example, if the “XXX”
amount equals 1400 lbs. and
WARNING
●Do not place cargo or luggage
in or on the following locations.
• At the feet of the driver
• On the front passenger or rear seats (when stacking items)
• On the luggage cover
• On the instrument panel
• On the dashboard
●Secure all items in the occupant
compartment.
■When loading cargo on the
roof luggage carrier (if
equipped)
Observe the following precau-
tions:
●Place the cargo so that its
weight is distributed evenly
between the front and rear
axles.
●If loading long or wide cargo,
never exceed the vehicle overall
length or width. ( P.476)
●Before driving, make sure the
cargo is securel y fastened on
the roof luggage carrier.
●Loading cargo on the roof lug-
gage carrier will make the cen-
ter of gravity of the vehicle
higher. Avoid high speeds, sud-
den starts, sharp turns, sudden
braking or abrupt maneuvers,
otherwise it may result in loss of
control or vehicle rollover due to
failure to operate this vehicle
correctly and resu lt in death or
serious injury.
●If driving for a long distance, on
rough roads, or at high speeds,
stop the vehicle now and then
during the trip to make sure the
cargo remains in its place.
●Do not exceed 176.4 lb. (80 kg)
cargo weight on the roof lug-
gage carrier.
NOTICE
■When loading cargo on the
roof luggage carrier (if
equipped)
Be careful not to scratch the sur-
face of the panoramic fixed moon
roof with one-touch frosted glass
control (if equipped).
Capacity and distribution
Page 215 of 548
2154-3. Operating the lights and wipers
4
Driving
4-3.Operating the lights and wipers
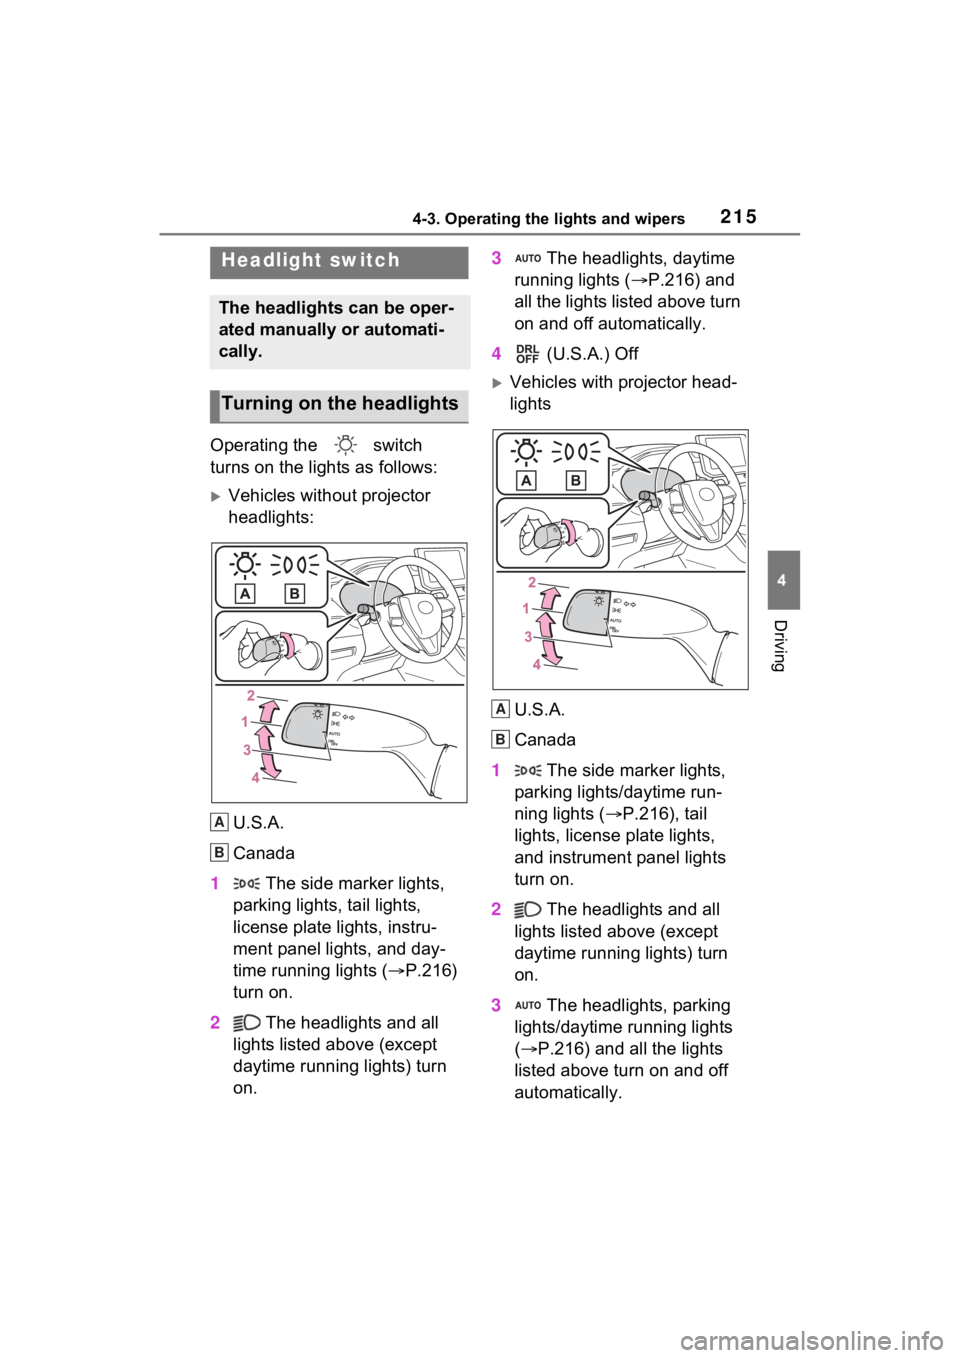
Operating the switch
turns on the lights as follows:
Vehicles without projector
headlights:
U.S.A.
Canada
1 The side marker lights,
parking lights, tail lights,
license plate lights, instru-
ment panel lights, and day-
time running lights ( P.216)
turn on.
2 The headlights and all
lights listed above (except
daytime running lights) turn
on. 3
The headlights, daytime
running lights ( P.216) and
all the lights listed above turn
on and off automatically.
4 (U.S.A.) Off
Vehicles with projector head-
lights
U.S.A.
Canada
1 The side marker lights,
parking lights/daytime run-
ning lights ( P.216), tail
lights, license plate lights,
and instrument panel lights
turn on.
2 The headlights and all
lights listed above (except
daytime running lights) turn
on.
3 The headlights, parking
lights/daytime running lights
( P.216) and all the lights
listed above turn on and off
automatically.
Headlight switch
The headlights can be oper-
ated manually or automati-
cally.
Turning on the headlights
A
B
A
B