2022 TOYOTA TUNDRA HYBRID lock
[x] Cancel search: lockPage 64 of 618
641-2. Child safety
Owners Manual_USA_M0C031_en
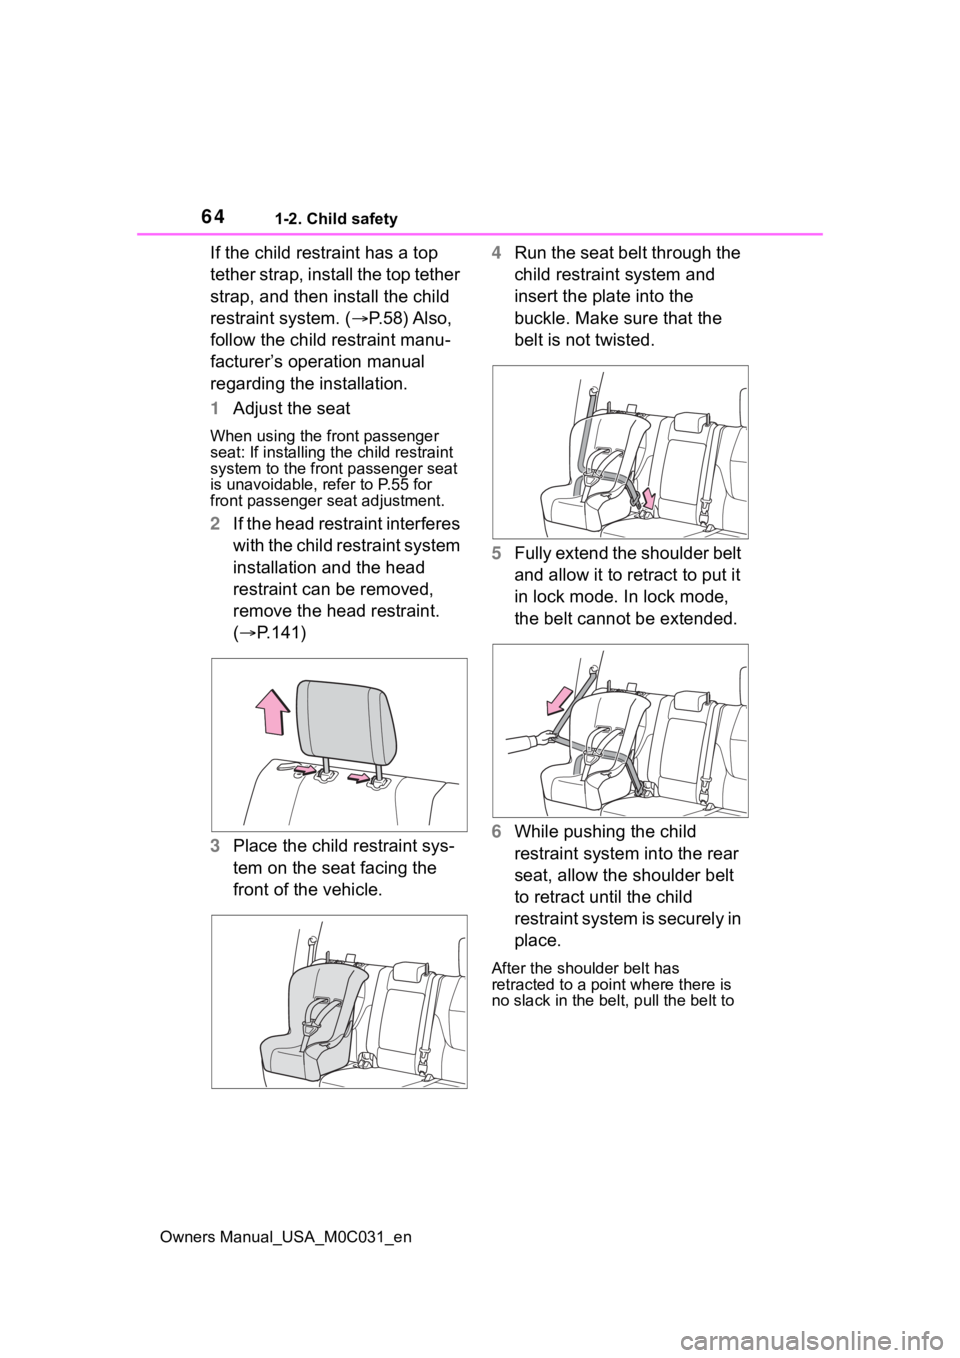
If the child restraint has a top
tether strap, install the top tether
strap, and then install the child
restraint system. (P. 5 8 ) A l s o ,
follow the child restraint manu-
facturer’s operation manual
regarding the installation.
1 Adjust the seat
When using the front passenger
seat: If installing t he child restraint
system to the front passenger seat
is unavoidable, refer to P.55 for
front passenger seat adjustment.
2 If the head restraint interferes
with the child restraint system
installation and the head
restraint can be removed,
remove the head restraint.
( P.141)
3 Place the child restraint sys-
tem on the seat facing the
front of the vehicle. 4
Run the seat belt through the
child restraint system and
insert the plate into the
buckle. Make sure that the
belt is not twisted.
5 Fully extend the shoulder belt
and allow it to retract to put it
in lock mode. In lock mode,
the belt cannot be extended.
6 While pushing the child
restraint system into the rear
seat, allow the shoulder belt
to retract until the child
restraint system is securely in
place.
After the shoulder belt has
retracted to a poi nt where there is
no slack in the belt, pull the belt to
Page 66 of 618
661-2. Child safety
Owners Manual_USA_M0C031_enlow as possible. (
P.29)
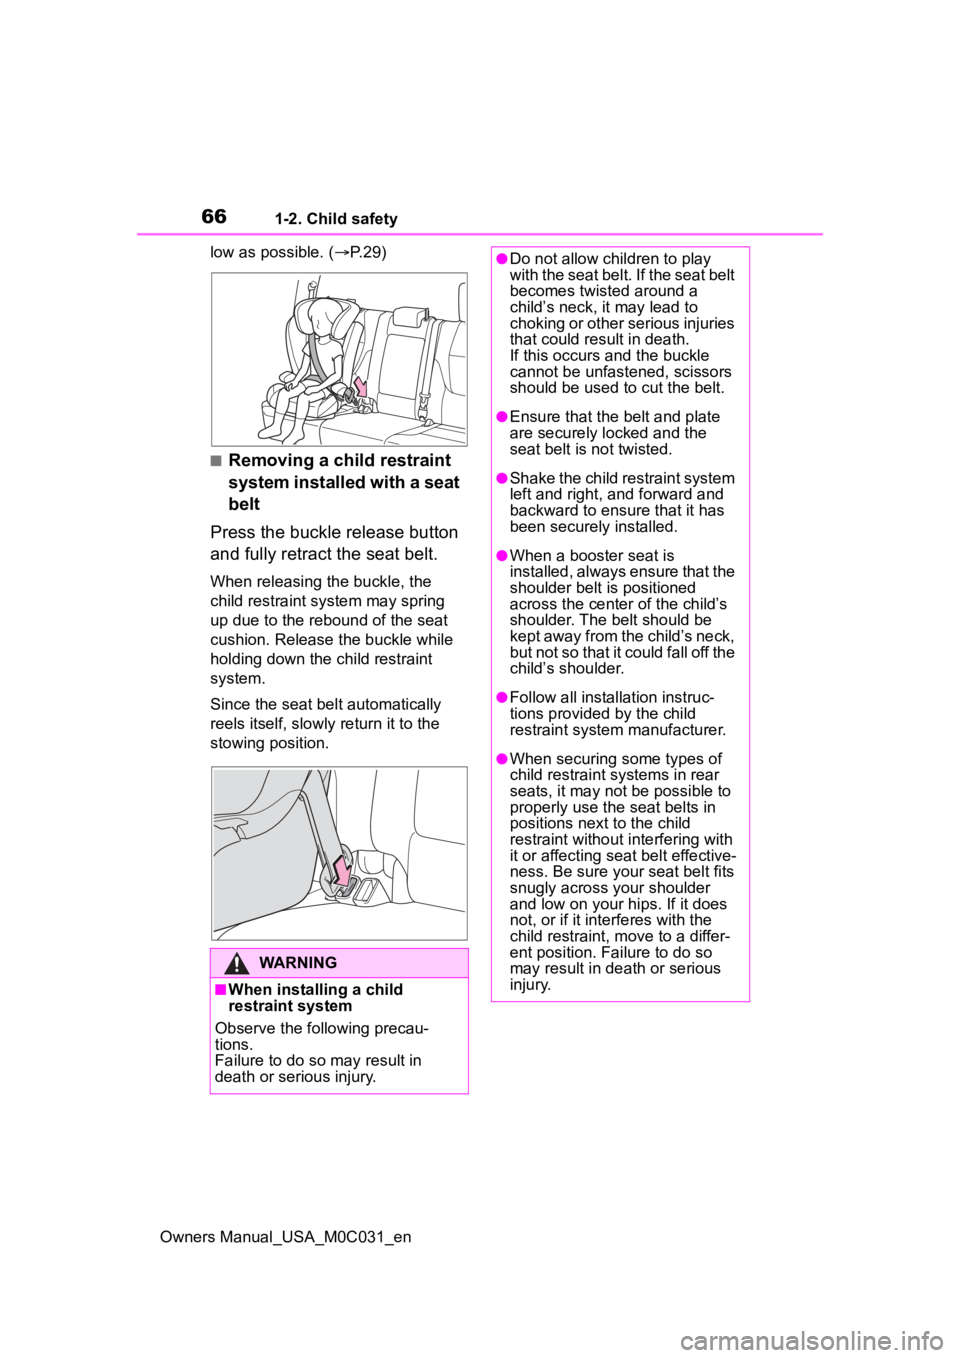
■Removing a child restraint
system installed with a seat
belt
Press the buckle release button
and fully retract the seat belt.
When releasing the buckle, the
child restraint system may spring
up due to the rebound of the seat
cushion. Release the buckle while
holding down the child restraint
system.
Since the seat belt automatically
reels itself, slowly return it to the
stowing position.
WARNING
■When installing a child
restraint system
Observe the following precau-
tions.
Failure to do so m ay result in
death or serious injury.
●Do not allow children to play
with the seat belt. If the seat belt
becomes twisted around a
child’s neck, it may lead to
choking or other serious injuries
that could result in death.
If this occurs and the buckle
cannot be unfastened, scissors
should be used to cut the belt.
●Ensure that the belt and plate
are securely locked and the
seat belt is not twisted.
●Shake the child restraint system
left and right, and forward and
backward to ensure that it has
been securely installed.
●When a booster seat is
installed, always ensure that the
shoulder belt is positioned
across the center of the child’s
shoulder. The belt should be
kept away from the child’s neck,
but not so that it could fall off the
child’s shoulder.
●Follow all installation instruc-
tions provided by the child
restraint system manufacturer.
●When securing some types of
child restraint systems in rear
seats, it may not be possible to
properly use the seat belts in
positions next to the child
restraint without interfering with
it or affecting seat belt effective-
ness. Be sure your seat belt fits
snugly across your shoulder
and low on your hips. If it does
not, or if it interferes with the
child restraint, move to a differ-
ent position. Fa ilure to do so
may result in death or serious
injury.
Page 67 of 618
671-2. Child safety
Owners Manual_USA_M0C031_en
1
For safety and security
WARNING
●When installing a child restraint
system in the rear center seat,
adjust both seat cushions to the
same position and align both
seatbacks at the same angle.
Otherwise, the child restraint
system cannot be securely
restrained and t his may cause
death or serious injuries in the
event of sudden braking, sud-
den swerving or an accident.
●If the seat is adjusted, reconfirm
the security of the child restraint
system.
■When installing a booster
seat
To prevent the belt from going into
ALR lock mode, do not fully
extend the shoulder belt. ALR
mode causes the belt to tighten
only. This could cause injury or
discomfort to the child. ( P.31,
33)
■Do not use a seat belt
extender
If a seat belt extender is used
when installing a child restraint
system, the seat belt will not
securely hold the child restraint
system, which could cause death
or serious injury to the child or
other passengers in the event of
sudden braking, sudden swerv-
ing or an accident.
Page 79 of 618

791-4. Hybrid system
Owners Manual_USA_M0C031_en
1
For safety and security
There are an air intake vents
under the rear seat for the pur-
pose of cooling the hybrid bat-
tery (traction battery). If the
vents becomes blocked, the
hybrid battery (traction battery)
input and output may be
reduced. When a certain level of impact is
detected by the impact sensor,
the emergency shut off system
blocks the high voltage current
and stops the fuel pump to mini-
mize the risk of electrocution
and fuel leakage. If the emer-
gency shut off system activates,
your vehicle will not restart. To
restart the hybrid system, con-
tact your Toyota dealer.
A message is automatically dis-
played when a malfunction
occurs in the hybrid system or
an improper operation is
attempted.
If a warning message is shown
on the multi-information display,
NOTICE
■Hybrid battery (traction bat-
tery) air intake vents
Do not carry large amounts of
water such as water cooler bottles
in the vehicle. If water spills onto
the hybrid battery (traction bat-
tery), the batte ry may be dam-
aged. Have the vehicle inspected
by your Toyota dealer.
Hybrid battery (traction
battery) air intake vents
NOTICE
■Hybrid battery (traction bat-
tery) air intake vents
●Make sure that the air intake
vents are not blocked, such as
by a seat cover, plastic cover, or
luggage. If the vents are
blocked, the hybrid battery
(traction battery) input and out-
put may be restricted, possibly
leading to a malfunction.
●Clean the air intake vents regu-
larly to prevent the hybrid bat-
tery (traction b attery) from
overheating.
●Do not get water or foreign
materials in the air intake vents
as this may cause a short circuit
and damage the hybrid battery
(traction battery).
●A filter is installed to the air
intake vents. When the filter
remains noticeably dirty even
after cleaning the air intake
vents, filter cleaning or replace-
ment is recommended. Refer to
P.481 for details on how to
clean the filters.
Emergency shut off sys-
tem
Hybrid warning message
Page 82 of 618

821-5. Theft deterrent system
Owners Manual_USA_M0C031_en
■Items to check before lock-
ing the vehicle
To prevent unexpected trigger-
ing of the alarm and vehicle
theft, make sure of the following:
Nobody is in the vehicle.
The windows and the pan-
oramic moon roof (if
equipped) are closed before
the alarm is set.
No valuables or other per-
sonal items are left in the
vehicle.
■Setting
Close the doors and hood, and
lock all the doors using the entry
function or wireless remote con- trol. The system will be set auto-
matically after 30 seconds.
The indicator light changes from
being on to flashing when the sys-
tem is set.
■Deactivating or stopping
Do one of the following to deac-
tivate or stop the alarms:
Unlock the doors and tailgate
using the entry function or
wireless remote control.
Turn the power switch to ACC
or ON, or start the hybrid sys-
tem. (The alarm will be deacti-
vated or stopped after a few
seconds.)
■System maintenance
The vehicle has a maintenance-free
type alarm system.
■Triggering of the alarm
The alarm may be triggered in the
following situations:
(Stopping the alarm deactivates the
alarm system.)
●The doors are unlocked using the
mechanical key.
Alarm
The alarm uses light and
sound to give an alert when
an intrusion is detected.
The alarm is triggered in the
following situations when
the alarm is set:
A locked door or tailgate is
unlocked or opened in any
way other than using the
entry function or wireless
remote control. (The doors
will lock again automati-
cally.)
The hood is opened.
Setting/deactivating/stop-
ping the alarm system
Page 83 of 618
831-5. Theft deterrent system
Owners Manual_USA_M0C031_en
1
For safety and security
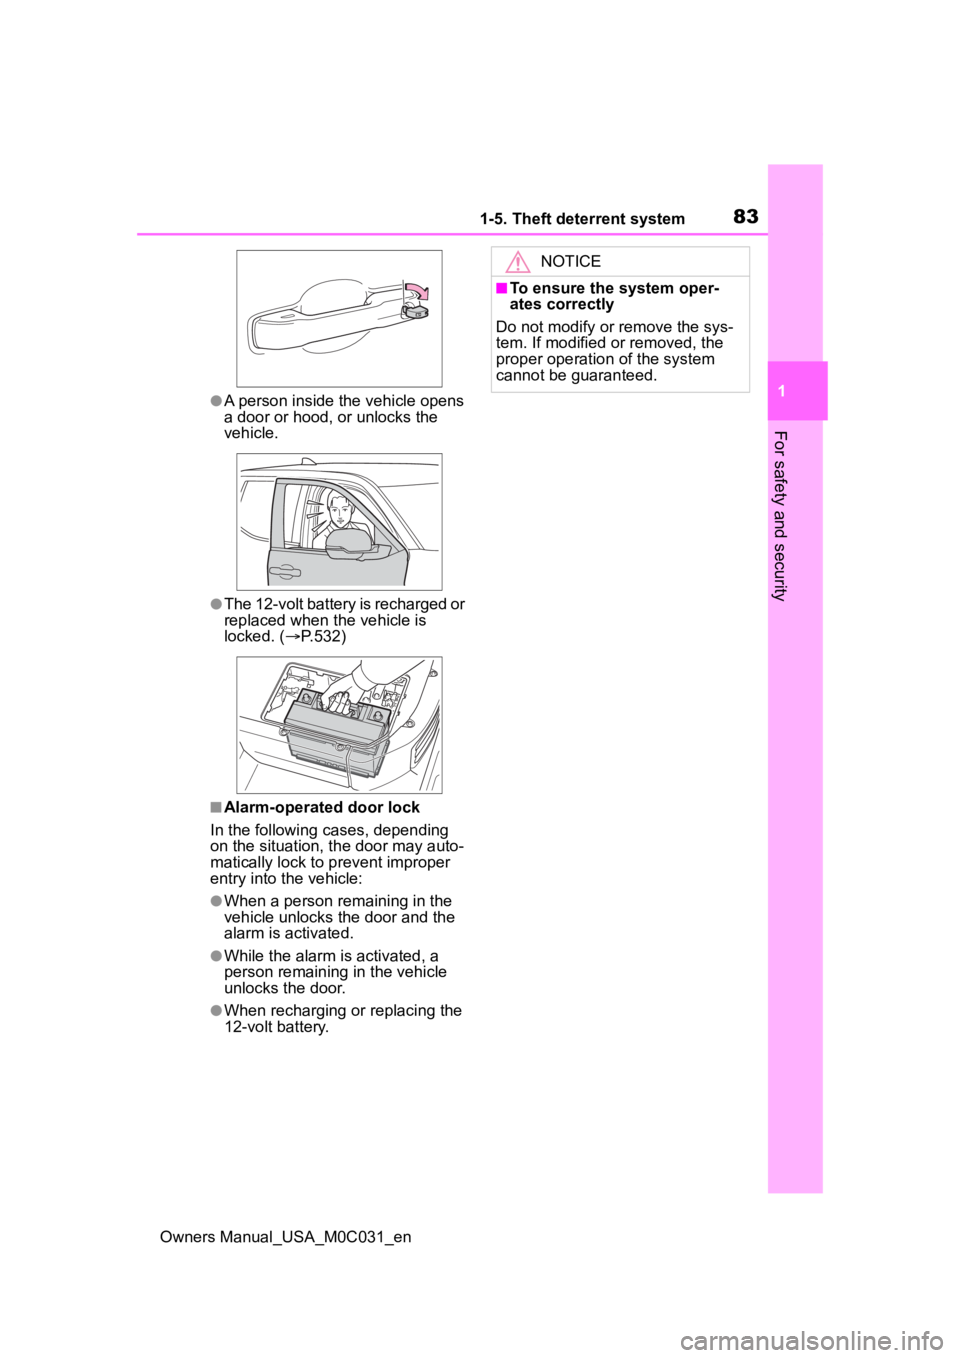
●A person inside the vehicle opens
a door or hood, or unlocks the
vehicle.
●The 12-volt battery is recharged or
replaced when the vehicle is
locked. ( P.532)
■Alarm-operated door lock
In the following cases, depending
on the situation, th e door may auto-
matically lock to p revent improper
entry into the vehicle:
●When a person remaining in the
vehicle unlocks the door and the
alarm is activated.
●While the alarm is activated, a
person remaining in the vehicle
unlocks the door.
●When recharging or replacing the
12-volt battery.
NOTICE
■To ensure the system oper-
ates correctly
Do not modify or remove the sys-
tem. If modified or removed, the
proper operation of the system
cannot be guaranteed.
Page 88 of 618
882-1. Instrument cluster
Owners Manual_USA_M0C031_en
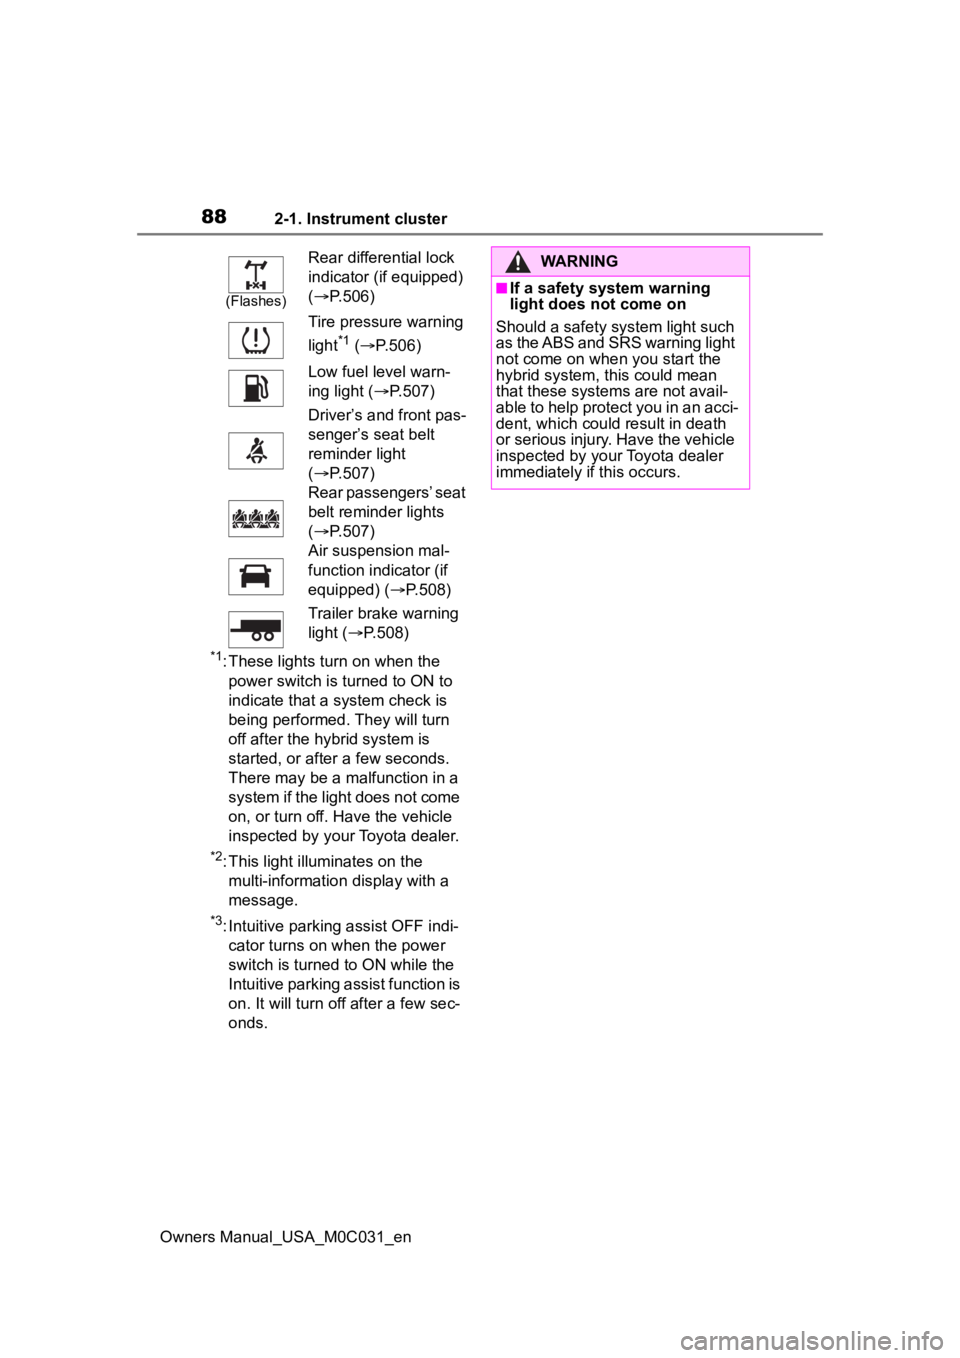
*1: These lights turn on when the power switch is turned to ON to
indicate that a system check is
being performed. They will turn
off after the hybrid system is
started, or after a few seconds.
There may be a malfunction in a
system if the light does not come
on, or turn off. Have the vehicle
inspected by your Toyota dealer.
*2: This light illuminates on the multi-informatio n display with a
message.
*3: Intuitive parking assist OFF indi- cator turns on when the power
switch is turned to ON while the
Intuitive parking assist function is
on. It will turn off after a few sec-
onds.
(Flashes)
Rear differential lock
indicator (if equipped)
( P.506)
Tire pressure warning
light
*1 ( P.506)
Low fuel level warn-
ing light ( P.507)
Driver’s and front pas-
senger’s seat belt
reminder light
( P.507)
Rear passengers’ seat
belt reminder lights
( P.507)
Air suspension mal-
function indicator (if
equipped) ( P.508)
Trailer brake warning
light ( P.508)
WARNING
■If a safety system warning
light does not come on
Should a safety system light such
as the ABS and SRS warning light
not come on when you start the
hybrid system, this could mean
that these system s are not avail-
able to help protect you in an acci-
dent, which could result in death
or serious injury. Have the vehicle
inspected by you r Toyota dealer
immediately if this occurs.
Page 90 of 618
902-1. Instrument cluster
Owners Manual_USA_M0C031_en
*1: This light illuminates on the multi-information display with a
message.
*2: Depending on the operating con-ditions of the system, the color
and state (illuminat ed/blinking) of
the indicator change.
*3: The light comes on when the system is turned off.
*4: Intuitive parking assist OFF indi-cator turns on wh en the power
switch is turned t o ON while the
Intuitive parking assist function is
on. It will turn off after a few sec-
onds.
*5: These lights tu rn on when the
power switch is turned to ON to
indicate that a system check is
being performed. They will turn
off after the hybrid system is
started, or after a few seconds.
There may be a malfunction in a
system if the lights do not turn
on, or turn off. Have the vehicle
inspected by your Toyota dealer.
*6: This light illuminates on the out- side rear view mirrors.
*7: This light illuminates on the over-head console.
*8: When the outside temperature is approximately 37°F (3°C) or
lower, the indicator will flash for
approximately 10 seconds, then
stay on.
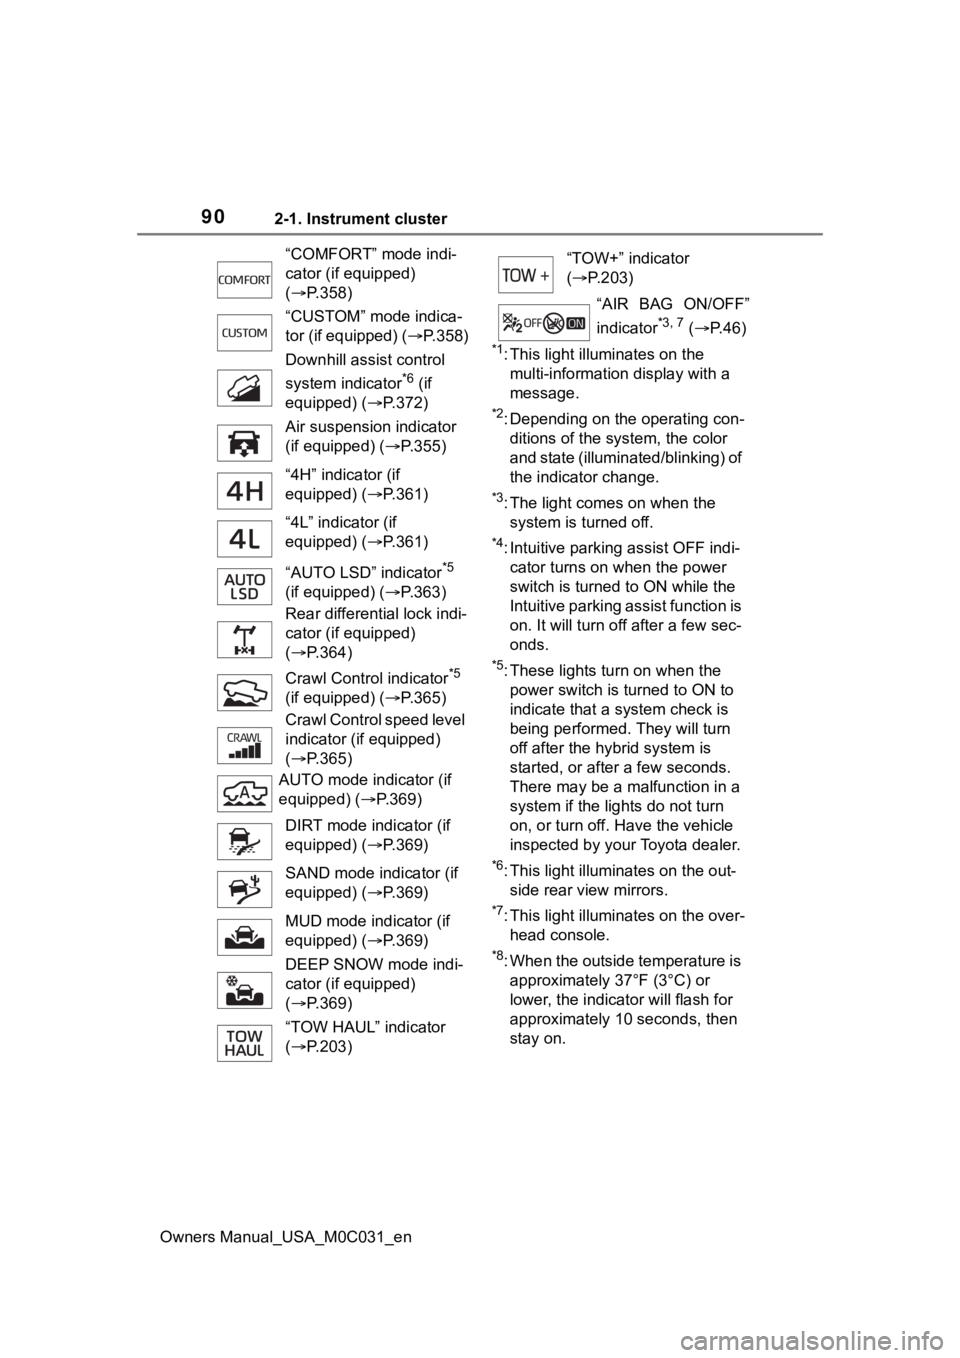
“COMFORT” mode indi-
cator (if equipped)
(
P.358)
“CUSTOM” mode indica-
tor (if equipped) ( P.358)
Downhill assist control
system indicator
*6 (if
equipped) ( P.372)
Air suspension indicator
(if equipped) ( P.355)
“4H” indicator (if
equipped) ( P.361)
“4L” indicator (if
equipped) ( P.361)
“AUTO LSD” indicator
*5
(if equipped) ( P.363)
Rear differential lock indi-
cator (if equipped)
( P.364)
Crawl Contro l indicator
*5
(if equipped) ( P.365)
Crawl Control speed level
indicator (if equipped)
( P.365)
AUTO mode indicator (if
equipped) ( P.369)
DIRT mode indicator (if
equipped) ( P.369)
SAND mode indicator (if
equipped) ( P.369)
MUD mode indicator (if
equipped) ( P.369)
DEEP SNOW mode indi-
cator (if equipped)
( P.369)
“TOW HAUL” indicator
( P.203)
“TOW+” indicator
( P.203)
“AIR BAG ON/OFF”
indicator
*3, 7 ( P. 4 6 )