2022 TOYOTA SIENNA HYBRID audio
[x] Cancel search: audioPage 24 of 600
24Pictorial index
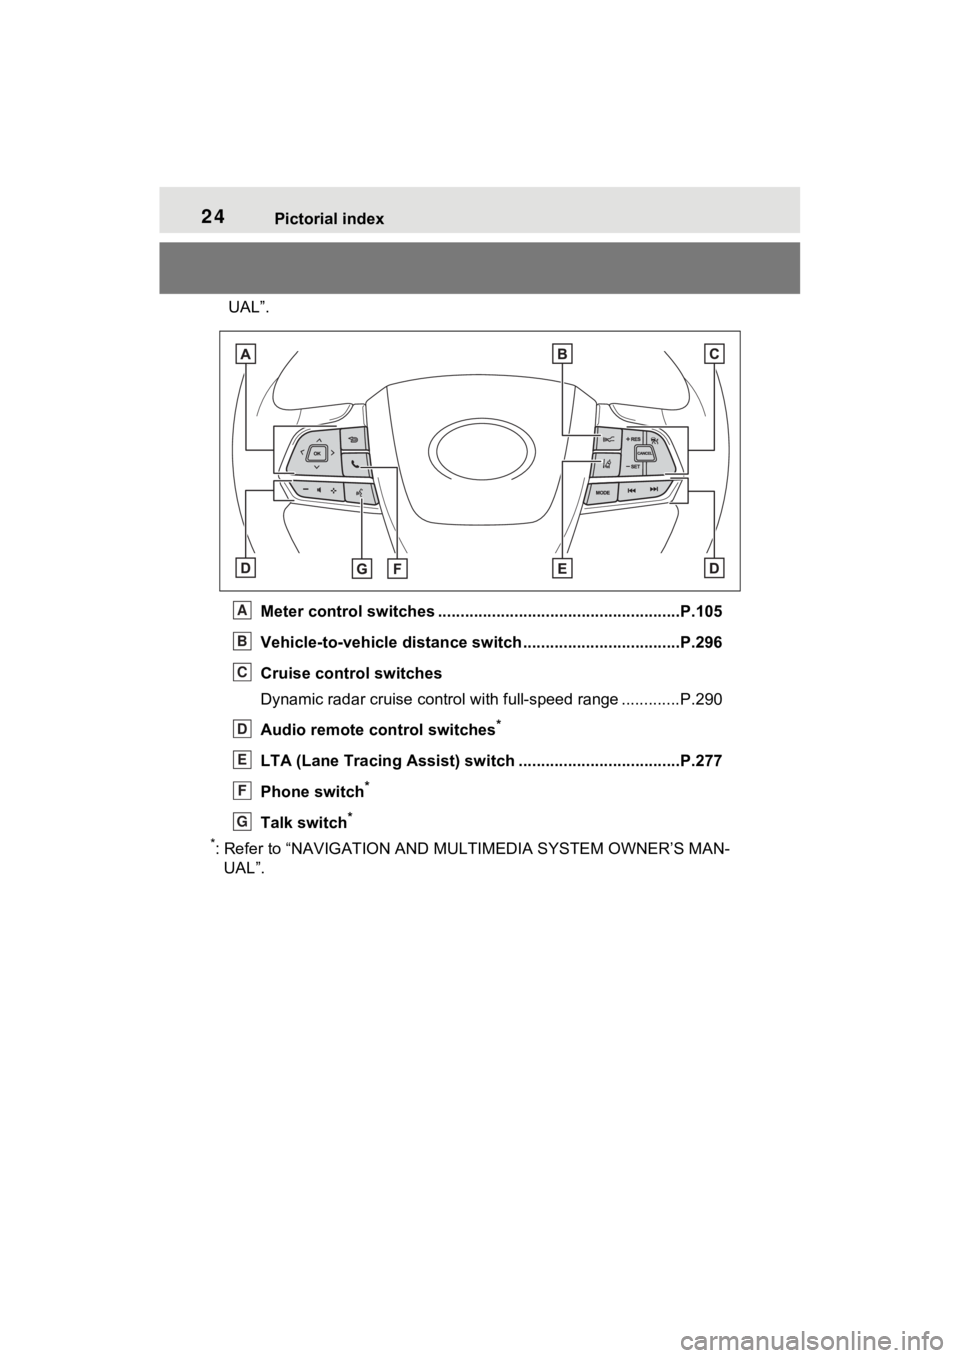
UAL”.Meter control switches .. ....................................................P.105
Vehicle-to-vehicle distance switch ...................................P.296
Cruise control switches
Dynamic radar cruise control with full-speed range ............. P.290
Audio remote control switches
*
LTA (Lane Tracing Assist) sw itch ....................................P.277
Phone switch
*
Talk switch*
*
: Refer to “NAVIGATION AND MULTIMEDIA SYSTEM OWNER’S MAN- UAL”.
A
B
C
D
E
F
G
Page 100 of 600
1002-1. Instrument cluster
■Pop-up display
Distance until the next engine oil
change will displayed when a warn-
ing message indicating that oil
maintenance should be performed
soon or is required is displayed.
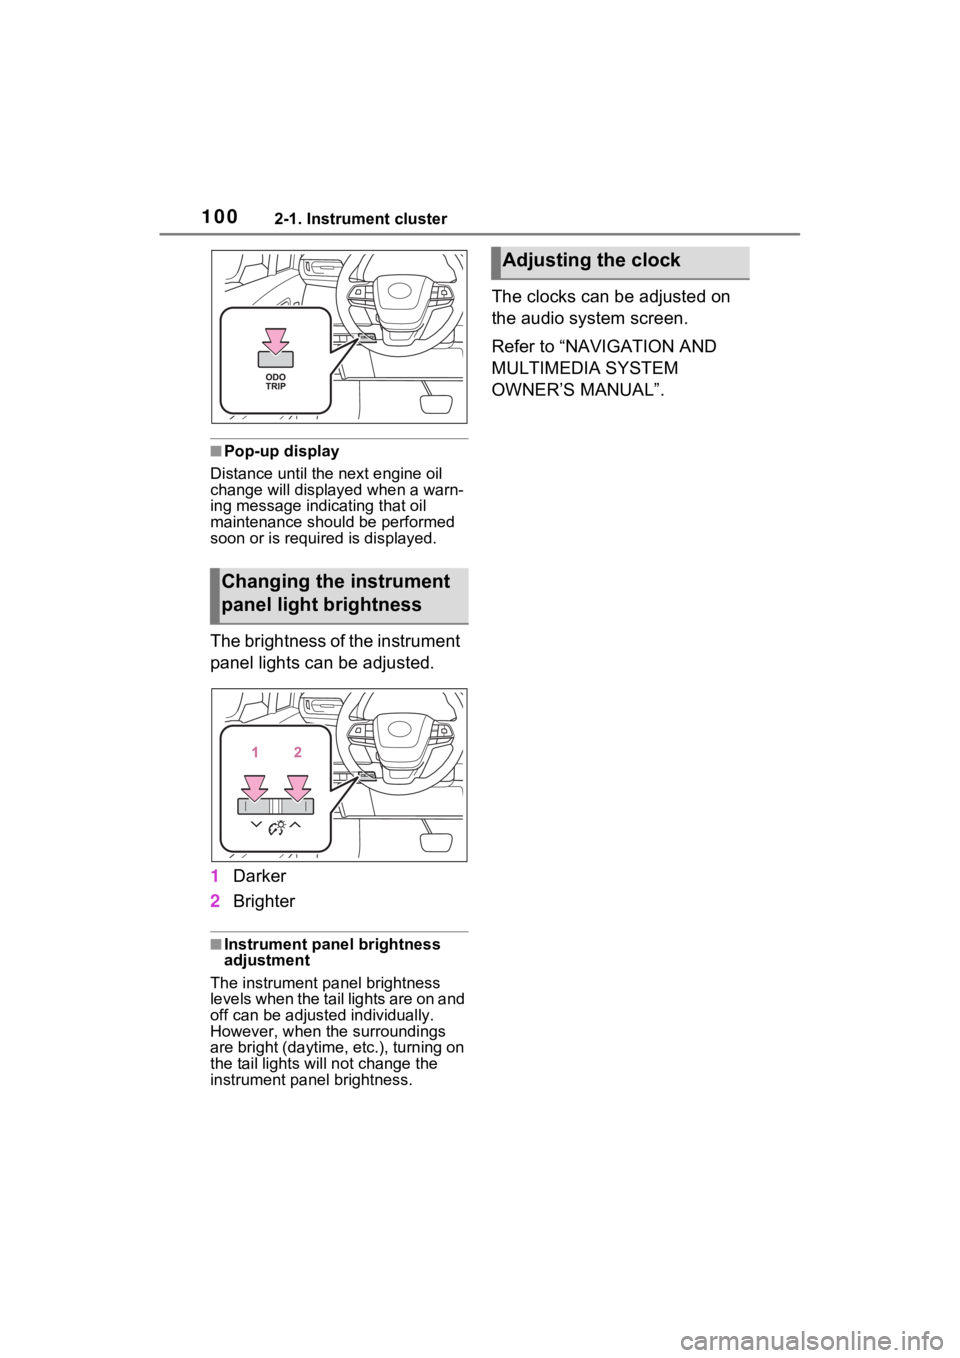
The brightness of the instrument
panel lights can be adjusted.
1 Darker
2 Brighter
■Instrument panel brightness
adjustment
The instrument panel brightness
levels when the tail lights are on and
off can be adjusted individually.
However, when the surroundings
are bright (daytime, etc.), turning on
the tail lights will not chan ge the
instrument panel brightness.
The clocks can be adjusted on
the audio system screen.
Refer to “NAVIGATION AND
MULTIMEDIA SYSTEM
OWNER’S MANUAL”.
Changing the instrument
panel light brightness
Adjusting the clock
Page 104 of 600
1042-1. Instrument cluster
■Pop-up display
Distance until the next engine oil
change will displayed when a warn-
ing message indicating that oil
maintenance should be performed
soon or is required is displayed.
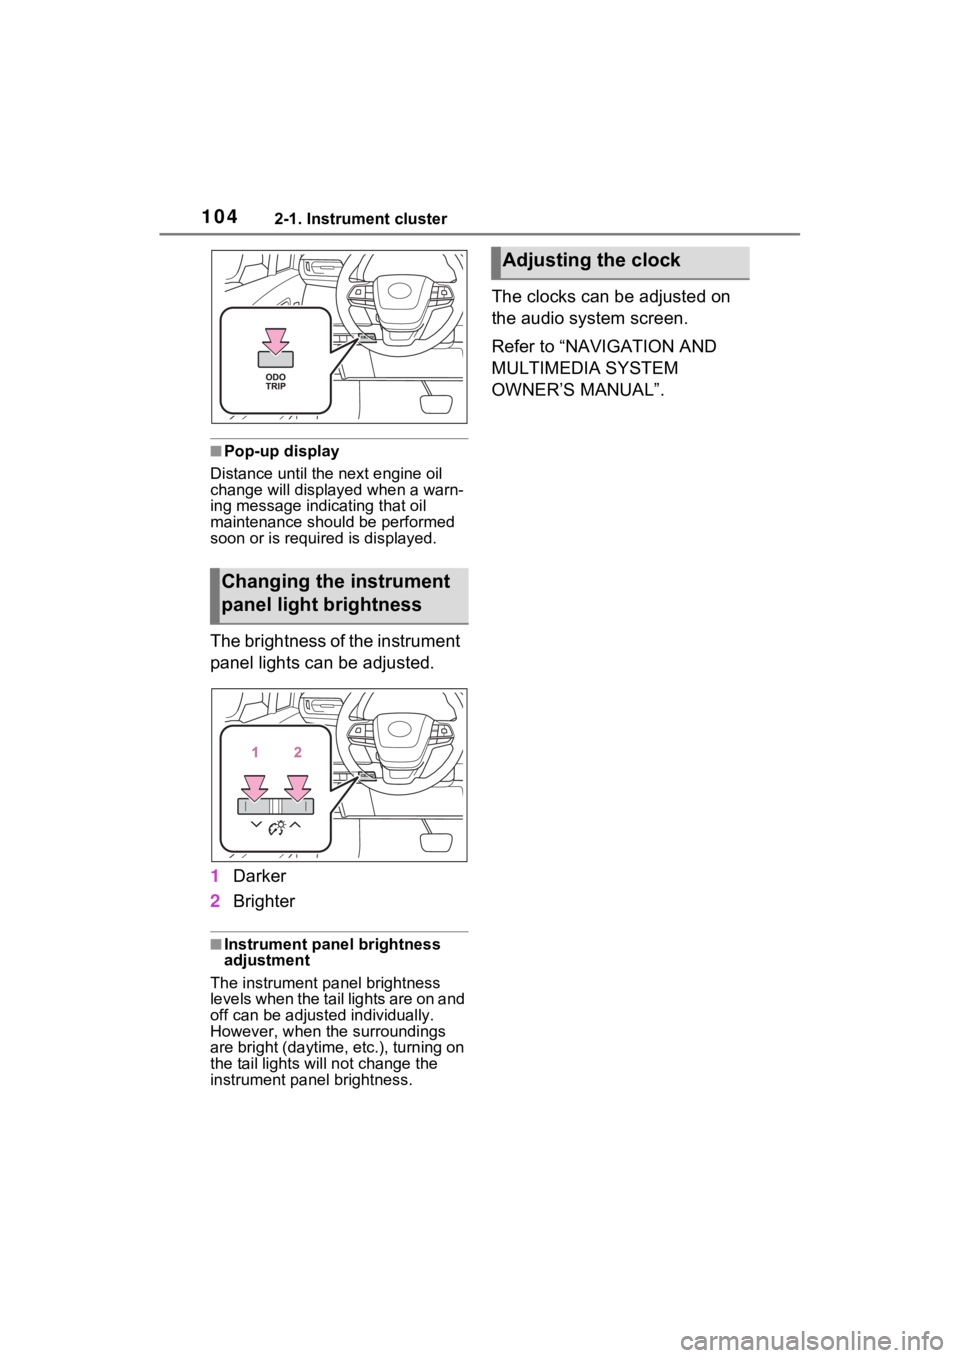
The brightness of the instrument
panel lights can be adjusted.
1 Darker
2 Brighter
■Instrument panel brightness
adjustment
The instrument panel brightness
levels when the tail lights are on and
off can be adjusted individually.
However, when the surroundings
are bright (daytime, etc.), turning on
the tail lights will not chan ge the
instrument panel brightness.
The clocks can be adjusted on
the audio system screen.
Refer to “NAVIGATION AND
MULTIMEDIA SYSTEM
OWNER’S MANUAL”.
Changing the instrument
panel light brightness
Adjusting the clock
Page 106 of 600
1062-1. Instrument cluster
■The multi-information display is
displayed when
The power swit ch is in ON.
■When changing driving mode
Background color of the multi-infor-
mation display is changed following
the selected driving mode.
( P.333)
■Liquid crystal display
Small spots or light spots may
appear on the display. This phe-
nomenon is character istic of liquid
crystal displays, and there is no
problem continuing to use the dis-
play.
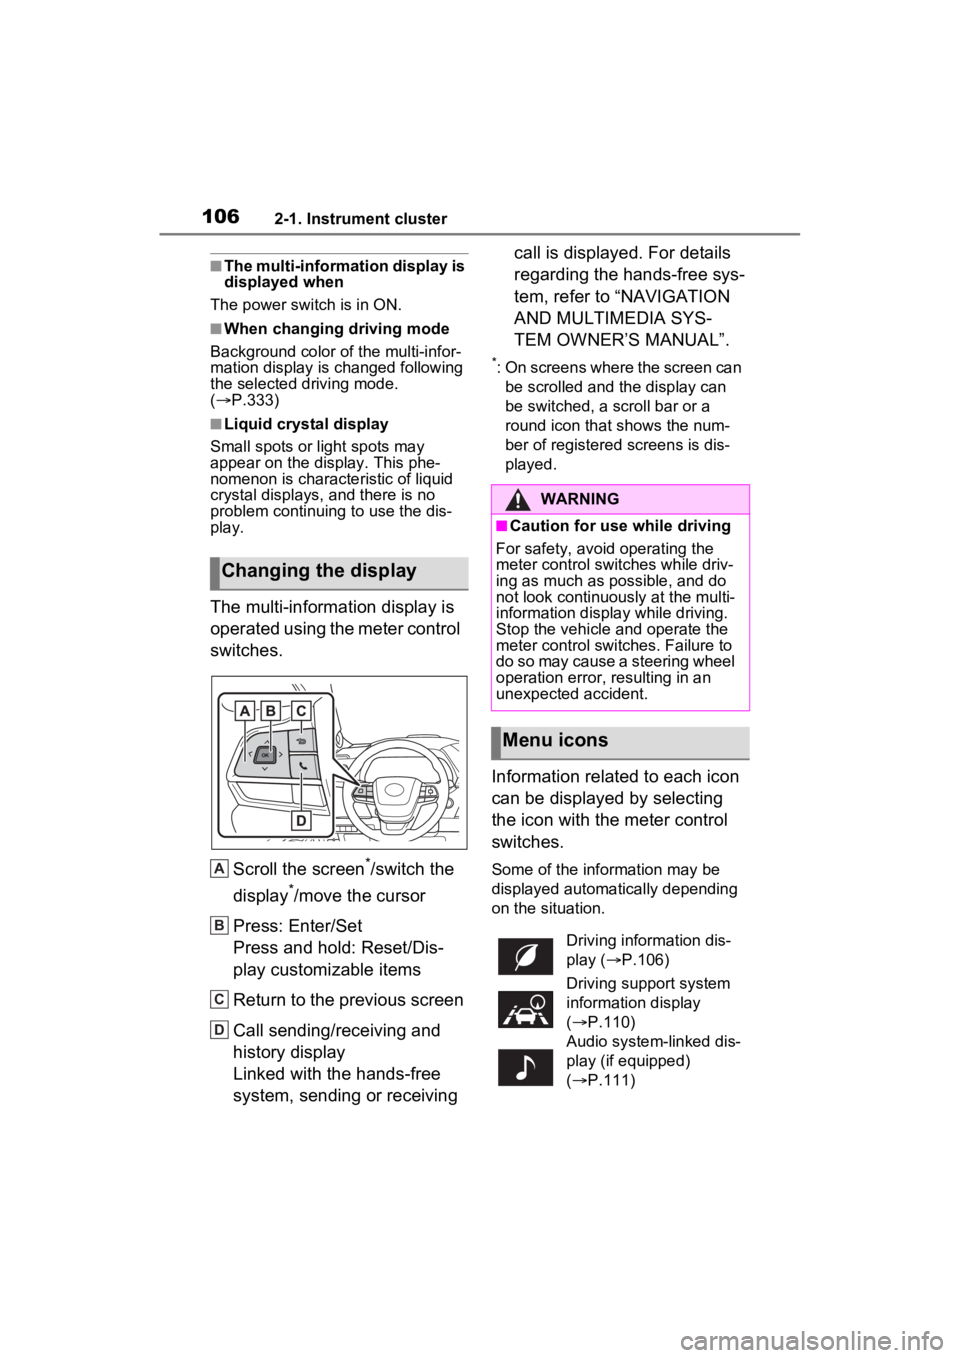
The multi-information display is
operated using the meter control
switches.
Scroll the screen
*/switch the
display
*/move the cursor
Press: Enter/Set
Press and hold: Reset/Dis-
play customizable items
Return to the previous screen
Call sending/receiving and
history display
Linked with the hands-free
system, sending or receiving call is displayed. For details
regarding the hands-free sys-
tem, refer to “NAVIGATION
AND MULTIMEDIA SYS-
TEM OWNER’S MANUAL”.
*: On screens where the screen can
be scrolled and the display can
be switched, a scroll bar or a
round icon that shows the num-
ber of registered screens is dis-
played.
Information related to each icon
can be displayed by selecting
the icon with the meter control
switches.
Some of the information may be
displayed automatically depending
on the situation.
Changing the display
A
B
C
D
�:�$�5�1�,�1�*
■Caution for use while driving
For safety, avoid operating the
meter control switches while driv-
ing as much as possible, and do
not look continuously at the multi-
information display while driving.
Stop the vehicle and operate the
meter control switches. Failure to
do so may cause a steering wheel
operation error, resulting in an
unexpected accident.
Menu icons
Driving information dis-
play ( P.106)
Driving support system
information display
( P.110)
Audio system-linked dis-
play (if equipped)
( P.111)
Page 111 of 600

1112-1. Instrument cluster
2
Vehicle status information and indicators
played.*
*
: The score result is displayed only when “Eco Score” is selected for
“Trip Summary”. ( P.112)
■Change the speedometer
display (7-inch display)
P.115
■Distance to empty
●This distance is computed based
on your averag e fuel consump-
tion. As a result, the actual dis-
tance that can be driven may
differ from tha t displayed.
●When only a small amount of fuel
is added to the tank, the display
may not be updated. When refuel-
ing, turn the power switch off. If
the vehicle is refueled without
turning the power switch off, the
display may not be updated.
●When “Refuel” is displayed, the
remaining fuel amount is low and
the distance that can be driven
with the remaining fuel cannot be
calculated.
Refuel immediately.
■ECO Accelerator Guid-
ance/“Eco Score” will not oper-
ate when
The ECO Accelerator Guid-
ance/“Eco Score” will not operate in
the following situations:
●The Hybrid System Indicator is not
operating.
●The vehicle is being driven using
the dynamic radar cruise control
with full-speed range.
■Driving support system
information display
Select to display the operational status of the following systems:
LTA (Lane Tracing Assist)
( P.277)
Dynamic radar cruise control
with full-speed range
( P.290)
RSA (Road Sign Assist) (if
equipped) ( P.287)
■Navigation system-linked
display (if equipped)
Select to display the following
navigation system-linked infor-
mation.
Route guidance
Compass display (north-up
display/heading-up display)
■Route guidance to destination
display
When the route guidance to destina-
tion display is enabled on the head-
up display, it will not be displayed on
the multi-information display.
( P.118)
Select to enable selection of an
audio source or track on the dis-
play.
■Drive information (4.2-inch
display)
2 items that are selected using
the “Drive Info Items” setting
Driving support system
information display ( )
Audio system-linked dis-
play (if equipped) ( )
Vehicle information dis-
play ( )
Page 116 of 600

1162-1. Instrument cluster
Select to change the tire pressure
warning system sensor ID code set.
To enable this function, a second
set of tire pressure warning system
sensor ID codes must be registered
by a Toyota dealer. For information
regarding changing the registered
ID code set, contact your Toyota
dealer.
• “Setting UNIT”
Select to change the units of the
tire pressure displayed.
“Scheduled Maintenance”
( P.403)
Select to reset the scheduled main-
tenance information (message indi-
cating maintenance is required and
distance until the next mainte-
nance) after all maintenance is per-
formed.
“Oil Maintenance” ( P.415)
Select to reset the Oil maintenance.
■ Meter Settings
“Language”
Select to change the language on
the multi-inform ation display.
“Units”
Select to change t he units of mea-
sure displayed.
Digital Speed (7-inch display)
Select to enable/disable the speed-
ometer display.
EV indicator ( P.80)
Select to enable/disable the EV
indicator.
Driving information display
settings
Select to set up t he following items.
• “Hybrid System”
Select to enable/disable the ECO
Accelerator Guidance (P.108).
• “Fuel Economy”
Select to change the average fuel
economy display ( P.106).
Audio settings
Select to enable/disable the audio
system-linked display.
Vehicle information dis-
play settings
• “Display Contents”
Select to displa y the following
items.
“Energy monitor”
Select to enable/disable the Energy
monitor ( P.122)
“AWD” (AWD models)
Select to enable /disable the AWD
system display ( P.112).
• “Drive Info Type” (4.2-inch dis- play)
Select to change the drive informa-
tion type between trip and total
( P.111).
• “Drive Info Items” (4.2-inch dis- play)
Select to set the items on the upper
and lower side of the drive informa-
tion screen. from th ree items, aver-
age speed, distance and total time.
“Trip Summary” (4.2-inch dis-
play)
Select to set the items displayed
when the power switch is turned off.
“Pop-Up Display”
Page 117 of 600
1172-1. Instrument cluster
2
Vehicle status information and indicators
Select to enable/disable the follow-
ing pop-up displays, which may
appear in some situations.
• TbT Navigation (if equipped)
• Telephone (if equipped)
• Audio operation
• Volume operation
• Voice control (if equipped)
• Brightness
“Multi-Information Display
OFF”
A blank screen is displayed.
“Default Settings”
Select to reset the meter display
settings.
■Suspension of the settings dis-
play
●In the following si tuations, opera-
tion of the setting s display will be
temporarily suspended.
• When a warning message appears on the multi-information
display
• When the vehicle begins to move
●Settings for functions not
equipped to the vehicle are not
displayed.
●When a function is turned off, the
related settings for that function
are not selectable.
Select to display warning mes-
sages and measures to be
taken if a malfunction is
detected. ( P.475)
Displays suggestions to the
driver in the following situations.
To select a response to a dis-
played suggestion, use the
meter control switches.
■Suggestion to turn on the
headlights
If the headlight switch is in other
than or , and the vehicle
speed is 3 mph (5 km/h) or
WARNING
■Cautions during setting up
the display
As the hybrid system needs to be
operating during setting up the
display, ensure that the vehicle is
parked in a place with adequate
ventilation. In a closed area such
as a garage, exhaust gases
including harmful carbon monox-
ide (CO) may collect and enter
the vehicle. This may lead to
death or a serious health hazard.
NOTICE
■During setting up the display
To prevent 12-vo lt battery dis-
charge, ensure that the hybrid
system is operating while setting
up the display features.
Warning message dis-
play ( )
Suggestion function
Page 120 of 600

1202-1. Instrument cluster
■Enabling/disabling the
head-up display
Select on the multi-informa-
tion display, select “Vehicle Set-
tings” (4.2-inch) / (7-inch)
and then select “HUD Main”.
“ON” and “OFF” switches each
time when “OK” is pressed.
■Changing settings of the
head-up display
The following settings can be
changed on “HUD Main” of the
multi-information display.
( P.112)
Press and hold “OK” to display
the following settings:
“HUD Brightness/Position”
Select to adjust t he brightness or
vertical position of the head-up dis-
play.
“HUD Driving Support”
• Tachometer Settings
Blank/Hybrid System/Tachometer
Select to change the display to
blank (no display)/Hybrid System Indicator/tachometer.
Select to enable/d
isable the follow-
ing items:
• Navigation (if equipped)
• Driving Assist
• Compass (if equipped)
•Audio
“HUD Rotation”
Select to adjus t the angle of the
head-up display.
P r e s s t h e o r s w i t c h t o a d j u s t
the angle of the head-up display.
■Enabling/disabling of the head-
up display
If the head-up display is disabled, it
will remain disabled when the power
switch is turned off then back to ON.
■Display brightness
The brightness of the head-up dis-
play can be adjusted on of the
multi-information di splay. Also, it is
automatically adjusted according to
the ambient brightness.
■Head-up display automatic
position adjustment (vehicles
with driving position memory)
If the display position is recorded
into memory, the head-up display
will be automatically adjusted to the
desired position. ( P.179)
■When the 12-volt battery is dis-
connected
The customize settings of the head-
up display will be reset.
●Do not place anything on or put
stickers onto the head-up dis-
play projector.
Doing so could interrupt head-
up display indications.
●Do not touch the inside of the
head-up display projector or
thrust sharp edges or the like
into the projector.
Doing so could cause mechani-
cal malfunctions.
Using the head-up display