2022 TOYOTA RAV4 ECO mode
[x] Cancel search: ECO modePage 581 of 748

5817-3. Do-it-yourself maintenance
7
Maintenance and care
■If the tread on snow tires wears
down below 0.16 in. (4 mm)
The effectiveness of the tires as
snow tires is lost.
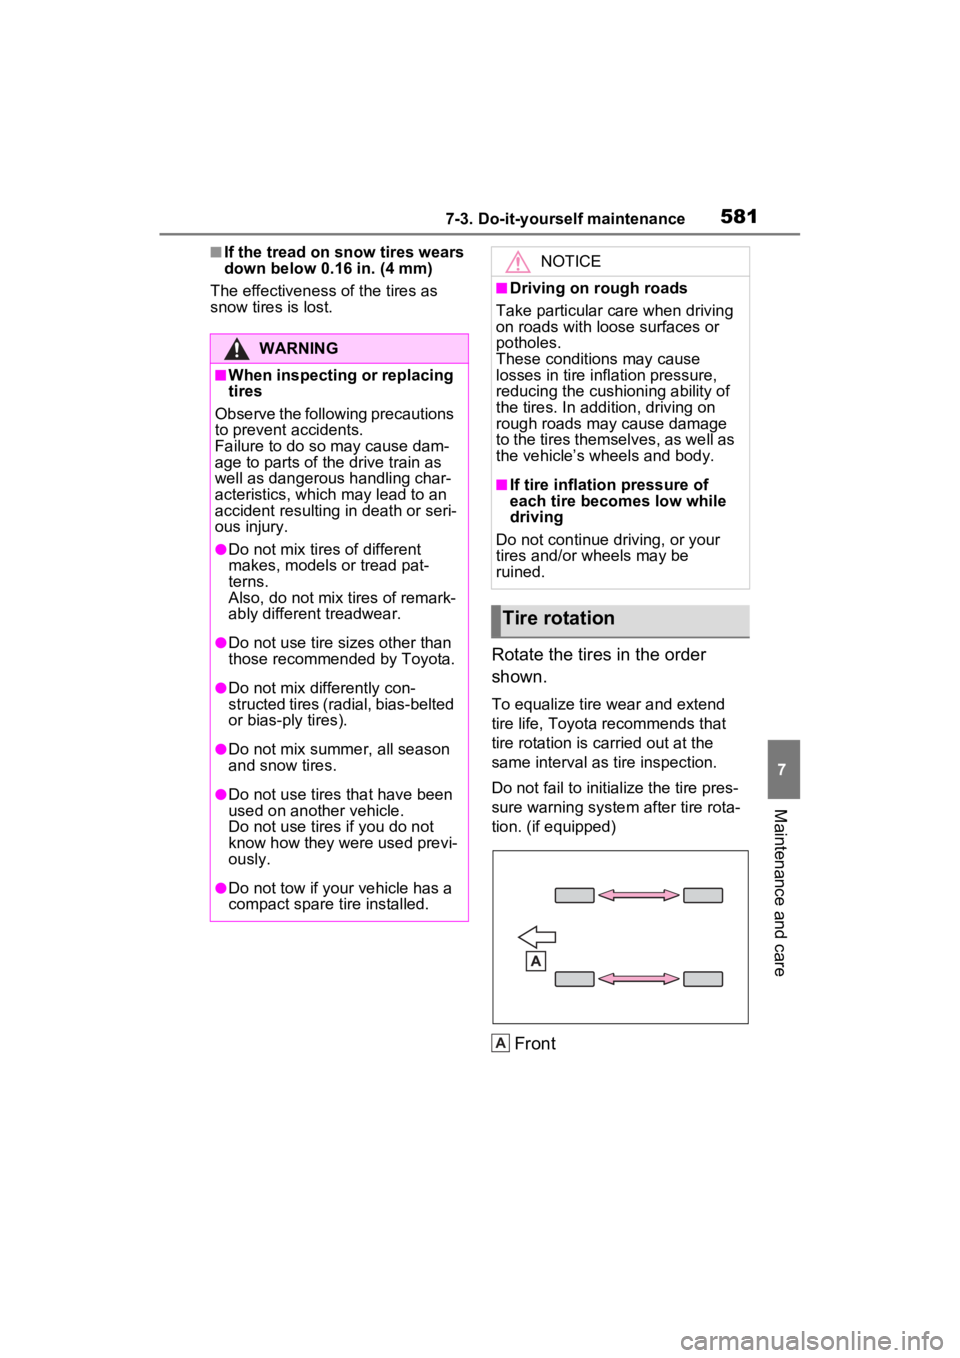
Rotate the tires in the order
shown.
To equalize tire wear and extend
tire life, Toyota recommends that
tire rotation is carried out at the
same interval as tire inspection.
Do not fail to initialize the tire pres-
sure warning system after tire rota-
tion. (if equipped)
Front
WARNING
■When inspecting or replacing
tires
Observe the following precautions
to prevent accidents.
Failure to do so may cause dam-
age to parts of t he drive train as
well as dangerous handling char-
acteristics, which may lead to an
accident resulting in death or seri-
ous injury.
●Do not mix tires of different
makes, models or tread pat-
terns.
Also, do not mix tires of remark-
ably different treadwear.
●Do not use tire sizes other than
those recommende d by Toyota.
●Do not mix differently con-
structed tires (radial, bias-belted
or bias-ply tires).
●Do not mix summer, all season
and snow tires.
●Do not use tires that have been
used on another vehicle.
Do not use tires if you do not
know how they were used previ-
ously.
●Do not tow if your vehicle has a
compact spare tire installed.
NOTICE
■Driving on rough roads
Take particular care when driving
on roads with loose surfaces or
potholes.
These conditions may cause
losses in tire inflation pressure,
reducing the cushioning ability of
the tires. In addition, driving on
rough roads may cause damage
to the tires themselves, as well as
the vehicle’s wheels and body.
■If tire inflation pressure of
each tire becomes low while
driving
Do not continue driving, or your
tires and/or wheels may be
ruined.
Tire rotation
A
Page 615 of 748

6158-2. Steps to take in an emergency
8
When trouble arises
8-2.Steps to take in an emergency
If your vehicle needs
to be towed
If towing is necessary, we
recommend having your
vehicle towed by your
Toyota dealer or commer-
cial towing service, using a
wheel-lift type truck or flat-
bed truck.
Use a safety chain system
for all towing, and abide by
all state/provincial and local
laws.
2WD models: If towing your
vehicle with a wheel-lift type
truck from the front, the
vehicle’s rear wheels and
axles must be in good con-
ditions. (P.615, 617)
If they are damaged, use a
towing dolly or flatbed
truck.
AWD models: If towing your
vehicle with a wheel-lift type
truck, use a towing dolly.
( P.615, 617)
WARNING
Observe the following precau-
tions. Failure to do so may result
in death or serious injury.
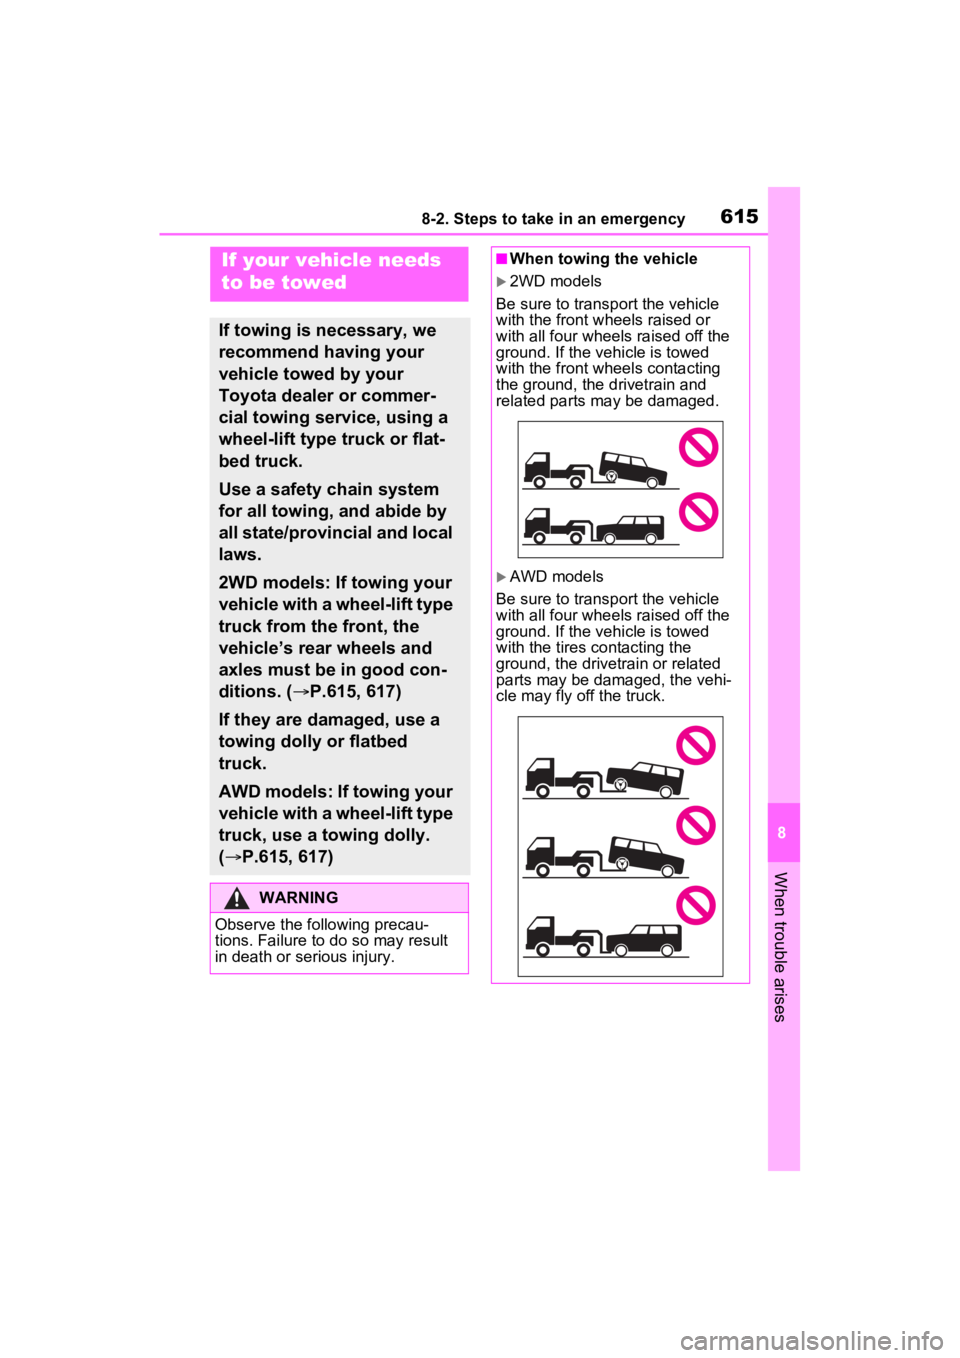
■When towing the vehicle
2WD models
Be sure to transp ort the vehicle
with the front wheels raised or
with all four wheels raised off the
ground. If the vehicle is towed
with the front wheels contacting
the ground, the drivetrain and
related parts may be damaged.
AWD models
Be sure to transp ort the vehicle
with all four wheels raised off the
ground. If the vehicle is towed
with the tires co ntacting the
ground, the drivetrain or related
parts may be damaged, the vehi-
cle may fly off the truck.
Page 644 of 748

6448-2. Steps to take in an emergency
installed on the compact spare
tire.
6Stow the flat tire, tire jack and
all tools.
■The compact spare tire
●The compact spare tire is identi-
fied by the label “TEMPORARY
USE ONLY” on the tire sidewall.
Use the compact s pare tire tem-
porarily, and only in an emer-
gency.
●Make sure to check the tire infla-
tion pressure of the compact
spare tire. ( P.667)
■When using the compact spare
tire
As the compact sp are tire is not
equipped with a tire pressure warn-
ing valve and transmitter (if
equipped), low inflation pressure of
the spare tire will not be indicated by
the tire pressure warning system.
Also, if you replace the compact
spare tire after th e tire pressure
warning light comes on, the light
remains on.
■When the compact spare tire is
attached
The vehicle height may become
lower when driving with the compact
spare tire compared to when driving
with standard tires.
■If you have a flat front tire on a
road covered with snow or ice
Install the compact spare tire on one
of the rear wheels of the vehicle.
Perform the following steps and fit
tire chains to the front tires:
1 Replace a rear tire with the com-
pact spare tire.
2 Replace the flat front tire with the
tire removed from the rear of the
vehicle.
3 Fit tire chains to the front tires.
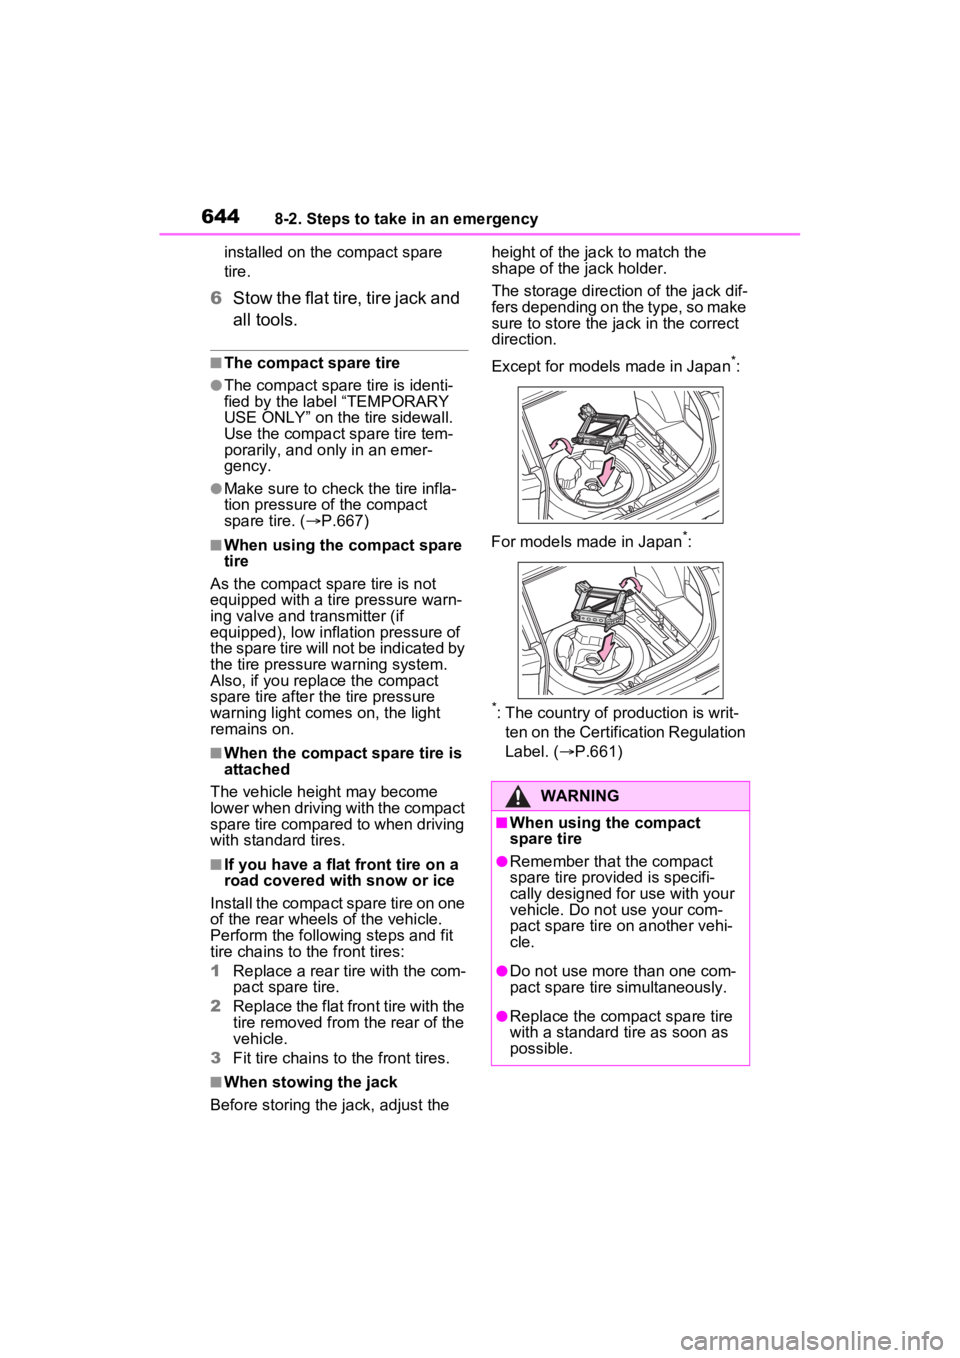
■When stowing the jack
Before storing the jack, adjust the height of the ja
ck to match the
shape of the jack holder.
The storage direction of the jack dif-
fers depending on the type, so make
sure to store the ja ck in the correct
direction.
Except for models made in Japan
*:
For models made in Japan
*:
*: The country of production is writ- ten on the Certification Regulation
Label. ( P.661)
WARNING
■When using the compact
spare tire
●Remember that the compact
spare tire provided is specifi-
cally designed for use with your
vehicle. Do not use your com-
pact spare tire on another vehi-
cle.
●Do not use more than one com-
pact spare tire simultaneously.
●Replace the comp act spare tire
with a standard tire as soon as
possible.
Page 650 of 748

6508-2. Steps to take in an emergency
3Firmly depress the brake
pedal and check that is
displayed on the multi-infor-
mation display.
4 Press the engine switch
shortly and firmly.
In the event that the engine still
cannot be started, contact your
Toyota dealer.
■Stopping the engine
Shift the shift lever to P, set the
parking brake and press the engine
switch as you no rmally do when
stopping the engine.
■Replacing the key battery
As the above proc edure is a tempo-
rary measure, it is recommended
that the electronic key battery be
replaced immediate ly when the bat-
tery is depleted. ( P.597)
■Alarm (if equipped) (for Canada)
Using the mechanical key to lock
the doors will not set the alarm sys-
tem.
If a door is unlocked using the
mechanical key when the alarm sys-
tem is set, the alarm may be trig-
gered.
■Changing engine switch modes
Release the brake pedal and press
the engine switch in step 3 above.
The engine does not start and
modes will be cha nged each time
the switch is pressed. ( P.195)
If you have a set of jumper (or
booster) cables and a second
vehicle with a 12-volt battery,
you can jump start your vehicle
by following the steps below.
1Vehicles with alarm: Confirm
that the electronic key is
being carried.
When connecting the jumper (or
booster) cables, depending on the
situation, the alarm may activate
and the doors locked. ( P.74)
2 Open the hood. ( P.569)
If the vehicle battery
is discharged
The following procedures
may be used to start the
engine if the vehicle’s bat-
tery is discharged.
You can also call your
Toyota dealer or a qualified
repair shop.
Restarting the engine
Page 652 of 748

6528-2. Steps to take in an emergency
■Starting the engine when the
battery is discharged
The engine cannot be started by
push-starting.
■To prevent battery discharge
●Turn off the headlights and the
audio system while the engine is
stopped.
(Vehicles with Stop & Start system:
Except when the engine is stopped
due to the Stop & Start system)
●Turn off any unnec essary electri-
cal components when the vehicle
is running at a low speed for an
extended period, such as in heavy
traffic.
■When the battery is removed or
discharged
●Information stor ed in the ECU is
cleared. When the battery is
depleted, have the vehicle
inspected at your Toyota dealer.
●Some systems may require initial-
ization. ( P.696)
■When removing the battery ter-
minals
When the battery terminals are
removed, the information stored in
the ECU is cleared . Before remov-
ing the battery terminals, contact
your Toyota dealer.
■Charging the battery
The electricity stor ed in the battery
will discharge gradu ally even when
the vehicle is not i n use, due to nat-
ural discharge and the draining
effects of certain electrical appli-
ances. If the vehicle is left for a long
time, the battery may discharge,
and the engine ma y be unable to
start. (The battery recharges auto-
matically during driving.)
■When recharging or replacing
the battery (vehicles without
smart key start system)
The engine may not start on the first
attempt after the battery has recharged but will start normally
after the second attempt. This is not
a malfunction.
■When recharging or replacing
the battery (vehicles with smart
key system)
●In some cases, it may not be pos-
sible to unlock the doors using the
smart key system when the bat-
tery is discharged. Use the wire-
less remote control or the
mechanical key to lock or unlock
the doors.
●The engine may not start on the
first attempt after
the battery has
recharged but will start normally
after the second attempt. This is
not a malfunction.
●The engine switch mode is memo-
rized by the vehicle. When the
battery is reconnected, the system
will return to the mode it was in
before the bat tery was dis-
charged. Before disconnecting the
battery, turn the engine switch to
OFF.
If you are unsure what mode the
engine switch wa s in before the
battery discharged, be especially
careful when reconnecting the
battery.
■When the battery is removed or
discharged (vehicles with Stop
& Start system)
The Stop & Start system may not
automatically stop the engine for up
to an hour.
■When replacing the battery
●Vehicles with Stop & Start system:
Use a genuine battery specifically
designed for use with the Stop &
Start system or a battery with equiv-
alent specifications to a genuine
battery. If an unsup ported battery is
used, Stop & Start system functions
may be restricted to protect the bat-
tery. Also, battery performance may
decrease and the engine may not
be able to restart. Contact your
Toyota dealer for details.
Page 681 of 748

6819-1. Specifications
9
Vehicle specifications
Intended outboard side-
wall
(a)The sidewall that contains a whitewall, bears
white lettering, or bear s manufacturer, brand,
and/or model name molding that is higher or
deeper than the same molding on the other
sidewall of the tire, or
(b)The outward facing sidewall of an asymmetri-
cal tire that has a par ticular side that must
always face outward whe n mounted on a vehi-
cle
Light truck (LT) tire
A tire designated by its manufacturer as primar-
ily intended for use on lightweight trucks or mul-
tipurpose passenger vehicles
Load ratingThe maximum load that a tire is rated to carry
for a given inflation pressure
Maximum load ratingThe load rating for a tire at the maximum per-
missible inflation pressure for that tire
Maximum permissible
inflation pressureThe maximum cold inflation pressure to which a
tire may be inflated
Measuring rimThe rim on which a tire is fitted for physical
dimension requirements
Open spliceAny parting at any junction of tread, sidewall, or
innerliner that extends to cord material
Outer diameterThe overall diameter o f an inflated new tire
Overall width
The linear distance between the exteriors of the
sidewalls of an inflated ti re, including elevations
due to labeling, decorations, or protective bands
or ribs
Passenger car tire
A tire intended for use on passenger cars, multi-
purpose passenger vehicles, and trucks, that
have a gross vehicle weight rating (GVWR) of
10,000 lb. or less.
PlyA layer of rubber-coated parallel cords
Ply separationA parting of rubber compound between adjacent
plies
Tire related termMeaning
Page 686 of 748

6869-2. Customization
*1: For details about each function: P.94
*2: The default setting varies according to country.
*3: Vehicles with 7-inch display only
*4: AWD models
“Fuel Economy”“Total Aver-
age”“Trip Average”
–O–“Tank Aver- age”
Audio system linked displayOnOff–O–
AWD system display*4OnOff–O–
Drive information typeTripTotal–O–
Drive informatio n items (first
item)Distance
Average Speed
–O–
Total Time
Drive information items (sec-
ond item)Total Time
Average Speed
–O–
Distance
Pop-up displayOnOff–O–
Multi-Information display offOffOn–O–
Rear seat reminder functionOnOff–O–
Convenience Services (Sug-
gestion function)On
On (when the vehicle is stopped)
O–O
Off
Function*1Default settingCustomized settingABC
Page 688 of 748

6889-2. Customization
■Smart key system*1 ( P.127)
*1: If equipped
*2: This setting can be changed when the smart door unlocking sett ing is set
to “Driver’s door”.
■Wireless remote control ( P.104)
*: If equipped
FunctionDefault settingCustomized
setting
Smart key systemOnOff––O
Smart door unlockingDriver’s doorAll the doorsO–O
Number of consecutive door
lock operations2 timesAs many as desired––O
Time elapsed before unlock-
ing all the door when gripping
and holding the driver’s door
handle
*2
2 seconds
Off
––O1.5 seconds
2.5 seconds
FunctionDefault settingCustomized setting
Wireless remote controlOnOff––O
Unlocking operation
Driver’s door unlocked in
first step, all doors
unlocked in
second step
All doors
unlocked in first step
O–O
Theft deterrent panic modeOnOff––O
Locking operation when door
openedOnOffO–O
The function that activates
the switch of the wire-
less remote control when
locking the door
* ( P.117)
On (Unlocking
all the door)
Off
––OOn (Unlocking back door
only)
ABC
ABC