2022 TOYOTA RAV4 HYBRID fuel
[x] Cancel search: fuelPage 566 of 752

5667-3. Do-it-yourself maintenance
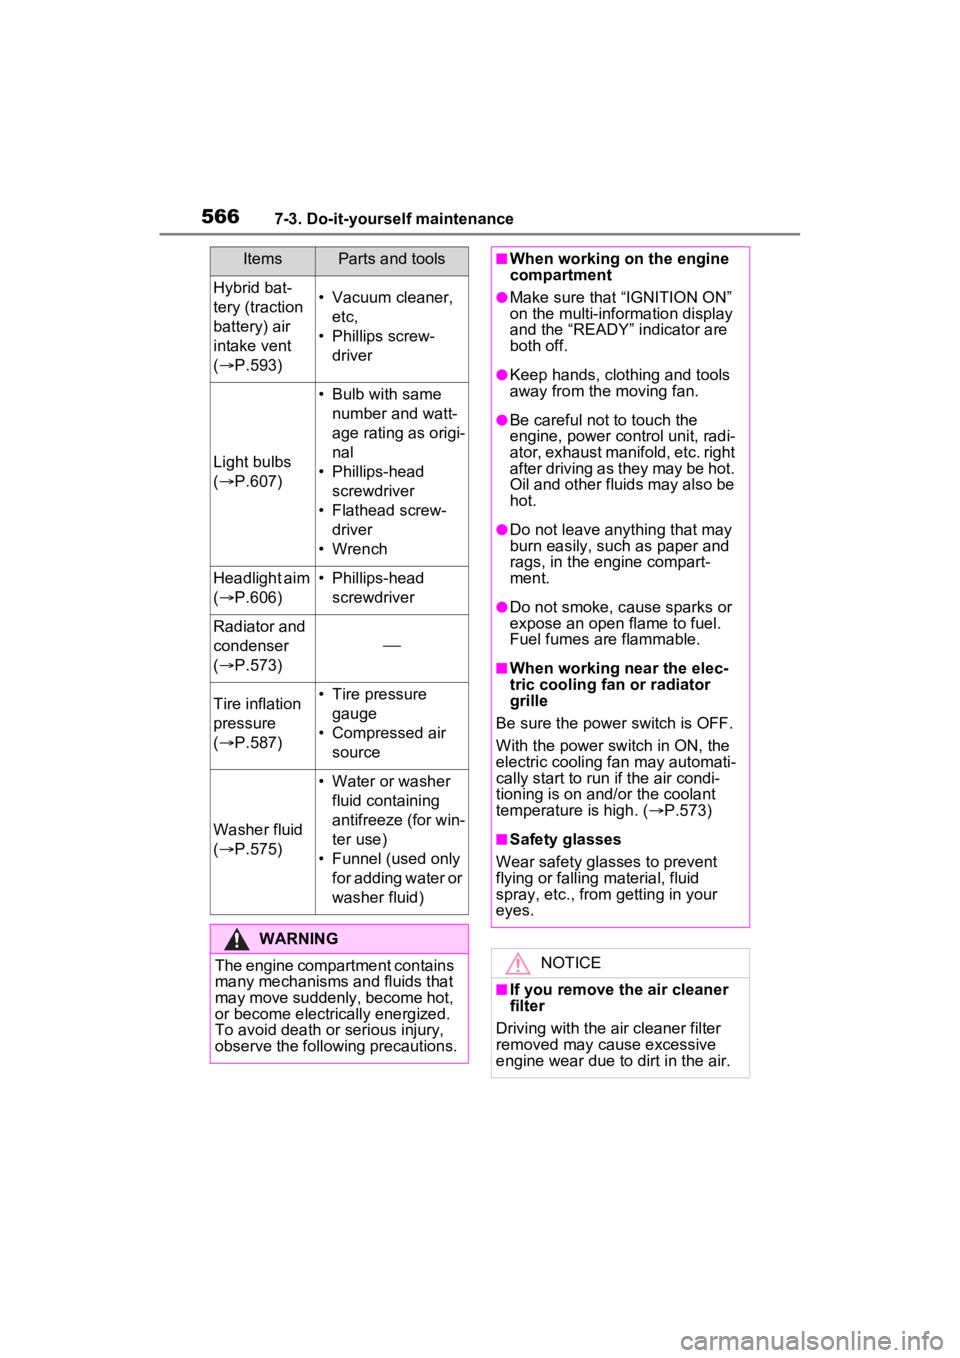
Hybrid bat-
tery (traction
battery) air
intake vent
( P.593)• Vacuum cleaner,
etc,
• Phillips screw- driver
Light bulbs
( P.607)
• Bulb with same
number and watt-
age rating as origi-
nal
• Phillips-head screwdriver
• Flathead screw- driver
• Wrench
Headlight aim
( P.606)• Phillips-head
screwdriver
Radiator and
condenser
( P.573)
Tire inflation
pressure
( P.587)• Tire pressure
gauge
• Compressed air source
Washer fluid
( P.575)
• Water or washer
fluid containing
antifreeze (for win-
ter use)
• Funnel (used only for adding water or
washer fluid)
WARNING
The engine compartment contains
many mechanisms and fluids that
may move suddenly, become hot,
or become electrically energized.
To avoid death or serious injury,
observe the following precautions.
ItemsParts and tools■When working on the engine
compartment
●Make sure that “IGNITION ON”
on the multi-information display
and the “READY” indicator are
both off.
●Keep hands, clothing and tools
away from the moving fan.
●Be careful not to touch the
engine, power control unit, radi-
ator, exhaust manifold, etc. right
after driving as they may be hot.
Oil and other fluids may also be
hot.
●Do not leave anything that may
burn easily, such as paper and
rags, in the engine compart-
ment.
●Do not smoke, cause sparks or
expose an open flame to fuel.
Fuel fumes are flammable.
■When working near the elec-
tric cooling fan or radiator
grille
Be sure the power switch is OFF.
With the power switch in ON, the
electric cooling fa n may automati-
cally start to run if the air condi-
tioning is on and/or the coolant
temperature is high. ( P.573)
■Safety glasses
Wear safety gla sses to prevent
flying or falling material, fluid
spray, etc., from getting in your
eyes.
NOTICE
■If you remove the air cleaner
filter
Driving with the air cleaner filter
removed may cause excessive
engine wear due to dirt in the air.
Page 588 of 752

5887-3. Do-it-yourself maintenance
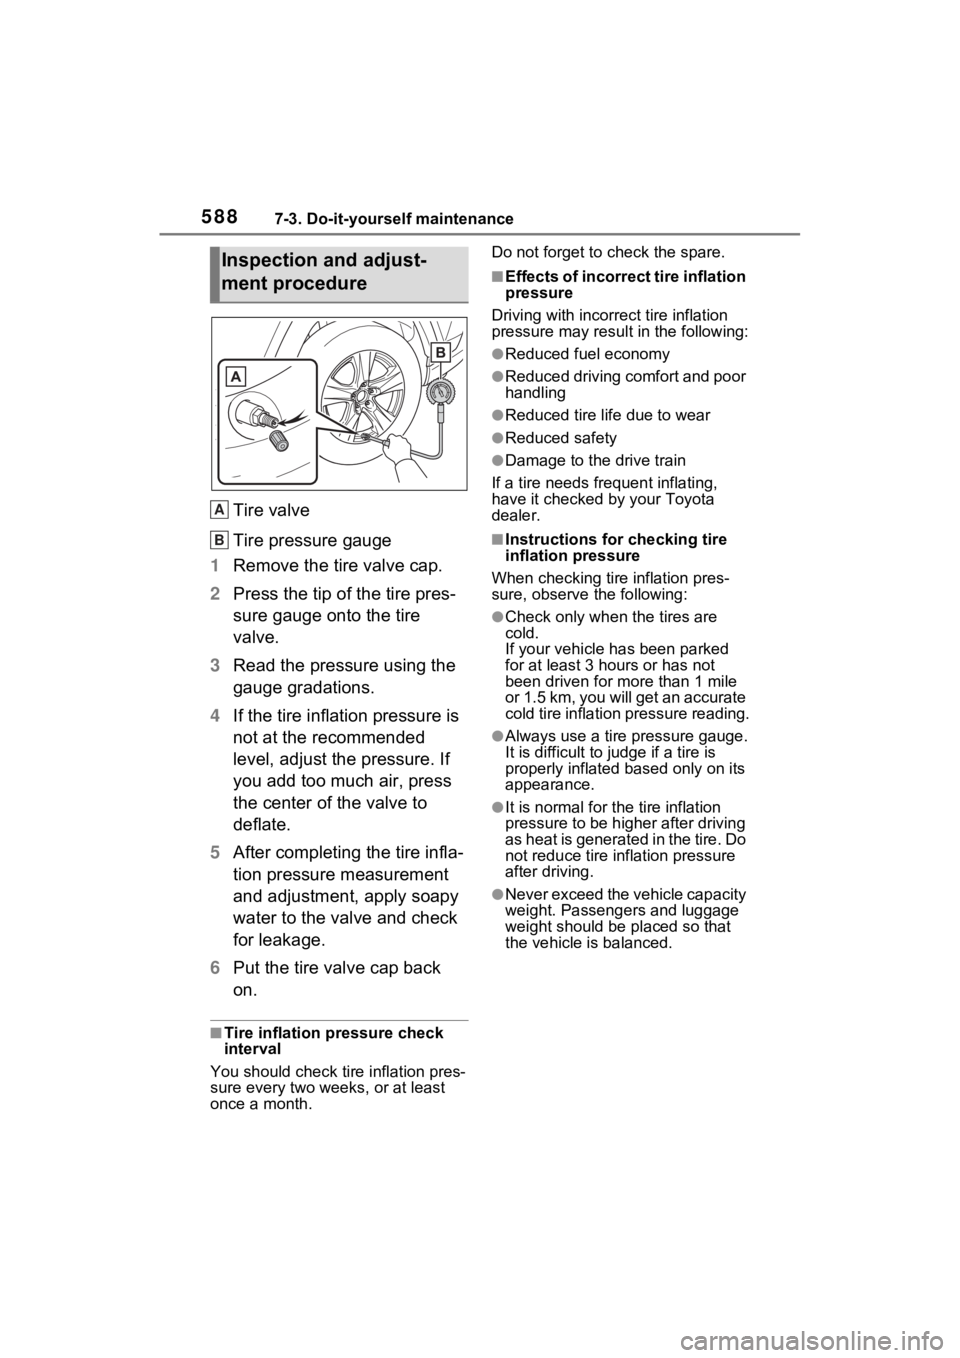
Tire valve
Tire pressure gauge
1 Remove the tire valve cap.
2 Press the tip of the tire pres-
sure gauge onto the tire
valve.
3 Read the pressure using the
gauge gradations.
4 If the tire inflation pressure is
not at the recommended
level, adjust the pressure. If
you add too much air, press
the center of the valve to
deflate.
5 After completing the tire infla-
tion pressure measurement
and adjustment, apply soapy
water to the valve and check
for leakage.
6 Put the tire valve cap back
on.
■Tire inflation pressure check
interval
You should check tire inflation pres-
sure every two weeks, or at least
once a month. Do not forget to
check the spare.
■Effects of incorrect tire inflation
pressure
Driving with incorrec t tire inflation
pressure may resul t in the following:
●Reduced fuel economy
●Reduced driving comfort and poor
handling
●Reduced tire life due to wear
●Reduced safety
●Damage to the drive train
If a tire needs frequent inflating,
have it checked by your Toyota
dealer.
■Instructions for checking tire
inflation pressure
When checking tire inflation pres-
sure, observe the following:
●Check only when the tires are
cold.
If your vehicle has been parked
for at least 3 hours or has not
been driven for more than 1 mile
or 1.5 km, you will get an accurate
cold tire inflation pressure reading.
●Always use a tire pressure gauge.
It is difficult to judge if a tire is
properly inflated based only on its
appearance.
●It is normal for the tire inflation
pressure to be higher after driving
as heat is generated in the tire. Do
not reduce tire inflation pressure
after driving.
●Never exceed the vehicle capacity
weight. Passengers and luggage
weight should be placed so that
the vehicle is balanced.
Inspection and adjust-
ment procedure
A
B
Page 593 of 752

5937-3. Do-it-yourself maintenance
7
Maintenance and care
Remove the dust from the air
intake vent with a vacuum
cleaner, etc.
Make sure to only use a vacuum to
suck out dust and clogs. Attempting
to blow out dust and clogs using an
airgun, etc. may push it into the air
intake vent. (P.596)
If dust and clogs cannot be com-
pletely removed with the air
intake vent cover installed,
remove the cover and clean the
filter.
1 Turn the power switch to
OFF.
2 Using a Phillips screwdriver,
remove the clip.
3 Remove the air intake vent
cover.
Pull the cover as shown in the illus-
tration to disengage the 8 claws,
starting from the claw in the upper
right corner and pull the cover
toward the front of the vehicle to
remove it.
4 Remove the air intake vent
filter.
Disengage the 4 center claws from
Cleaning the hybrid
battery (traction bat-
tery) air intake vent
and filter
To prevent the fuel econ-
omy from being affected,
visually inspect the hybrid
battery (traction battery) air
intake vent periodically for
dust and clogs. If it is dusty
or clogged or if “Mainte-
nance Required for Trac-
tion Battery Cooling Parts
See Owner’s Manual” is
shown on the multi-informa-
tion display, clean the air
intake vent using the follow-
ing procedures:
Cleaning the air intake
vent
If dust and clogs cannot
be completely removed
Page 595 of 752

5957-3. Do-it-yourself maintenance
7
Maintenance and care
8Install the clip.
■Scheduled maintenance of the
air intake vent is necessary
when
In some situations such as when the
vehicle is used frequently or in
heavy traffic or dusty areas, the air
intake vent may need to be cleaned
more regularly. For details, refer to
“Owner’s Warranty Information
Booklet” or “Owner’s Manual Sup-
plement”.
■Cleaning the air intake vent
●Dust in the air intake vent may
interfere with the cooling of the
hybrid battery (traction battery). If
charging/discharging of the hybrid
battery (traction battery) becomes
limited, the distance that the vehi-
cle can be driven using the electric
motor (traction motor) may be
reduced and the fuel economy
may be reduced. Inspect and
clean the air intake vent periodi-
cally.
●Improper handling of the air intake
vent cover and filt er may result in
damage to them. If you have any
concerns about cleaning the filter,
contact your Toyota dealer.
■If “Maintenance Required for
Traction Battery Cooling Parts
See Owner’s Manual” is shown
on the multi-information display
●If this warning m essage is shown
on the multi-information display,
remove the air in take vent cover
and clean the filter. ( P.593)
●After cleaning the air intake vent,
start the hybrid system and check
that the warning message is no
longer shown.
It may take approximately 20 min-
utes after the hybrid system is
started until the warning message
disappears. If the warning mes-
sage does not disappear, have
the vehicle inspected by your
Toyota dealer.
WARNING
■When cleaning the air intake
vent
●Before cleaning the air intake
vent, make sure to turn the
power switch to OFF to stop the
hybrid system.
●Do not use water or other liq-
uids to clean the air intake vent.
If water is applied to the hybrid
battery (traction battery) or
other components, a malfunc-
tion or fire may occur.
■When removing the air intake
vent cover
Do not touch the service plug
located near the air intake vent.
( P.77)
Page 615 of 752

615
8
8
When trouble arises
When trouble arises
8-1. Essential informationEmergency flashers .... 616
If your vehicle has to be stopped in an emergency.................................. 617
If the vehicle is submerged or water on the road is ris-
ing ............................. 618
8-2. Steps to take in an emer- gency
If your vehicle needs to be towed......................... 619
If you think something is wrong ........................ 623
If a warning light turns on or a warning buzzer sounds
.................................. 624
If a warning message is dis- played........................ 635
If you have a flat tire.... 640
If the hybrid system will not start ........................... 649
If you lose your keys ... 650
If the fuel filler door cannot be opened ................. 651
If the electronic key does not operate properly (vehi-
cles with smart key sys-
tem) ........................... 652
If the 12-volt battery is dis- charged ..................... 654
If your vehicle overheats .................................. 659If the vehicle becomes stuck
.................................. 662
Page 630 of 752

6308-2. Steps to take in an emergency
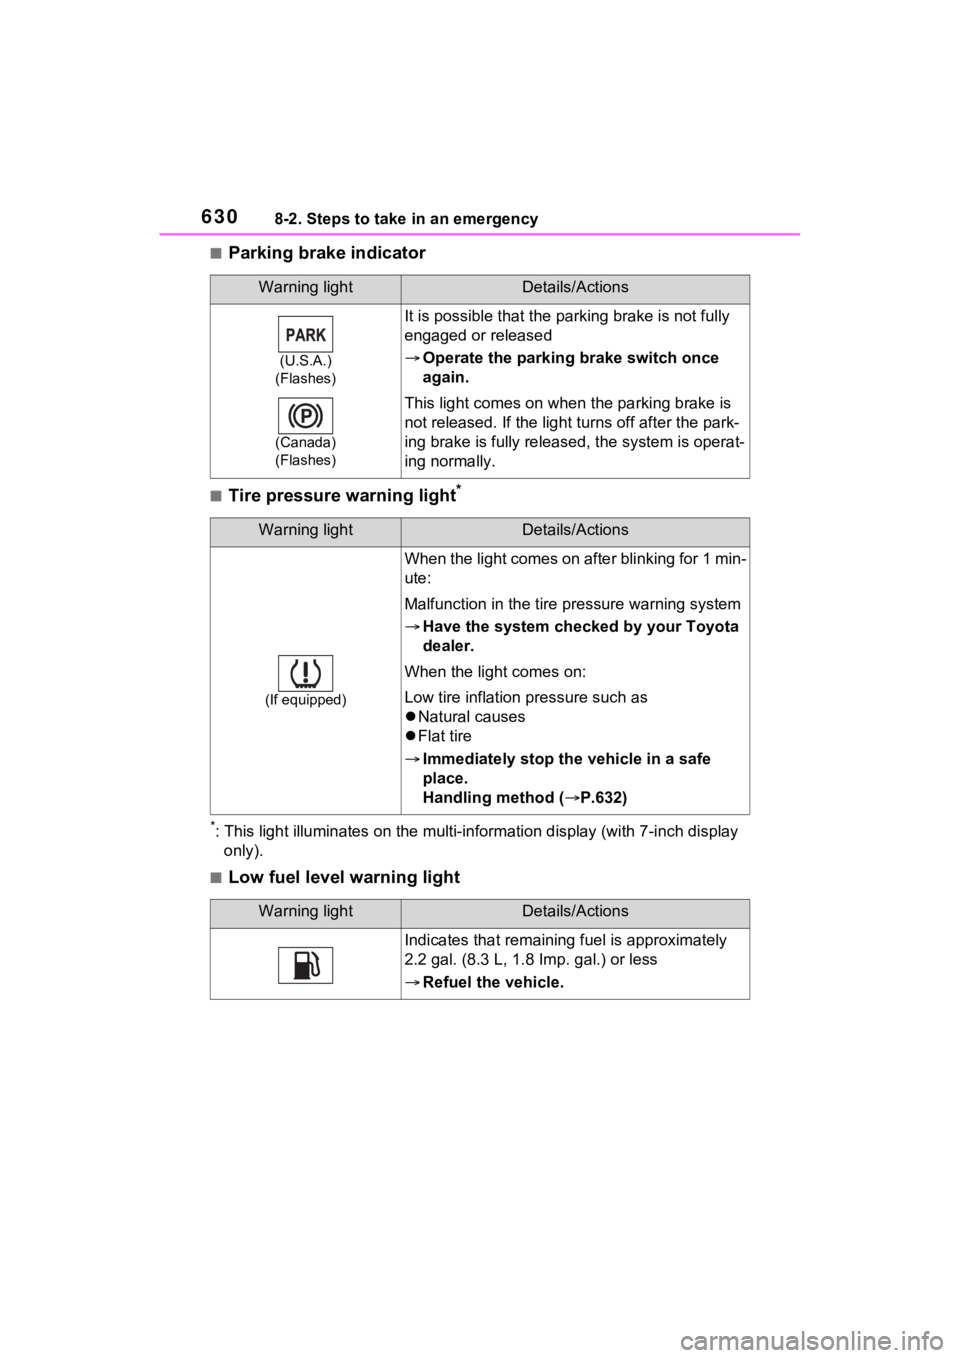
■Parking brake indicator
■Tire pressure warning light*
*: This light illuminates on the mu lti-information display (with 7-inch display
only).
■Low fuel level warning light
Warning lightDetails/Actions
(U.S.A.)
(Flashes)
(Canada)
(Flashes)
It is possible that the par king brake is not fully
engaged or released
Operate the parking brake switch once
again.
This light comes on when the parking brake is
not released. If the light t urns off after the park-
ing brake is fully released, the system is operat-
ing normally.
Warning lightDetails/Actions
(If equipped)
When the light comes on after blinking for 1 min-
ute:
Malfunction in the tire pressure warning system
Have the system checked by your Toyota
dealer.
When the light comes on:
Low tire inflation pressure such as
Natural causes
Flat tire
Immediately stop the vehicle in a safe
place.
Handling method ( P.632)
Warning lightDetails/Actions
Indicates that remaining fuel is approximately
2.2 gal. (8.3 L, 1.8 Imp. gal.) or less
Refuel the vehicle.
Page 632 of 752

6328-2. Steps to take in an emergency
the warning light to flash and the
warning buzzer to sound even if a
passenger is not sitting in the
seat.
●If a cushion is placed on the seat,
the sensor may not detect a pas-
senger, and the warning light may
not operate properly.
■SRS warning light
This warning light system monitors
the airbag sensor assembly, front
impact sensors, side impact sensors
(front door), side impact sensors
(front), driver’s seat position sen-
sor, driver’s seat belt buckle switch,
front passenger occupant classifica-
tion system (ECU and sensors),
“AIR BAG ON” indicator light, “AIR
BAG OFF” indicator light, front pas-
senger’s seat belt buckle switch,
driver’s seat belt p retensioner, front
passenger’s seat be lt pretensioner
and force limiter, airbags, intercon-
necting wiring and power sources.
( P.36)
■If the malfunction indicator
lamp comes on while driving
First check the following:
●Is the fuel t ank empty?
If it is, fill the fuel tank immediately.
●Is the fuel tank cap loose?
If it is, tighten it securely.
The light will go o ff after several
driving trips.
If the light does not go off even after
several trips, contact your Toyota
dealer as soon as possible.
■Electric power steering system
warning light (warning buzzer)
When the 12-volt battery charge
becomes insufficien t or the voltage
temporarily drops, the electric power
steering system warning light may
come on and the warning buzzer
may sound.
■When the tire pressure warning
light comes on ( vehicles with
tire pressure warning system)
Inspect the tires to check if a tire is
punctured.
If a tire is punctured: P.640
If none of the tires are punctured:
Turn the power switch to OFF then
turn it to ON.
Check if the tire pressure warning
light comes on or blinks.
If the tire pressur e warning light
blinks for approximately 1 minute
then stays on
There may be a malfunction in the
tire pressure warning system. Have
the vehicle inspected by your
Toyota dealer immediately.
If the tire pressur e warning light
comes on
1 After the temperature of the tires
has lowered sufficiently, check
the inflation pressure of each tire
and adjust them to the specified
level.
2 If the warning light does not turn
off even after several minutes
have elapsed, check that the
inflation pressure of each tire is
at the specified level and perform
initialization. ( P.583)
■The tire pressure warning light
may come on due to natural
causes (vehicles with tire pres-
sure warning system)
The tire pressure warning light may
come on due to natural causes such
as natural air leaks and tire inflation
pressure changes caused by tem-
perature. In this ca se, adjusting the
tire inflation pressure will turn off the
warning ligh t (after a few minutes).
■When a tire is replaced with a
compact spare tire (vehicles
with tire pressure warning sys-
tem)
The compact spare tire is not
equipped with a tire pressure warn-
Page 634 of 752

6348-2. Steps to take in an emergency
WARNING
■Maintenance of the tires
(vehicles with tire pressure
warning system)
Each tire, including the spare (if
provided), should be checked
monthly when cold and inflated to
the inflation pressure recom-
mended by the vehicle manufac-
turer on the vehicle placard or tire
inflation pressure label (tire and
load information label). (If your
vehicle has tires of a different size
than the size indicated on the
vehicle placard or tire inflation
pressure label [tire and load infor-
mation label], you should deter-
mine the proper tire inflation
pressure for those tires.)
As an added safe ty feature, your
vehicle has been equipped with a
tire pressure m onitoring system
(TPMS-tire pressure warning sys-
tem) that illuminates a low tire
pressure telltale (tire pressure
warning light) when one or more
of your tires is significantly under-
inflated. Accordingly, when the
low tire pressure telltale (tire pres-
sure warning light) illuminates,
you should stop and check your
tires as soon as possible, and
inflate them to the proper pres-
sure. Driving on a significantly
under-inflated tire causes the tire
to overheat and can lead to tire
failure. Under-inflation also
reduces fuel efficiency and tire
tread life, and may affect the vehi-
cle’s handling and stopping abil-
ity.
Please note that the TPMS (tire
pressure warning system) is not a
substitute for proper tire mainte-
nance, and it is the driver’s
responsibility to m aintain correct
tire pressure, even if under-infla-
tion has not reached the level to
trigger illumination of the TPMS
low tire pressure te lltale (tire pres-
sure warning light).
Your vehicle has also been
equipped with a TPMS (tire pres-
sure warning system) malfunc-
tion indicator to indicate when the
system is not operating properly.
The TPMS (tire pressure warning
system) malfunction indicator is
combined with the low tire pres-
sure telltale (tire pressure warning
light). When the system detects a
malfunction, the te lltale will flash
for approximately one minute and
then remain continuously illumi-
nated. This sequence will con-
tinue upon subsequent vehicle
start-ups as long as the malfunc-
tion exists. When the malfunction
indicator is illuminated, the sys-
tem may not be ab le to detect or
signal low tire pressure as
intended.
TPMS (tire pressure warning sys-
tem) malfunctions may occur for a
variety of reasons, including the
installation of replacement or
alternate tires or wheels on the
vehicle that prevent the TPMS
(tire pressure warning system)
from functioning properly. Always
check the TPMS (tire pressure
warning system) malfunction tell-
tale after replacing one or more
tires or wheels on your vehicle to
ensure that the replacement or
alternate tires and wheels allow
the TPMS (tire pressure warning
system) to continue to function
properly.