2022 TOYOTA RAV4 HYBRID lights
[x] Cancel search: lightsPage 158 of 752

1583-4. Adjusting the steering wheel and mirrors
*: If equipped
The height of the rear view mir-
ror can be adjusted to suit your
driving posture.
Adjust the height of the rear
view mirror by moving it up and
down.Reflected light from the head-
lights of vehicles behind can be
reduced by operating the lever.
1
Normal position
2 Anti-glare position
Responding to the level of
brightness of the headlights of
vehicles behind, the reflected
light is automatically reduced.
Changing automatic anti-glare
function mode on/off
When the automatic anti-glare func-
tion is in ON mode, the indicator
illuminates.
The function will set to ON mode
each time the power switch is
turned to ON.
Pressing the button turns the func-
tion to OFF mode. (The indicator also turns off.)
Inside rear view mir-
ror*
The rear view mirror’s posi-
tion can be adjusted to
enable sufficient confirma-
tion of the rear view.
Adjusting the height of
rear view mirror
WARNING
■Caution while driving
Do not adjust the position of the
mirror while driving.
Doing so may lead to mishandling
of the vehicle and cause an acci-
dent, resulting in death or serious
injury.
Anti-glare function (vehi-
cles with manual anti-
glare inside rear view mir-
ror)
Anti-glare function (vehi-
cles with auto anti-glare
inside rear view mirror)
A
A
Page 161 of 752

1613-4. Adjusting the steering wheel and mirrors
3
Before driving
Operate the lever to change
between digital mirror mode and
optical mirror mode.
1Digital mirror mode
Displays an image of the area
behind the vehicle.
will illuminate in this mode.
2Optical mirror mode
Turns off the disp lay of the Digital
Rear-view Mirror allows it to be
used as an optical mirror.
■Digital mirror mode operating
condition
The power switch is turned to ON.
When the power switch is changed
from ON to OFF or ACC, the image
will disappear afte r several seconds.
■When using the Digital Rear-
view Mirror in digital mirror
mode
●If it is difficult to see the displayed
image due to light reflected off the
Digital Rear-view Mirror, the cam-
era being dirty or covered with
water droplets, or if lights of a
vehicle behind your vehicle or the
displayed image are bothering
you, change to optical mirror
mode.
●When the back door is open, the
Digital Rear-view Mirror image
may not display properly. Before driving, make sure the back door
is closed.
●If the display is difficult to see due
to reflected light
, close the sun-
shade for the moon roof (if
equipped) or the electronic sun-
shade for the panoramic moon
roof (if equipped).
●Any of the following conditions
may occur when driving in the
dark, such as at night. None of
them indicates that a malfunction
has occurred.
• Colors of objects in the displayed image may differ from their actual
color.
• Depending on the height of the
lights of the vehicle behind, the
area around the vehicle may
appear white and blurry.
• Automatic image adjustment for brighter surrounding image may
cause flickering.
If it is difficult to see the displayed
image or flickering bothers you,
change to optical mirror mode.
●The Digital Rear-view Mirror may
become hot while it is in digital
mirror mode.
This is not a malfunction.
●Depending on your physical con-
dition or age, it may take longer
than usual to fo cus on the dis-
played image. In this case,
change to optical mirror mode.
●Do not let passengers stare at the
displayed image when the vehicle
is being driven, as doing so may
cause motion sickness.
■When the system malfunctions
If the symbol shown in the illustra-
tion is displayed when using the
Digital Rear-view Mirror in digital
mirror mode, the system may be
malfunctioning. The symbol will dis-
appear in a few seconds. Operate
the lever, change to optical mirror
mode and have the vehicle
inspected by your Toyota dealer.
Changing modes
Page 163 of 752

1633-4. Adjusting the steering wheel and mirrors
3
Before driving
*: This is a function for the optical
mirror mode, however, the setting
can also be changed while using
the digital mirror mode.
■Enabling/disabling the
automatic anti-glare func-
tion (optical mirror mode)
The automatic anti-glare func-
tion in the optical mirror mode
can be enabled/disabled. The
setting can be changed in both
the digital mirror mode and the
optical mirror mode.
When using the digital mirror
mode
P.162
When using the optical mirror
mode
1 Press the menu button.
The icons will be displayed.
2Press the menu button
repeatedly and select .
The setting display will be dis-
played.
3Press or to
enable (ON)/disable (OFF)
the automatic anti-glare func-
tion.
The icons will disappear if a button
is not operated fo r approximately 5
seconds or more.
■Adjusting the display (digital
mirror mode)
●If the displayed image is adjusted,
it may appear distorted. This is not
a malfunction.
●If the brightness of the Digital
Rear-view Mirror is set too high, it
may cause eye strain. Adjust the
Digital Rear-view Mirror to an
appropriate brightness. If your
eyes become tired, change to
optical mirror mode.
●The brightness of the Digital Rear-
view Mirror will change automati-
cally according to the brightness
of the area in front of your vehicle.
Select to enable/disable the
automatic anti-glare func-
tion.
*
Responding to the bright-
ness of the headlights of
vehicles behind, the
reflected light is automati-
cally adjusted.
The automatic anti-glare
function is enabled each
time the power switch is
changed to ON.
Select to display
HomeLink
® Training Tuto-
rial to assist c ustomers to
train their Garage Door
Opener System. ( P.546)
Select to change the lan-
guage of the Homelink
®
Training Tutorial.
IconsSettings
Page 166 of 752

1663-4. Adjusting the steering wheel and mirrors
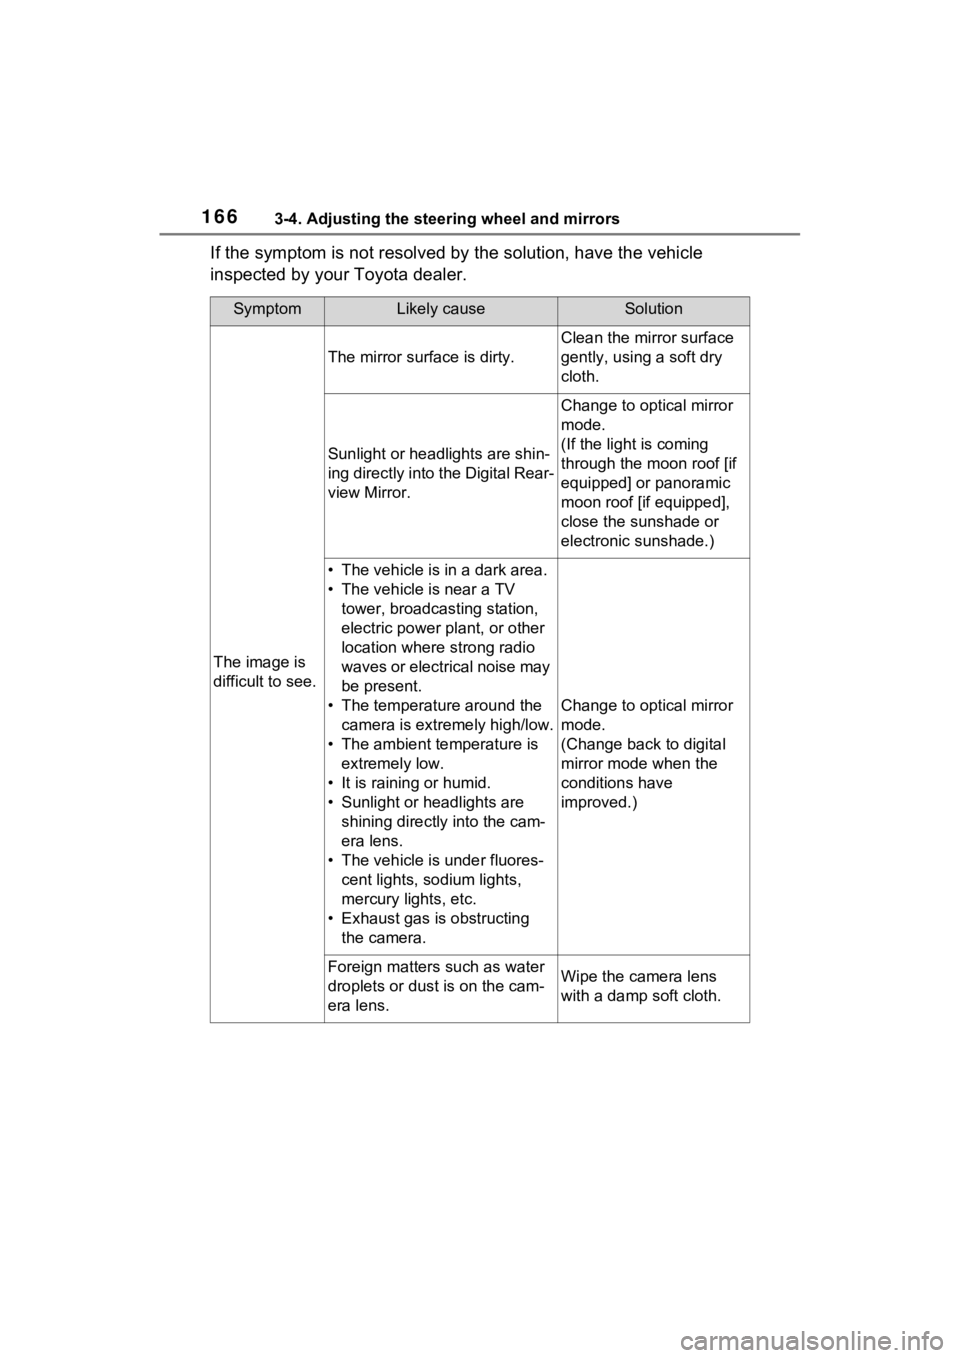
If the symptom is not resolved by the solution, have the vehicle
inspected by your Toyota dealer.
SymptomLikely causeSolution
The image is
difficult to see.
The mirror surface is dirty.
Clean the mirror surface
gently, using a soft dry
cloth.
Sunlight or headlights are shin-
ing directly into the Digital Rear-
view Mirror.
Change to optical mirror
mode.
(If the light is coming
through the moon roof [if
equipped] or panoramic
moon roof [if equipped],
close the sunshade or
electronic sunshade.)
• The vehicle is in a dark area.
• The vehicle is near a TV tower, broadcasting station,
electric power plant, or other
location where strong radio
waves or electrical noise may
be present.
• The temperature around the camera is extremely high/low.
• The ambient te mperature is
extremely low.
• It is raining or humid.
• Sunlight or headlights are shining directly into the cam-
era lens.
• The vehicle is under fluores- cent lights, sodium lights,
mercury lights, etc.
• Exhaust gas is obstructing the camera.
Change to optical mirror
mode.
(Change back to digital
mirror mode when the
conditions have
improved.)
Foreign matters such as water
droplets or dust is on the cam-
era lens.Wipe the camera lens
with a damp soft cloth.
Page 181 of 752

181
4
4
Driving
Driving
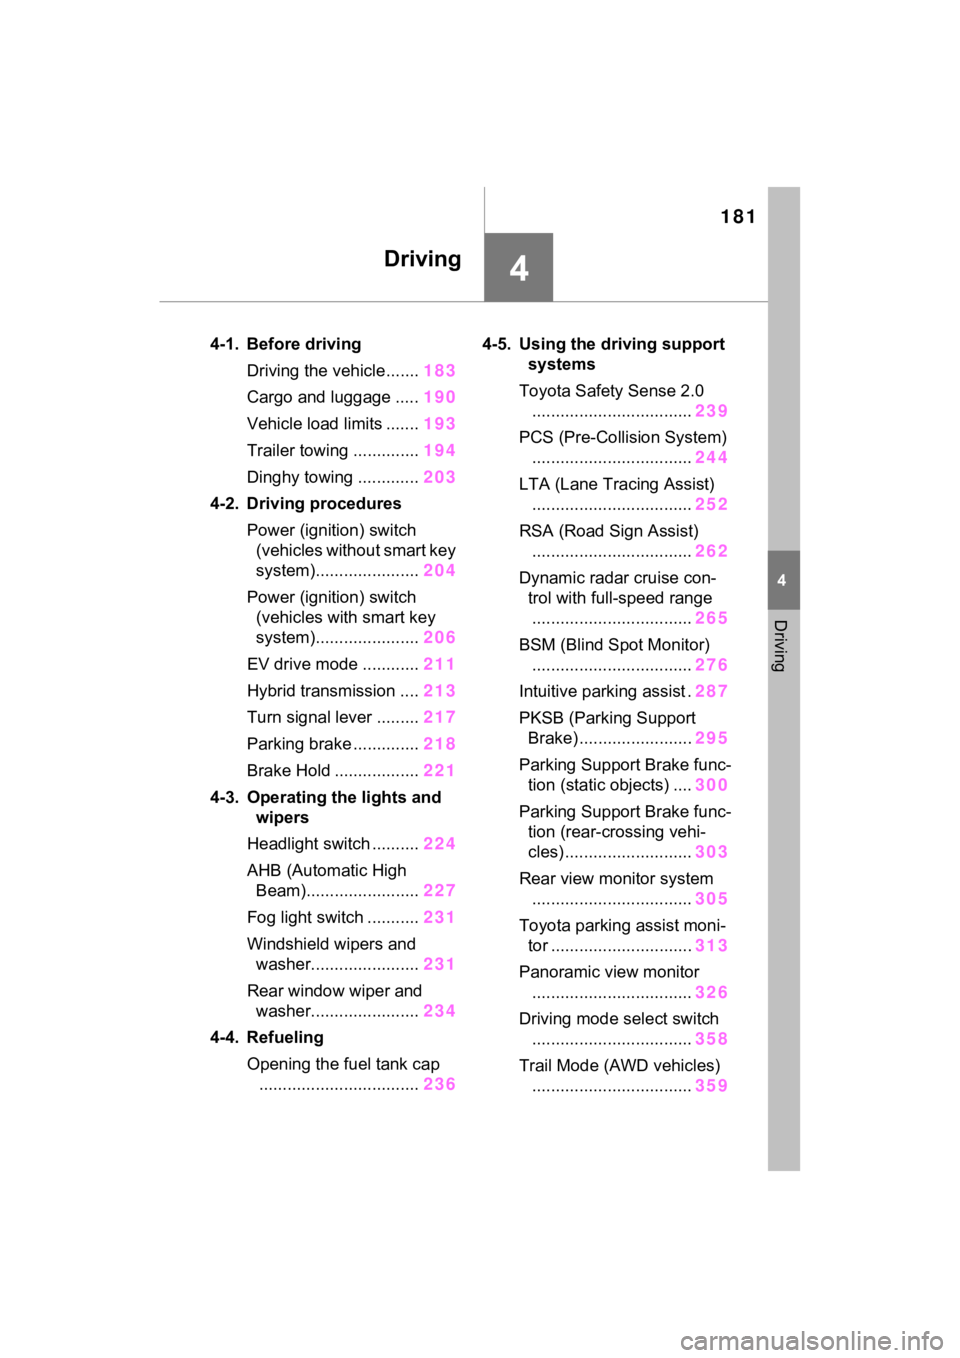
4-1. Before drivingDriving the vehicle....... 183
Cargo and luggage ..... 190
Vehicle load limits ....... 193
Trailer towing .............. 194
Dinghy towing ............. 203
4-2. Driving procedures Power (ignition) switch (vehicles without smart key
system)...................... 204
Power (ignition) switch (vehicles with smart key
system)...................... 206
EV drive mode ............ 211
Hybrid transmission .... 213
Turn signal lever ......... 217
Parking brake .............. 218
Brake Hold .................. 221
4-3. Operating the lights and wipers
Headlight switch .......... 224
AHB (Automatic High Beam)........................ 227
Fog light switch ........... 231
Windshield wipers and washer....................... 231
Rear window wiper and washer....................... 234
4-4. Refueling Opening the fuel tank cap.................................. 2364-5. Using the dr
iving support
systems
Toyota Safety Sense 2.0 .................................. 239
PCS (Pre-Collision System) .................................. 244
LTA (Lane Tracing Assist) .................................. 252
RSA (Road Sign Assist) .................................. 262
Dynamic radar cruise con- trol with full-speed range
.................................. 265
BSM (Blind Spot Monitor) .................................. 276
Intuitive parking assist . 287
PKSB (Parking Support Brake) ........................ 295
Parking Support Brake func- tion (static objects) .... 300
Parking Support Brake func- tion (rear-crossing vehi-
cles) ........................... 303
Rear view monitor system .................................. 305
Toyota parking assist moni- tor .............................. 313
Panoramic view monitor .................................. 326
Driving mode select switch .................................. 358
Trail Mode (AWD vehicles) .................................. 359
Page 194 of 752

1944-1. Before driving
■Before towing
Check that the fo llowing conditions
are met:
●Ensure that your vehicle’s tires
are properly inflated. ( P.672)
●Trailer tires are inflated according
to the trailer manufacturer’s rec-
ommendation.
●All trailer lights work as required
by law.
●All lights work each time you con-
nect them.
●The trailer ball is set at the proper
height for the coupler on the
trailer.
●The trailer is level when it is
hitched.
Do not drive if th e trailer is not
level, and check for improper
tongue weight, overloading, worn
suspension, or other possible
causes.
●The trailer cargo is securely
loaded.
●The rear view mirr ors conform to
all applicable fede ral, state/provin-
cial or local regulations. If they do
not, install rear view mirrors
appropriate for towing purposes.
Trailer towing
Your vehicle is designed
primarily as a passenger-
and-load-carrying vehicle.
Towing a trailer can have an
adverse impact on handling,
performance, braking, dura-
bility, and fuel consump-
tion. For your safety and the
safety of others, you must
not overload your vehicle or
trailer. You must also
ensure that you are using
appropriate towing equip-
ment, that the towing equip-
ment has been installed
correctly and used properly,
and that you employ the
requisite driving habits.
Vehicle-trailer stability and
braking performance are
affected by trailer stability,
brake performance and set-
ting, trailer brakes, the hitch
and hitch systems (if
equipped).
To tow a trailer safely, use
extreme care and drive the
vehicle in accordance with
your trailer’s characteris-
tics and operating condi-
tions.
Toyota warranties do not
apply to damage or mal-
function caused by towing a
trailer for commercial pur-
poses.
Contact your Toyota dealer for
further information about addi-
tional requirements such as a
towing kit, etc.
Page 200 of 752

2004-1. Before driving
Please consult your dealer
when installing trailer lights, as
incorrect installation may cause
damage to the vehicle’s lights.
Please take care to comply with
your state’s laws when installing
trailer lights.
Your vehicle will handle differ-
ently when towing a trailer. Help
to avoid an accident, death or
serious injury, keep the follow-
ing in mind when towing:
Speed limits for towing a
trailer vary by state or prov-
ince. Do not exceed the
posted towing speed limit.
Toyota recommends that the
vehicle-trailer speed limit is 65
mph (104 km/h) on a flat,
straight, dry road. Do not
exceed this limit, the posted
towing speed limit or the
speed limit for your trailer as
set forth in your trailer owner’s
manual, whichever is lowest.
Instability of the towing vehi-
cle-trailer combination (trailer
sway) increases as speed increases. Exceeding speed
limits may cause loss of con-
trol.
Before starting out, check the
trailer lights, tires and the
vehicle-trailer connections.
Recheck after driving a short
distance.
Practice turning, stopping and
reversing with the trailer
attached in an area away
from traffic until you become
accustomed to the feel of the
vehicle-trailer combination.
Reversing with a trailer
attached is difficult and
requires practice. Grip the
bottom of the steering wheel
and move your hand to the
left to move the trailer to the
left. Move your hand to the
right to move the trailer to
right. (This is generally oppo-
site to reversing without a
trailer attached.) Avoid sharp
or prolonged turning. Have
someone guide you when
reversing to reduce the risk of
an accident.
As stopping distance is
increased when towing a
trailer, vehicle-to vehicle dis-
tance should be increased.
For each 10 mph (16 km/h) of
speed, allow at least one
vehicle and trailer length.
Avoid sudden braking as you
may skid, resulting in the
trailer jackknifing and a loss of
Connecting trailer lights
NOTICE
■Do not directly splice trailer
lights
Do not directly splice trailer lights.
Directly splicing trailer lights may
damage your vehicle’s electrical
system and cause a malfunction.
Trailer towing tips
Page 217 of 752

2174-2. Driving procedures
4
Driving
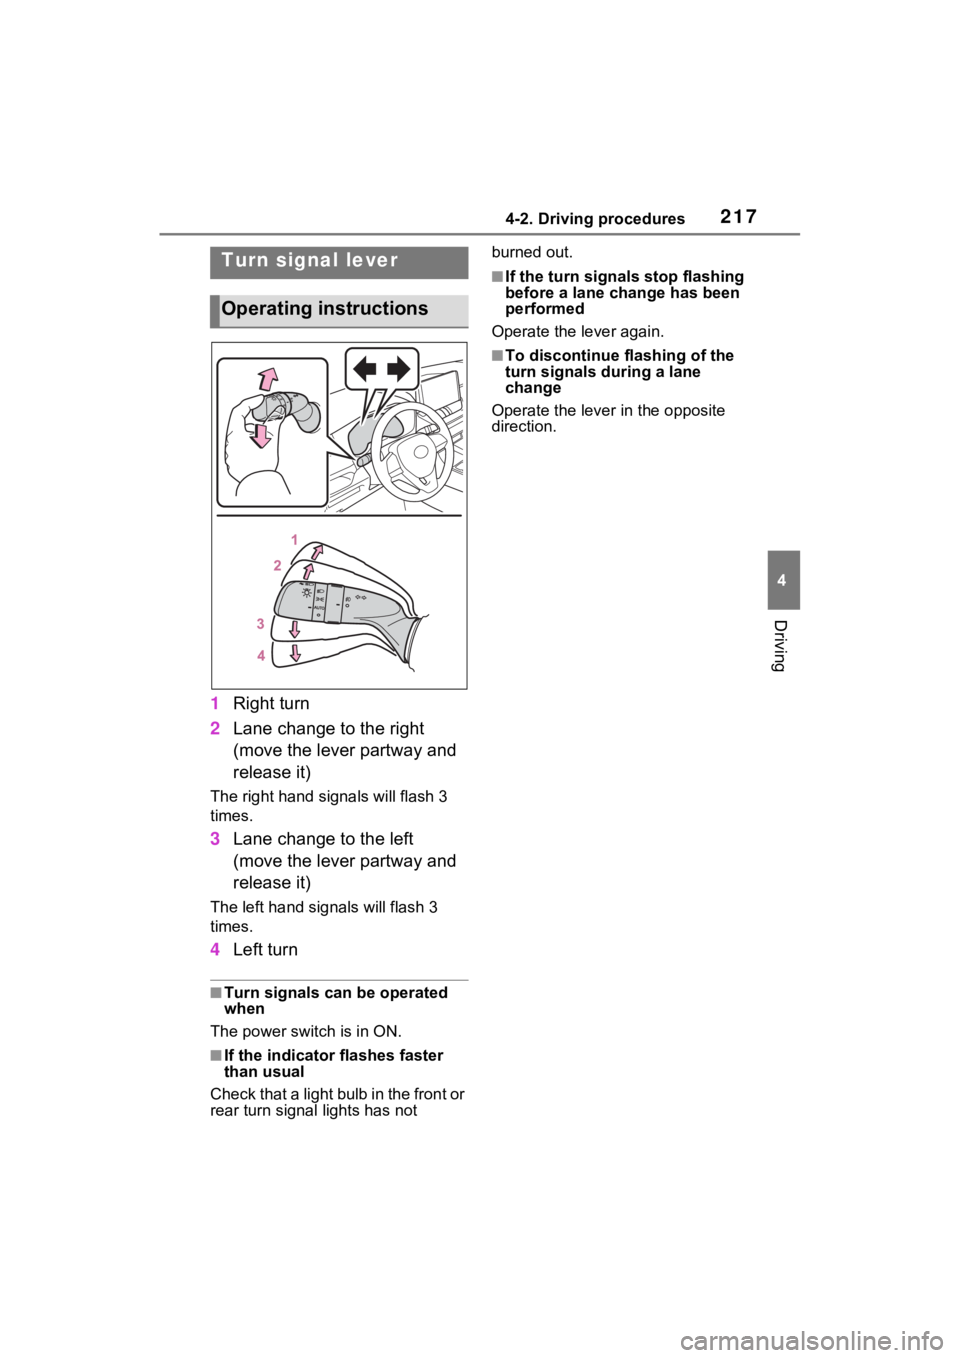
1Right turn
2 Lane change to the right
(move the lever partway and
release it)
The right hand signals will flash 3
times.
3Lane change to the left
(move the lever partway and
release it)
The left hand signals will flash 3
times.
4Left turn
■Turn signals can be operated
when
The power swit ch is in ON.
■If the indicator flashes faster
than usual
Check that a light bulb in the front or
rear turn signal lights has not burned out.
■If the turn signals stop flashing
before a lane change has been
performed
Operate the lever again.
■To discontinue flashing of the
turn signals during a lane
change
Operate the lever in the opposite
direction.
Turn signal lever
Operating instructions