2022 TOYOTA PROACE CITY VERSO keyless
[x] Cancel search: keylessPage 133 of 320
133
Driving
6
exhaust gases, such as carbon monoxide. Danger of poisoning and death!
NOTIC E
With petrol engines, after a cold start, preheating the catalytic converter can cause noticeable engine vibrations for anything up to 2 minutes while stationary with the engine running (accelerated idle speed).
WARNI NG
For Diesel vehicles, when the temperature is below zero, starting will only occur once the preheating warning lamp is off.If this warning lamp comes on after pressing the "START/STOP" button, press down on the brake or clutch pedal until the warning lamp goes off, without pressing the "START/STOP" button again, until the engine starts and runs.
NOTIC E
The presence of the “Keyless Entry and Starting” system remote control is imperative in the recognition zone.Never leave the vehicle with the engine running and with the remote control on your person.
If the remote control leaves the recognition zone, a message is displayed.Move the remote control into the zone in order to be able to start the engine.
NOTIC E
If one of the starting conditions is not met, a message is displayed in the instrument panel. In some circumstances, it is necessary to turn
the steering wheel while pressing the "START/STOP" button to assist unlocking of the steering column. A message is displayed.
Switching off
► Immobilise the vehicle, with the engine at idle.► With a manual gearbox, ideally put the gear lever into neutral.► With an automatic gearbox, ideally select position P.
With the conventional key/With the
remote control key
► Turn the key all the way to position 1 (Stop) and remove it from the ignition.► To lock the steering column, turn the steering wheel until it locks.
NOTIC E
To facilitate unlocking of the steering column, it is recommended that the wheels be returned to the straight ahead position before switching off the engine.
► Check that the parking brake is correctly applied, particularly on sloping ground.
WARNI NG
Never switch off the ignition before the complete immobilisation of the vehicle. With the engine off, the braking and steering assistance systems are also turned off: risk of loss of control of the vehicle.
NOTIC E
As a safety measure, never leave the vehicle without taking the remote control with you, even for a short time.
NOTIC E
Avoid attaching heavy objects to the key or the remote control, which would weigh down on its blade in the ignition switch and could
cause a malfunction.
Page 134 of 320
134
Key left in the ignition
NOTIC E
When opening the driver's door, an alert message is displayed, accompanied by an audible signal, to remind you that the key is still in the ignition switch at position 1 (Stop).If the key has been left in the ignition switch at position 2 (Ignition on), the ignition will be
switched off automatically after one hour.To switch the ignition back on, turn the key to position 1 (Stop), then back to position 2 (Ignition on).
With Keyless Entry and Starting
► With the remote control in the recognition zone, press the "START/STOP" button.With a manual gearbox, the engine switches off and the steering column locks.With the EAT8 automatic gearbox, the engine switches off.
NOTIC E
If the vehicle is not immobilised, the engine will not stop.
WARNI NG
To avoid any risk of jamming the pedals:– only use mats which are suited to the fixings already present in the vehicle; these fixings must be used,– never place one mat on top of another.The use of mats not approved by TOYOTA may interfere with access to the pedals and hinder the operation of the cruise control / speed limiter.The mats approved by TOYOTA have two fixings located below the seat.
Starting/Switching off the
electric motor
Starting
The drive selector must be in mode P.► If using a conventional or remote control key, depress the brake pedal and turn the key to position 3 until the motor starts, without
depressing the accelerator. As soon as the motor starts, release the key so it returns to position 2.► If using Keyless Entry and Starting, depress the brake pedal and briefly press the "START/STOP" button.► Keep your foot on the brake pedal until the READY indicator lamp comes on and an audible signal is emitted, indicating that the vehicle is ready to drive.
► With your foot on the brake, select mode D or R.► Release the brake pedal, then accelerate.On starting, the instrument panel lights up and the power indicator cursor moves to the "neutral" position. The steering column automatically unlocks (you may hear a sound and feel the steering wheel move).
Switching off
► If using a conventional or remote control key, turn the key fully to position 1 (Stop).► If using Keyless Entry and Starting, press the "START/STOP" button.Before exiting the vehicle, check that:– The drive selector is in mode P.– The READY indicator lamp is off.
NOTIC E
The drive selector moves automatically to mode P when the motor is switched off or when the driver's door is opened.
NOTIC E
If the driver's door is opened while the required conditions for stopping are not satisfied, an audible signal is emitted,
accompanied by the display of a warning message.
Page 135 of 320
135
Driving
6
Special case with Keyless
Entry and Starting
Switching on the ignition with
Keyless Entry and Starting
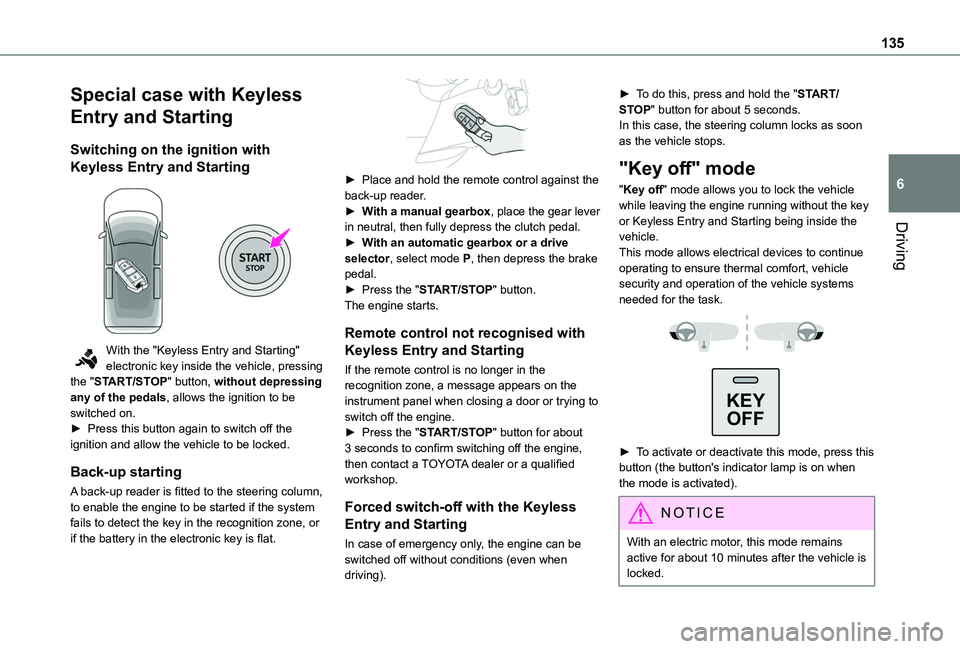
With the "Keyless Entry and Starting" electronic key inside the vehicle, pressing the "START/STOP" button, without depressing any of the pedals, allows the ignition to be switched on.► Press this button again to switch off the ignition and allow the vehicle to be locked.
Back-up starting
A back-up reader is fitted to the steering column, to enable the engine to be started if the system fails to detect the key in the recognition zone, or if the battery in the electronic key is flat.
► Place and hold the remote control against the back-up reader.► With a manual gearbox, place the gear lever in neutral, then fully depress the clutch pedal.► With an automatic gearbox or a drive selector, select mode P, then depress the brake pedal.► Press the "START/STOP" button.The engine starts.
Remote control not recognised with
Keyless Entry and Starting
If the remote control is no longer in the recognition zone, a message appears on the instrument panel when closing a door or trying to switch off the engine.► Press the "START/STOP" button for about 3 seconds to confirm switching off the engine, then contact a TOYOTA dealer or a qualified workshop.
Forced switch-off with the Keyless
Entry and Starting
In case of emergency only, the engine can be
switched off without conditions (even when driving).
► To do this, press and hold the "START/STOP" button for about 5 seconds.In this case, the steering column locks as soon as the vehicle stops.
"Key off" mode
"Key off" mode allows you to lock the vehicle while leaving the engine running without the key or Keyless Entry and Starting being inside the vehicle.This mode allows electrical devices to continue operating to ensure thermal comfort, vehicle security and operation of the vehicle systems needed for the task.
KEY
OFF
► To activate or deactivate this mode, press this button (the button's indicator lamp is on when the mode is activated).
NOTIC E
With an electric motor, this mode remains
active for about 10 minutes after the vehicle is locked.
Page 193 of 320
193
Practical information
7
WARNI NG
Stop & StartNever refuel with the engine in STOP mode; you must switch off the ignition.
Refuelling
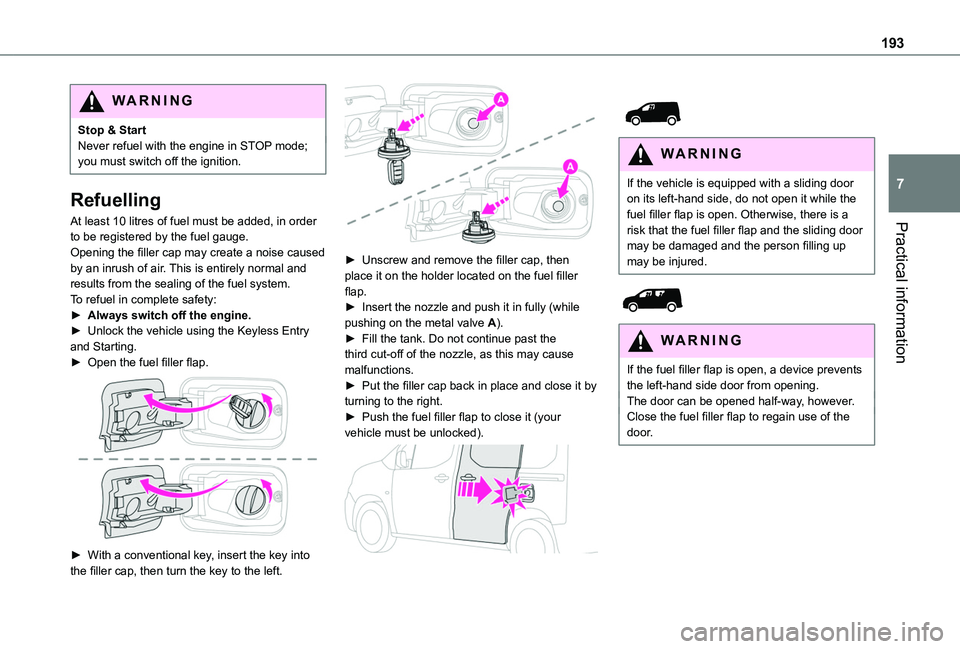
At least 10 litres of fuel must be added, in order to be registered by the fuel gauge.Opening the filler cap may create a noise caused by an inrush of air. This is entirely normal and results from the sealing of the fuel system.To refuel in complete safety:► Always switch off the engine.► Unlock the vehicle using the Keyless Entry and Starting.► Open the fuel filler flap.
► With a conventional key, insert the key into the filler cap, then turn the key to the left.
► Unscrew and remove the filler cap, then place it on the holder located on the fuel filler flap.► Insert the nozzle and push it in fully (while pushing on the metal valve A).► Fill the tank. Do not continue past the third cut-off of the nozzle, as this may cause malfunctions.► Put the filler cap back in place and close it by turning to the right.► Push the fuel filler flap to close it (your vehicle must be unlocked).
WARNI NG
If the vehicle is equipped with a sliding door on its left-hand side, do not open it while the fuel filler flap is open. Otherwise, there is a risk that the fuel filler flap and the sliding door may be damaged and the person filling up may be injured.
WARNI NG
If the fuel filler flap is open, a device prevents the left-hand side door from opening.The door can be opened half-way, however.Close the fuel filler flap to regain use of the door.
Page 197 of 320
197
Practical information
7
State of charging indicator lampMeaning
Fixed whiteGuide lighting on opening the charging flap and disconnecting the charging cable.
Fixed blueDeferred charging.
Flashing greenCharging.
Fixed greenCharging complete.The charging indicator lamp goes off after about 2 minutes as the vehicle's functions go into standby.The indicator lamp comes back on when the vehicle is unlocked using the Keyless Entry and Starting or when a door is opened, to indicate that the battery is fully charged.
Fixed redMalfunction.
WARNI NG
In case of impact, even light, against the charging flap, do not use it.Do not dismantle or modify the charging connector - risk of electrocution and/or fire!Contact any authorized Toyota retailer or Toyota authorized repairer, or any reliable repairer.
Charging cables, sockets
and chargers
The charging cable supplied with the vehicle (depending on version) is compatible with the electrical systems in the country of sale. When travelling abroad, check the compatibility of local electrical systems with the charging cable.A full range of charging cables is available from your dealer.Contact any authorized Toyota retailer or Toyota authorized repairer, or any reliable repairer for
more information and to obtain suitable charging cables.
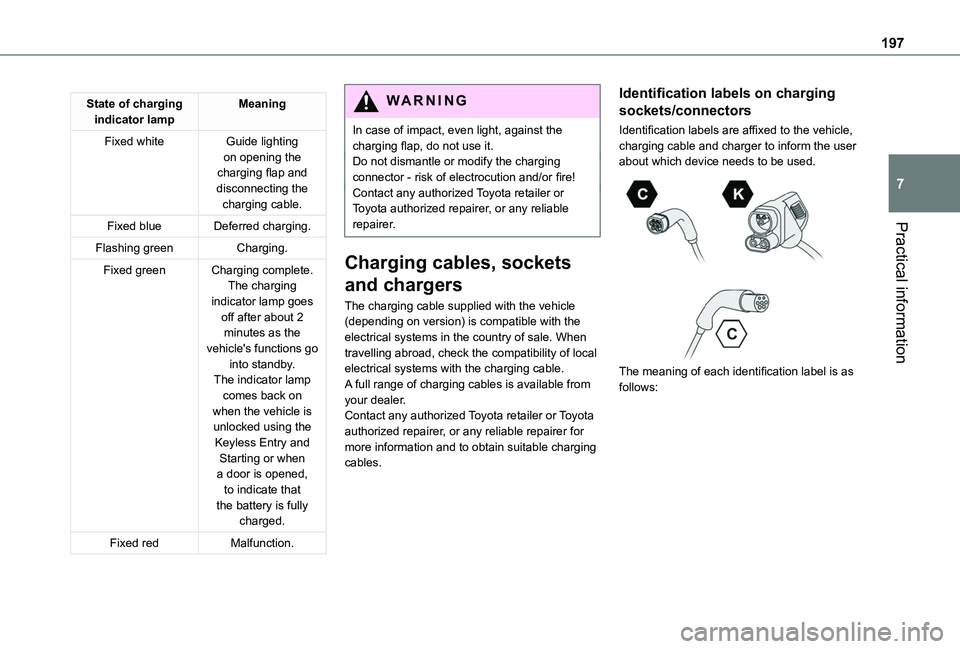
Identification labels on charging
sockets/connectors
Identification labels are affixed to the vehicle, charging cable and charger to inform the user about which device needs to be used.
The meaning of each identification label is as follows:
Page 219 of 320
219
Practical information
7
If swallowed, immediately wash out the mouth with clean water and then drink plenty of water.In certain conditions (high temperature, for example), the risk of release of ammonia cannot be excluded: do not inhale the fluid. Ammonia vapours have an irritant effect on mucous membranes (eyes, nose and throat).
WARNI NG
Store AdBlue® out of the reach of children, in
its original container.
Precautions for use
AdBlue® is a urea-based solution. This fluid is non-flammable, colourless and odourless (when kept in a cool place).In the event of contact with the skin, wash the affected area with soap and running water. In the event of contact with the eyes, immediately rinse the eyes with large amounts of water or with an eye wash solution for at least 15 minutes. Seek medical attention if you feel a persistent burning sensation or irritation.If swallowed, immediately wash out the mouth with clean water and then drink plenty of water.In certain conditions (high temperature, for example), the risk of release of ammonia cannot be excluded: do not inhale the fluid. Ammonia vapours have an irritant effect on mucous membranes (eyes, nose and throat).
WARNI NG
Store AdBlue® out of the reach of children, in its original container.
Procedure
Before starting the top-up procedure, ensure that the vehicle is parked on a flat and level surface.In wintry conditions, ensure that the temperature of the vehicle is above -11°C. Otherwise the AdBlue® may be frozen and so cannot be poured into the tank. Park the vehicle in a warmer area for a few hours to allow the top-up to be carried out.
WARNI NG
Never pour the AdBlue® into the Diesel fuel tank.
WARNI NG
If any AdBlue® is splashed, or if there are any spillages on the bodywork, rinse immediately with cold water or wipe with a damp cloth.If the fluid has crystallised, clean it off using a sponge and hot water.
WARNI NG
Important: in the event of a top-up after a breakdown because of a lack of AdBlue, it is essential to wait around 5 minutes before switching on the ignition, without opening the driver’s door, unlocking the vehicle, inserting the key into the ignition switch, or bringing the key for the "Keyless Entry and Starting" system into the passenger compartment.Switch on the ignition, then wait for 10 seconds before starting the engine.
► Switch off the ignition and remove the key from the switch to switch off the engine.or► With Keyless Entry and Starting, press the "START/STOP" button to switch off the engine.
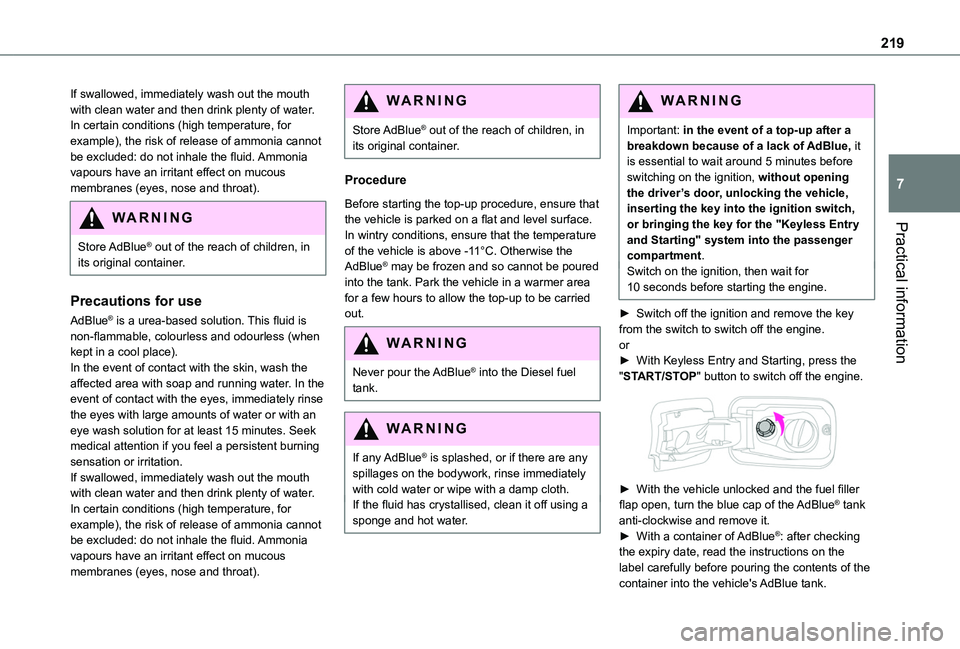
► With the vehicle unlocked and the fuel filler flap open, turn the blue cap of the AdBlue® tank anti-clockwise and remove it.► With a container of AdBlue®: after checking the expiry date, read the instructions on the label carefully before pouring the contents of the container into the vehicle's AdBlue tank.
Page 221 of 320
221
Practical information
7
With drive selector and
electric parking brake /
Release procedure
► With the vehicle stationary and the engine running, depress the brake pedal and select mode N.Within 5 seconds:► Depress and hold the brake pedal, then observe this order: switch off the ignition (if start with START/STOP, press and hold the button for 2 seconds) and move the push selector forwards or backwards.► Release the brake pedal, then switch on the ignition again.► Place your foot on the brake and press the electric parking brake control to release it.► Release the brake pedal, then switch off the ignition.
NOTIC E
Keyless Entry and StartingYou must not depress the brake pedal while switching the ignition on again, then switching it off. If you do, the engine will start, requiring you to restart the procedure.
WARNI NG
A message is displayed on the instrument panel to confirm the unlocking of the wheels for 15 minutes.When the vehicle is free-wheeling, the audio system cannot be updated (message displayed on the instrument panel).
Reverting to normal operation
► While depressing the brake pedal, restart the engine, then set the gear selector to P.
Advice on care and
maintenance
General recommendations
Observe the following recommendations to avoid damaging the vehicle.
Exterior
WARNI NG
Never use a high-pressure jet wash in the engine compartment - risk of damaging the electrical components!Do not wash the vehicle in bright sunshine or extremely cold conditions.
NOTIC E
When washing the vehicle at an automatic roller-brush car wash, be sure to lock the doors and, depending on version, remove the electronic key.When using a pressure washer, hold the lance at least 30 cm from the vehicle (particularly when cleaning areas containing chipped paint, sensors or seals).Promptly clean up any stains containing chemicals liable to damage the vehicle's paint (including tree resin, bird droppings, insect secretions, pollen and tar).If justified by the environment, clean the vehicle frequently to remove salty deposits (in coastal areas), soot (in industrial areas) and mud/salts (in wet or cold areas). These substances can be highly corrosive.Contact any authorized Toyota retailer or Toyota authorized repairer, or any reliable repairer for advice on removing stubborn stains requiring special products (such as tar
or insect removers).Preferably, have paint touch-ups performed by any authorized Toyota retailer or Toyota authorized repairer, or any reliable repairer.
Page 309 of 320
309
Alphabetical index
Inflating tyres 215, 252Inflating tyres and accessories (using the kit) 223–224Infrared camera 153Instrument panel 8, 10, 154Internet browser 286, 290ISOFIX 124
J
Jack 225, 294Jump starting 236
K
Key 31, 33–35, 37, 39Key, electronic 31, 133Keyless Entry and Starting 32–38, 130, 132–133Key not recognised 133
Key with remote control 37–38Kit, hands-free 259, 271–272, 295–296Kit, puncture repair 221Kit, temporary puncture repair 221, 223–225
L
Labels 6, 61Labels, identification 252
Lamps, parking 91Lamps, rear 233Lane departure warning active 171LEDs - Light-emitting diodes 92, 229Level, AdBlue® 213Level, brake fluid 212Level, Diesel additive 213–214Level, engine coolant 18, 212Level, engine oil 2 11Level, headlamp wash 96Levels and checks 210–212Level, screenwash fluid 96, 212Light-emitting diodes - LEDs 92, 229Lighting 90Lighting, exterior 90, 93Lighting, guide-me home 93Lighting, welcome 93Loading 71, 208Load reduction mode 204Load restraint 70Locating your vehicle 32Locking 32–33, 37–38
Locking from the inside 42–43Long load support bar 46Low fuel level 190–192Lumbar 53
M
Mains socket (domestic network) 195Maintenance (advice) 193, 219
Maintenance, routine 18, 154, 213Manoeuvring aids (recommendations) 152Markings, identification 252Mat 63, 154Memorising a speed 167Menu 270Menu, main 28Menus (audio) 254–255, 265–266, 278–279Menu short cuts 28Messages 297Messages, quick 298Mirror, child surveillance 57Mirror, rear view 57Mirrors, door 56, 84, 174Misfuel prevention 192Mobile application 29, 87, 202Motor, electric 132, 2 11, 251Mountings, ISOFIX 122
N
Navigation 284–286Navigation, connected 286–288Net 69–70Net, high load retaining 68Number plate lamps 234
O
Obstacle detection 177