2022 TOYOTA PROACE CITY VERSO tailgate
[x] Cancel search: tailgatePage 78 of 320
78
WARNI NG
The partition must not be moved with the latches extended - risk of scratches or damage to the plastic trims!
WARNI NG
The partition must never be removed to
convert the vehicle from a commercial vehicle to a passenger vehicle.This would pose a risk to the safety of users due to the absence of a child lock on the tailgate (mandatory on passenger vehicles).
WARNI NG
Pay attention to the loading height behind the partition and the size of the long load in the protective cover: the driver must keep a good field of vision.
WARNI NG
Do not place loads between the partition and the bench seat backrest.
Opening/closing the hatch
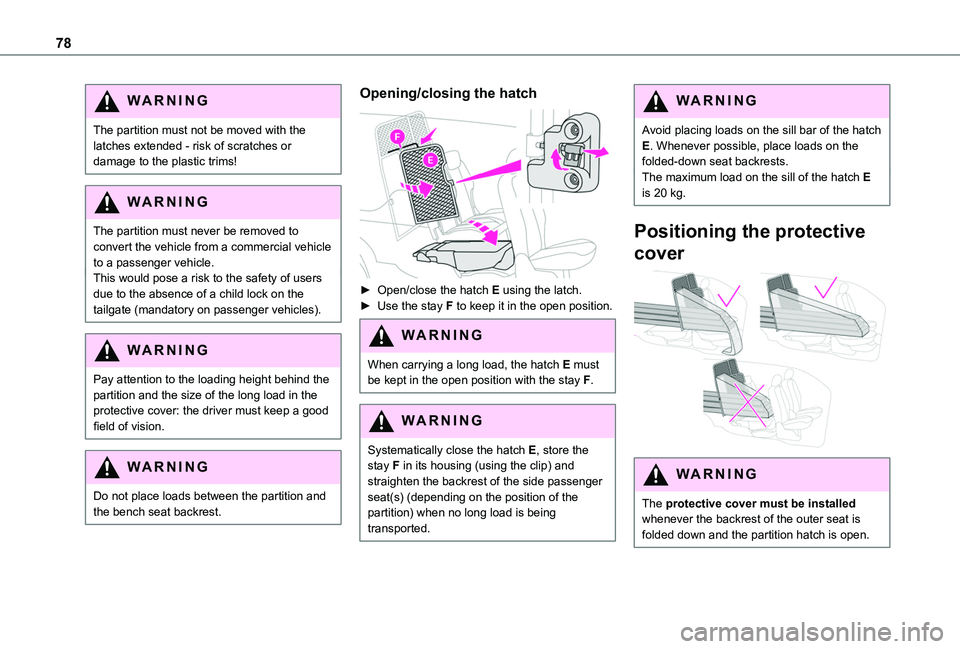
► Open/close the hatch E using the latch.► Use the stay F to keep it in the open position.
WARNI NG
When carrying a long load, the hatch E must be kept in the open position with the stay F.
WARNI NG
Systematically close the hatch E, store the stay F in its housing (using the clip) and straighten the backrest of the side passenger seat(s) (depending on the position of the partition) when no long load is being transported.
WARNI NG
Avoid placing loads on the sill bar of the hatch E. Whenever possible, place loads on the folded-down seat backrests.The maximum load on the sill of the hatch E is 20 kg.
Positioning the protective
cover
WARNI NG
The protective cover must be installed whenever the backrest of the outer seat is folded down and the partition hatch is open.
Page 91 of 320
91
Ease of use and comfort
3
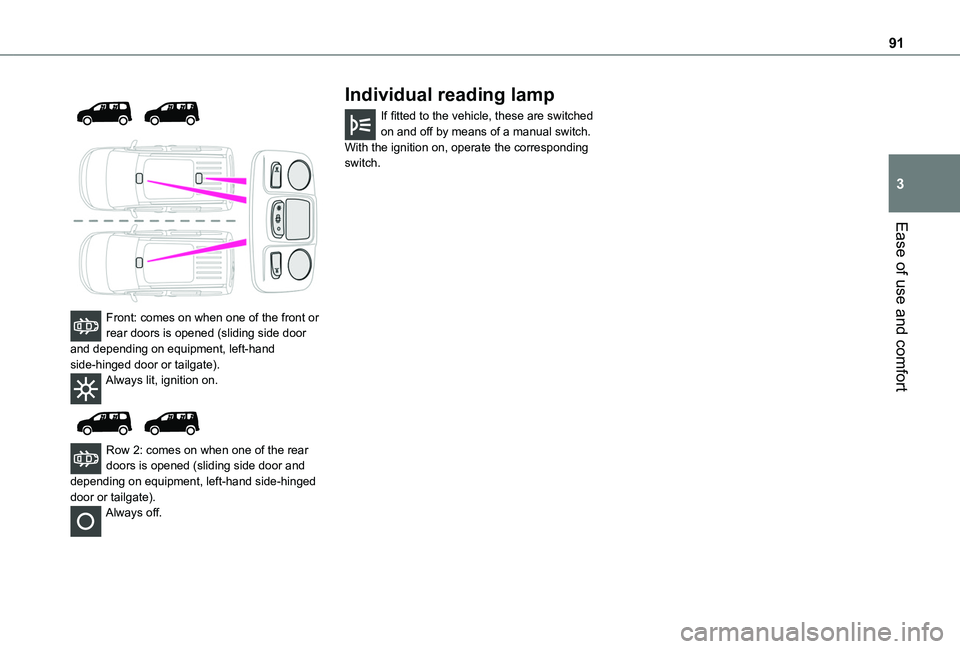
Front: comes on when one of the front or rear doors is opened (sliding side door and depending on equipment, left-hand side-hinged door or tailgate).Always lit, ignition on.
Row 2: comes on when one of the rear doors is opened (sliding side door and depending on equipment, left-hand side-hinged door or tailgate).Always off.
Individual reading lamp
If fitted to the vehicle, these are switched on and off by means of a manual switch.With the ignition on, operate the corresponding switch.
Page 128 of 320
128
Manual child lock
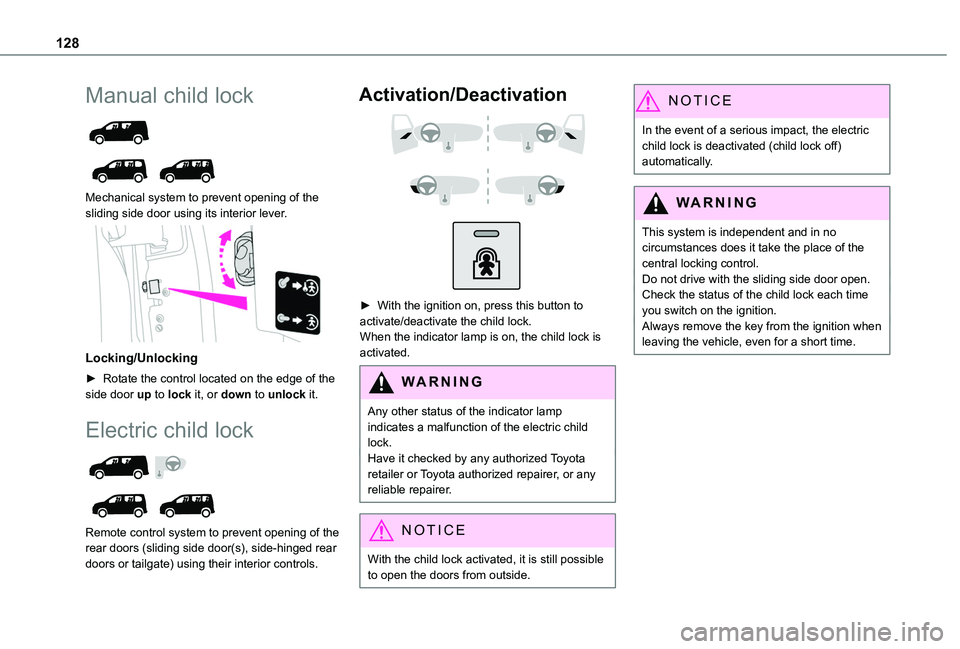
Mechanical system to prevent opening of the sliding side door using its interior lever.
Locking/Unlocking
► Rotate the control located on the edge of the side door up to lock it, or down to unlock it.
Electric child lock
Remote control system to prevent opening of the rear doors (sliding side door(s), side-hinged rear doors or tailgate) using their interior controls.
Activation/Deactivation
► With the ignition on, press this button to activate/deactivate the child lock.When the indicator lamp is on, the child lock is activated.
WARNI NG
Any other status of the indicator lamp indicates a malfunction of the electric child lock.Have it checked by any authorized Toyota retailer or Toyota authorized repairer, or any reliable repairer.
NOTIC E
With the child lock activated, it is still possible to open the doors from outside.
NOTIC E
In the event of a serious impact, the electric child lock is deactivated (child lock off) automatically.
WARNI NG
This system is independent and in no circumstances does it take the place of the central locking control.Do not drive with the sliding side door open.Check the status of the child lock each time you switch on the ignition.Always remove the key from the ignition when leaving the vehicle, even for a short time.
Page 183 of 320
183
Driving
6
Operating limits
The system may be disrupted (or even damaged) and not work in the following situations:– Installation of a bicycle carrier on the tailgate or side-hinged door (depending on version).– Attachment of a trailer to the towball.– Driving with a door open.
WARNI NG
Please note, the camera must not be obscured (by a sticker, a bicycle carrier, etc.).
NOTIC E
The field of vision of the camera may vary depending on the load in vehicle.
Maintenance
recommendations
In bad or wintry weather, ensure that the camera is not covered by mud, frost or snow.Check the cleanliness of the camera lens regularly.If necessary, clean the camera with a soft, dry cloth.
When washing the vehicle using a high-pressure jet, keep the spray directed at least 30 cm (0 ft 11") away from the camera.
Surround Rear Vision
WARNI NG
For more information, refer to the General recommendations on the use of driving and manoeuvring aids.
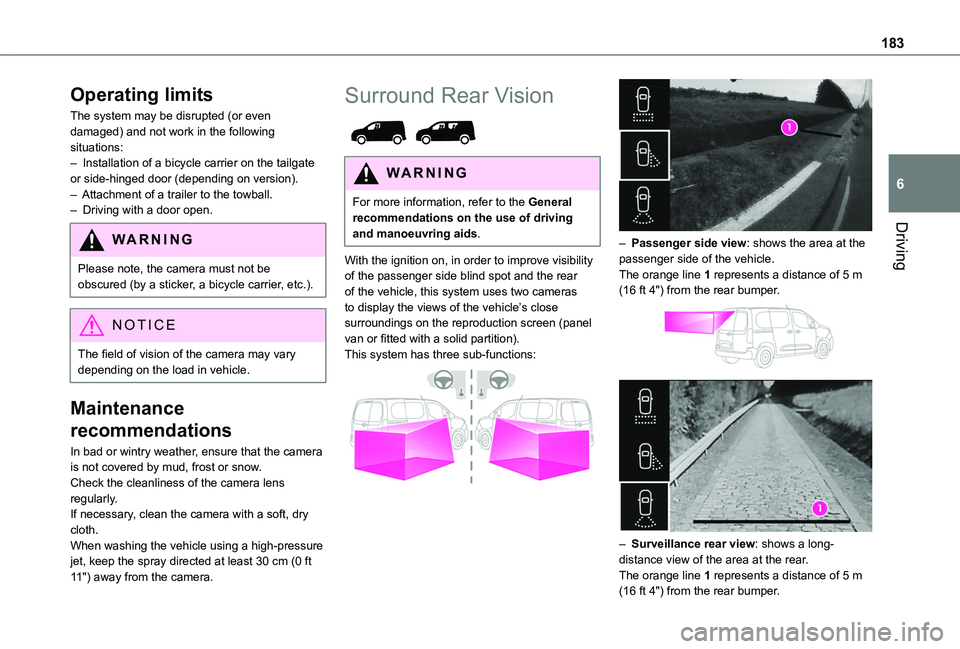
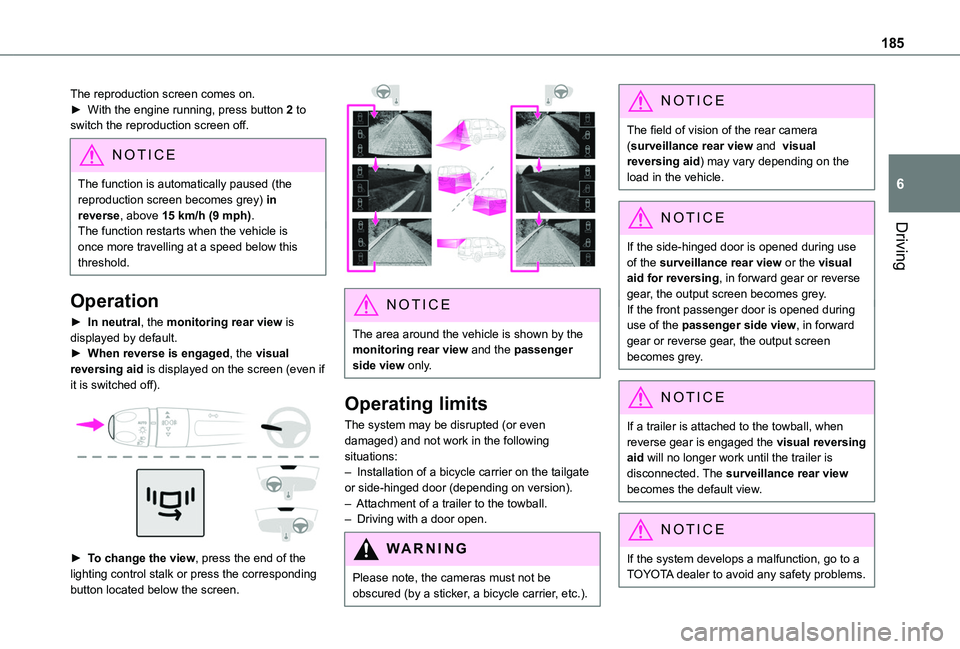
With the ignition on, in order to improve visibility of the passenger side blind spot and the rear of the vehicle, this system uses two cameras to display the views of the vehicle’s close surroundings on the reproduction screen (panel van or fitted with a solid partition).This system has three sub-functions:
– Passenger side view: shows the area at the passenger side of the vehicle.The orange line 1 represents a distance of 5 m (16 ft 4") from the rear bumper.
– Surveillance rear view: shows a long-distance view of the area at the rear.The orange line 1 represents a distance of 5 m (16 ft 4") from the rear bumper.
Page 185 of 320
185
Driving
6
The reproduction screen comes on.► With the engine running, press button 2 to switch the reproduction screen off.
NOTIC E
The function is automatically paused (the reproduction screen becomes grey) in reverse, above 15 km/h (9 mph).The function restarts when the vehicle is
once more travelling at a speed below this threshold.
Operation
► In neutral, the monitoring rear view is displayed by default.► When reverse is engaged, the visual reversing aid is displayed on the screen (even if it is switched off).
► To change the view, press the end of the lighting control stalk or press the corresponding button located below the screen.
NOTIC E
The area around the vehicle is shown by the monitoring rear view and the passenger side view only.
Operating limits
The system may be disrupted (or even damaged) and not work in the following situations:– Installation of a bicycle carrier on the tailgate or side-hinged door (depending on version).– Attachment of a trailer to the towball.– Driving with a door open.
WARNI NG
Please note, the cameras must not be obscured (by a sticker, a bicycle carrier, etc.).
NOTIC E
The field of vision of the rear camera (surveillance rear view and visual reversing aid) may vary depending on the load in the vehicle.
NOTIC E
If the side-hinged door is opened during use of the surveillance rear view or the visual aid for reversing, in forward gear or reverse gear, the output screen becomes grey.If the front passenger door is opened during use of the passenger side view, in forward gear or reverse gear, the output screen becomes grey.
NOTIC E
If a trailer is attached to the towball, when reverse gear is engaged the visual reversing aid will no longer work until the trailer is disconnected. The surveillance rear view becomes the default view.
NOTIC E
If the system develops a malfunction, go to a TOYOTA dealer to avoid any safety problems.
Page 186 of 320
186
Top Rear Vision
Refer to the General recommendations on the use of driving and manoeuvring aids.
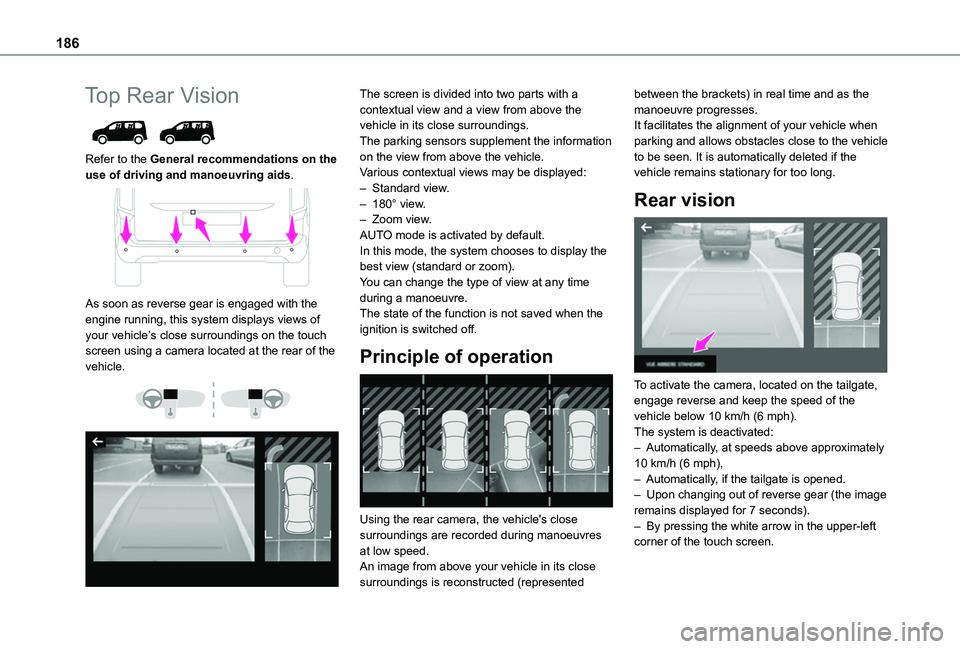
As soon as reverse gear is engaged with the engine running, this system displays views of your vehicle’s close surroundings on the touch screen using a camera located at the rear of the vehicle.
The screen is divided into two parts with a contextual view and a view from above the vehicle in its close surroundings.The parking sensors supplement the information on the view from above the vehicle.Various contextual views may be displayed:– Standard view.– 180° view.– Zoom view.AUTO mode is activated by default.In this mode, the system chooses to display the best view (standard or zoom).You can change the type of view at any time during a manoeuvre.The state of the function is not saved when the ignition is switched off.
Principle of operation
Using the rear camera, the vehicle's close surroundings are recorded during manoeuvres
at low speed.An image from above your vehicle in its close surroundings is reconstructed (represented
between the brackets) in real time and as the manoeuvre progresses.It facilitates the alignment of your vehicle when parking and allows obstacles close to the vehicle to be seen. It is automatically deleted if the vehicle remains stationary for too long.
Rear vision
To activate the camera, located on the tailgate, engage reverse and keep the speed of the vehicle below 10 km/h (6 mph).The system is deactivated:– Automatically, at speeds above approximately 10 km/h (6 mph),– Automatically, if the tailgate is opened.– Upon changing out of reverse gear (the image remains displayed for 7 seconds).– By pressing the white arrow in the upper-left corner of the touch screen.
Page 191 of 320
191
Driving
6
Operating limits
– The system may suggest an inappropriate parking space (parking prohibited, work in progress with damaged road surface, location alongside a ditch, etc.).– The system may indicate that a space has been found but not offer it because of a fixed obstacle on the opposite side of the manoeuvre, which would not allow the vehicle to follow the necessary trajectory required for parking.– The system may indicate that a space has been found but the manoeuvre will not be triggered, because the width of the lane is insufficient.– The system is not designed to perform the parking manoeuvre on a sharp bend.– The system does not detect spaces that are much larger than the vehicle itself or that are delimited by obstacles that are too low (pavements, studs, etc.) or too thin (trees, posts, wire fences, etc.).– If the boot is heavily loaded, the tilt of the
vehicle towards the rear may interfere with the distance measurements.
WARNI NG
Do not use the function under the following exterior conditions:– Alongside a soft shoulder (e.g. ditch) or quay or on the edge of a drop.– When the road surface is slippery (e.g. ice).
WARNI NG
If any of the following malfunctions occurs, do not use the system:– If a tyre is under-inflated.– If one of the bumpers is damaged.– If one of the cameras is faulty.
WARNI NG
If the vehicle has undergone any of the following modifications, do not use the function:– When carrying an object extending beyond the dimensions of the vehicle (ladder on the roof bars, bicycle carrier on the tailgate, etc.).– With a non-approved towball in place.– With snow chains fitted.– When driving on a small-diameter or "space-saver" type spare wheel.– When the wheels fitted are a different size from the original ones.
– After modifying one or both bumpers (added protection).– If the sensors have been repainted other than by the TOYOTA dealer network.– With sensors not approved for the vehicle.
Malfunctions
When the function is not activated, this indicator lamp will flash briefly and an audible signal will be emitted to indicate a system malfunction.If the malfunction occurs while the system is in use, the warning lamp goes off.If the parking sensor malfunction occurs during use, indicated by this warning lamp coming on, it causes the function to deactivate.In the event of a malfunction, have the system checked by a TOYOTA dealer or a qualified workshop.In the event of a power steering malfunction, this warning lamp is displayed on the instrument panel, accompanied by a warning message.
WARNI NG
You must stop the vehicle.Stop as soon as it is safe to do so and switch off the ignition.Contact a TOYOTA dealer or a qualified workshop.
Page 227 of 320
227
In the event of a breakdown
8
Spare wheel
NOTIC E
For more information on the Tool kit, refer to the corresponding section.
► Park the vehicle, taking care to avoid obstructing traffic, and apply the parking brake.► Follow the safety instructions (hazard warning lamps, warning triangle, wearing high visibility vest, etc.) according to the legislation in force in the country where you are driving.► Switch off the ignition.
Access to the spare wheel
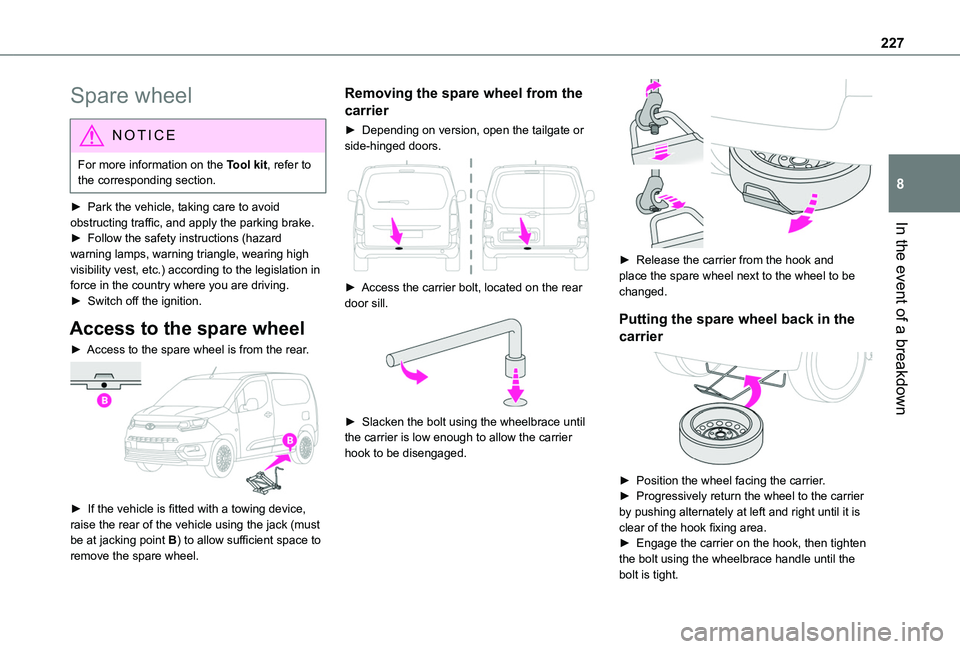
► Access to the spare wheel is from the rear.
► If the vehicle is fitted with a towing device, raise the rear of the vehicle using the jack (must be at jacking point B) to allow sufficient space to
remove the spare wheel.
Removing the spare wheel from the
carrier
► Depending on version, open the tailgate or side-hinged doors.
► Access the carrier bolt, located on the rear door sill.
► Slacken the bolt using the wheelbrace until the carrier is low enough to allow the carrier hook to be disengaged.
► Release the carrier from the hook and place the spare wheel next to the wheel to be changed.
Putting the spare wheel back in the
carrier
► Position the wheel facing the carrier.► Progressively return the wheel to the carrier by pushing alternately at left and right until it is clear of the hook fixing area.► Engage the carrier on the hook, then tighten the bolt using the wheelbrace handle until the bolt is tight.