2022 TOYOTA PROACE CITY VERSO key battery
[x] Cancel search: key batteryPage 150 of 320
150
Deactivation/Activation
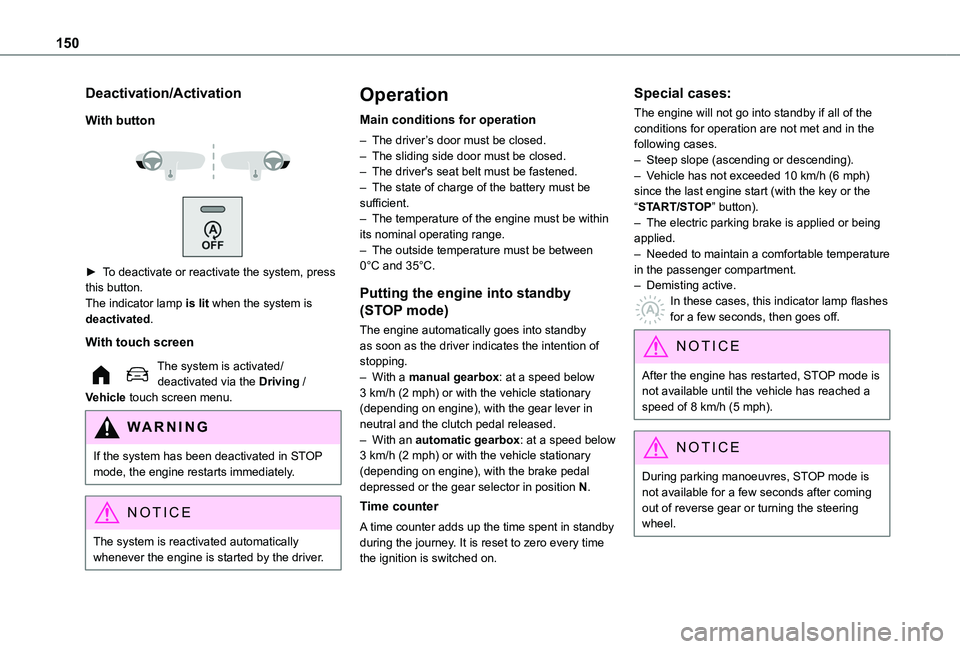
With button
► To deactivate or reactivate the system, press this button.The indicator lamp is lit when the system is deactivated.
With touch screen
The system is activated/deactivated via the Driving / Vehicle touch screen menu.
WARNI NG
If the system has been deactivated in STOP mode, the engine restarts immediately.
NOTIC E
The system is reactivated automatically
whenever the engine is started by the driver.
Operation
Main conditions for operation
– The driver’s door must be closed.– The sliding side door must be closed.– The driver's seat belt must be fastened.– The state of charge of the battery must be sufficient.– The temperature of the engine must be within its nominal operating range.– The outside temperature must be between 0°C and 35°C.
Putting the engine into standby
(STOP mode)
The engine automatically goes into standby as soon as the driver indicates the intention of stopping.– With a manual gearbox: at a speed below 3 km/h (2 mph) or with the vehicle stationary (depending on engine), with the gear lever in neutral and the clutch pedal released.– With an automatic gearbox: at a speed below
3 km/h (2 mph) or with the vehicle stationary (depending on engine), with the brake pedal depressed or the gear selector in position N.
Time counter
A time counter adds up the time spent in standby during the journey. It is reset to zero every time the ignition is switched on.
Special cases:
The engine will not go into standby if all of the conditions for operation are not met and in the following cases.– Steep slope (ascending or descending).– Vehicle has not exceeded 10 km/h (6 mph) since the last engine start (with the key or the “START/STOP” button).– The electric parking brake is applied or being applied.– Needed to maintain a comfortable temperature in the passenger compartment.– Demisting active.In these cases, this indicator lamp flashes for a few seconds, then goes off.
NOTIC E
After the engine has restarted, STOP mode is not available until the vehicle has reached a speed of 8 km/h (5 mph).
NOTIC E
During parking manoeuvres, STOP mode is not available for a few seconds after coming out of reverse gear or turning the steering wheel.
Page 151 of 320
151
Driving
6
Restarting the engine (START mode)
The engine automatically restarts as soon as the driver indicates the intention of moving off again.– With a manual gearbox: with the clutch pedal fully depressed.– With an automatic gearbox:• With the selector in position D or M: with the brake pedal released.• With the selector in position N and the brake pedal released: with the selector at D or M.• With the selector in position P and the brake pedal depressed: with the selector at R, N, D or M.
Special cases
The engine will restart automatically if all conditions for operation are met again and in the following case.– Speed of the vehicle exceeds 3 km/h (2 mph) (depending on the engine).In this case, this indicator lamp flashes for a few seconds, then goes off.
Malfunctions
Depending on the vehicle’s equipment:In the event of a system malfunction, this warning lamp flashes on the instrument panel.The warning lamp in this button flashes and a message appears, accompanied by an audible signal.Have the vehicle checked by a TOYOTA dealer or a qualified workshop.
The vehicle stalls in STOP mode
All of the instrument panel warning lamps come on if there is a fault.Depending on version, a warning message may also be displayed, prompting you to place the gear selector in position N and depress the brake pedal.► Switch off the ignition then start the engine again with the key or the "START/STOP" button.
WARNI NG
12 V batteryThe Stop & Start system requires a 12 V battery of specific technology and specification.All work must be carried out only by any authorized Toyota retailer or Toyota authorized repairer, or any reliable repairer.
Under-inflation detection
This system alerts the driver if one or more tyres suffer a drop in pressure.The alert is raised when the vehicle is moving, not when stationary.It compares the information given by the wheel speed sensors with reference values, which must be reinitialised every time the tyre pressures are adjusted or a wheel changed.It takes into account the last values stored during the reinitialisation request. It is therefore essential that the tyre pressure is correct during the operation. This operation is the driver's responsibility.
WARNI NG
The tyre under-inflation detection cannot, in any circumstances, replace the need for vigilance on the part of the driver.This system does not avoid the need to regularly check the tyre pressures (including the spare wheel), especially before a long journey.Driving with under-inflated tyres, particularly in adverse conditions (heavy load, high speed, long journey):– worsens road-holding.– lengthens braking distances.– causes premature wear of the tyres.– increases energy consumption.
Page 197 of 320
197
Practical information
7
State of charging indicator lampMeaning
Fixed whiteGuide lighting on opening the charging flap and disconnecting the charging cable.
Fixed blueDeferred charging.
Flashing greenCharging.
Fixed greenCharging complete.The charging indicator lamp goes off after about 2 minutes as the vehicle's functions go into standby.The indicator lamp comes back on when the vehicle is unlocked using the Keyless Entry and Starting or when a door is opened, to indicate that the battery is fully charged.
Fixed redMalfunction.
WARNI NG
In case of impact, even light, against the charging flap, do not use it.Do not dismantle or modify the charging connector - risk of electrocution and/or fire!Contact any authorized Toyota retailer or Toyota authorized repairer, or any reliable repairer.
Charging cables, sockets
and chargers
The charging cable supplied with the vehicle (depending on version) is compatible with the electrical systems in the country of sale. When travelling abroad, check the compatibility of local electrical systems with the charging cable.A full range of charging cables is available from your dealer.Contact any authorized Toyota retailer or Toyota authorized repairer, or any reliable repairer for
more information and to obtain suitable charging cables.
Identification labels on charging
sockets/connectors
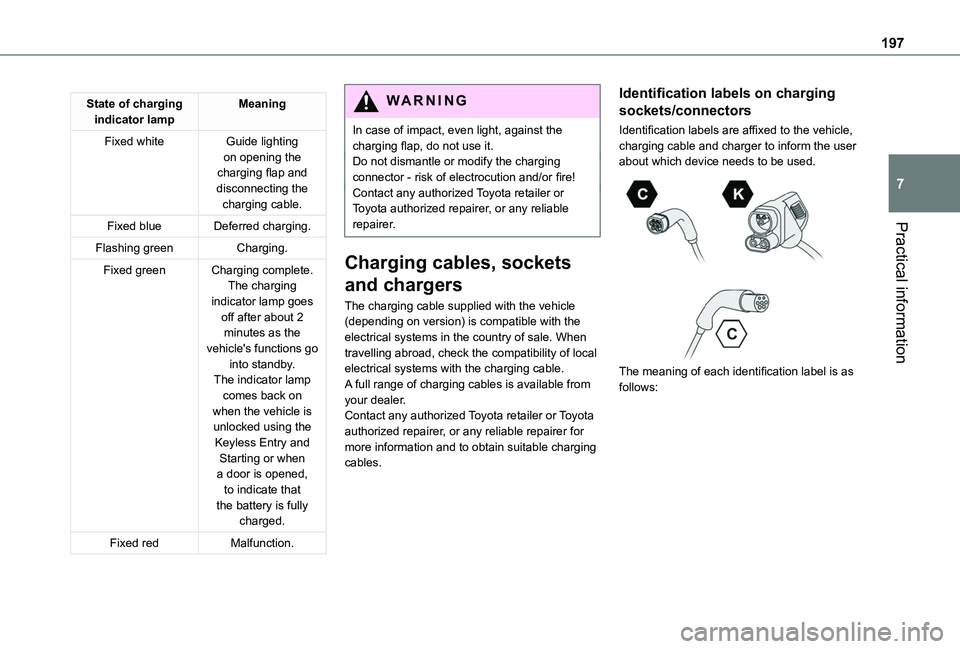
Identification labels are affixed to the vehicle, charging cable and charger to inform the user about which device needs to be used.
The meaning of each identification label is as follows:
Page 240 of 320
240
Disconnecting/reconnecting
the battery
In order to maintain an adequate state of charge for starting the engine, we recommend disconnecting the battery if the vehicle is to be unused for an extended period.Before disconnecting the battery:► Close all openings (doors, boot, windows, roof).► Switch off all electricity-consuming devices (audio system, wipers, lamps, etc.).► Switch off the ignition and wait for 4 minutes.After accessing the battery, it is only necessary to disconnect the (+) terminal.
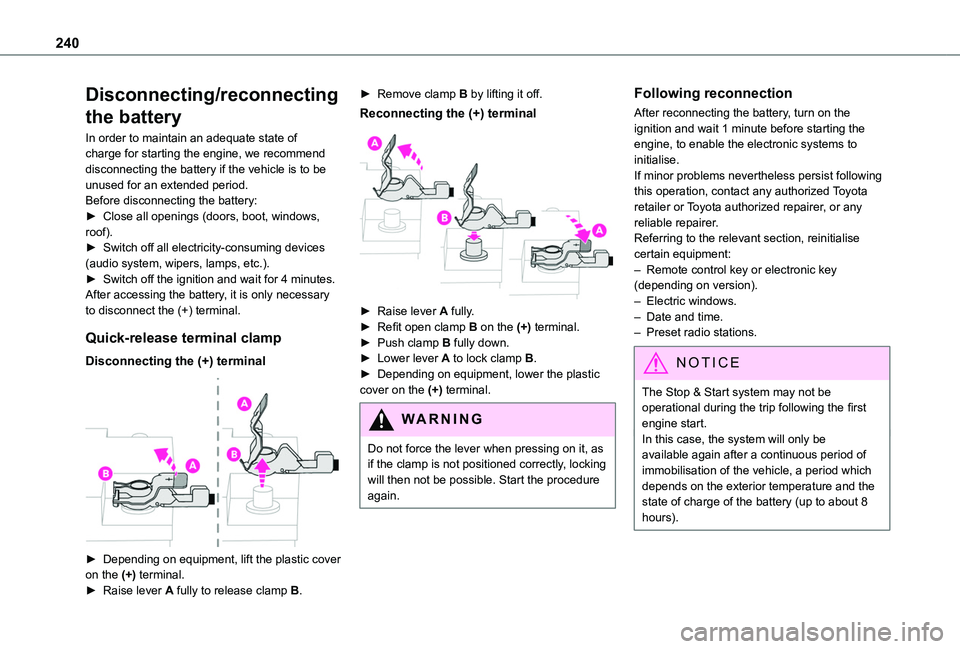
Quick-release terminal clamp
Disconnecting the (+) terminal
► Depending on equipment, lift the plastic cover on the (+) terminal.► Raise lever A fully to release clamp B.
► Remove clamp B by lifting it off.
Reconnecting the (+) terminal
► Raise lever A fully.► Refit open clamp B on the (+) terminal.► Push clamp B fully down.► Lower lever A to lock clamp B.► Depending on equipment, lower the plastic cover on the (+) terminal.
WARNI NG
Do not force the lever when pressing on it, as if the clamp is not positioned correctly, locking will then not be possible. Start the procedure again.
Following reconnection
After reconnecting the battery, turn on the ignition and wait 1 minute before starting the engine, to enable the electronic systems to initialise.If minor problems nevertheless persist following this operation, contact any authorized Toyota retailer or Toyota authorized repairer, or any reliable repairer.Referring to the relevant section, reinitialise certain equipment:– Remote control key or electronic key (depending on version).– Electric windows.– Date and time.– Preset radio stations.
NOTIC E
The Stop & Start system may not be operational during the trip following the first engine start.In this case, the system will only be
available again after a continuous period of immobilisation of the vehicle, a period which depends on the exterior temperature and the state of charge of the battery (up to about 8 hours).
Page 242 of 320
242
NOTIC E
In case of battery or electric parking brake failure, it is essential to call a professional using flatbed recovery vehicles (excluding manual gearbox).
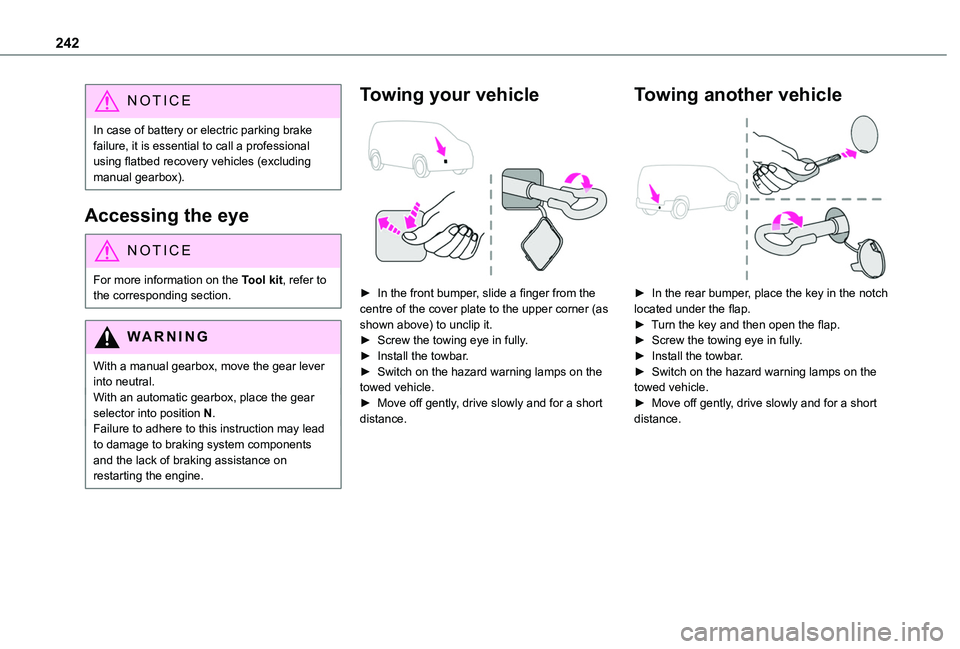
Accessing the eye
NOTIC E
For more information on the Tool kit, refer to the corresponding section.
WARNI NG
With a manual gearbox, move the gear lever into neutral.With an automatic gearbox, place the gear selector into position N.Failure to adhere to this instruction may lead to damage to braking system components and the lack of braking assistance on restarting the engine.
Towing your vehicle
► In the front bumper, slide a finger from the centre of the cover plate to the upper corner (as shown above) to unclip it.► Screw the towing eye in fully.► Install the towbar.► Switch on the hazard warning lamps on the towed vehicle.► Move off gently, drive slowly and for a short distance.
Towing another vehicle
► In the rear bumper, place the key in the notch located under the flap.► Turn the key and then open the flap.► Screw the towing eye in fully.► Install the towbar.► Switch on the hazard warning lamps on the towed vehicle.► Move off gently, drive slowly and for a short distance.
Page 310 of 320
310
Oil change 2 11Oil consumption 2 11OIl, engine 2 11On-board tools 221–222Opening the bonnet 209Opening the boot 31–32Opening the doors 31–32Overhead storage 63
P
Pads, brake 214Paint 220, 252Paint colour code 252Park Assist 186Parking brake 134, 215Parking brake, electric 134–137, 215Parking sensors, audible and visual 177Parking sensors, front 178Parking sensors, rear 178Passenger compartment temperature
pre-conditioning (Electric) 87Pedestrian horn (Electric) 102, 128Plates, identification 252Player, Apple® 258, 269, 295Player, USB 257, 269, 294Port, USB 65, 257, 269–270, 289, 294Power indicator (Electric) 7Pressures, tyres 215, 224, 228, 252Pre-tensioning seat belts 111Priming the fuel system 221
Profiles 273, 299Programmable cruise control 160Protecting children 11 2–11 3, 11 5–11 8, 120, 124–126Public fast charging station 195, 201Puncture 223, 225
R
Radar (warnings) 153Radio 256–257, 266–267, 292Radio, digital (Digital Audio Broadcasting - DAB) 257, 268, 293Range, AdBlue 213RDS 256, 267, 292–293Rear screen, demisting 84Recharging the battery 237Recharging the traction battery 196Recharging the traction battery (Electric) 193, 200–201, 203Recirculation, air 81
Recovery 239Reduction of electrical load 204Regeneration of the particle filter 214Regenerative braking (deceleration by engine braking) 145–146Reinitialisation of the under-inflation detection system 150Reinitialising the remote control 41Reminder, key in ignition 132Reminder, lighting on 91
Remote control 31–35, 37, 39, 129Remote functions 202Remotely operable functions (Electric) 87Removing a wheel 226–227Removing the mat 63Replacing bulbs 228–229Replacing fuses 234Replacing the air filter 214Replacing the oil filter 214Replacing the passenger compartment filter 213Reservoir, screenwash 212Reversing camera 153, 180, 184Reversing lamps 233Roof 64Roof bars 208–209Roof flap 46Running out of fuel (Diesel) 221
S
Safety, children 11 2–11 3, 11 5–11 8, 120, 124–126Saturation of the particle filter (Diesel) 214Screen menu map 270Screenwash 96Screenwash, front 96Screenwash, rear 96–97SCR (Selective Catalytic Reduction) 215Seat belts 108–111, 11 9Seat, bench front, 2-seat 57, 59, 108