2022 TOYOTA PROACE CITY VERSO instrument panel
[x] Cancel search: instrument panelPage 14 of 320
14
The information is displayed immediately on the instrument panel if the corresponding display mode is selected.
NOTIC E
The type of information selected in "Personal 1" mode is not available in "Personal 2" mode.
Warning and indicator
lamps
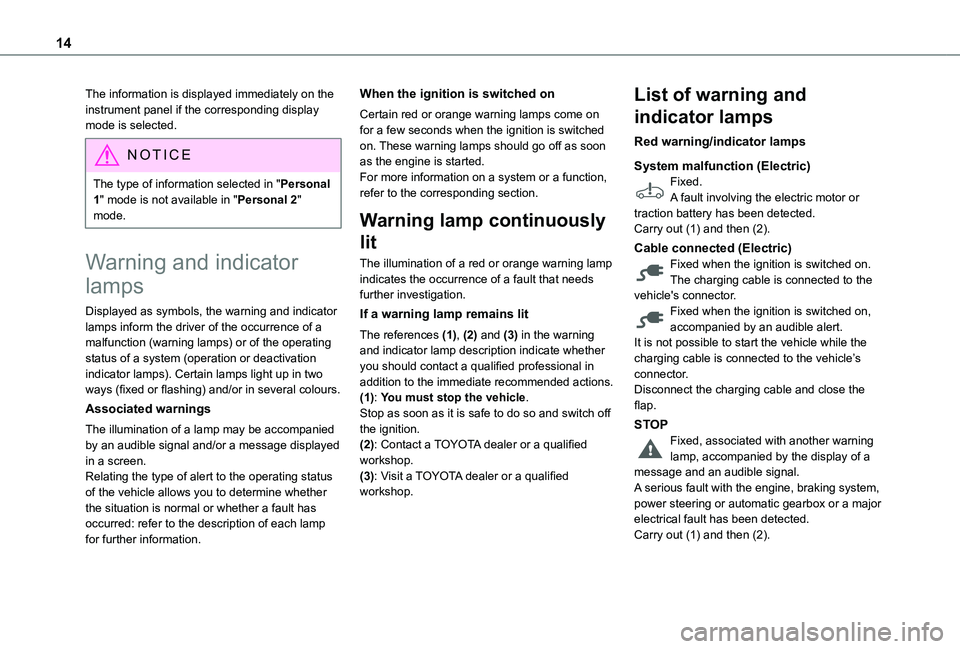
Displayed as symbols, the warning and indicator lamps inform the driver of the occurrence of a malfunction (warning lamps) or of the operating status of a system (operation or deactivation indicator lamps). Certain lamps light up in two ways (fixed or flashing) and/or in several colours.
Associated warnings
The illumination of a lamp may be accompanied by an audible signal and/or a message displayed in a screen.Relating the type of alert to the operating status of the vehicle allows you to determine whether the situation is normal or whether a fault has occurred: refer to the description of each lamp for further information.
When the ignition is switched on
Certain red or orange warning lamps come on for a few seconds when the ignition is switched on. These warning lamps should go off as soon as the engine is started.For more information on a system or a function, refer to the corresponding section.
Warning lamp continuously
lit
The illumination of a red or orange warning lamp indicates the occurrence of a fault that needs further investigation.
If a warning lamp remains lit
The references (1), (2) and (3) in the warning and indicator lamp description indicate whether you should contact a qualified professional in addition to the immediate recommended actions.(1): You must stop the vehicle.Stop as soon as it is safe to do so and switch off the ignition.
(2): Contact a TOYOTA dealer or a qualified workshop.(3): Visit a TOYOTA dealer or a qualified workshop.
List of warning and
indicator lamps
Red warning/indicator lamps
System malfunction (Electric)Fixed.A fault involving the electric motor or traction battery has been detected.Carry out (1) and then (2).
Cable connected (Electric)Fixed when the ignition is switched on.The charging cable is connected to the vehicle's connector.Fixed when the ignition is switched on, accompanied by an audible alert.It is not possible to start the vehicle while the charging cable is connected to the vehicle’s connector.Disconnect the charging cable and close the flap.
STOPFixed, associated with another warning
lamp, accompanied by the display of a message and an audible signal.A serious fault with the engine, braking system, power steering or automatic gearbox or a major electrical fault has been detected.Carry out (1) and then (2).
Page 16 of 320
16
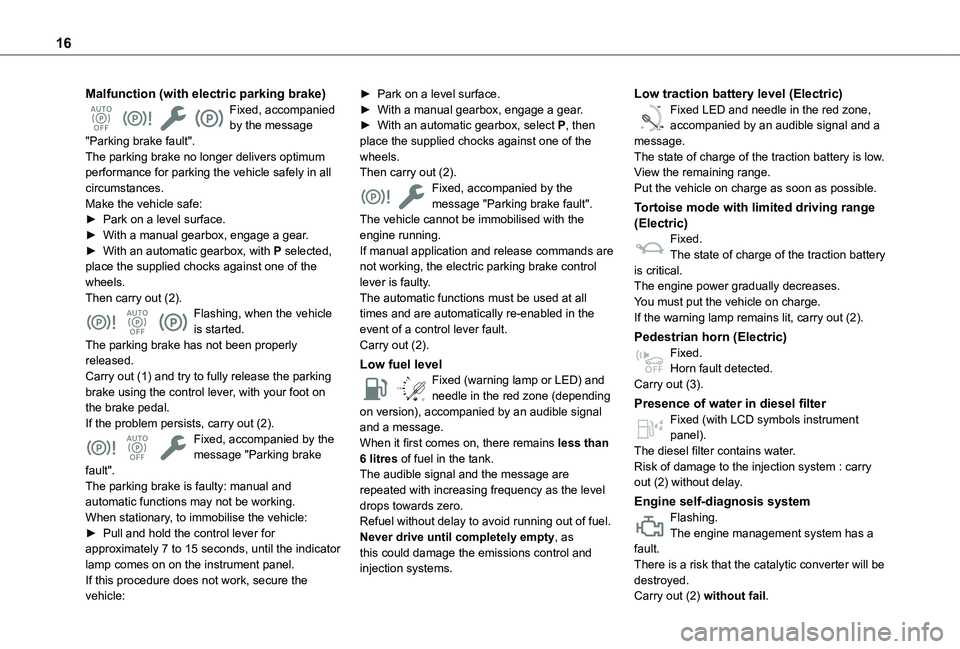
Malfunction (with electric parking brake)Fixed, accompanied by the message "Parking brake fault".The parking brake no longer delivers optimum performance for parking the vehicle safely in all circumstances.Make the vehicle safe:► Park on a level surface.► With a manual gearbox, engage a gear.► With an automatic gearbox, with P selected, place the supplied chocks against one of the wheels.Then carry out (2).Flashing, when the vehicle is started.The parking brake has not been properly released.Carry out (1) and try to fully release the parking brake using the control lever, with your foot on the brake pedal.If the problem persists, carry out (2).Fixed, accompanied by the
message "Parking brake fault".The parking brake is faulty: manual and automatic functions may not be working.When stationary, to immobilise the vehicle:► Pull and hold the control lever for approximately 7 to 15 seconds, until the indicator lamp comes on on the instrument panel.If this procedure does not work, secure the
vehicle:
► Park on a level surface.► With a manual gearbox, engage a gear.► With an automatic gearbox, select P, then place the supplied chocks against one of the wheels.Then carry out (2).Fixed, accompanied by the message "Parking brake fault".The vehicle cannot be immobilised with the engine running.If manual application and release commands are not working, the electric parking brake control lever is faulty.The automatic functions must be used at all times and are automatically re-enabled in the event of a control lever fault.Carry out (2).
Low fuel level
/2
1 1Fixed (warning lamp or LED) and needle in the red zone (depending on version), accompanied by an audible signal and a message.When it first comes on, there remains less than
6 litres of fuel in the tank.The audible signal and the message are repeated with increasing frequency as the level drops towards zero.Refuel without delay to avoid running out of fuel.Never drive until completely empty, as this could damage the emissions control and injection systems.
Low traction battery level (Electric)
0 %
100
Fixed LED and needle in the red zone, accompanied by an audible signal and a message.The state of charge of the traction battery is low.View the remaining range.Put the vehicle on charge as soon as possible.
Tortoise mode with limited driving range (Electric)Fixed.The state of charge of the traction battery is critical.The engine power gradually decreases.You must put the vehicle on charge.If the warning lamp remains lit, carry out (2).
Pedestrian horn (Electric)Fixed.Horn fault detected.Carry out (3).
Presence of water in diesel filterFixed (with LCD symbols instrument panel).
The diesel filter contains water.Risk of damage to the injection system : carry out (2) without delay.
Engine self-diagnosis systemFlashing.The engine management system has a fault.There is a risk that the catalytic converter will be destroyed.
Carry out (2) without fail.
Page 19 of 320
19
Instruments
1
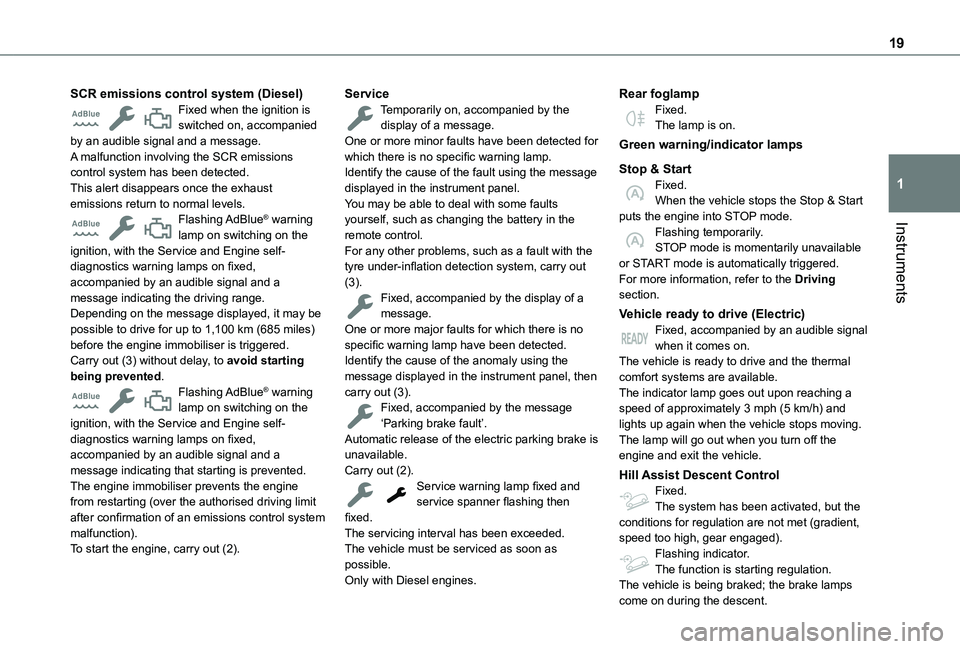
SCR emissions control system (Diesel)Fixed when the ignition is switched on, accompanied by an audible signal and a message.A malfunction involving the SCR emissions control system has been detected.This alert disappears once the exhaust emissions return to normal levels.Flashing AdBlue® warning lamp on switching on the ignition, with the Service and Engine self-diagnostics warning lamps on fixed, accompanied by an audible signal and a message indicating the driving range.Depending on the message displayed, it may be possible to drive for up to 1,100 km (685 miles) before the engine immobiliser is triggered.Carry out (3) without delay, to avoid starting being prevented.Flashing AdBlue® warning lamp on switching on the ignition, with the Service and Engine self-diagnostics warning lamps on fixed,
accompanied by an audible signal and a message indicating that starting is prevented.The engine immobiliser prevents the engine from restarting (over the authorised driving limit after confirmation of an emissions control system malfunction).To start the engine, carry out (2).
ServiceTemporarily on, accompanied by the display of a message.One or more minor faults have been detected for which there is no specific warning lamp.Identify the cause of the fault using the message displayed in the instrument panel.You may be able to deal with some faults yourself, such as changing the battery in the remote control.For any other problems, such as a fault with the tyre under-inflation detection system, carry out (3).Fixed, accompanied by the display of a message.One or more major faults for which there is no specific warning lamp have been detected.Identify the cause of the anomaly using the message displayed in the instrument panel, then carry out (3).Fixed, accompanied by the message ‘Parking brake fault’.Automatic release of the electric parking brake is
unavailable.Carry out (2).Service warning lamp fixed and service spanner flashing then fixed.The servicing interval has been exceeded.The vehicle must be serviced as soon as possible.Only with Diesel engines.
Rear foglampFixed.The lamp is on.
Green warning/indicator lamps
Stop & StartFixed.When the vehicle stops the Stop & Start puts the engine into STOP mode.Flashing temporarily.STOP mode is momentarily unavailable or START mode is automatically triggered.For more information, refer to the Driving section.
Vehicle ready to drive (Electric)Fixed, accompanied by an audible signal when it comes on.The vehicle is ready to drive and the thermal comfort systems are available.The indicator lamp goes out upon reaching a speed of approximately 3 mph (5 km/h) and lights up again when the vehicle stops moving.The lamp will go out when you turn off the
engine and exit the vehicle.
Hill Assist Descent ControlFixed.The system has been activated, but the conditions for regulation are not met (gradient, speed too high, gear engaged).Flashing indicator.The function is starting regulation.The vehicle is being braked; the brake lamps
come on during the descent.
Page 20 of 320
20
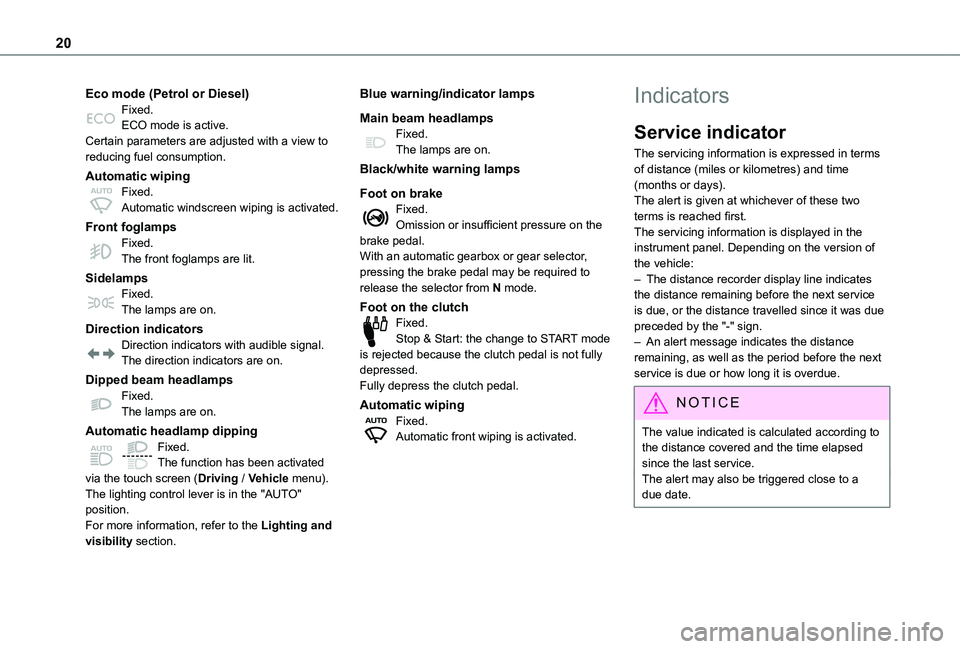
Eco mode (Petrol or Diesel)Fixed.ECO mode is active.Certain parameters are adjusted with a view to reducing fuel consumption.
Automatic wipingFixed.Automatic windscreen wiping is activated.
Front foglampsFixed.The front foglamps are lit.
SidelampsFixed.The lamps are on.
Direction indicatorsDirection indicators with audible signal.The direction indicators are on.
Dipped beam headlampsFixed.The lamps are on.
Automatic headlamp dipping
Fixed.The function has been activated via the touch screen (Driving / Vehicle menu).The lighting control lever is in the "AUTO" position.For more information, refer to the Lighting and visibility section.
Blue warning/indicator lamps
Main beam headlampsFixed.The lamps are on.
Black/white warning lamps
Foot on brakeFixed.Omission or insufficient pressure on the brake pedal.With an automatic gearbox or gear selector, pressing the brake pedal may be required to release the selector from N mode.
Foot on the clutchFixed.Stop & Start: the change to START mode is rejected because the clutch pedal is not fully depressed.Fully depress the clutch pedal.
Automatic wipingFixed.Automatic front wiping is activated.
Indicators
Service indicator
The servicing information is expressed in terms of distance (miles or kilometres) and time (months or days).The alert is given at whichever of these two terms is reached first.The servicing information is displayed in the instrument panel. Depending on the version of the vehicle:– The distance recorder display line indicates the distance remaining before the next service is due, or the distance travelled since it was due preceded by the "-" sign.– An alert message indicates the distance remaining, as well as the period before the next service is due or how long it is overdue.
NOTIC E
The value indicated is calculated according to the distance covered and the time elapsed since the last service.The alert may also be triggered close to a due date.
Page 21 of 320
21
Instruments
1
Service spannerLights up temporarily when the ignition is switched on.Between 3,000 km (1,800 miles) and 1,000 km (600 miles) remain before the next service is due.Fixed, when the ignition is switched on.The service is due in less than 1,000 km (600 miles).Have your vehicle serviced very soon.
Service spanner flashingFlashing then fixed, when the ignition is switched on.(With Diesel engines, combined with the Service warning lamp.)The servicing interval has been exceeded.Have your vehicle serviced as soon as possible.
Resetting the service indicator
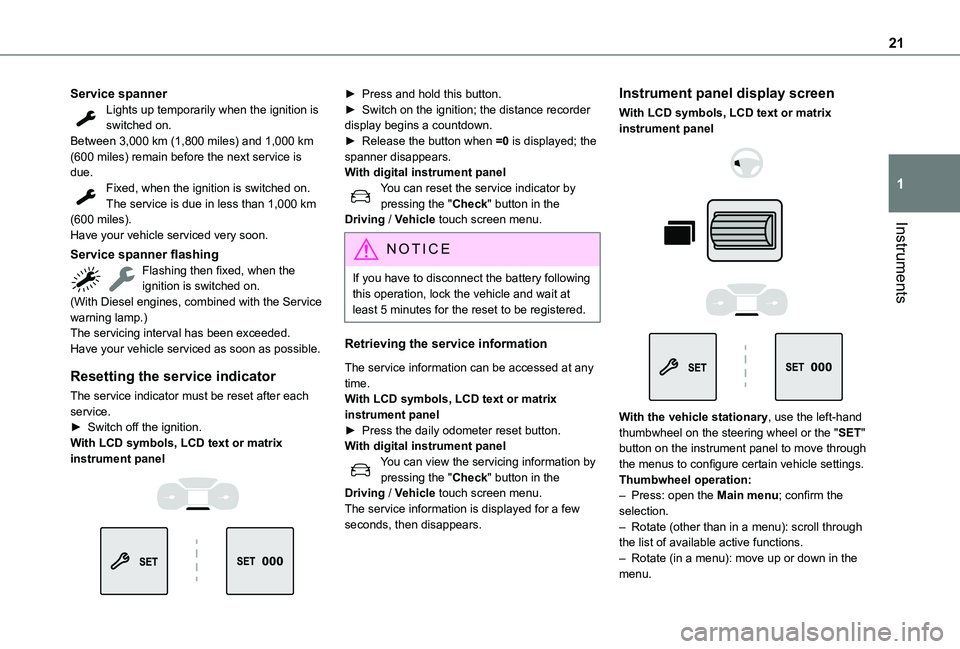
The service indicator must be reset after each service.► Switch off the ignition.With LCD symbols, LCD text or matrix
instrument panel
► Press and hold this button.► Switch on the ignition; the distance recorder display begins a countdown.► Release the button when =0 is displayed; the spanner disappears.With digital instrument panelYou can reset the service indicator by pressing the "Check" button in the Driving / Vehicle touch screen menu.
NOTIC E
If you have to disconnect the battery following this operation, lock the vehicle and wait at least 5 minutes for the reset to be registered.
Retrieving the service information
The service information can be accessed at any time.With LCD symbols, LCD text or matrix instrument panel► Press the daily odometer reset button.With digital instrument panelYou can view the servicing information by pressing the "Check" button in the Driving / Vehicle touch screen menu.The service information is displayed for a few seconds, then disappears.
Instrument panel display screen
With LCD symbols, LCD text or matrix instrument panel
With the vehicle stationary, use the left-hand thumbwheel on the steering wheel or the "SET" button on the instrument panel to move through the menus to configure certain vehicle settings.
Thumbwheel operation:– Press: open the Main menu; confirm the selection.– Rotate (other than in a menu): scroll through the list of available active functions.– Rotate (in a menu): move up or down in the menu.
Page 22 of 320
22
With digital instrument panelThe configuration of some parameters of the vehicle is done by pressing the "Check" button in the Driving / Vehicle touch screen menu.
Distance recorders
The total and trip distances are displayed for thirty seconds when the ignition is switched off, when the driver's door is opened and when the vehicle is locked or unlocked.
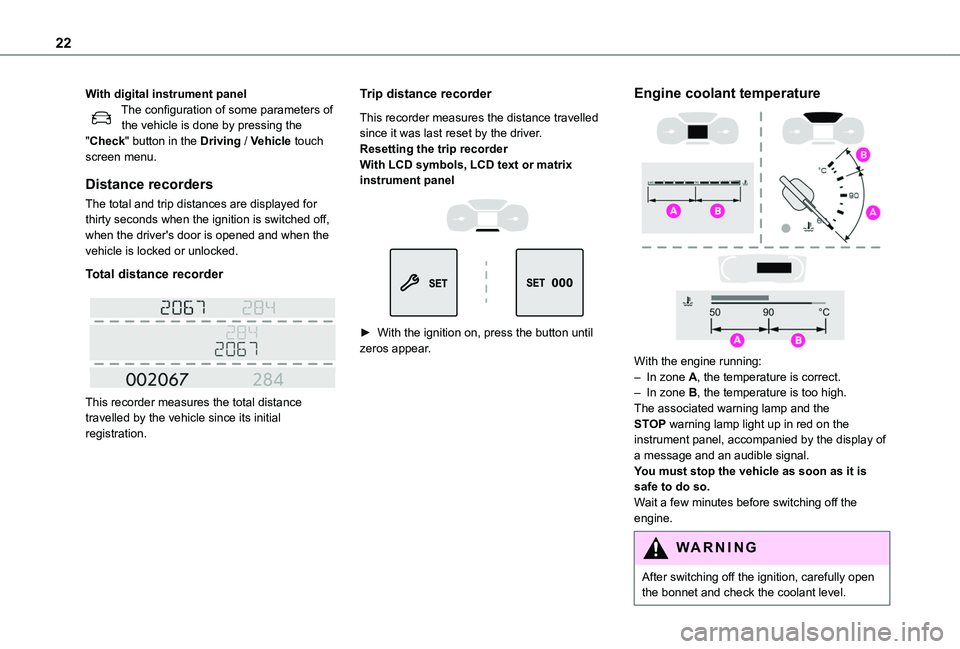
Total distance recorder
This recorder measures the total distance travelled by the vehicle since its initial registration.
Trip distance recorder
This recorder measures the distance travelled since it was last reset by the driver.Resetting the trip recorderWith LCD symbols, LCD text or matrix instrument panel
► With the ignition on, press the button until zeros appear.
Engine coolant temperature
With the engine running:– In zone A, the temperature is correct.– In zone B, the temperature is too high. The associated warning lamp and the STOP warning lamp light up in red on the instrument panel, accompanied by the display of a message and an audible signal.You must stop the vehicle as soon as it is safe to do so.Wait a few minutes before switching off the engine.
WARNI NG
After switching off the ignition, carefully open the bonnet and check the coolant level.
Page 23 of 320
23
Instruments
1
NOTIC E
For more information on Checking levels, refer to the corresponding section.
Checking
After driving for a few minutes, the temperature and pressure in the cooling system increase.To top up the level:► wait at least one hour for the engine to cool,► unscrew the cap by two turns to allow the pressure to drop,► when the pressure has dropped, remove the cap,► top up the level to the "MAX" mark.For more information on Checking levels, refer to the corresponding section.
WARNI NG
Be aware of the risk of scalding when topping up the coolant. Do not fill above the maximum level (indicated on the reservoir).
Engine oil level indicator
(Depending on version)On versions fitted with an electric gauge, the engine oil level status is displayed on the instrument panel for a few seconds when the ignition is switched on, at the same time as the servicing information.
NOTIC E
The level read will only be correct if the vehicle is on level ground and the engine has been off for more than 30 minutes.
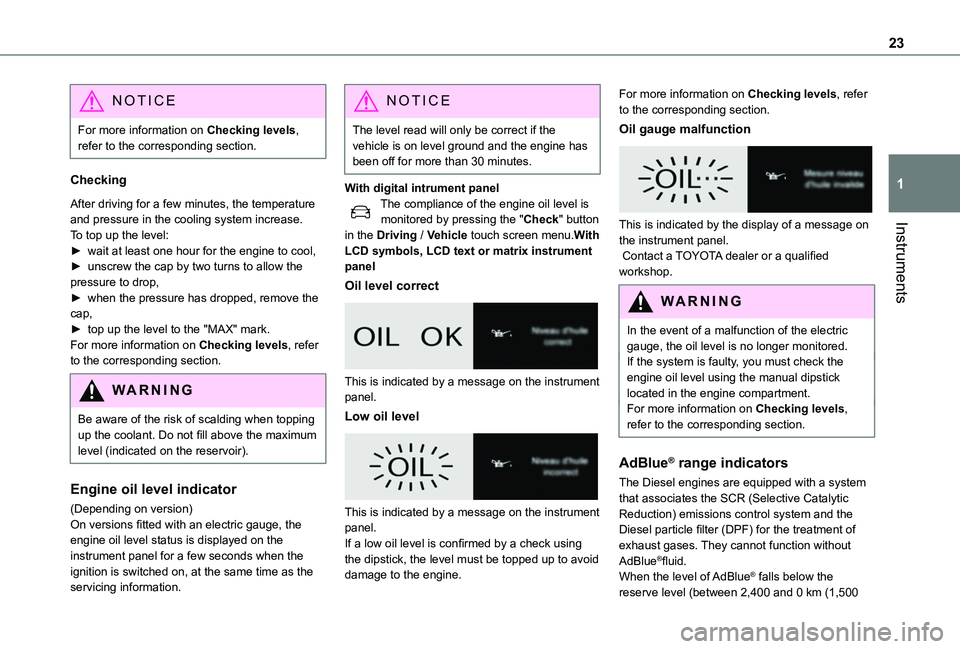
With digital intrument panelThe compliance of the engine oil level is monitored by pressing the "Check" button in the Driving / Vehicle touch screen menu.With LCD symbols, LCD text or matrix instrument panel
Oil level correct
This is indicated by a message on the instrument panel.
Low oil level
This is indicated by a message on the instrument panel.If a low oil level is confirmed by a check using the dipstick, the level must be topped up to avoid damage to the engine.
For more information on Checking levels, refer to the corresponding section.
Oil gauge malfunction
This is indicated by the display of a message on the instrument panel. Contact a TOYOTA dealer or a qualified workshop.
WARNI NG
In the event of a malfunction of the electric gauge, the oil level is no longer monitored.If the system is faulty, you must check the engine oil level using the manual dipstick located in the engine compartment.For more information on Checking levels, refer to the corresponding section.
AdBlue® range indicators
The Diesel engines are equipped with a system that associates the SCR (Selective Catalytic Reduction) emissions control system and the Diesel particle filter (DPF) for the treatment of
exhaust gases. They cannot function without AdBlue®fluid.When the level of AdBlue® falls below the reserve level (between 2,400 and 0 km (1,500
Page 24 of 320
24
miles and 0 miles)), a warning lamp lights up when the ignition is switched on and an estimate of the distance that can be travelled before engine starting is prevented is displayed in the instrument panel.
WARNI NG
The engine starting prevention system required by regulations is activated
automatically once the AdBlue® tank is empty.
It is then no longer possible to start the engine until the minimum level of AdBlue® has been topped up.
Manual display of the range
While the driving range is greater than 1,500 miles (2,400 km), it is not displayed automatically.With LCD symbols, LCD text or matrix instrument panel
► Press this button to temporarily display the driving range. With digital intrument panel
You can view the range information by pressing the "CHECK" button in the Driving/Vehicle" touch screen menu.
Actions required related to a lack of AdBlue®
The following warning lamps light up when the quantity of AdBlue® is lower than the reserve level corresponding to a range of 2,400 km (1,500 miles).Together with the warning lamps, messages regularly remind you of the need to top up to avoid engine starting being prevented. Refer to the Warning and indicator lamps section for details of the messages displayed.
NOTIC E
For more information on AdBlue® (Diesel engines), and in particular on topping up, refer to the corresponding section.
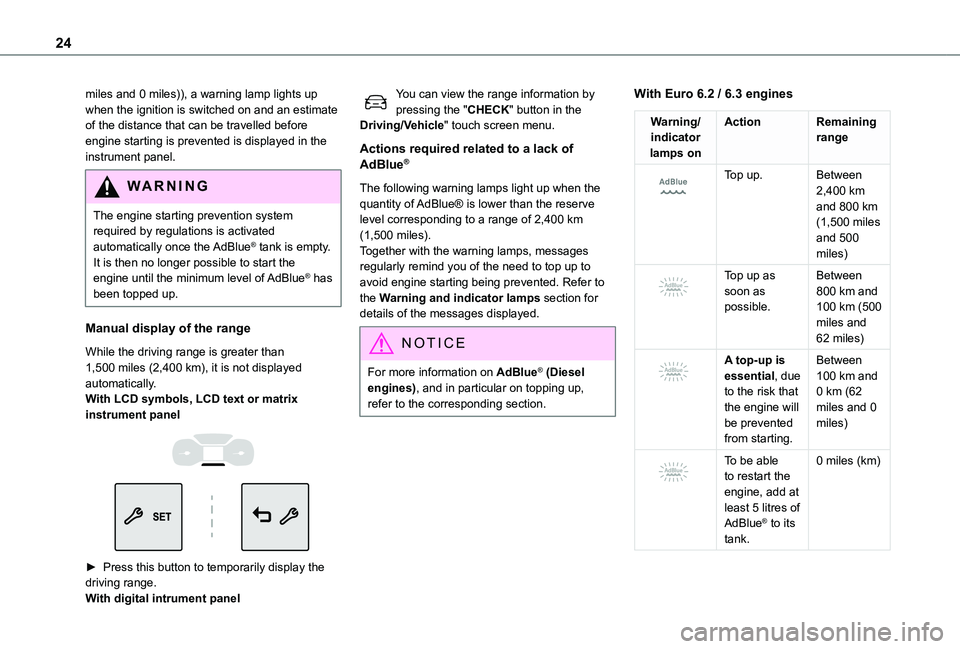
With Euro 6.2 / 6.3 engines
Warning/indicator lamps on
ActionRemaining range
Top up.Between 2,400 km and 800 km (1,500 miles and 500
miles)
Top up as soon as possible.
Between 800 km and 100 km (500 miles and 62 miles)
A top-up is essential, due to the risk that the engine will be prevented from starting.
Between 100 km and 0 km (62 miles and 0 miles)
To be able to restart the engine, add at least 5 litres of AdBlue® to its tank.
0 miles (km)