2022 TOYOTA PROACE CITY VERSO EV change time
[x] Cancel search: change timePage 188 of 320
188
It consists of 3 areas: left A, centre B and right C.This view is available only from the view selection menu.
Park Assist
WARNI NG
For more information, refer to the General recommendations on the use of driving and manoeuvring aids.
This system provides active parking assistance for vehicles fitted with a manual gearbox: it detects a parking space and then steers in the appropriate direction to park in this space while the driver controls the driving direction, engagement of gears, acceleration and braking.To assist the driver in monitoring the correct manoeuvring operation, the system automatically triggers the display of Top Rear Vision and the activation of the parking sensors.The system performs the measurements of available parking spaces and calculations of distances to obstacles using ultrasonic sensors built into the front and rear bumpers of the vehicle.
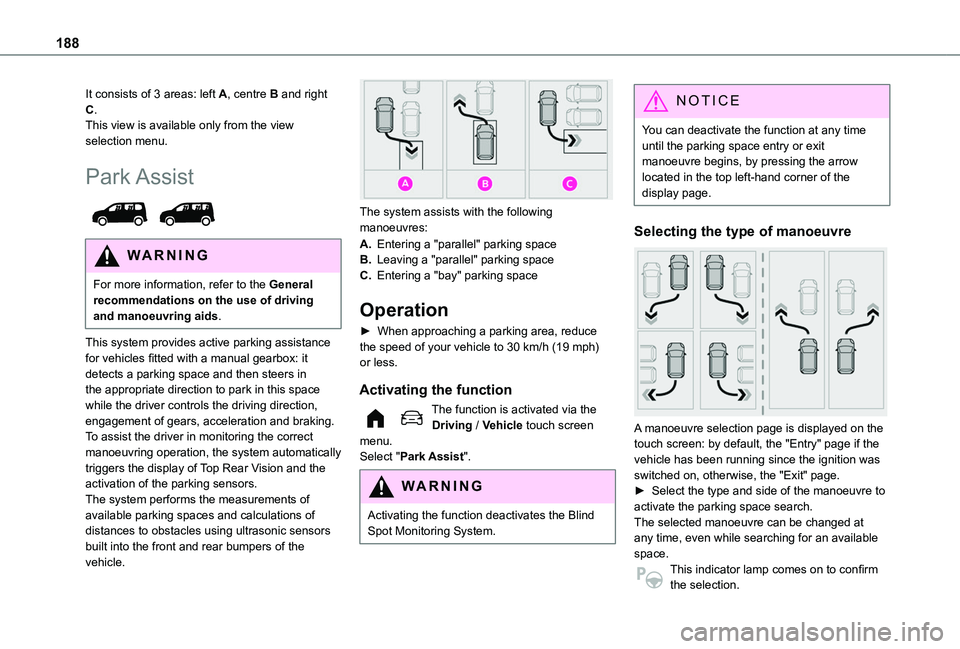
The system assists with the following manoeuvres:
A.Entering a "parallel" parking space
B.Leaving a "parallel" parking space
C.Entering a "bay" parking space
Operation
► When approaching a parking area, reduce the speed of your vehicle to 30 km/h (19 mph) or less.
Activating the function
The function is activated via the Driving / Vehicle touch screen menu.
Select "Park Assist".
WARNI NG
Activating the function deactivates the Blind Spot Monitoring System.
NOTIC E
You can deactivate the function at any time until the parking space entry or exit manoeuvre begins, by pressing the arrow located in the top left-hand corner of the display page.
Selecting the type of manoeuvre
A manoeuvre selection page is displayed on the touch screen: by default, the "Entry" page if the
vehicle has been running since the ignition was switched on, otherwise, the "Exit" page.► Select the type and side of the manoeuvre to activate the parking space search.The selected manoeuvre can be changed at any time, even while searching for an available space.This indicator lamp comes on to confirm the selection.
Page 213 of 320
213
Practical information
7
For more information on the Charging system (Electric), refer to the corresponding section.
Checking levels
Check all of the following levels regularly in accordance with the manufacturer's service schedule. Top them up if required, unless otherwise indicated.If a level drops significantly, have the corresponding system checked by a TOYOTA dealer or a qualified workshop.
WARNI NG
The fluids must comply with the manufacturer's requirements and with the vehicle's engine.
WARNI NG
Take care when working under the bonnet, as certain areas of the engine may be extremely hot (risk of burns) and the cooling fan could start at any time (even with the ignition off).
Used products
WARNI NG
Avoid prolonged contact of used oil or fluids with the skin.Most of these fluids are harmful to health and very corrosive.
ECO
Do not discard used oil or fluids into sewers or onto the ground.Empty used oil into the containers reserved for this purpose at a TOYOTA dealer or a qualified workshop.
Engine oil
The level is checked, with the engine having been switched off for at least 30 minutes and on level ground, either using the oil level indicator in the instrument panel when the ignition is switched on (for vehicles equipped with an electric gauge), or using the dipstick.It is normal to top up the oil level between two services (or oil changes). It is recommended that you check the level, and top up if necessary, every 5,000 km (3,000 miles).
WARNI NG
In order to maintain the reliability of the engine and emissions control system, never use additives in the engine oil.
Checking using the dipstick
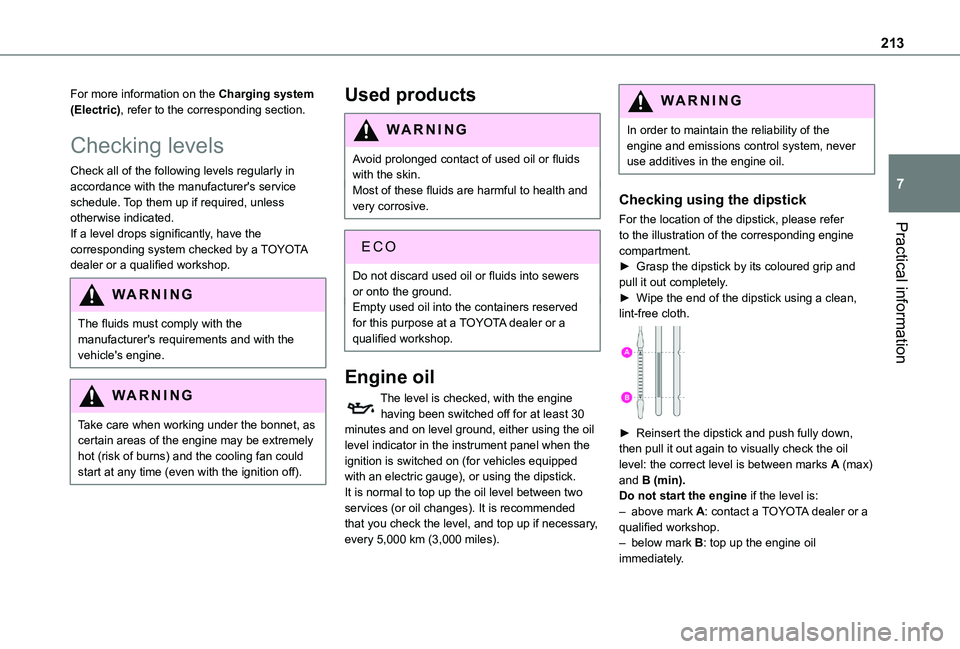
For the location of the dipstick, please refer to the illustration of the corresponding engine compartment.► Grasp the dipstick by its coloured grip and pull it out completely.► Wipe the end of the dipstick using a clean, lint-free cloth.
► Reinsert the dipstick and push fully down, then pull it out again to visually check the oil level: the correct level is between marks A (max) and B (min).Do not start the engine if the level is:– above mark A: contact a TOYOTA dealer or a qualified workshop.– below mark B: top up the engine oil immediately.
Page 216 of 320
216
Air filter
Depending on the environment and the use of the vehicle (e.g. dusty atmosphere, city driving), change it twice as often, if necessary.
Oil filter
Change the oil filter each time the engine oil is changed.
Particle filter (Diesel)
The start of clogging of the particle filter is indicated by the temporary lighting of this warning lamp, accompanied by an alert message.As soon as the traffic conditions permit, regenerate the filter by driving at a speed of at least 37 mph (60 km/h), with an engine speed above 2,500 rpm, for about 15 minutes (until the warning lamp goes off).If it is not possible to reach 37 mph (60 km/h), leave the engine running at idle for about
15 minutes, then drive with an engine speed above 2,500 rpm for 15 minutes.
NOTIC E
Do not switch off the engine until the filter is fully regenerated; repeated intervals can degrade the engine oil prematurely.Regenerating the filter while the vehicle is stationary is not recommended.
NOTIC E
If the warning lamp stays on, this indicates a low Diesel additive level.For more information on Checking levels, refer to the corresponding section.
NOTIC E
Following prolonged operation of the vehicle at very low speed or at idle, you may, in exceptional circumstances, notice water vapour coming from the exhaust while accelerating. These emissions have no impact on the vehicle’s behaviour and the environment.
NOTIC E
New vehicleDuring the first few particle filter regeneration operations, you may notice a "burning" smell. This is perfectly normal.
Manual gearbox
The gearbox does not require any maintenance (no oil change).
Automatic gearbox
The gearbox does not require any maintenance (no oil change).
Drive selector
The drive selector does not require any maintenance.
Brake pads
Brake wear depends on the style of driving, particularly in the case of vehicles used in town, over short distances. It may be necessary to have the condition of the brakes checked, even between vehicle services.Unless there is a leak in the circuit, a drop in the brake fluid level indicates that the brake pads are worn.
NOTIC E
After washing the vehicle, moisture, or in wintry conditions, ice can form on the brake discs and pads: braking efficiency may be reduced. Gently dab the brakes to dry and defrost them.
Page 256 of 320
256
Steering mounted controls
Steering mounted controls -
Type 1
Radio:Select the previous/next preset radio station.Select the previous/next item in a menu or a list.Media:Select the previous/next track.Select the previous/next item in a menu or a list.Radio:Short press: display the list of radio stations.Long press: update the list.Media:Short press: display the list of folders.Long press: display the available sorting options.Short press: change audio source (radio;
USB; AUX if equipment connected; CD; streaming).Long press: display the call log.
Short press during an incoming call: accept the call.Short press during a call in progress: end the call.Confirm a selection.
Increase volume.
Decrease volume.
Mute/restore sound by simultaneously pressing the increase and decrease volume buttons.
Steering mounted controls -
Type 2
Voice commands:This control is located on the steering wheel or at the end of the lighting control stalk (depending on equipment).Short press, smartphone voice commands via the system.Increase volume.
Decrease volume.Mute by pressing the volume increase
and decrease buttons simultaneously (depending on equipment).Restore the sound by pressing one of the two volume buttons.Change the multimedia source.
Short press: display the calls log.Short press during an incoming call: accept the call.
Long press during an incoming call: reject the call.Short press during a call in progress: end the call.Radio (rotate): previous/next preset station.Media (rotate): previous/next track, move in a list.Short press: confirm a selection; if nothing selected, access to presets.Radio: display the list of stations.Media: display the list of tracks.
Menus
Radio
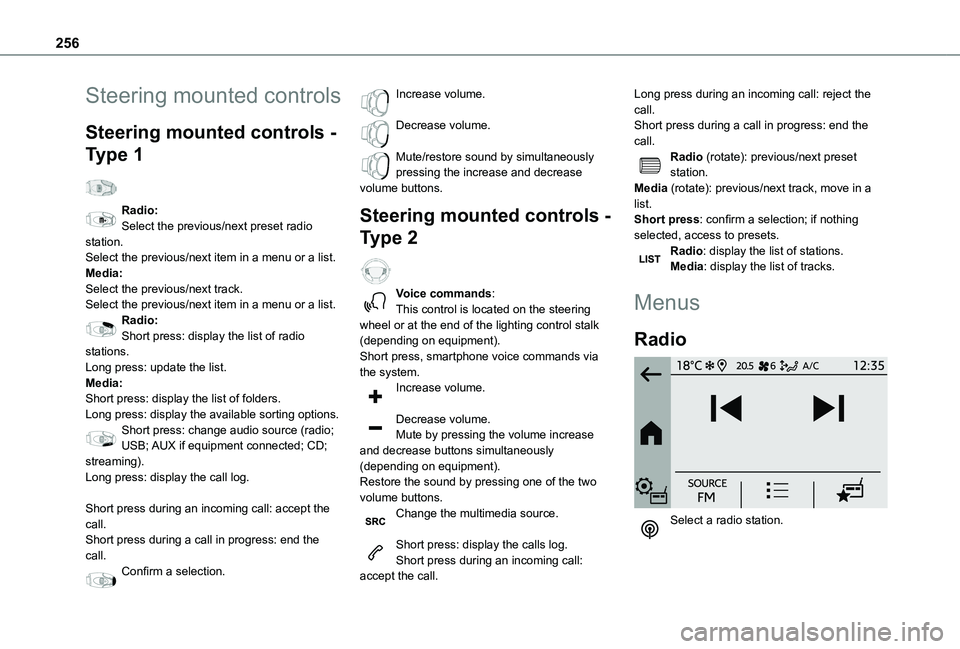
Select a radio station.
Page 259 of 320
259
Touch screen BLUETOOTH audio system
10
DAB (Digital Audio
Broadcasting) radio
Terrestrial Digital Radio
Choosing the DAB radio
Terrestrial digital radio (DAB) provides higher quality reception.The different "multiplexes/ensembles" offer a choice of radio stations arranged in alphabetical order.Press the "Radio" menu.
Press the "SOURCE" button.In the list of available sources, choose "DAB Radio".
Activating FM-DAB Tracking
"DAB" does not cover 100% of the territory.When the digital radio signal is poor, the "FM-DAB tracking" allows you to continue listening to the same station, by automatically
switching to the corresponding "FM" analogue station (if there is one).Press the "Radio Settings" button.
Activate "DAB-FM".
NOTIC E
If "FM-DAB tracking" is activated, there may be a difference of a few seconds when the system switches to "FM" analogue radio with sometimes a variation in volume.Once the digital signal quality is restored, the system automatically changes back to "DAB".
WARNI NG
If the "DAB" station being listened to is not available on "FM", or if the "FM-DAB tracking" is not activated, the sound will cut out while the digital signal is too weak.
Media
Selecting the source
Press the "Media" menu.
Press the "SOURCE" button.Select the source (USB, Bluetooth or AUX, depending on equipment).
USB port
Insert the USB memory stick into the USB port or connect the USB device to the USB port using a suitable cable (not supplied).
WARNI NG
To protect the system, do not use a USB hub.
The system builds playlists (in temporary memory); this operation can take from a few seconds to several minutes at the first connection.Playlists are updated whenever a USB memory stick is connected or the contents of a particular USB memory stick are changed. The lists are memorised: if they are not modified, the subsequent loading time will be shorter.
Auxiliary (AUX) jack socket
Depending on equipmentConnect a portable device (MP3 player, etc.) to the auxiliary jack socket using an audio cable (not supplied).This source is only available if "Aux Amplification" has been selected in the audio settings.
First adjust the volume on the portable device (to a high level). Then adjust the volume of the audio system.Controls are managed via the portable device.
Page 263 of 320
263
Touch screen BLUETOOTH audio system
10
Select "Units" to change the units of distance, fuel consumption and temperature.Press "Factory settings" to return to the initial settings.Press "System Info" to check the system version.
Privacy settings
Three data privacy options are available:"No data sharing (data, vehicle position)""Only data sharing"
“Data and vehicle position sharing"
When data and vehicle position sharing are enabled, this symbol is displayed in the upper bar of the touch screen.
Selecting the language
Press "Settings".
Select "Languages" to change the language.
Setting the date and time
Press "Settings".
Press "Date/Time".
Setting the date:
Press the arrows to set the day, month and year.
NOTIC E
First set the day, then the month.
Setting the time:Press these buttons to set hours and minutes.
Select or deselect the 24h format.
In 12h format, choose "AM" or "PM".
NOTIC E
The system does not automatically manage the change between winter and summer time.
Date format:Select the display format for the date.
Frequently asked
questions
The following information groups together the answers to the most frequently asked questions
concerning the system.
Radio
The reception quality of the tuned radio station gradually deteriorates or the station presets are not working (no sound, 87.5 MHz is displayed, etc.).The vehicle is too far from the selected station’s transmitter, or no transmitter is present in the geographical area.► Activate the "RDS" function in the upper bar to enable the system to check whether there is a more powerful transmitter in the geographical area.The environment (hills, buildings, tunnels, basement car parks, etc.) is blocking reception, including in RDS mode.This is a perfectly normal phenomenon, and is not indicative of an audio system malfunction.The aerial is missing or has been damaged (for example while entering a car wash or underground car park).► Have the aerial checked by a dealer.I cannot find some radio stations in the list of
received stations.The name of the radio station changes.The station is no longer received or its name has changed in the list.Some radio stations send other information in place of their name (the title of the song for example).The system interprets these details as the station name.
Page 264 of 320
264
► Press the "Radio Settings" button then select "Update list". The radio reception is cut off while searching for available stations (approximately 30 seconds).
Media
Playback of my USB memory stick starts only after a very long wait (around 2 to 3 minutes).Some files supplied with the memory stick may greatly slow down access to reading the memory stick (multiplication by 10 of the cataloguing time).► Delete the files supplied with the memory stick and limit the number of sub-folders in the file structure on the memory stick. Some characters in information about the currently playing media are not displayed correctly.The audio system is unable to process certain types of character.► Use standard characters to name tracks and folders.Playback of streaming files does not start.
The connected device does not automatically launch playback.► Start playback from the device.Track names and playing times are not displayed on the audio streaming screen.The Bluetooth profile does not allow the transfer of this information.
Telephone
I cannot connect my Bluetooth telephone.The telephone's Bluetooth function may be switched off or the telephone may not be visible.► Check that the telephone has Bluetooth switched on.► Check in the telephone settings that it is "visible to all".The Bluetooth telephone is not compatible with the system.► Check the compatibility of the telephone on the Brand's website (services).The volume of the telephone connected in Bluetooth mode is inaudible.The volume depends on both the system and the telephone.Ambient noise affects the quality of the telephone call.► Increase the volume of the audio system, to maximum if required, and increase the volume of the telephone if necessary.► Reduce ambient noise (close windows,
reduce ventilation, slow down, etc.).The contacts are not listed in alphabetical order.Some telephones offer display options. Depending on the settings chosen, contacts can be transferred in a specific order.► Modify the telephone directory display settings.
Settings
When the treble and bass settings are changed, the ambience is deselected.When the ambience is changed, the treble and bass settings are reset.Selecting an ambience imposes the treble and bass settings, and vice versa.► Modify the treble and bass or ambience settings to obtain the desired musical ambience.There is a difference in sound quality between audio sources.To allow for optimal listening quality, the sound settings can be tailored to different audio sources, which can generate audible differences when changing source.► Check that the sound settings are appropriate to the sources listened to. Adjust the sound functions to the middle position.When the engine is off, the system switches off after several minutes of use.When the engine is switched off, the system's operating time depends on the state of charge of
the battery.The switch-off is normal: the system automatically goes into energy economy mode and switches off to maintain an adequate charge in the battery.► Start the vehicle’s engine to increase the charge of the battery.
Page 266 of 320
266
– Media player connected via the auxiliary socket (depending on equipment).
NOTIC E
In the "Settings" menu, it is possible to create a profile for an individual or for a group of people with shared interests, and configure a wide range of settings (radio presets, audio settings, ambiences, etc.). Settings are applied automatically.
NOTIC E
In very hot conditions, the volume may be limited to protect the system. It may enter standby mode (with the screen and sound off) for 5 minutes or more.The system will resume normal operation when the temperature in the passenger compartment has dropped.
Steering mounted controls
Steering mounted controls -
Type 1
Radio:Select the previous/next preset radio station.Select the previous/next item in a menu or a list.Media:Select the previous/next track.Select the previous/next item in a menu or a list.Radio:Short press: display the list of radio stations.Long press: update the list.Media:Short press: display the list of folders.Long press: display the available sorting options.Change audio source (radio; USB; AUX if
equipment connected; CD; streaming).Confirm a selection.
Increase volume.
Decrease volume.
Mute/restore sound by simultaneously pressing the increase and decrease volume buttons.
Steering mounted controls -
Type 2
Voice commands:This control is located on the steering wheel or at the end of the lighting control lever (depending on equipment).Short press, smartphone voice commands via the system.Increase volume.
Decrease volume.Mute by pressing the volume increase and decrease buttons simultaneously (depending on equipment).Restore the sound by pressing one of the two volume buttons.Media (short press): change the multimedia source.Telephone (short press): start telephone call.
Call in progress (short press): access telephone menu.Telephone (long press): reject an incoming call, end call; when no call is in progress, access telephone menu.Radio (rotate): automatic search for the previous/next station.Media (rotate): previous/next track, move in a list.