2022 TOYOTA PROACE CITY stop start
[x] Cancel search: stop startPage 221 of 320
221
Practical information
7
With drive selector and
electric parking brake /
Release procedure
► With the vehicle stationary and the engine running, depress the brake pedal and select mode N.Within 5 seconds:► Depress and hold the brake pedal, then observe this order: switch off the ignition (if start with START/STOP, press and hold the button for 2 seconds) and move the push selector forwards or backwards.► Release the brake pedal, then switch on the ignition again.► Place your foot on the brake and press the electric parking brake control to release it.► Release the brake pedal, then switch off the ignition.
NOTIC E
Keyless Entry and StartingYou must not depress the brake pedal while switching the ignition on again, then switching it off. If you do, the engine will start, requiring you to restart the procedure.
WARNI NG
A message is displayed on the instrument panel to confirm the unlocking of the wheels for 15 minutes.When the vehicle is free-wheeling, the audio system cannot be updated (message displayed on the instrument panel).
Reverting to normal operation
► While depressing the brake pedal, restart the engine, then set the gear selector to P.
Advice on care and
maintenance
General recommendations
Observe the following recommendations to avoid damaging the vehicle.
Exterior
WARNI NG
Never use a high-pressure jet wash in the engine compartment - risk of damaging the electrical components!Do not wash the vehicle in bright sunshine or extremely cold conditions.
NOTIC E
When washing the vehicle at an automatic roller-brush car wash, be sure to lock the doors and, depending on version, remove the electronic key.When using a pressure washer, hold the lance at least 30 cm from the vehicle (particularly when cleaning areas containing chipped paint, sensors or seals).Promptly clean up any stains containing chemicals liable to damage the vehicle's paint (including tree resin, bird droppings, insect secretions, pollen and tar).If justified by the environment, clean the vehicle frequently to remove salty deposits (in coastal areas), soot (in industrial areas) and mud/salts (in wet or cold areas). These substances can be highly corrosive.Contact any authorized Toyota retailer or Toyota authorized repairer, or any reliable repairer for advice on removing stubborn stains requiring special products (such as tar
or insect removers).Preferably, have paint touch-ups performed by any authorized Toyota retailer or Toyota authorized repairer, or any reliable repairer.
Page 226 of 320
226
WARNI NG
If after approximately 7 minutes the pressure of 2 bars is not reached, this indicates that the tyre is not repairable; contact a TOYOTA dealer or a qualified workshop for assistance.
► Move the switch to position "O".► Disconnect the compressor's electric plug from the vehicle's 12 V socket.► Refit the cap on the valve.► Remove the kit.► Remove and store the bottle of sealant.
WARNI NG
The sealant product is harmful if swallowed and causes irritation to the eyes.Keep this product out of the reach of children.The use-by date of the fluid is marked on the bottle.After use, do not discard the bottle in standard waste, take it to a TOYOTA dealer or an authorised waste disposal site.Do not forget to obtain a new bottle of sealant, available from a TOYOTA dealer or a qualified workshop.
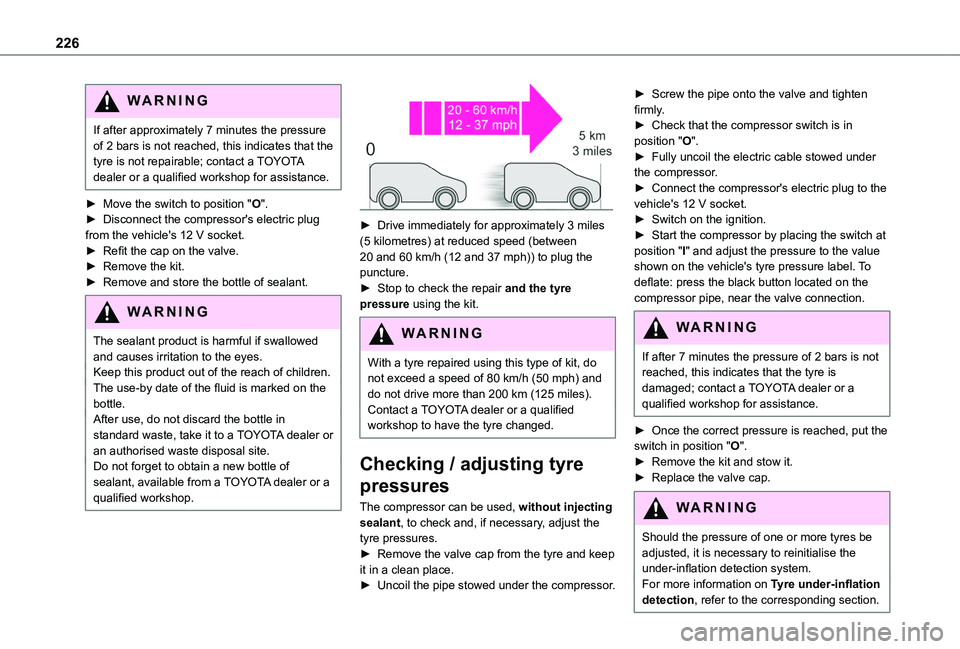
► Drive immediately for approximately 3 miles (5 kilometres) at reduced speed (between 20 and 60 km/h (12 and 37 mph)) to plug the puncture.► Stop to check the repair and the tyre pressure using the kit.
WARNI NG
With a tyre repaired using this type of kit, do not exceed a speed of 80 km/h (50 mph) and do not drive more than 200 km (125 miles).Contact a TOYOTA dealer or a qualified workshop to have the tyre changed.
Checking / adjusting tyre
pressures
The compressor can be used, without injecting sealant, to check and, if necessary, adjust the tyre pressures.► Remove the valve cap from the tyre and keep it in a clean place.► Uncoil the pipe stowed under the compressor.
► Screw the pipe onto the valve and tighten firmly.► Check that the compressor switch is in position "O".► Fully uncoil the electric cable stowed under the compressor.► Connect the compressor's electric plug to the vehicle's 12 V socket.► Switch on the ignition.► Start the compressor by placing the switch at position "I" and adjust the pressure to the value shown on the vehicle's tyre pressure label. To deflate: press the black button located on the compressor pipe, near the valve connection.
WARNI NG
If after 7 minutes the pressure of 2 bars is not reached, this indicates that the tyre is damaged; contact a TOYOTA dealer or a qualified workshop for assistance.
► Once the correct pressure is reached, put the switch in position "O".► Remove the kit and stow it.► Replace the valve cap.
WARNI NG
Should the pressure of one or more tyres be adjusted, it is necessary to reinitialise the under-inflation detection system.For more information on Tyre under-inflation detection, refer to the corresponding section.
Page 238 of 320
238
Starting using another
battery
If the vehicle's battery is flat, the engine can be started using a backup battery (either external or from another vehicle) and jump leads or using a battery booster.
WARNI NG
Never start the engine by connecting a battery charger.Never use a 24 V or higher battery booster.Check beforehand that the backup battery has a nominal voltage of 12 V and a capacity at least equal to that of the discharged battery.The two vehicles must not be in contact with each other.Switch off all electricity-consuming equipment on both vehicles (audio system, wipers, lighting, etc.).Make sure that the jump leads are well away from the engine’s moving parts (fan, belt, etc.).Do not disconnect the (+) terminal while the engine is running.
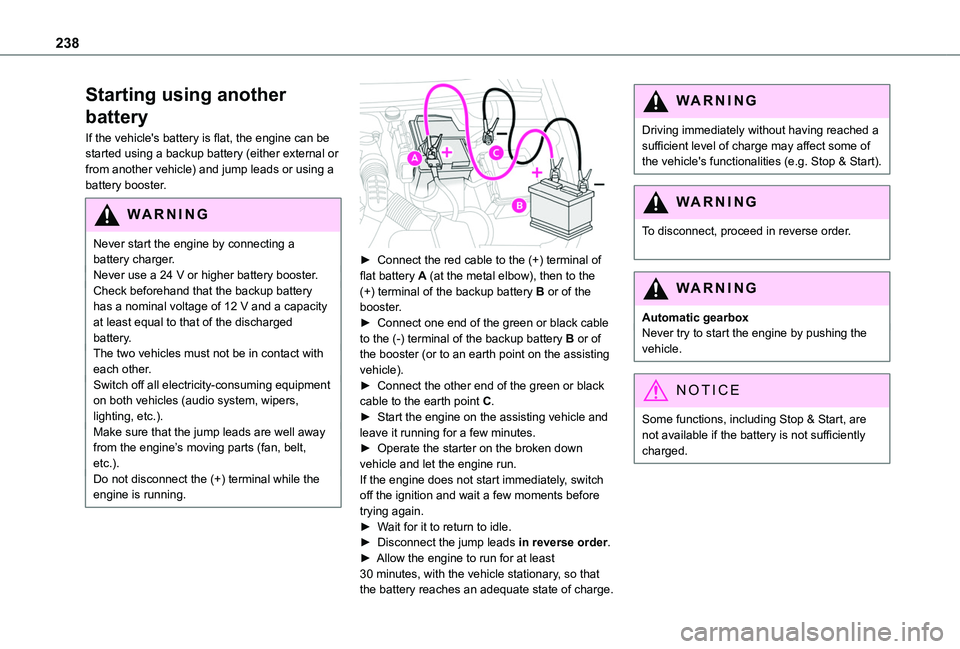
► Connect the red cable to the (+) terminal of flat battery A (at the metal elbow), then to the (+) terminal of the backup battery B or of the booster.► Connect one end of the green or black cable to the (-) terminal of the backup battery B or of the booster (or to an earth point on the assisting vehicle).► Connect the other end of the green or black cable to the earth point C.► Start the engine on the assisting vehicle and leave it running for a few minutes.► Operate the starter on the broken down vehicle and let the engine run.If the engine does not start immediately, switch off the ignition and wait a few moments before trying again.► Wait for it to return to idle.► Disconnect the jump leads in reverse order.► Allow the engine to run for at least 30 minutes, with the vehicle stationary, so that the battery reaches an adequate state of charge.
WARNI NG
Driving immediately without having reached a sufficient level of charge may affect some of the vehicle's functionalities (e.g. Stop & Start).
WARNI NG
To disconnect, proceed in reverse order.
WARNI NG
Automatic gearboxNever try to start the engine by pushing the vehicle.
NOTIC E
Some functions, including Stop & Start, are not available if the battery is not sufficiently charged.
Page 240 of 320
240
Disconnecting/reconnecting
the battery
In order to maintain an adequate state of charge for starting the engine, we recommend disconnecting the battery if the vehicle is to be unused for an extended period.Before disconnecting the battery:► Close all openings (doors, boot, windows, roof).► Switch off all electricity-consuming devices (audio system, wipers, lamps, etc.).► Switch off the ignition and wait for 4 minutes.After accessing the battery, it is only necessary to disconnect the (+) terminal.
Quick-release terminal clamp
Disconnecting the (+) terminal
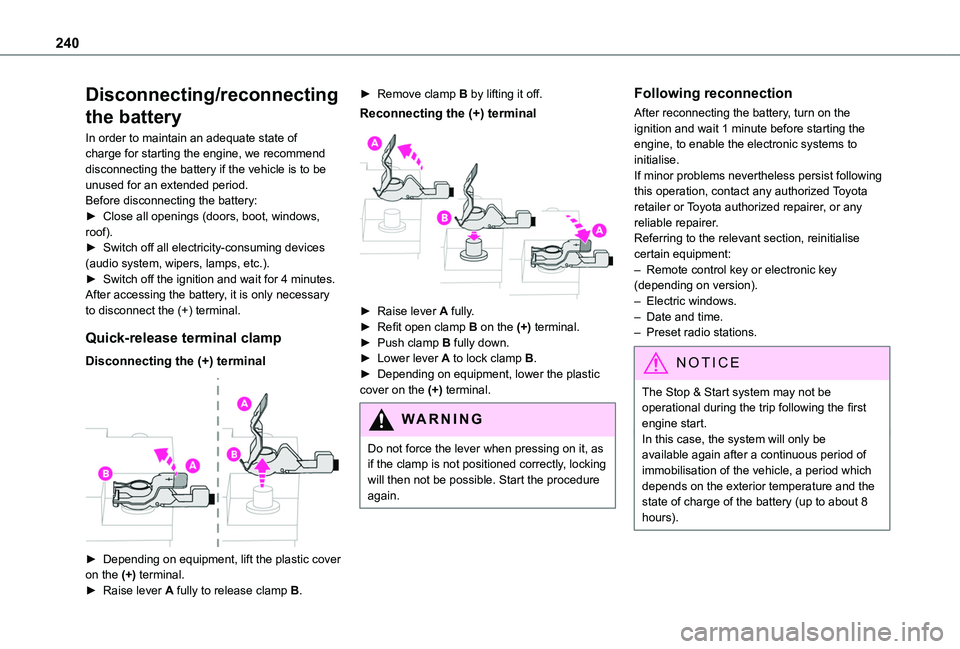
► Depending on equipment, lift the plastic cover on the (+) terminal.► Raise lever A fully to release clamp B.
► Remove clamp B by lifting it off.
Reconnecting the (+) terminal
► Raise lever A fully.► Refit open clamp B on the (+) terminal.► Push clamp B fully down.► Lower lever A to lock clamp B.► Depending on equipment, lower the plastic cover on the (+) terminal.
WARNI NG
Do not force the lever when pressing on it, as if the clamp is not positioned correctly, locking will then not be possible. Start the procedure again.
Following reconnection
After reconnecting the battery, turn on the ignition and wait 1 minute before starting the engine, to enable the electronic systems to initialise.If minor problems nevertheless persist following this operation, contact any authorized Toyota retailer or Toyota authorized repairer, or any reliable repairer.Referring to the relevant section, reinitialise certain equipment:– Remote control key or electronic key (depending on version).– Electric windows.– Date and time.– Preset radio stations.
NOTIC E
The Stop & Start system may not be operational during the trip following the first engine start.In this case, the system will only be
available again after a continuous period of immobilisation of the vehicle, a period which depends on the exterior temperature and the state of charge of the battery (up to about 8 hours).
Page 279 of 320
279
TOYOTA Connect Nav
12
TOYOTA Connect Nav
GPS navigation -
Applications - Multimedia
audio system - Bluetooth®
telephone
NOTIC E
The functions and settings described vary according to the vehicle version and configuration, as well as the country of sale.
WARNI NG
For safety reasons and because they require sustained attention by the driver, the following operations must be carried out with the vehicle stationary and the ignition on:– Pairing the smartphone with the system via Bluetooth.– Using the smartphone.– Connecting to the CarPlay® or Android Auto applications (certain applications stop displaying when the vehicle is moving).– Watching a video (the video stops when the vehicle starts to move again).
– Changing the system settings and configuration.
NOTIC E
The system is protected so that it only operates in the vehicle.The message Energy economy mode is displayed when the system is about to go into standby.
NOTIC E
System and map updates can be downloaded from the Brand's website.The update procedure is also available there.
First steps
With the engine running, a press mutes the sound.With the ignition off, a press turns the system on.Increase or decrease the volume using the wheel or the "plus" or "minus" buttons (depending on the equipment).Use the menu buttons on either side of or below the touch screen for access to the menus, then press the virtual buttons in the touch screen.Depending on the model, use the "Source" or "Menu" buttons to access the rolling menus, then press the virtual buttons in the touch screen.Display the rolling menus at any time by pressing the screen briefly with three fingers.All of the touch areas of the screen are white.
Press the back arrow to go back a level.Press "OK" to confirm.
WARNI NG
The touch screen is of the "capacitive" type.To clean the screen, use a soft, non-abrasive cloth (e.g. spectacles cloth) with no additional product.Do not use sharp objects on the screen.
Do not touch the screen with wet hands.
Certain information is displayed permanently in the side bars or in the upper bar of the touch screen (depending on equipment):– Air conditioning status information (depending on version), and direct access to the corresponding menu.– Go directly to the audio source selection option, to view the list of radio stations (or list of titles depending on the source).– Go to the "Notifications" of messages, emails, map updates and, depending on the services, the navigation notifications.– Go to the settings for the touch screen and the digital instrument panel.Audio source selection (depending on equipment):– FM/DAB/AM radio stations (depending on equipment).– Telephone connected via Bluetooth and Bluetooth multimedia broadcast (streaming).– USB memory stick.
Page 283 of 320
283
TOYOTA Connect Nav
12
some examples or take you through it step by step. There's more information available in "novice" mode. You can set the dialogue mode to "expert" when you feel comfortable.
Global voice commands
Voice commands
Set dialogue mode as novice - expertSelect user 1 / Select profile JohnIncrease temperatureDecrease temperatureHelp messages
There are lots of topics I can help you with. You can say: "help with phone", "help with navigation", "help with media" or "help with radio". For an overview on how to use voice controls, you can say "help with voice controls".Say "yes" if I got that right. Otherwise, say "no" and we'll start that again.
"Navigation" voice
commands
Voice commands
Navigate homeNavigate to workNavigate to preferred address, Tennis clubNavigate to contact, John MillerNavigate to address 11 regent street, London
Help messages
To plan a route, say "navigate to" followed by the address, the contact name or an intersection. For example, "navigate to address 11 Regent Street, London", "navigate to contact, John Miller", or "navigate to intersection of Regent Street, London". You can specify if it's a preferred address, or a Point of Interest. For example, say "navigate to preferred address, Tennis club", or "navigate to POI Heathrow Airport in London". Or, you can just say, "navigate home". To see Points of Interest on a map, you can say things like "show POI hotels in Banbury". For more information say "help with points of interest" or "help with route guidance".To choose a destination, say something like "navigate to line three" or "select line two". If you can't find the destination but the street's right, say for example "select the street in line three". To move around a displayed list, you can say "next page" or "previous page". You can undo your last action and start over by saying "undo",
or say "cancel" to cancel the current action.Voice commands
Tell me the remaining distanceTell me the remaining timeTell me the arrival timeStop route guidanceHelp messages
You can say "stop" or "resume route guidance". To get information about your current route, you can say "tell me the remaining time", "remaining distance" or "arrival time". To learn more commands, try saying "help with navigation". Voice commands
Show POI ''hotel'' at the destinationShow nearby POI petrol stationNavigate to POI Heathrow Airport in LondonNavigate to POI petrol station along the routeHelp messages
To see points of interest on a map, you can say things like "show hotels in Banbury", "show nearby parking", "show hotel at the destination" or "show petrol station along the route". If you prefer to navigate directly to a point of interest, you can say "navigate to nearby petrol station". If you feel you are not being well understood, try to say the word "POI" in front of the point of interest. For example say "navigate to POI restaurant at the destination".
To choose a POI, say something like "select line 2". If you've searched for a Point of Interest and don't see the one you're after, you can filter further by saying something like "select POI in line 2", or "select the city in line 3". You can also scroll through the list by saying "next page" or "previous page".
Page 296 of 320
296
Media
USB port
Insert the USB memory stick into the USB port or connect the USB device to the USB port using a suitable cable (not supplied).
WARNI NG
To protect the system, do not use a USB hub.
The system builds playlists (in temporary memory); this operation can take from a few seconds to several minutes at the first connection.Reduce the number of non-music files and the number of folders to reduce the waiting time.Playlists are updated whenever the ignition is switched off or a USB memory stick is connected. The audio system memorises these lists, which will subsequently load faster if they have not been changed.
Auxiliary socket (AUX)
Depending on equipmentConnect a portable device (MP3 player, etc.) to the auxiliary jack socket using an audio cable (not supplied).This source is only available if "Auxiliary input" has been selected in the audio settings.First adjust the volume on the portable device (to a high level). Then adjust the volume of the audio system.Controls are managed via the portable device.
Selecting the source
Press Radio Media to display the main page.Select "SOURCES".Select the source.
Watching a video
Depending on equipment/Depending on version/Depending on country.Insert a USB memory stick in the USB port.
NOTIC E
Video control commands are accessible only through the touch screen.
Press Radio Media to display the main page.Select "SOURCES".Select Video to start the video.
To remove the USB memory stick, press the pause button to stop the video, then remove the memory stick.The system can play video files in the MPEG-4 Part 2, MPEG-2, MPEG-1, H.264, H.263, VP8, WMV and RealVideo formats.
Streaming Bluetooth®
Streaming allows you to listen to the audio feed from your smartphone.The Bluetooth profile must be activated.First adjust the volume on the portable device (to a high level).Then adjust the volume of the audio system.If play does not start automatically, it may be necessary to start the audio playback from the smartphone.Control is from the portable device or by using the system's touch buttons.
NOTIC E
Once connected in streaming mode, the smartphone is considered to be a media source.
Page 303 of 320
303
TOYOTA Connect Nav
12
Frequently asked
questions
The following information groups together the answers to the most frequently asked questions concerning the system.
Navigation
I cannot enter the navigation address.The address is not recognised.► Use the "intuitive method" by pressing the "Search…" button at the bottom of the "Navigation” page.The route calculation is not successful.The route settings may conflict with the current location (for example, if toll roads are excluded but the vehicle is on a toll road).► Check the route settings in the "Navigation" menu.I do not receive "Danger zone” alerts.You have not subscribed to the online services option.► If you have subscribed to the option:
- a few days may elapse before the service is activated,- services may not be selected in the system menu,- online services are not active ("TOMTOM TRAFFIC" not shown on the map).The POIs do not appear.The POIs have not been selected.► Set the zoom level to 600 ft (200 m) or select
POIs in the POI list.
The "Danger zone" audible warning feature is not working.The audible warning is not active or the volume is too low.► Activate the audible warning in the "Navigation" menu and check the voice volume in the sound settings.The system does not suggest a detour around an incident on the route.The route settings do not take account of TMC messages.► Configure the "Traffic info " function in the route settings list (Without, Manual or Automatic).I receive a warning about a "Danger area" that is not on my route.As well as providing guided navigation, the system announces all "Danger areas" positioned in a cone located in front of the vehicle. It may provide an alert for "Danger areas" located on nearby or parallel roads.► Zoom the map to show the exact location of the "Danger area". You can select "On the
route" to stop receiving warnings or decrease the warning duration.Certain traffic jams along the route are not indicated in real time.On starting, a few minutes may elapse before the system begins to receive traffic information.► Wait until traffic information is being received correctly (traffic information icons shown on the map).
In certain countries, only major routes (motorways, etc.) are listed for the traffic information.This is perfectly normal. The system is dependent on the traffic information available.The altitude is not displayed.On starting, GPS initialisation may take up to 3 minutes to receive more than 4 satellites correctly.► Wait until the system has started up completely so that there is GPS coverage by at least 4 satellites.Depending on the geographical environment (tunnel, etc.) or the weather, the conditions of reception of the GPS signal may vary.This behaviour is normal. The system is dependent on the GPS signal reception conditions.My navigation is no longer connected.During start-up and in certain geographical areas, the connection may be unavailable.► Check that the online services are activated (settings, contract).