2022 TOYOTA HIGHLANDER wheel torque
[x] Cancel search: wheel torquePage 88 of 568

882-1. Instrument cluster
Dynamic radar cruise control
with full-speed range
( P.257)
Select to enable selection of an
audio source or track on the
meter using the meter control
switches.
This menu icon can be set to be
displayed/not displayed in .
■Drive information
2 items that are selected using
the “Drive Info Items” setting
(average speed, distance and
total time) can be displayed ver-
tically.
The displayed information
changes according to the “Drive
Info Type” setting (since the sys-
tem was started or between
resets). ( P.89)
Use the displayed information
as a reference only.
Following items will be dis-
played.
“Trip”
• “Average Speed”: Displays the
average vehicl e speed since
engine start
*
• “Distance”: Displ ays the distance driven since engine start
*
• “Total Time”: Displays the elapsed
time since engine start
*
*
: These items are r eset each time
the engine stops.
“Total”
• “Average Speed”: Displays the
average vehicle speed since the
display was reset
*
• “Distance”: Displ ays the distance
driven since the display was
reset
*
• “Total Time”: Displays the elapsed
time since the display was reset
*
*
: To reset, display the desired item and press and hold .
■Tire pressure
P.420
■AWD Control (if equipped)
The illustration used is intended as
an example, and may differ from the
image that is actually displayed on
the multi-information display.
Torque distribution display
Displays the drive status of each
wheel in 6 steps from 0 to 5.
G-force display*
Displays the size a nd direction of
Audio system-linked dis-
play ( )
Vehicle information dis-
play ( )
Page 97 of 568

972-1. Instrument cluster
2
Vehicle status information and indicators
When “Refuel” is displayed, the
remaining fuel amount is low and
the distance that can be driven with
the remaining fuel cannot be calcu-
lated.
Refuel immediately.
■Eco Driving Indicator
Eco Driving Indica tor will not oper-
ate under the following conditions:
●The shift lever is in any position
other than D.
●The driving mode is set to sport
mode.
●The vehicle speed is approxi-
mately 80 mph (130 km/h) or
higher.
■Driving support system
information
Select to display the operational
status of the following systems:
LTA (Lane Tracing Assist)
( P.246)
RSA (Road Sign Assist) (if
equipped) ( P.269)
Dynamic radar cruise control
with full-speed range
( P.257)
■Navigation system-linked
display (if equipped)
Select to display the following
navigation system-linked infor-
mation:
Route guidance to destination
Compass display (head-
ing-up display)
■Route guidance to destination
display
When the route guidance to destina-
tion display is enabled on the
head-up display, it will not be dis-
played on the multi-information dis-
play. ( P.105)
Select to enable selection of an
audio source or track on the
meter using the meter control
switches.
This menu icon can be set to be
displayed/not displayed in .
■Tire pressure
P.420
■AWD Control (if equipped)
The illustration used is intended as
an example, and may differ from the
image that is actually displayed on
the multi-information display.
Torque distribution display
Displays the drive status of each
wheel in 6 steps from 0 to 5.
Driving support system
information display ( )
Audio system-linked dis-
play ( )
Vehicle information dis-
play ( )
Page 201 of 568

2014-1. Before driving
4
Driving
Dinghy towing
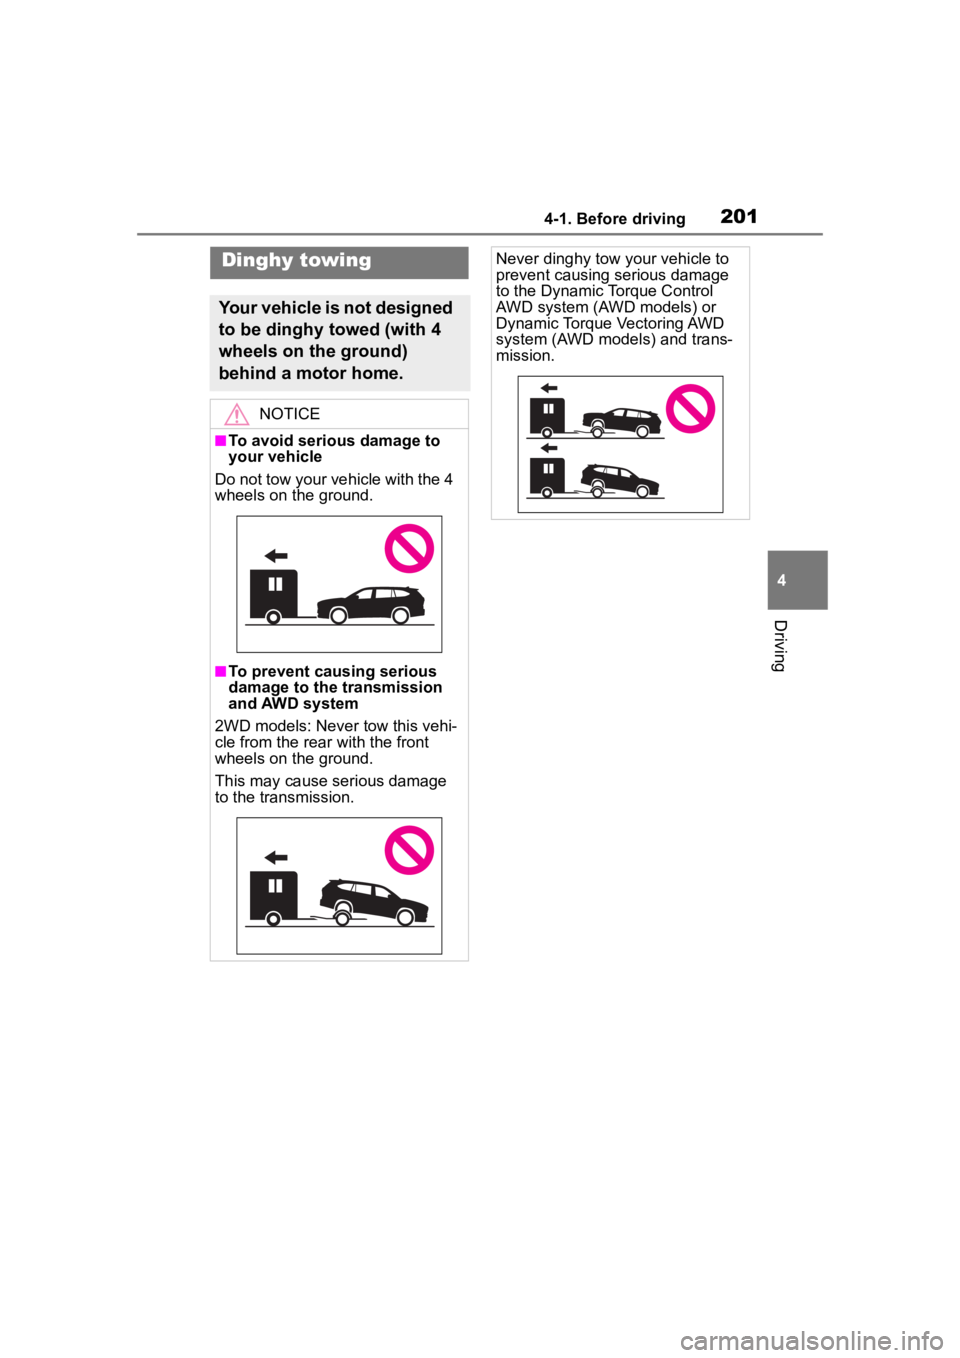
Your vehicle is not designed
to be dinghy towed (with 4
wheels on the ground)
behind a motor home.
NOTICE
■To avoid serious damage to
your vehicle
Do not tow your vehicle with the 4
wheels on the ground.
■To prevent causing serious
damage to the transmission
and AWD system
2WD models: Never tow this vehi-
cle from the rear with the front
wheels on the ground.
This may cause serious damage
to the transmission.
Never dinghy tow your vehicle to
prevent causing serious damage
to the Dynamic Torque Control
AWD system (AWD models) or
Dynamic Torque Vectoring AWD
system (AWD models) and trans-
mission.
Page 318 of 568

3184-5. Using the driving support systems
■ABS (Anti-lock Brake Sys-
tem)
Helps to prevent wheel lock
when the brakes are applied
suddenly, or if the brakes are
applied while driving on a slip-
pery road surface
■Brake assist
Generates an increased level of
braking force after the brake
pedal is depressed when the
system detects a panic stop sit-
uation
■VSC (Vehicle Stability Con-
trol)
Helps the driver to control skid-
ding when swerving suddenly or
turning on slippery road sur-
faces
■Enhanced VSC (Enhanced
Vehicle Stability Control)
Provides cooperative control of
the ABS, TRAC, VSC and EPS.
Helps to maintain directional
stability when swerving on slip-
pery road surfaces by con-
trolling steering performance.
■Trailer Sway Control
Helps the driver to control trailer
sway by selectively applying
brake pressure for individual
wheels and reducing driving
torque when trailer sway is
detected.
■TRAC (Traction Control)
Helps to maintain drive power
and prevent the drive wheels
from spinning when starting the
vehicle or accelerating on slip-
pery roads
■Active Cornering Assist
(ACA)
Helps to prevent the vehicle
from drifting to the outer side by
performing inner wheel brake
control when attempting to
accelerate while turning
■Hill-start assist control
Helps to reduce the backward
movement of the vehicle when
starting on an uphill
■EPS (Electric Power Steer-
ing)
Employs an electric motor to
reduce the amount of effort
needed to turn the steering
Driving assist systems
To keep driving safety and
performance, the following
systems operate automati-
cally in response to various
driving situations. Be
aware, however, that these
systems are supplementary
and should not be relied
upon too heavily when oper-
ating the vehicle.
Summary of the driving
assist systems
Page 319 of 568

3194-5. Using the driving support systems
4
Driving
wheel
■Dynamic Torque Control
AWD system (AWD models)
Automatically switches from
front-wheel drive to all-wheel
drive (AWD) according to the
driving conditions, helping to
ensure reliable handling and
stability. Examples of conditions
where the system will switch to
AWD are when cornering, going
uphill, starting off or accelerat-
ing, and when the road surface
is slippery due to snow, rain, etc.
■Dynamic Torque Vectoring
AWD system (AWD models)
Automatically switches from
front-wheel drive to all-wheel
drive (AWD) according to the
driving conditions, helping to
ensure reliable handling and
stability. Examples of conditions
where the system will switch to
AWD are when cornering, going
uphill, starting off or accelerat-
ing, and when the road surface
is slippery due to snow, rain, etc.
Also, when the vehicle is corner-
ing, the drive torque distribution
between the front and rear
wheels and between the rear left
and right wheels is precisely
controlled to improve drivability
and stability.
■The Secondary Collision
Brake
When the SRS airbag sensor
detects a collision and the sys- tem operates, the brakes and
brake lights are automatically
controlled to reduce the vehicle
speed and help reduce the pos-
sibility of further damage due to
a secondary collision.
■When the TRAC/VSC/Trailer
Sway Control systems are oper-
ating
The slip indicator light will flash
while the TRAC/VSC/Trailer Sway
Control systems are operating.
■Disabling the TRAC system
If the vehicle gets stuck in mud, dirt
or snow, the TRAC system may
reduce power from the engine to the
wheels. Pressing the switch to
turn the system off may make it eas-
ier for you to rock the vehicle in
order to free it.
To turn the TRAC system off, quickly
press and release the switch.
The “Traction Cont rol Turned OFF”
will be shown on the multi-informa-
tion display.
Press the switch again to turn
the system back on.
Page 322 of 568

3224-5. Using the driving support systems
WARNING
●When driving over bumps in the
road
●When driving over roads with
potholes or uneven surfaces
■TRAC/VSC may not operate
effectively when
Directional control and power may
not be achievable while driving on
slippery road surfaces, even if the
TRAC/VSC system is operating.
Drive the vehicle carefully in con-
ditions where stability and power
may be lost.
■Active Cornering Assist does
not operate effectively when
●Do not overly rely on Active
Cornering Assist. Active Corner-
ing Assist may not operate
effectively when accelerating
down slopes or driving on slip-
pery road surfaces.
●When Active Cornering Assist
frequently operates, Active Cor-
nering Assist may temporarily
stop operating to ensure proper
operation of the brakes, TRAC
and VSC.
■Hill-start assist control does
not operate effectively when
●Do not overly rely on hill-start
assist control. Hill-start assist
control may not operate effec-
tively on steep inclines and
roads covered with ice.
●Unlike the parking brake,
hill-start assist control is not
intended to hold the vehicle sta-
tionary for an extended period
of time. Do not attempt to use
hill-start assist control to hold
the vehicle on an incline, as
doing so may lead to an acci-
dent.
■When the TRAC/VSC/Trailer
Sway Control is activated
The slip indicator light flashes.
Always drive carefully. Reckless
driving may cause an accident.
Exercise particula r care when the
indicator light flashes.
■When the TRAC/VSC/Trailer
Sway Control systems are
turned off
●Be especially careful and drive
at a speed appropriate to the
road conditions. As these are
the systems to help ensure
vehicle stability and driving
force, do not turn the
TRAC/VSC/Trailer Sway Con-
trol systems off unless neces-
sary.
●Trailer Sway Control is part of
the VSC system and will not
operate if VSC is turned off or
experiences a malfunction.
■Dynamic Torque Vectoring
AWD system
The cornering performance of the
AWD system has been improved.
However, do not overly rely on the
system and drive with caution.
■Replacing tires
Make sure that all tires are of the
specified size, brand, tread pat-
tern and total load capacity. In
addition, make sure that the tires
are inflated to the recommended
tire inflation p ressure level.
The ABS, TRAC, Trailer Sway
Control and VSC systems will not
function correctly if different tires
are installed on the vehicle.
Contact your Toyota dealer for fur-
ther information when replacing
tires or wheels.
Page 452 of 568

4527-2. Steps to take in an emergency
The following may indicate a
problem with your transmission.
Contact your Toyota dealer or
commercial towing service
before towing.
The engine is running but the
vehicle does not move.
The vehicle makes an abnor-
mal sound.
WARNING
■While towing
When towing using cables or
chains, avoid sudden starts, etc.
which place excessive stress on
the towing eyelets, cables or
chains. The towing eyelets,
cables or chains may become
damaged, broken debris may hit
people, and cause serious dam-
age.
NOTICE
■To prevent damage to the
vehicle when towing using a
wheel-lift type truck
When raising the vehicle, ensure
adequate ground clearance for
towing at the opposite end of the
raised vehicle. Without adequate
clearance, the vehicle could be
damaged while being towed.
■To prevent damage to the
vehicle when towing with a
sling-type truck
Do not tow with a sling-type truck,
either from the front or rear.
■To prevent damage to the
vehicle during emergency
towing
Do not secure cables or chains to
the suspension components.
■When towing a vehicle
equipped with a Stop & Start
system (if equipped)
If it is necessary to tow the vehicle
with all 4 wheels on the ground,
perform the following procedure
before towing the vehicle, in order
to protect t he system.
Turn the engine switch off and
then start the engine or turn the
engine switch to ON.
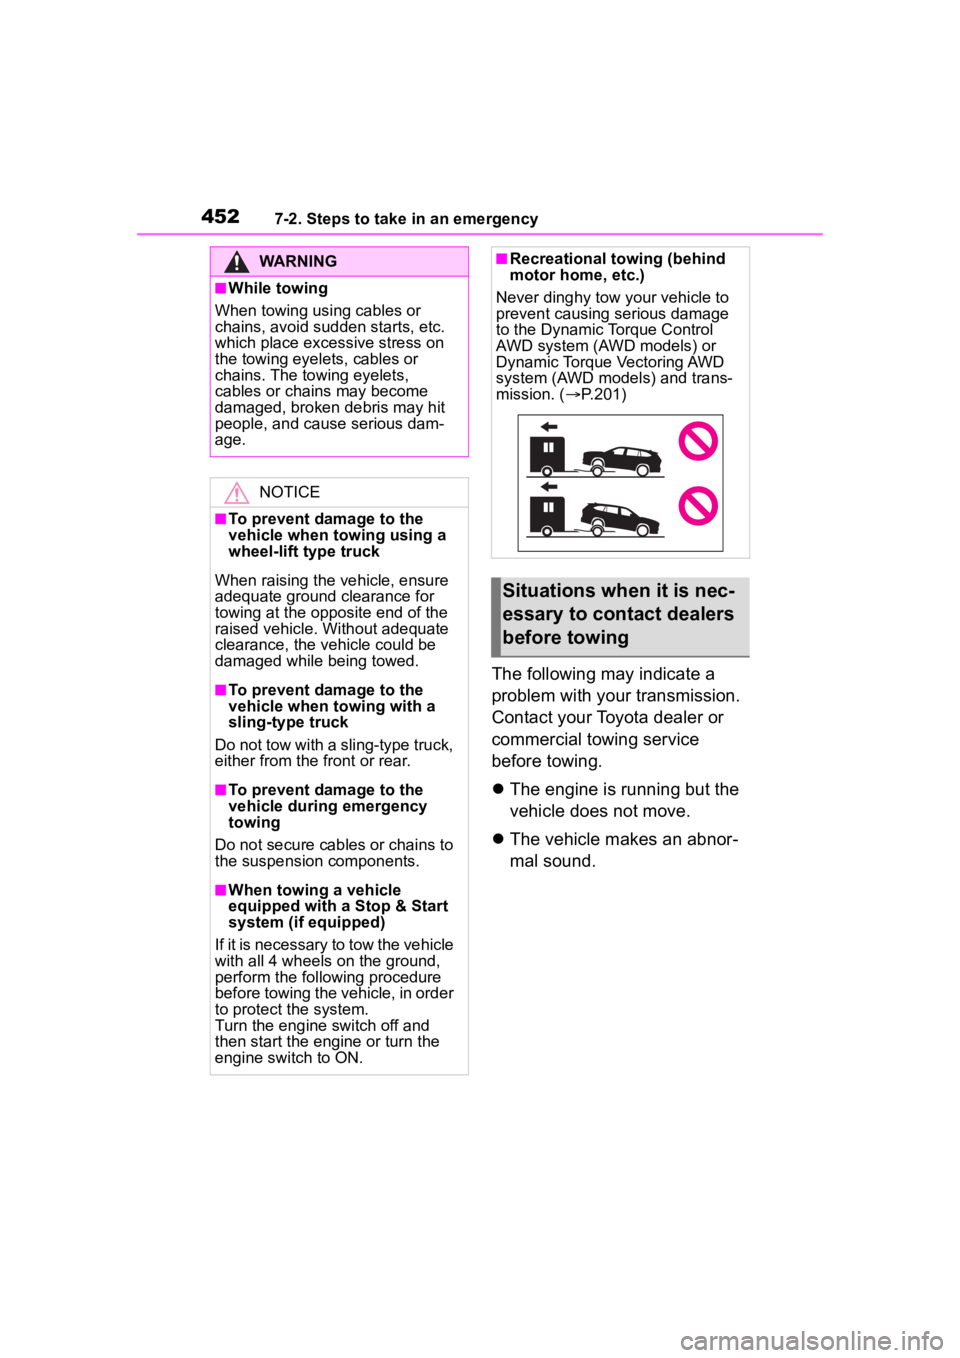
■Recreational towing (behind
motor home, etc.)
Never dinghy tow your vehicle to
prevent causing serious damage
to the Dynamic Torque Control
AWD system (AWD models) or
Dynamic Torque Vectoring AWD
system (AWD models) and trans-
mission. ( P.201)
Situations when it is nec-
essary to contact dealers
before towing
Page 472 of 568

4727-2. Steps to take in an emergency
When replacing tires on a vehi-
cle with wheel lock nuts, use the
following procedures to remove
and install the wheel lock nuts.
The wheel lock key is stored in
the tray inside the luggage com- partment. Always return the
wheel lock key to its original
position after use, so that it does
not get lost. (
P.472)
■Removal
For ease of removal, the wheel
lock nut should always be the
first one loosened.
1 Place the wheel lock key on
top of the wheel lock nut,
turning until the wheel lock
key and wheel lock nut pat-
terns engage.
2 Place the wheel nut wrench
on the wheel lock key, and
while applying pressure on
the wheel lock key, loosen
the wheel lock nut.
■Installation
For ease of installation, the
wheel lock nut should always be
the last one tightened.
1 By hand, install a wheel lock
nut on each wheel.
2 Place the wheel lock key on
top of the wheel lock nut,
turning until the wheel lock
key and wheel lock nut pat-
terns engage.
3 Place the wheel nut wrench
on the wheel lock key, and
while applying pressure on
the wheel lock key, tighten
the wheel lock nut to the rec-
ommended torque.
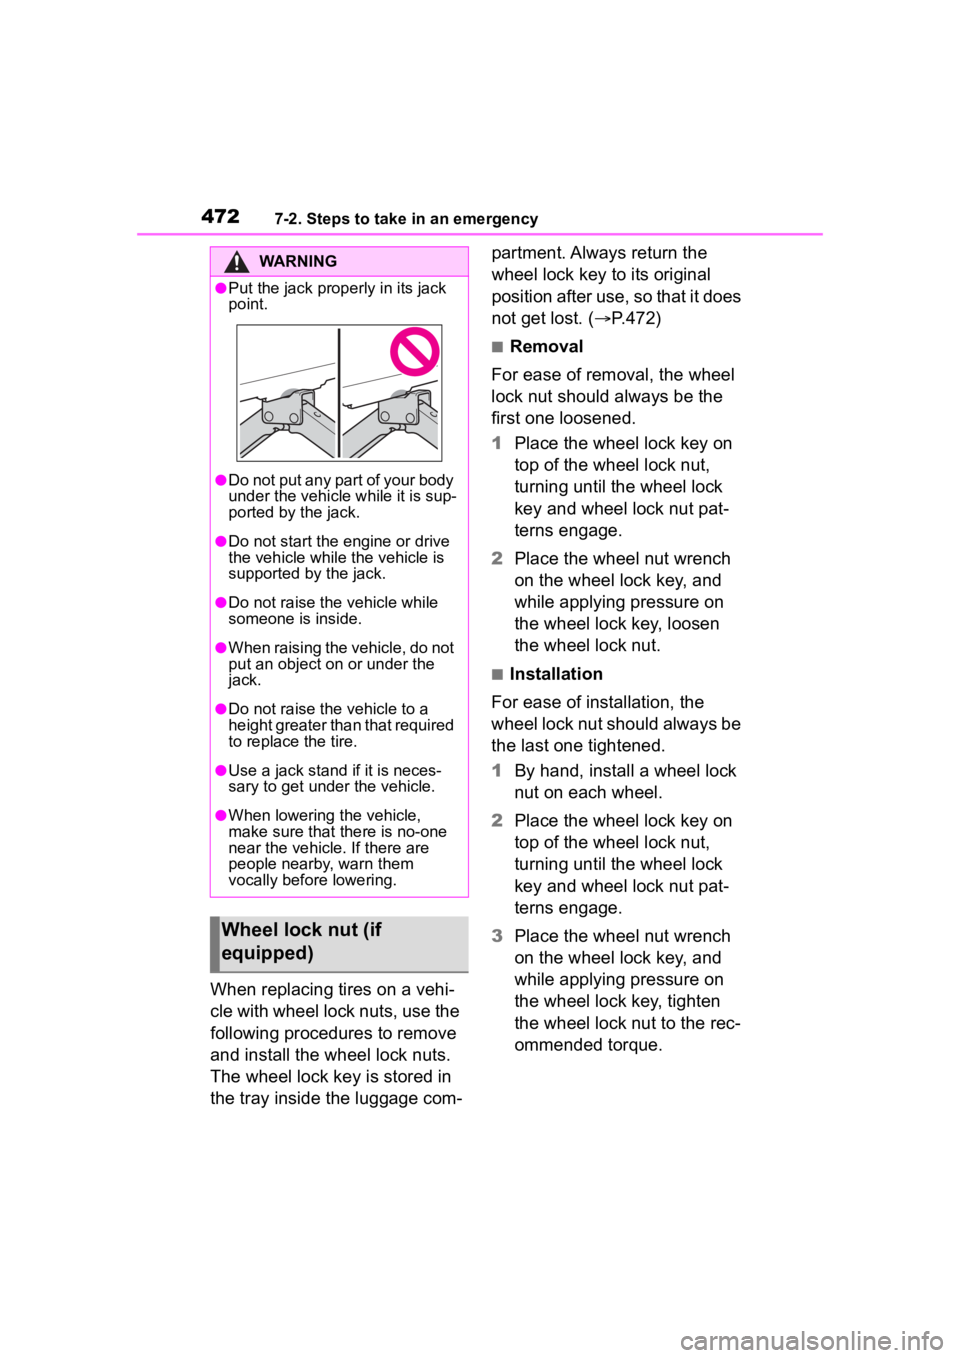
WARNING
●Put the jack prope rly in its jack
point.
●Do not put any part of your body
under the vehicle while it is sup-
ported by the jack.
●Do not start the engine or drive
the vehicle while the vehicle is
supported by the jack.
●Do not raise the vehicle while
someone is inside.
●When raising the vehicle, do not
put an object on or under the
jack.
●Do not raise the vehicle to a
height greater than that required
to replace the tire.
●Use a jack stand if it is neces-
sary to get under the vehicle.
●When lowering the vehicle,
make sure that there is no-one
near the vehicle. If there are
people nearby, warn them
vocally before lowering.
Wheel lock nut (if
equipped)