2022 TOYOTA HIGHLANDER door lock
[x] Cancel search: door lockPage 404 of 568

4046-2. Maintenance
The OBD system determines
that a problem exists some-
where in the emission control
system. Your vehicle may not
pass the I/M test and may need
to be repaired. Contact your
Toyota dealer to service the
vehicle.
When the battery is discon-
nected or discharged
Readiness codes that are set
during ordinary driving are erased.
Also, depending on your driving
habits, the readiness codes may
not be completely set.
When the fuel tank cap is
loose
Vehicle exterior
ItemsCheck points
Doors
• Do the doors
operate
smoothly?
Engine hood
• Does the engine hood lock system
work properly?
Fluid leaks
• There should not be any signs of
fluid leakage
after the vehicle
has been parked.
Tires
• Is the tire infla-tion pressure
correct?
• The tires should not be damaged
or excessively
worn.
• Have the tires been rotated
according to the
maintenance
schedule?
• The wheel nuts should not be
loose.
Windshield
wipers/rear
window wiper
• The wiper blades should not show
any signs of
cracking, split-
ting, wear, con-
tamination or
deformation.
• The wiper blades should clear the
windshield/rear
window without
streaking or skip-
ping.
Emission inspection
and maintenance (I/M)
programs
Some states have vehicle
emission inspection pro-
grams which include OBD
(On Board Diagnostics)
checks. The OBD system
monitors the operation of
the emission control sys-
tem.
If the malfunction indica-
tor lamp comes on
Your vehicle may not pass
the I/M test in the follow-
ing situations:
Page 415 of 568

4156-3. Do-it-yourself maintenance
6
Maintenance and care
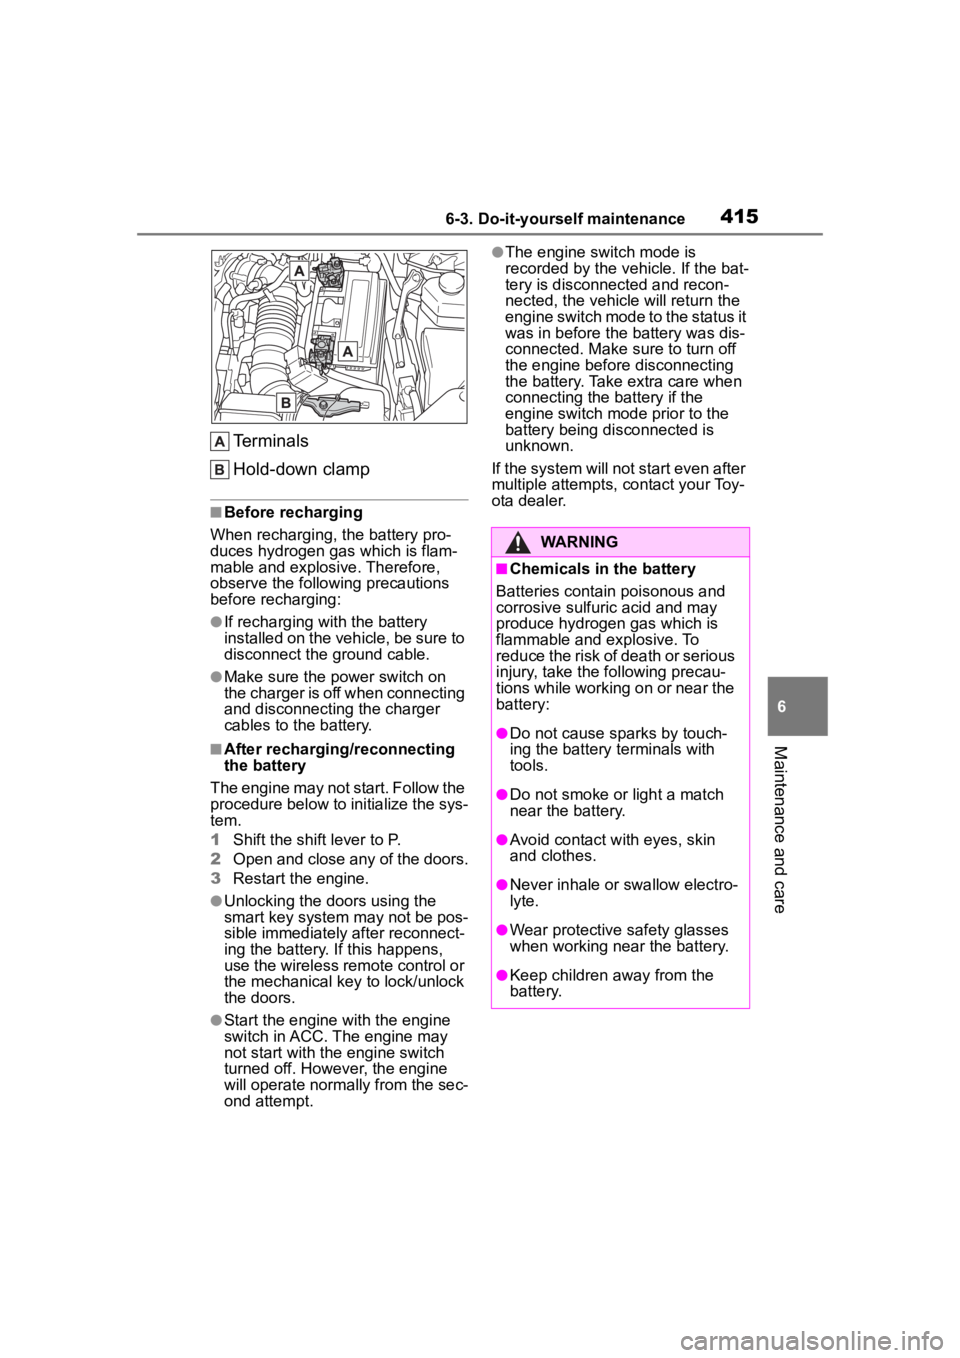
Terminals
Hold-down clamp
■Before recharging
When recharging, t he battery pro-
duces hydrogen ga s which is flam-
mable and explosive. Therefore,
observe the following precautions
before recharging:
●If recharging wi th the battery
installed on the vehicle, be sure to
disconnect the ground cable.
●Make sure the power switch on
the charger is off when connecting
and disconnecting the charger
cables to the battery.
■After recharging/reconnecting
the battery
The engine may not start. Follow the
procedure below to initialize the sys-
tem.
1 Shift the shift lever to P.
2 Open and close any of the doors.
3 Restart the engine.
●Unlocking the doors using the
smart key system may not be pos-
sible immediately after reconnect-
ing the battery. If this happens,
use the wireless remote control or
the mechanical key to lock/unlock
the doors.
●Start the engine with the engine
switch in ACC. The engine may
not start with the engine switch
turned off. However, the engine
will operate normally from the sec-
ond attempt.
●The engine switch mode is
recorded by the vehicle. If the bat-
tery is disconnected and recon-
nected, the vehicle will return the
engine switch mode to the status it
was in before the battery was dis-
connected. Make sure to turn off
the engine before disconnecting
the battery. Take extra care when
connecting the battery if the
engine switch mode prior to the
battery being disconnected is
unknown.
If the system will not start even after
multiple attempts, contact your Toy-
ota dealer.
WARNING
■Chemicals in the battery
Batteries contain poisonous and
corrosive sulfur ic acid and may
produce hydrogen gas which is
flammable and explosive. To
reduce the risk of death or serious
injury, take the following precau-
tions while working on or near the
battery:
●Do not cause sparks by touch-
ing the battery terminals with
tools.
●Do not smoke or light a match
near the battery.
●Avoid contact with eyes, skin
and clothes.
●Never inhale or swallow electro-
lyte.
●Wear protective safety glasses
when working near the battery.
●Keep children away from the
battery.
Page 441 of 568

4416-3. Do-it-yourself maintenance
6
Maintenance and care
securely installed and turn the lights
and turn signal lights on to visually
check that there is no light leaking
from between the bulb base and
light unit.
■Front side marker lights
1 Turn the bulb base counter-
clockwise and remove it.
2 Remove the light bulb.
3 Install a new light bulb, and
then install the bulb base to
the light unit by inserting it
and turning the bulb base
clockwise.
After installing th e bulb base, wig- gle it lightly to make sure it is
securely installed a
nd turn the lights
on to visually check that there is no
light leaking from between the bulb
base and light unit.
■Rear turn signal lights
1 Open the back door and
using a flathead screwdriver,
remove the cover.
To prevent damage to the vehicle,
wrap the tip of th e flathead screw-
driver with tape, etc.
2 Remove the securing 2
screws and light unit.
Remove the light u nit by pulling it
straight back from the rear of the
Page 443 of 568

4436-3. Do-it-yourself maintenance
6
Maintenance and care
8Install the 2 screws.
9 Install the cover.
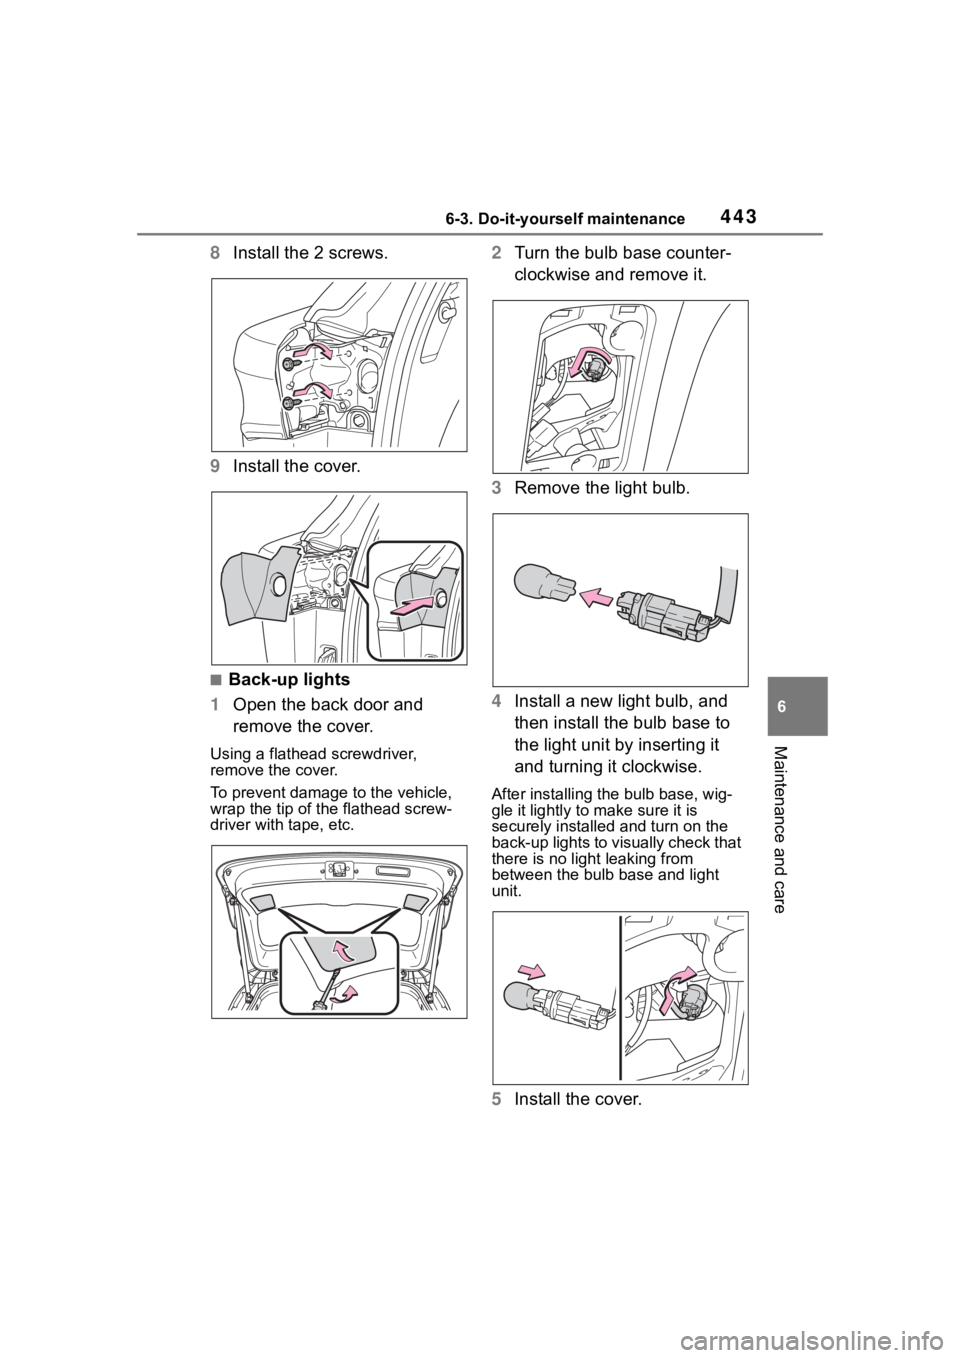
■Back-up lights
1 Open the back door and
remove the cover.
Using a flathead screwdriver,
remove the cover.
To prevent damage to the vehicle,
wrap the tip of the flathead screw-
driver with tape, etc.
2Turn the bulb base counter-
clockwise and remove it.
3 Remove the light bulb.
4 Install a new light bulb, and
then install the bulb base to
the light unit by inserting it
and turning it clockwise.
After installing the bulb base, wig-
gle it lightly to make sure it is
securely installed and turn on the
back-up lights to visually check that
there is no light leaking from
between the bulb base and light
unit.
5Install the cover.
Page 487 of 568

4877-2. Steps to take in an emergency
7
When trouble arises
■When the electronic key does
not work properly
●Make sure that the smart key sys-
tem has not been deactivated in
the customization setting. If it is
off, turn the function on. (Custom-
izable features: P.521)
●Check if battery-saving mode is
set. If it is set, cancel the function.
( P.135)
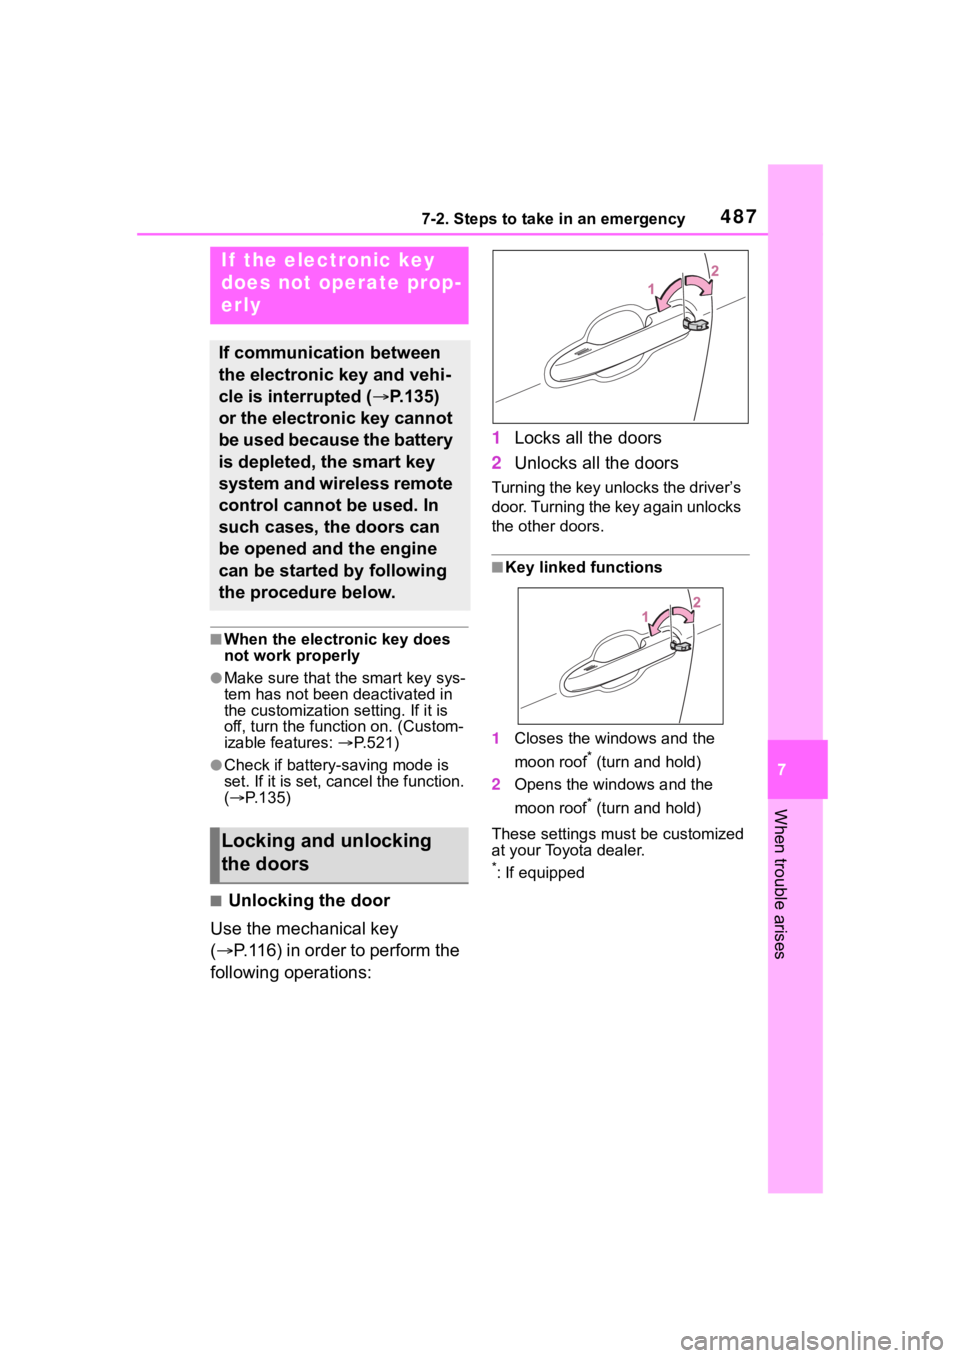
■Unlocking the door
Use the mechanical key
( P.116) in order to perform the
following operations: 1
Locks all the doors
2 Unlocks all the doors
Turning the key unlocks the driver’s
door. Turning the key again unlocks
the other doors.
■Key linked functions
1 Closes the windows and the
moon roof
* (turn and hold)
2 Opens the windows and the
moon roof
* (turn and hold)
These settings mus t be customized
at your Toyota dealer.
*: If equipped
If the electronic key
does not operate prop-
erly
If communication between
the electronic key and vehi-
cle is interrupted ( P.135)
or the electronic key cannot
be used because the battery
is depleted, the smart key
system and wireless remote
control cannot be used. In
such cases, the doors can
be opened and the engine
can be started by following
the procedure below.
Locking and unlocking
the doors
Page 489 of 568

4897-2. Steps to take in an emergency
7
When trouble arises
If you have a set of jumper (or
booster) cables and a second
vehicle with a 12-volt battery,
you can jump start your vehicle
by following the steps below.
1Confirm that the electronic
key is being carried.
Vehicles with an alarm: When con-
necting the jumper (or booster)
cables, depending on the situation,
the alarm may activate and doors
locked. ( P. 7 4 )
2 Open the hood. ( P.408)
3 Connect a positive jumper cable clamp to on your vehicle and
connect the clamp on the other end of the positive cable to on
the second vehicle. Then, connect a negative cable clamp to
If the vehicle batter y
is discharged
The following procedures
may be used to start the
engine if the vehicle’s bat-
tery is discharged.
You can also call your Toy-
ota dealer or a qualified
repair shop.
Restarting the engine
Page 491 of 568

4917-2. Steps to take in an emergency
7
When trouble arises
traffic.
■When the battery is removed or
discharged
●Information stored in the ECU is
cleared. When the battery is
depleted, have the vehicle
inspected at you r Toyota dealer.
●Some systems may require initial-
ization. ( P.533)
■When removing the battery ter-
minals
When the battery terminals are
removed, the information stored in
the ECU is cleared . Before remov-
ing the battery terminals, contact
your Toyota dealer.
■Charging the battery
The electricity stor ed in the battery
will discharge gradu ally even when
the vehicle is not i n use, due to nat-
ural discharge and the draining
effects of certain electrical appli-
ances. If the vehicle is left for a long
time, the battery may discharge,
and the engine ma y be unable to
start. (The battery recharges auto-
matically during driving.)
■After jump starting the vehicle
(Vehicles with Stop & Start sys-
tem)
Be sure to disable the Stop & Start
system so that the battery can be
charged. ( P.273)
■When recharging or replacing
the battery
●In some cases, i t may not be pos-
sible to unlock the doors using the
smart key system when the bat-
tery is discharged. Use the wire-
less remote control or the
mechanical key to lock or unlock
the doors.
●The engine may not start on the
first attempt after the battery has
recharged but will start normally
after the se cond attempt. This is
not a malfunction.
●The engine switch mode is memo- rized by the vehicle. When the
battery is reconnected, the system
will return to the mode it was in
before the bat
tery was dis-
charged. Before disconnecting the
battery, turn the engine switch off.
If you are unsure what mode the
engine switch wa s in before the
battery discharged, be especially
careful when reconnecting the
battery.
●Vehicles with power back door:
The power back door must be ini-
tialized. ( P.129)
●Vehicles with Stop & Start system:
The Stop & Start system may not
automatically stop the engine for
up to an hour.
■When replacing the battery
●Use a Central Degassing type bat-
tery (European Regulations).
●Vehicles with Stop & Start system:
Use a genuine battery specifically
designed for use with the Stop &
Start system or a battery with
equivalent specifications to a gen-
uine battery. If an unsupported
battery is used, Stop & Start sys-
tem functions may be restricted to
protect the battery.
Also, battery per formance may
decrease and the engine may not
be able to restart. Contact your
Toyota dealer for details.
●Vehicles without Stop & Start sys-
tem: Use a battery that the case
size is same as the previous one
(LN3), 20 hour rate capacity
(20HR) is equivalent (70Ah) or
greater, and per formance rating
(CCA) is equivalent (603A) or
greater.
Vehicles with Stop & Start system:
Use a battery that the case size is
same as the previous one (LN3), 20
hour rate capacity (20HR) is equiva-
lent (65Ah) or greater, and perfor-
mance rating (CCA) is equivalent
(603A) or greater.
• If the sizes differ, the battery can- not be properly secured.
Page 524 of 568

5248-2. Customization
■Head-up Display*(P.103)
*: If equipped
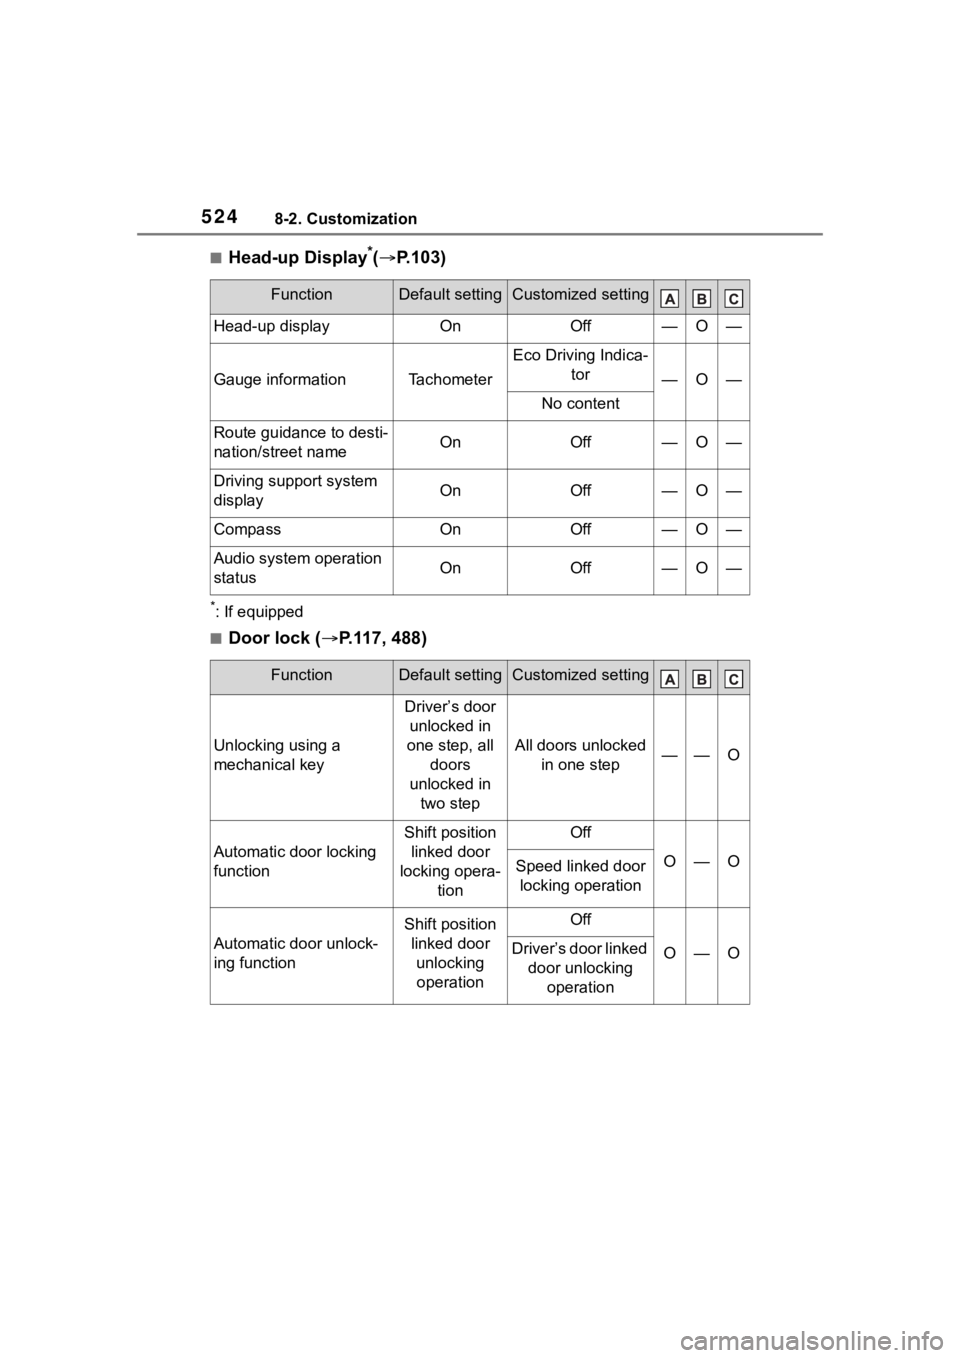
■Door lock ( P.117, 488)
FunctionDefault settingCustomized setting
Head-up displayOnOff—O—
Gauge informationTachometer
Eco Driving Indica-
tor
—O—
No content
Route guidance to desti-
nation/street nameOnOff—O—
Driving support system
displayOnOff—O—
CompassOnOff—O—
Audio system operation
statusOnOff—O—
FunctionDefault settingCustomized setting
Unlocking using a
mechanical key
Driver’s door unlocked in
one step, all doors
unlocked in two step
All doors unlocked in one step——O
Automatic door locking
function
Shift position linked door
locking opera- tionOff
O—OSpeed linked door locking operation
Automatic door unlock-
ing function
Shift position linked door unlocking operationOff
O—ODriver’s door linked door unlocking operation