2022 TOYOTA HIGHLANDER door lock
[x] Cancel search: door lockPage 203 of 568

2034-2. Driving procedures
4
Driving
■Customization
If the smart key system has been
deactivated in a customized setting,
refer to P.488.
1 Stop the vehicle completely.
2 Set the parking brake
( P.210), and shift the shift
lever to P.
Check the parking brake indicator
is illuminated.
3 Press the engine switch.
The engine will stop, and the meter
display will be extinguished.
4Release the brake pedal and
check that “ACCESSORY” or
“IGNITION ON” is not shown
on the multi-information dis-
play.
■Automatic engine shut off fea-
ture
●The vehicle is equipped with a
feature that automatically shuts off
the engine when the shift lever is
in P with the engine running for an
extended period.
●The engine will automatically shut
off after approxima tely 1 hour if it
has been left running while the
shift lever is in P.
●The timer for the automatic engine
shut off feature will reset if the
brake pedal is depressed or if the
shift lever is in a position other
than P.
●After the vehicle is parked, if the
door is locked with the door lock
switch ( P.120) from the inside or
the mechanical k ey from the out-
side, the automatic engine shut off
feature will be disab led. The timer
for the automatic engine shut off
feature will be re-enabled if the
driver’s door is opened.
WARNING
■When starting the engine
Always start the e ngine while sit-
ting in the driver’s seat. Do not
depress the accelerator pedal
while starting the engine under
any circumstances.
Doing so may cause an accident
resulting in death or serious injury.
NOTICE
■When starting the engine
●Do not race a cold engine.
●If the engine becomes difficult to
start or stalls frequently, have
your vehicle checked by your
Toyota dealer immediately.
■Symptoms indicating a mal-
function with the engine
switch
If the engine switch seems to be
operating somewh at differently
than usual, such as the switch
sticking slightly, there may be a
malfunction. Contact your Toyota
dealer immediately.
Stopping the engine
Page 211 of 568

2114-2. Driving procedures
4
Driving
Pull and hold the parking brake
switch if an emergency occurs and
it is necessary to operate the park-
ing brake while driving.
2Push the switch to release
the parking brake
• Operate the parking brake switch
while depressing the brake pedal.
• Parking brake automatic release function ( P.211)
Make sure that t he parking brake
indicator light and parking brake
light turn off.
If the parking brake indicator light
and parking brake light flashes,
operate the switch again. ( P.463)
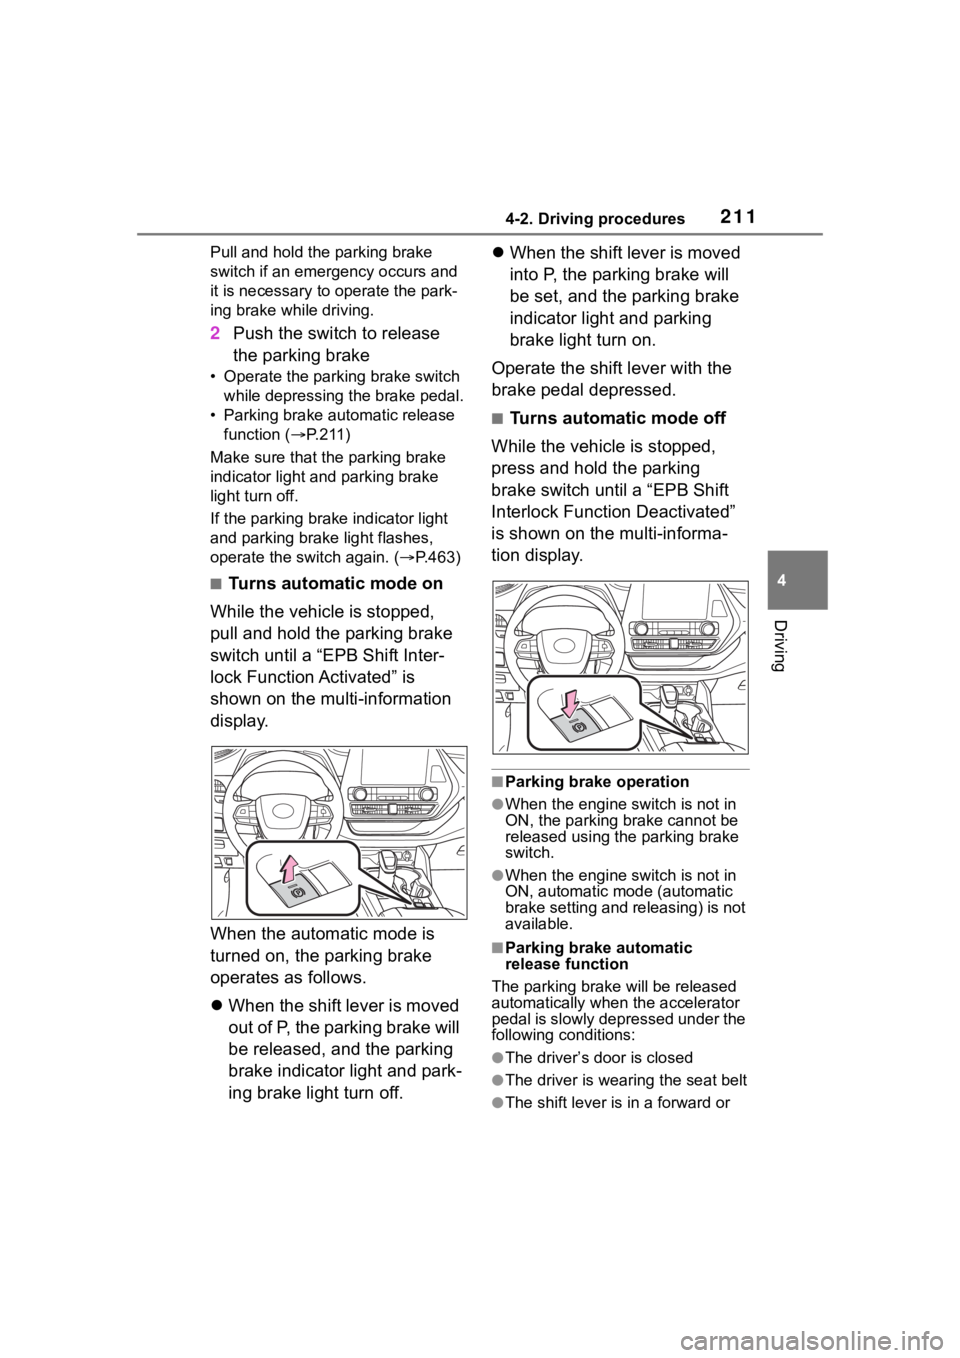
■Turns automatic mode on
While the vehicle is stopped,
pull and hold the parking brake
switch until a “EPB Shift Inter-
lock Function Activated” is
shown on the multi-information
display.
When the automatic mode is
turned on, the parking brake
operates as follows.
When the shift lever is moved
out of P, the parking brake will
be released, and the parking
brake indicator light and park-
ing brake light turn off.
When the shift lever is moved
into P, the parking brake will
be set, and the parking brake
indicator light and parking
brake light turn on.
Operate the shift lever with the
brake pedal depressed.
■Turns automatic mode off
While the vehicle is stopped,
press and hold the parking
brake switch until a “EPB Shift
Interlock Function Deactivated”
is shown on the multi-informa-
tion display.
■Parking brake operation
●When the engine switch is not in
ON, the parking brake cannot be
released using the parking brake
switch.
●When the engine switch is not in
ON, automatic mode (automatic
brake setting and releasing) is not
available.
■Parking brake automatic
release function
The parking brake will be released
automatically when the accelerator
pedal is slowly depressed under the
following conditions:
●The driver’s door is closed
●The driver is wearing the seat belt
●The shift lever is in a forward or
Page 217 of 568

2174-3. Operating the lights and wipers
4
Driving
■Headlight control sensor
The sensor may not function prop-
erly if an object is placed on the sen-
sor, or anything that blocks the
sensor is affixed to the windshield.
Doing so interfere s with the sensor
detecting the level of ambient light
and may cause the automatic head-
light system to malfunction.
■Automatic light off system
●When the headlights are on: The
headlights and tail lights turn off
30 seconds after a door is opened
and closed if the engine switch is
turned to ACC or OFF. (The lights
turn off immediately if on the
key is pressed afte r all the doors
are closed.)
●When only the tail lights are on:
The tail lights tu rn off automati-
cally if the engine switch is turned
to ACC or OFF an d the driver’s
door is opened.
Except for Canada: To turn the lights
on again, turn the engine switch to
ON, or turn the light switch off once
and then back to or .
For Canada: To tu rn the lights on
again, turn the engine switch to ON,
or turn the light s witch to once
and then back to or .
■Automatic headlight leveling
system (if equipped)
The level of the headlights is auto-
matically adjusted according to the
number of passengers and the load-
ing condition of the vehicle to
ensure that the headlights do not interfere with o
ther road users.
■Light reminder buzzer
A buzzer sounds when the engine
switch is turned off or turned to ACC
and the driver’s door is opened
while the lights are turned on.
■Welcome lighting
The parking lights and tail lights
automatically turn on at night when
the doors are un locked using the
entry function or wireless remote
control if the light switch is in the
position.
■Windshield wiper linked head-
light illumination
When driving during daytime with
the headlight switch turned to , if
the windshield wipers are used, the
headlights will turn o n automatically
after several se conds to help
enhance the visibility of your vehi-
cle.
■Battery-saving function
In order to prevent the battery of the
vehicle from discharging, if the
headlights and/or tail lights are on
when the engine switch is turned off
the battery saving function will oper-
ate and automatically turn off all the
lights after approximately 20 min-
utes. When the engine switch is
turned to ON, the battery-saving
function will be disabled.
When any of the following are per-
formed, the battery-saving function
is canceled once and then reacti-
vated. All the lights will turn off auto-
matically 20 minutes after the
battery-saving function has been
reactivated:
●When the headlight switch is oper-
ated
●When a door is opened or closed
■Customization
Some functions can be customized.
( P.521)
Page 224 of 568

2244-3. Operating the lights and wipers
the sensor sensitivity can be
adjusted by turning the switch
ring.
6Increases the sensitivity
7 Decreases the sensitivity
8 Washer/wiper dual
operation
Pulling the lever o perates the wip-
ers and washer.
The wipers will au tomatically oper-
ate a couple of times after the
washer squirts.
■The windshield wipers and
washer can be operated when
The engine switch is in ON.
■Dripping prevention wiper
sweep
After washing and wiping operation
several times, the wipers operate
one more time after a short delay to
prevent dripping. However, this
function will not operate while driv-
ing.
■Effects of vehicle speed on
wiper operation
Vehicle speed affects the intermit-
tent wiper interval.
■Raindrop sensor (vehicles with
rain-sensing windshield wipers)
●The raindrop sensor judges the
amount of raindrops.
An optical sensor is adopted. It
may not operate properly when
sunlight from the rising or setting
of the sun intermittently strikes the
windshield, or if bugs, etc. are
present on the windshield
●If the wiper switch i s turned to the
“AUTO” position while the engine
switch is in ON, the wipers will
operate once to show that AUTO
mode is activated.
●When the sensor sensitivity ring is
turned toward high while in
“AUTO” position, the wipers will
operate once to indicate that the
sensor sensitivity is enhanced.
●If the temperature of the raindrop
sensor is 185°F (85°C) or higher,
or 5°F (-15°C) or lower, automatic
operation may not occur. In this
case, operate the wipers in any
mode other than AUTO mode.
■If no windshield washer fluid
sprays
Check that the washer nozzles are
not blocked, if there is washer fluid
in the washer fluid tank.
■Front door opening linked wind-
shield wiper stop function
(vehicles with rain-sensing
windshield wipers)
When “AUTO” is selected and the
Page 225 of 568

2254-3. Operating the lights and wipers
4
Driving
windshield wipers are operating, if a
front door is opened, the operation
of the windshield wipers will be
stopped to prevent anyone enter-
ing/exiting the vehicle from being
sprayed by water from the wipers,
provided the vehicle is stopped with
the parking brake applied or the shift
lever in P. When the front door is
closed, wiper operation will resume.
Operating the switch
operates the rear wiper as fol-
lows.
1 (U.S.A.) or (Canada)
Off
2 (U.S.A.) or (Canada)
Intermittent operation
3 (U.S.A.) or (Canada)
Normal operation
WARNING
■Caution regarding the use of
windshield wipers in AUTO
mode (vehicles with
rain-sensing windshield wip-
ers)
The windshield wipers may oper-
ate unexpectedly if the sensor is
touched or the windshield is sub-
ject to vibration in AUTO mode.
Take care that your fingers, etc.
do not become caught in the
windshield wipers.
■Caution regarding the use of
washer fluid
When it is cold, do not use the
washer fluid until the windshield
becomes warm. The fluid may
freeze on the windshield and
cause low visibility. This may lead
to an accident, resulting in death
or serious injury.
NOTICE
■When the washer fluid tank is
empty
Do not operate the switch continu-
ally as the washer fluid pump may
overheat.
■When a nozzle becomes
blocked
In this case, contact your Toyota
dealer.
Do not try to clear it with a pin or
other object. The nozzle will be
damaged.
Rear windshield wiper
and washer
NOTICE
■When the rear window is dry
Do not use the wiper, as it may
damage the rear window.
Operating the wiper lever
Page 362 of 568

3625-3. Using the interior lights
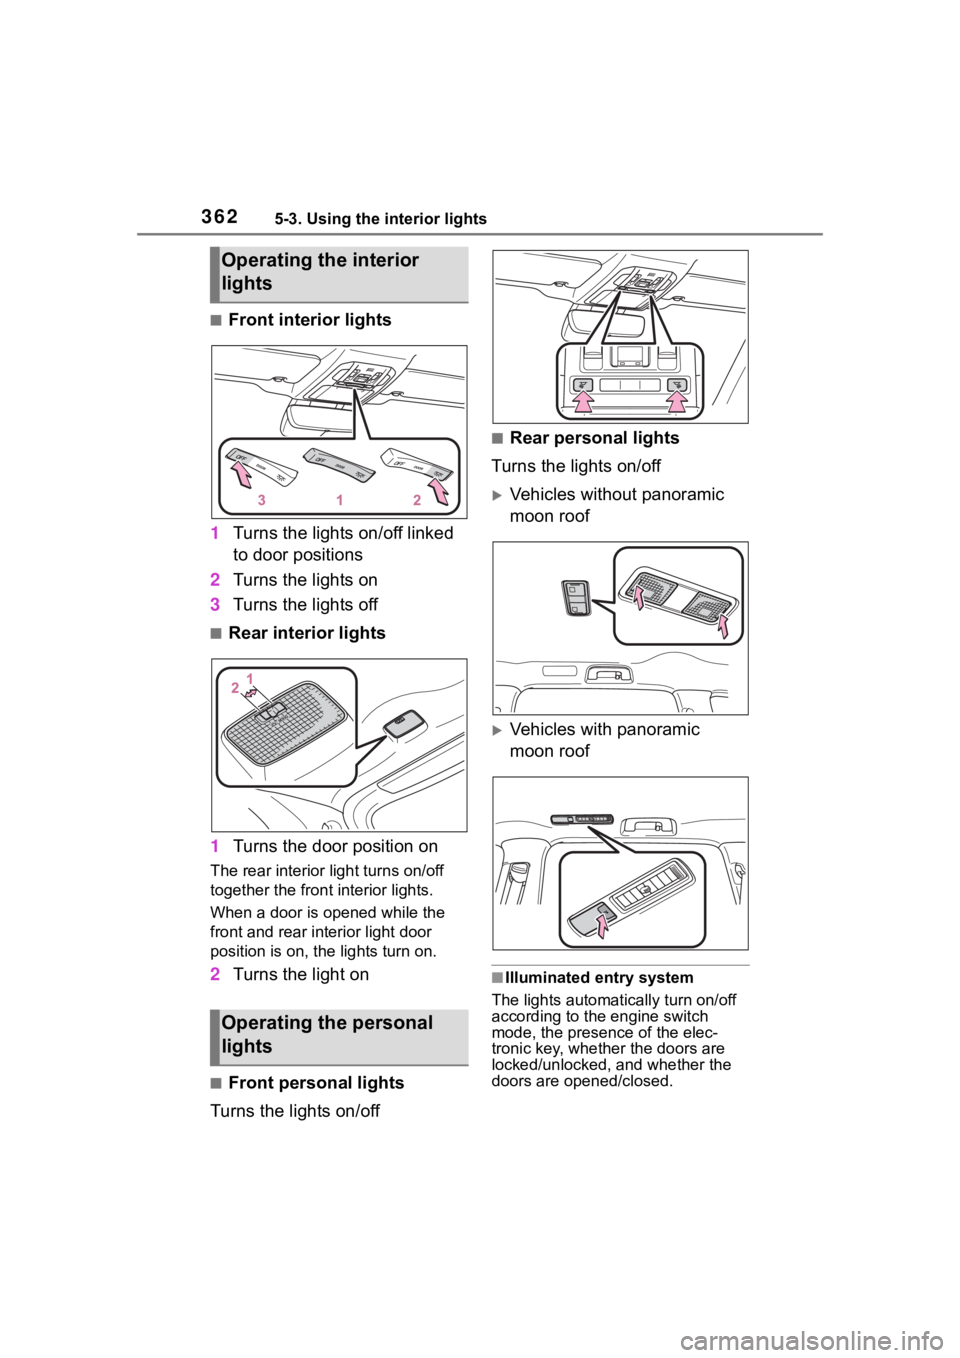
■Front interior lights
1 Turns the lights on/off linked
to door positions
2 Turns the lights on
3 Turns the lights off
■Rear interior lights
1 Turns the door position on
The rear interior light turns on/off
together the front interior lights.
When a door is opened while the
front and rear interior light door
position is on, the lights turn on.
2Turns the light on
■Front personal lights
Turns the lights on/off
■Rear personal lights
Turns the lights on/off
Vehicles without panoramic
moon roof
Vehicles with panoramic
moon roof
■Illuminated entry system
The lights automatically turn on/off
according to the engine switch
mode, the presence of the elec-
tronic key, whether the doors are
locked/unlocked, and whether the
doors are opened/closed.
Operating the interior
lights
Operating the personal
lights
Page 385 of 568

3855-5. Using the other interior features
5
Interior features
*: If equipped
■HomeLink® programming pro-
cedure
The programming procedures can
also be found at the following URL.
Website: www.homelink.com/toyota
For support, contact customer sup-
port at the following.
Help Line: 1-800-355-3515
The HomeLink® wireless control
system in your vehicle has 3
buttons which can be pro-
grammed to operate 3 different
devices. Refer to the program-
ming methods on the following
pages to determine the method
which is appropriate for the
device.
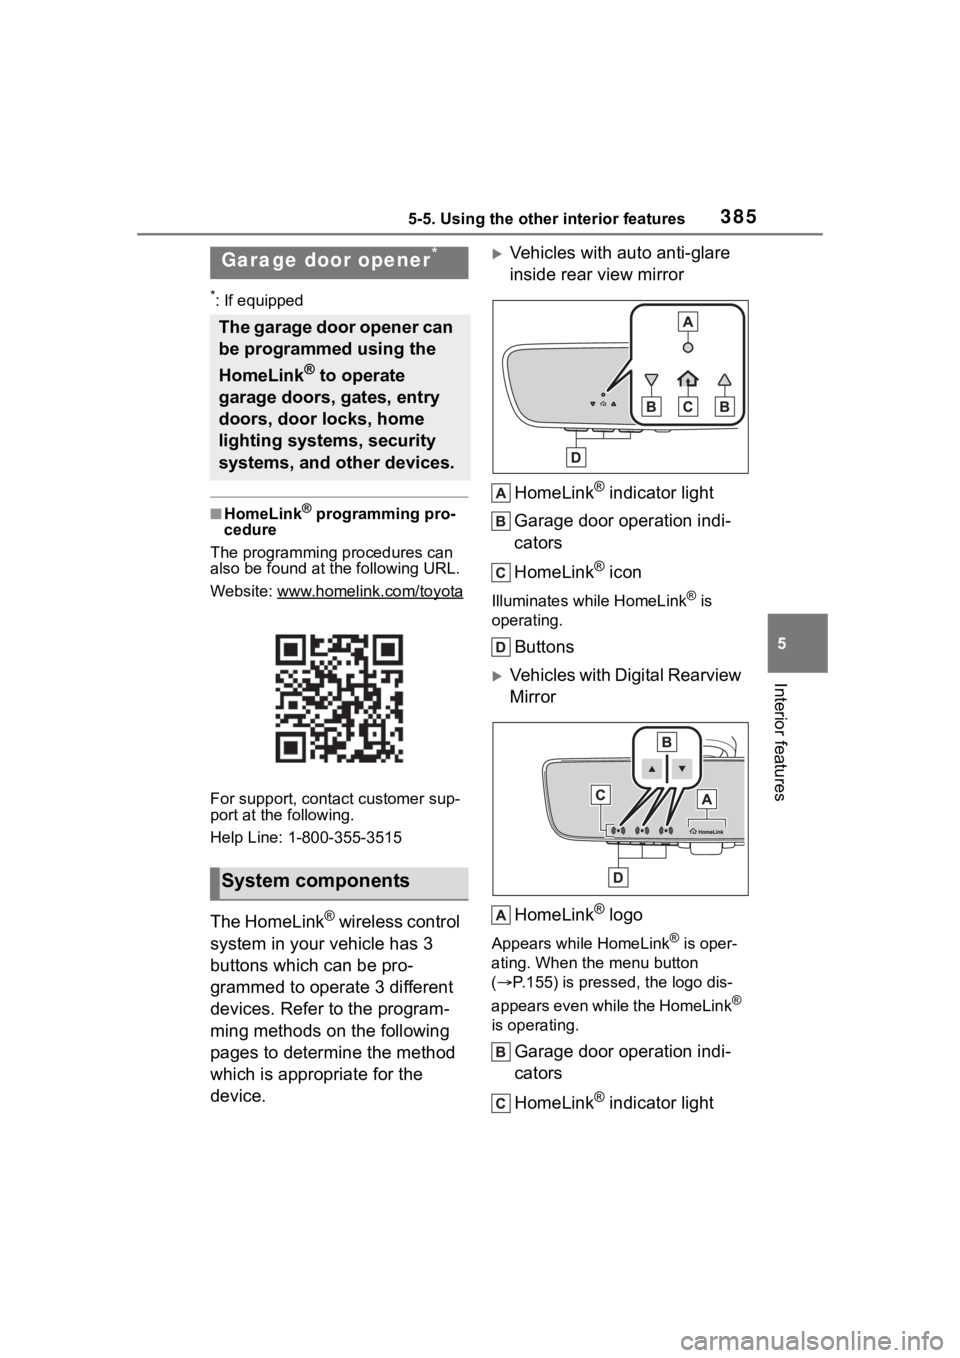
Vehicles with auto anti-glare
inside rear view mirror
HomeLink
® indicator light
Garage door operation indi-
cators
HomeLink
® icon
Illuminates while HomeLink® is
operating.
Buttons
Vehicles with Digital Rearview
Mirror
HomeLink
® logo
Appears while HomeLink® is oper-
ating. When the menu button
( P.155) is pressed, the logo dis-
appears even while the HomeLink
®
is operating.
Garage door operation indi-
cators
HomeLink
® indicator light
Garage door opener*
The garage door opener can
be programmed using the
HomeLink
® to operate
garage doors, gates, entry
doors, door locks, home
lighting systems, security
systems, and other devices.
System components
Page 394 of 568

3946-1. Maintenance and care
6-1.Maintenance and care
Working from top to bottom,
liberally apply water to the
vehicle body, wheel wells and
underside of the vehicle to
remove any dirt and dust.
Wash the vehicle body using
a sponge or soft cloth, such
as a chamois.
For hard-to-remove marks,
use car wash soap and rinse
thoroughly with water.
Wipe away any water.
Wax the vehicle when the
waterproof coating deterio-
rates.
If water does not bead on a clean
surface, apply wax when the vehi-
cle body is cool.
■Automatic car washes
●Before washing the vehicle:
• Fold the mirrors
• Turn off the power back door (if equipped)
Start washing from the front of the
vehicle. Extend the mirrors before
driving.
●Brushes used in automatic car
washes may scratch the vehicle
surface, parts (wheel, etc.) and harm your vehicle’s paint.
●Rear spoiler may not be washable
in some automatic car washes.
There may also be an increased
risk of damage to vehicle.
■High pressure car washes
As water may enter the cabin, do
not bring the nozzle tip near the
gaps around the doors or perimeter
of the windows, or spray these
areas continuously.
■When using a car wash
If the door handle becomes wet
while the electronic key is within the
effective range, the door may lock
and unlock repeatedly. In that case,
follow the following correction pro-
cedures to wash the vehicle:
●Place the key in a position 6 ft. (2
m) or more separate from the
vehicle while the vehicle is being
washed. (Take care to ensure that
the key is not stolen.)
●Set the electronic key to bat-
tery-saving mode to disable the
smart key system. ( P.134)
■Wheels and wheel ornaments
●Remove any dirt immediately by
using a neutral detergent.
●Wash detergent off with water
immediately after use.
●To protect the paint from damage,
make sure to obs erve the follow-
ing precautions.
• Do not use acidic, alkaline or abrasive detergent
• Do not use hard brushes
• Do not use detergent on the
wheels when they are hot, such
as after driving or parking in hot
weather
■Brake pads and calipers
Rust may form if the vehicle is
parked with wet brake pads or disc
rotors, causing them to stick. Before
parking the vehicle after it is
washed, drive slo wly and apply the
brakes several times to dry the
Cleaning and protect-
ing the vehicle exte-
rior
Perform cleaning in a man-
ner appropriate to each
component and its material.
Cleaning instructions