2022 TOYOTA HIGHLANDER ESP
[x] Cancel search: ESPPage 104 of 568
1042-1. Instrument cluster
Message display area (P.107)
The following pop-up displays will be displayed in certain situ ations:
• Warning/message
• Hands-free system status
• Audio system operation status
■Head-up display will operate
when
The engine switch is in ON.
■When using the head-up dis-
play
The head-up display may seem
dark or hard to see when viewed
through sunglasses, especially
polarized sunglasses. Adjust the
brightness of the head-up display or
remove your sunglasses.
■Outside temperature display
If the outside temperature becomes
approximately 37°F (3°C) or lower,
the low outside temperature indica-
tor will flash for 10 seconds then the
low outside temperature indicator
and outside temperature display will
turn off. The low outside tempera-
ture indicator will operate again if
the outside temperature becomes
approximately 41°F (5°C) or more
and then decreases to 37°F (3°C) or
lower.
■Changing settings of the
head-up display
Select on the multi-informa-
WARNING
■Before using the head-up dis-
play
●Check that the position and
brightness of the head-up dis-
play image does not interfere
with safe driving. Incorrect
adjustment of the image’s posi-
tion or brightness may obstruct
the driver’s view and lead to an
accident, resulting in death or
serious injury.
●Do not continuously look at the
head-up display while driving as
you may fail to see pedestrians,
objects on the road, etc. ahead
of the vehicle.
NOTICE
■To prevent damage to compo-
nents
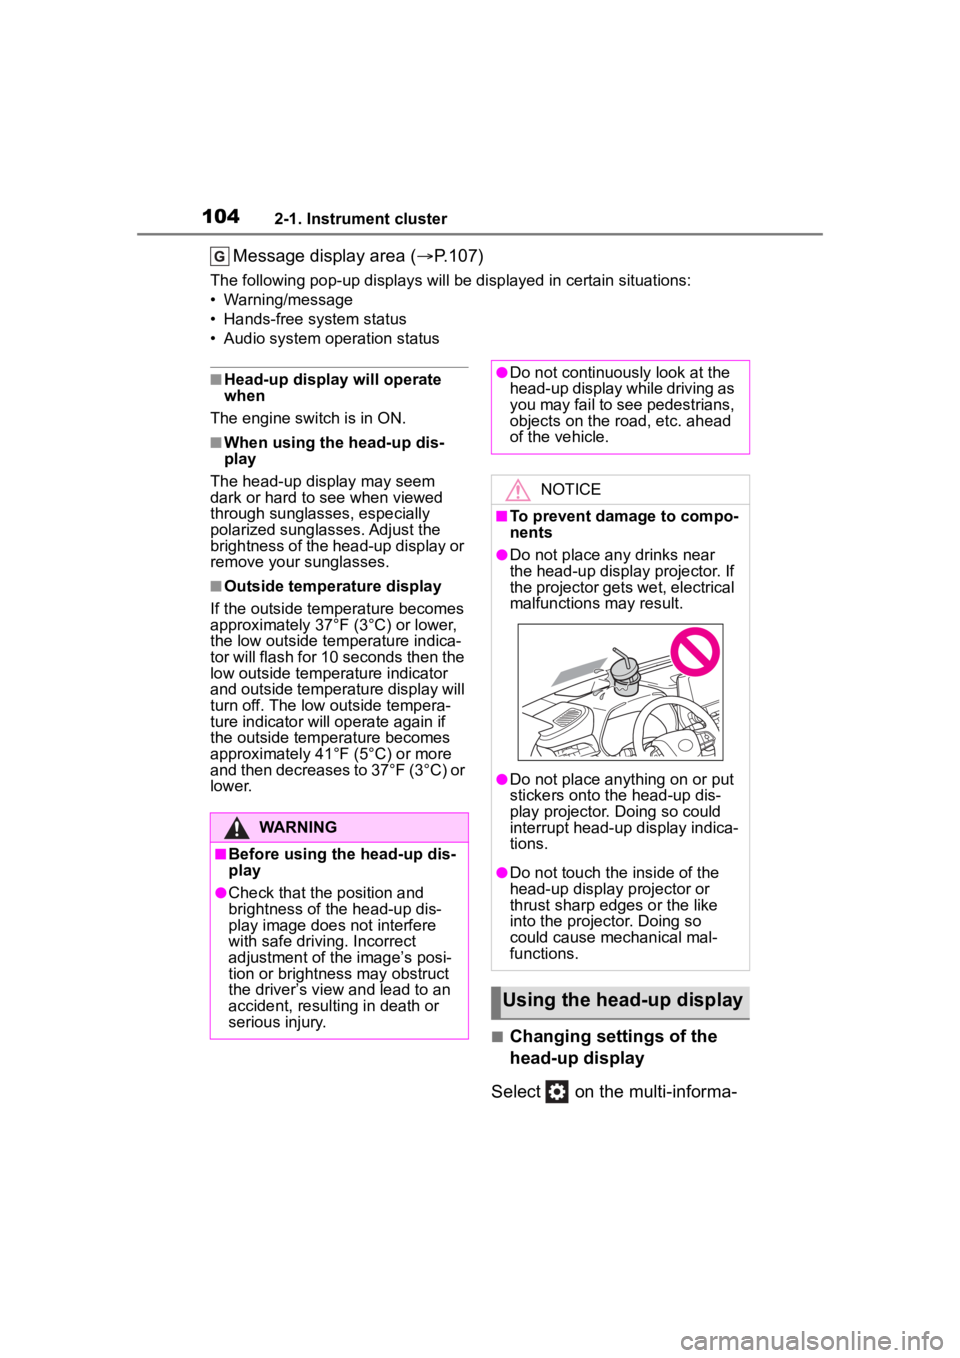
●Do not place any drinks near
the head-up display projector. If
the projector gets wet, electrical
malfunctions may result.
●Do not place any thing on or put
stickers onto the head-up dis-
play projector. Doing so could
interrupt head-up display indica-
tions.
●Do not touch the inside of the
head-up display projector or
thrust sharp edges or the like
into the projector. Doing so
could cause mechanical mal-
functions.
Using the head-up display
Page 119 of 568
1193-2. Opening, closing and locking the doors
3
Before driving
■Conditions affecting the opera-
tion of the smart key system or
wireless remote control
P. 1 3 5
■If the smart key system or the
wireless remote control does
not operate properly
Use the mechanical key to lock and
unlock the doors. ( P.488)
Replace the key battery with a new
one if it is depleted. ( P.434)
■If the battery is discharged
The doors cannot be locked and
unlocked using the smart key sys-
tem or wireless remote control. Lock
or unlock the doors using the
mechanical key. ( P.488)
■Rear seat reminder function
In order to remind you not to forget
luggage, etc. in the rear seat, when
the engine switch is turned off after
any of the following conditions are
met, a buzzer will sound and a mes-
sage will be displayed on the
multi-information di splay for approx-
imately 6 seconds.
●The engine is started within 10
minutes after opening and closing
a rear door.
●A rear door has been opened and
closed after the engine was
started.
However, if a rear door is opened
and then closed within approxi-
mately 2 seconds , the rear seat
reminder function may not operate.
The rear seat rem inder function
determines that luggage, etc. has
been placed in a rear seat based on
opening and closing of a rear door.
Therefore, depending on the situa-
tion, the rear seat reminder function
may not operate and you may still
forget luggage, etc. in the rear seat,
or it may operate unnecessarily.
The rear seat reminder function can
be enabled/disabled. ( P.521)
■Customization
Some functions can be customized.
( P.521)
WARNING
■To prevent an accident
Observe the following precautions
while driving the vehicle. Failure
to do so may result in a door
opening and an occupant falling
out, resulting in death or serious
injury.
●Ensure that all doors are prop-
erly closed and locked.
●Do not pull the inside handle of
the doors while driving.
Be especially careful for the front
doors, as the doors may be
opened even if the inside lock but-
tons are in locked position.
●Set the rear door child-protector
locks when children are seated
in the rear seats.
■When opening or closing a
door
Check the surroundings of the
vehicle such as wh ether the vehi-
cle is on an incline, whether there
is enough space for a door to
open and whether a strong wind
is blowing. When opening or clos-
ing the door, hold the door handle
tightly to prepare for any unpre-
dictable movement.
Page 134 of 568
1343-2. Opening, closing and locking the doors
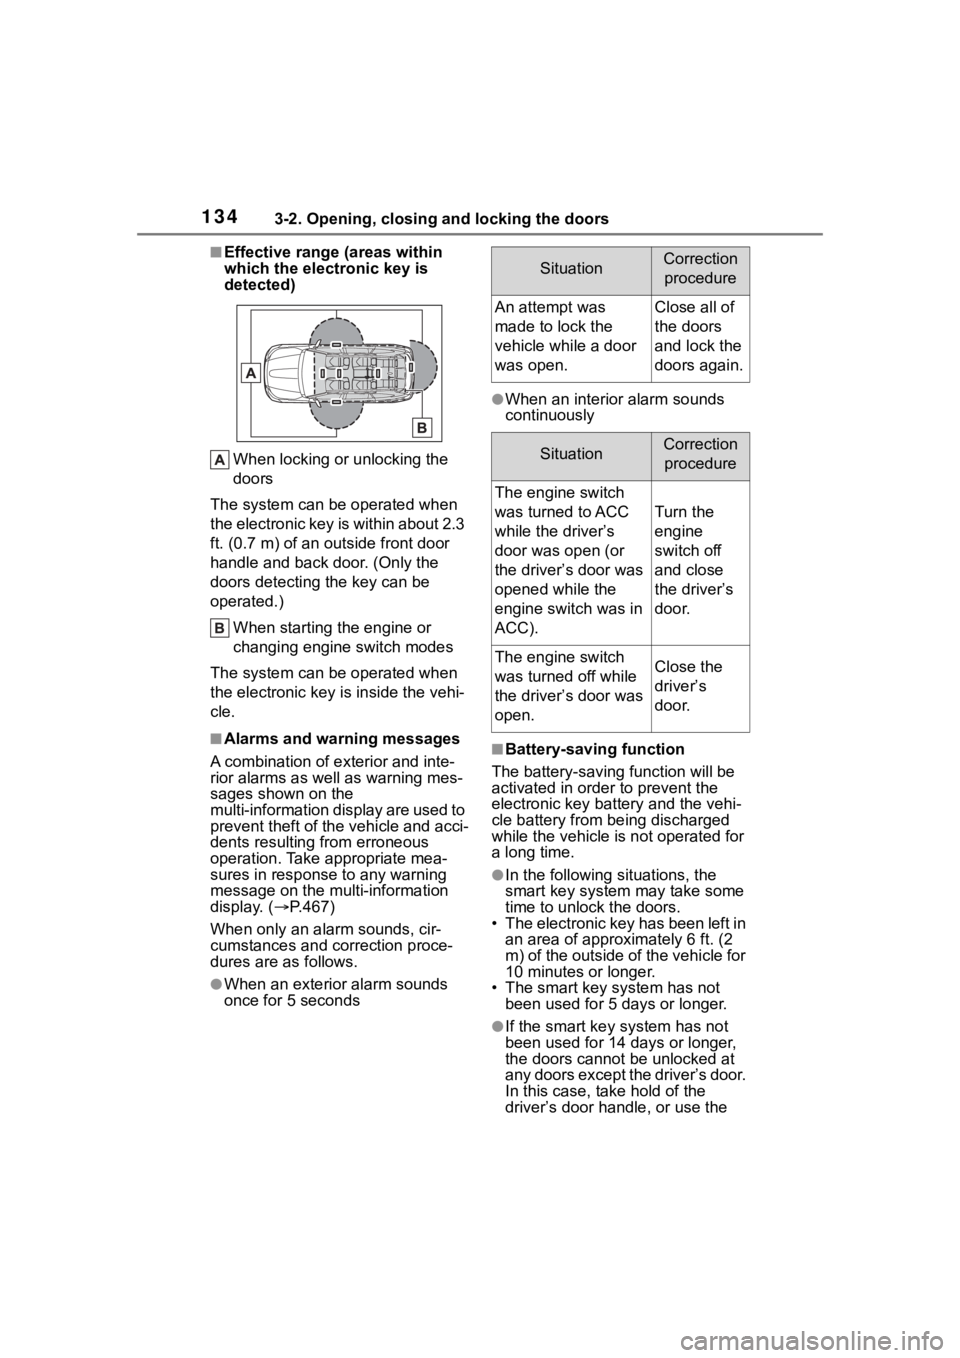
■Effective range (areas within
which the electronic key is
detected)When locking or unlocking the
doors
The system can be operated when
the electronic key is within about 2.3
ft. (0.7 m) of an outside front door
handle and back door. (Only the
doors detecting t he key can be
operated.)
When starting the engine or
changing engine switch modes
The system can be operated when
the electronic key is inside the vehi-
cle.
■Alarms and warning messages
A combination of e xterior and inte-
rior alarms as well as warning mes-
sages shown on the
multi-information display are used to
prevent theft of the vehicle and acci-
dents resulting from erroneous
operation. Take appropriate mea-
sures in response to any warning
message on the multi-information
display. ( P.467)
When only an ala rm sounds, cir-
cumstances and c orrection proce-
dures are as follows.
●When an exterior alarm sounds
once for 5 seconds
●When an interior alarm sounds
continuously
■Battery-saving function
The battery-saving function will be
activated in ord er to prevent the
electronic key battery and the vehi-
cle battery from being discharged
while the vehicle is not operated for
a long time.
●In the following situations, the
smart key system may take some
time to unlock the doors.
• The electronic key has been left in
an area of approxi mately 6 ft. (2
m) of the outside of the vehicle for
10 minutes or longer.
• The smart key system has not been used for 5 days or longer.
●If the smart key system has not
been used for 14 days or longer,
the doors cannot be unlocked at
any doors except the driver’s door.
In this case, take hold of the
driver’s door handle, or use the
SituationCorrection
procedure
An attempt was
made to lock the
vehicle while a door
was open.Close all of
the doors
and lock the
doors again.
SituationCorrection procedure
The engine switch
was turned to ACC
while the driver’s
door was open (or
the driver’s door was
opened while the
engine switch was in
ACC).
Turn the
engine
switch off
and close
the driver’s
door.
The engine switch
was turned off while
the driver’s door was
open.Close the
driver’s
door.
Page 150 of 568
1503-3. Adjusting the seats
( P.521)
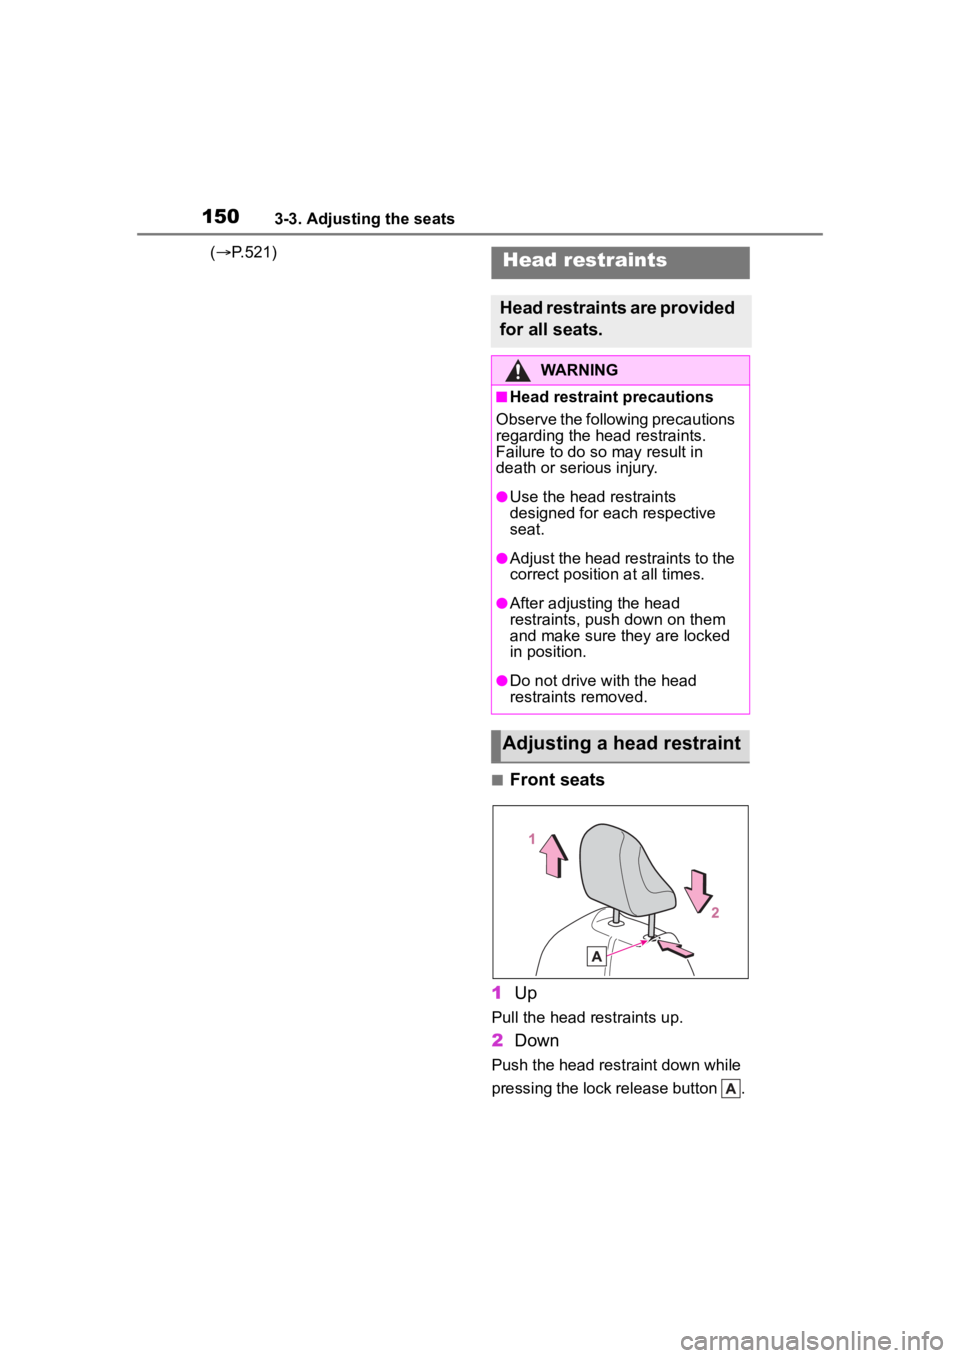
■Front seats
1 Up
Pull the head restraints up.
2Down
Push the head restraint down while
pressing the lock release button .
Head restraints
Head restraints are provided
for all seats.
WARNING
■Head restraint precautions
Observe the following precautions
regarding the head restraints.
Failure to do so may result in
death or serious injury.
●Use the head restraints
designed for each respective
seat.
●Adjust the head restraints to the
correct position at all times.
●After adjusting the head
restraints, push down on them
and make sure they are locked
in position.
●Do not drive with the head
restraints removed.
Adjusting a head restraint
Page 154 of 568
1543-4. Adjusting the steering wheel and mirrors
*: If equipped
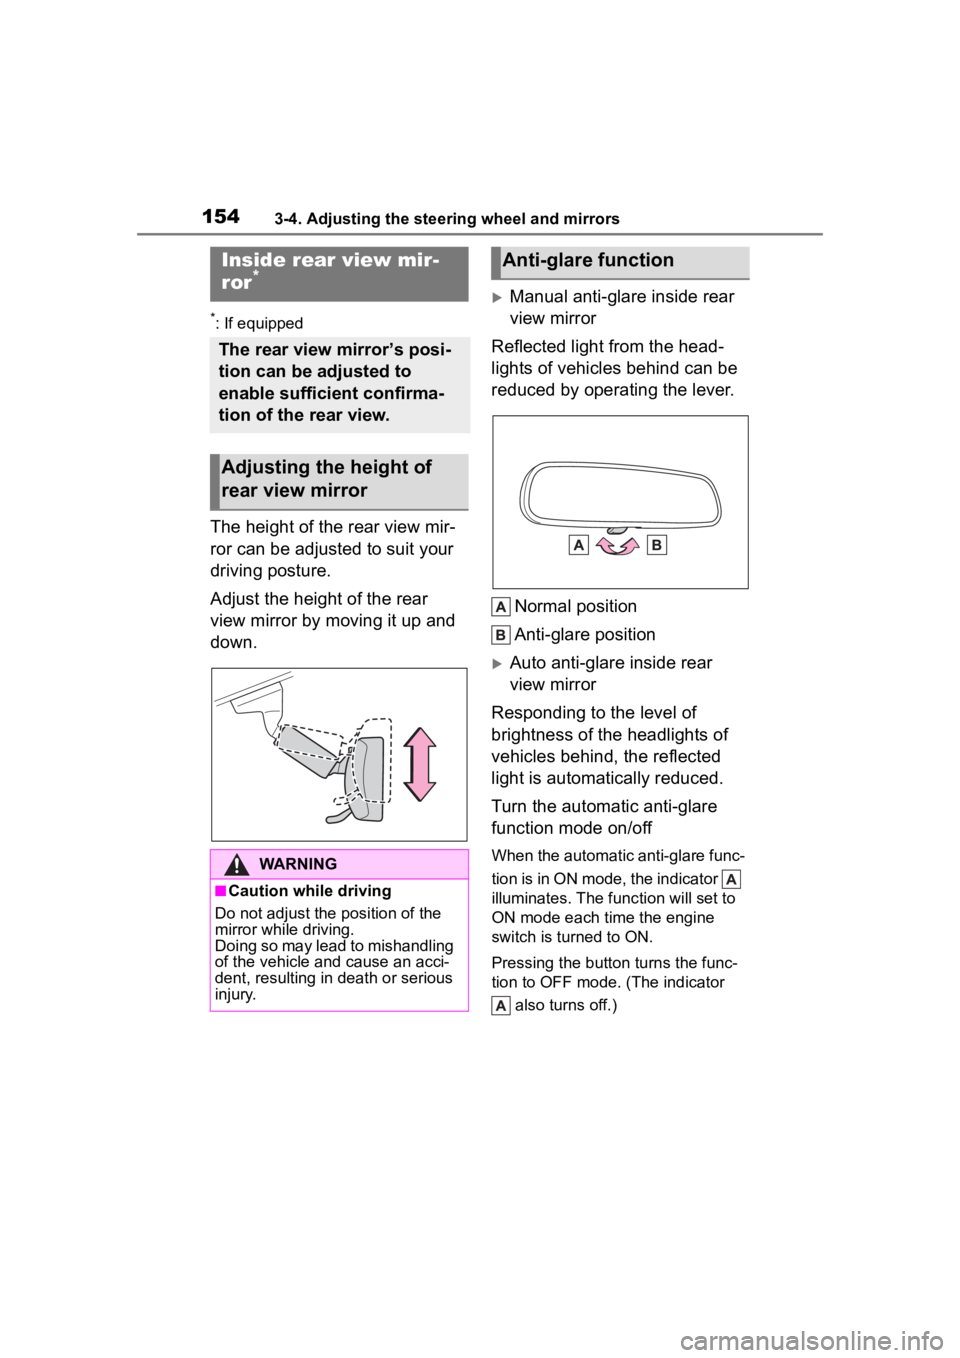
The height of the rear view mir-
ror can be adjusted to suit your
driving posture.
Adjust the height of the rear
view mirror by moving it up and
down.
Manual anti-glare inside rear
view mirror
Reflected light from the head-
lights of vehicles behind can be
reduced by operating the lever.
Normal position
Anti-glare position
Auto anti-glare inside rear
view mirror
Responding to the level of
brightness of the headlights of
vehicles behind, the reflected
light is automatically reduced.
Turn the automatic anti-glare
function mode on/off
When the automatic anti-glare func-
tion is in ON mode, the indicator
illuminates. The func tion will set to
ON mode each time the engine
switch is turned to ON.
Pressing the button turns the func-
tion to OFF mode. (The indicator
also turns off.)
Inside rear view mir-
ror*
The rear view mirror’s posi-
tion can be adjusted to
enable sufficient confirma-
tion of the rear view.
Adjusting the height of
rear view mirror
WARNING
■Caution while driving
Do not adjust the position of the
mirror while driving.
Doing so may lead to mishandling
of the vehicle and cause an acci-
dent, resulting in death or serious
injury.
Anti-glare function
Page 155 of 568

1553-4. Adjusting the steering wheel and mirrors
3
Before driving
■To prevent sensor error (vehi-
cles with auto anti-glare inside
rear view mirror)
To ensure that the sensors operate
properly, do not touch or cover
them.
*: If equipped
Digital Rear view Mir-
ror*
The Digital Rearview Mirror
is a system that uses the
camera on the rear of the
vehicle and displays its
image on the display of the
Digital Rearview Mirror.
The Digital Rearview Mirror
can be changed between
optical mirror mode and dig-
ital mirror mode by operat-
ing the lever.
The Digital Rearview Mirror
allows the driver to see the
rear view despite obstruc-
tions, such as the head
restraints or luggage, ensur-
ing rear visibility. Also, the
rear seats are not displayed
and privacy of the passen-
gers is enhanced.
WARNING
Observe the following precau-
tions.
Failure to do so may result in
death or serious injury.
■Before using the Digital Rear-
view Mirror
●Make sure to adjust the mirror
before driving. ( P.157)
• Change to optical mirror mode and adjust the position of the
Digital Rearview Mirror so that
the area behind your vehicle
can be viewed properly.
Page 158 of 568
1583-4. Adjusting the steering wheel and mirrors
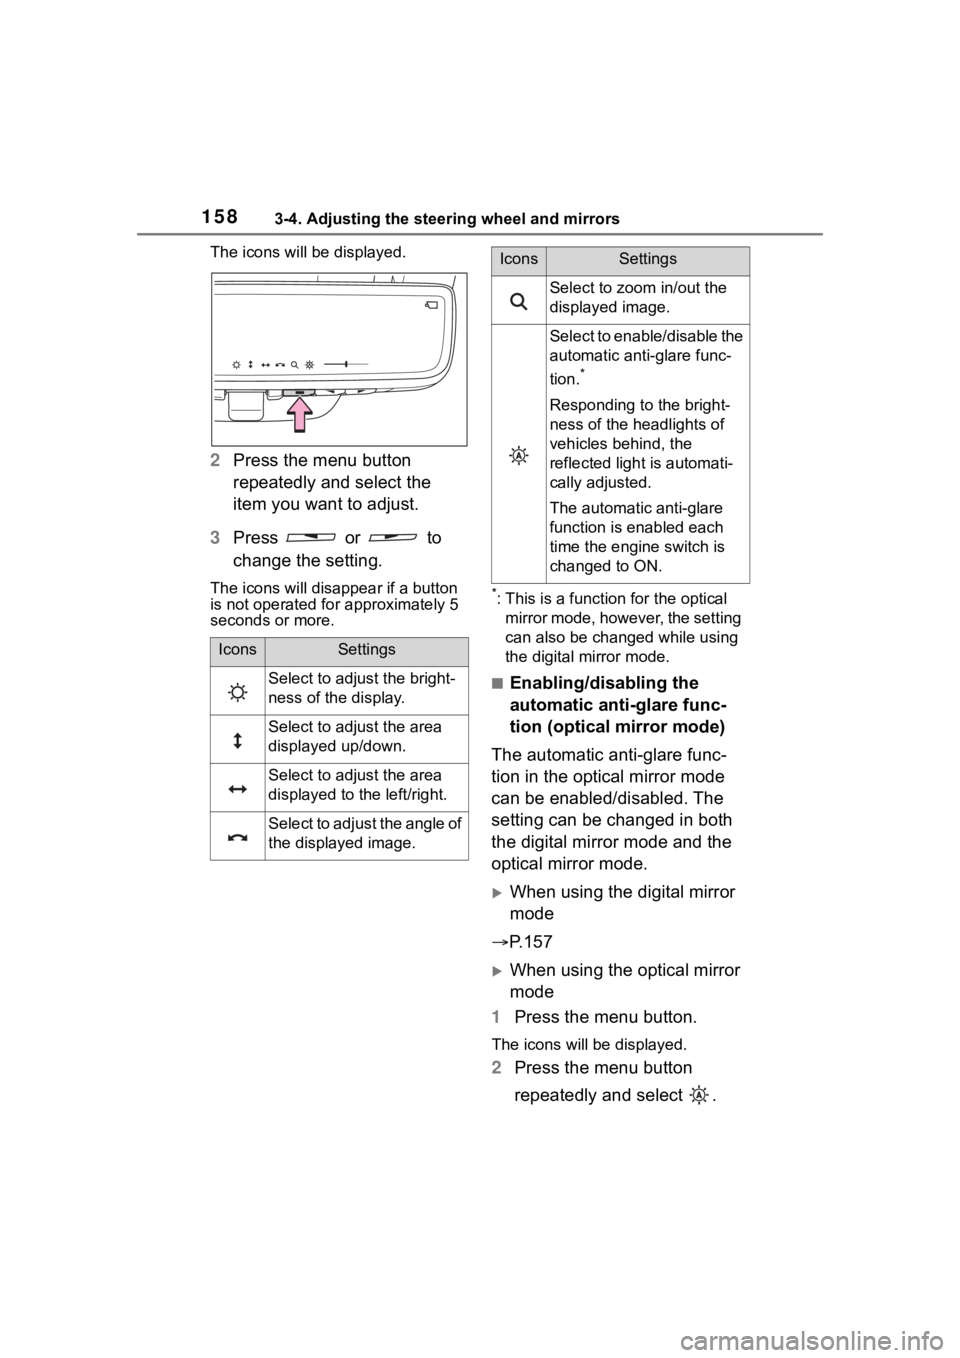
The icons will be displayed.
2Press the menu button
repeatedly and select the
item you want to adjust.
3 Press or to
change the setting.
The icons will disapp ear if a button
is not operated fo r approximately 5
seconds or more.*: This is a functi on for the optical
mirror mode, however, the setting
can also be changed while using
the digital mirror mode.
■Enabling/disabling the
automatic anti-glare func-
tion (optical mirror mode)
The automatic anti-glare func-
tion in the optical mirror mode
can be enabled/disabled. The
setting can be changed in both
the digital mirror mode and the
optical mirror mode.
When using the digital mirror
mode
P.157
When using the optical mirror
mode
1 Press the menu button.
The icons will be displayed.
2Press the menu button
repeatedly and select .
IconsSettings
Select to adjust the bright-
ness of the display.
Select to adjust the area
displayed up/down.
Select to adjust the area
displayed to the left/right.
Select to adjust the angle of
the displayed image.
Select to zoom in/out the
displayed image.
Select to enable/disable the
automatic anti-glare func-
tion.
*
Responding to the bright-
ness of the headlights of
vehicles behind, the
reflected light is automati-
cally adjusted.
The automatic anti-glare
function is enabled each
time the engine switch is
changed to ON.
IconsSettings
Page 159 of 568

1593-4. Adjusting the steering wheel and mirrors
3
Before driving
The setting display will be dis-
played.
3Press or to
enable (“ON”)/disable
(“OFF”) the automatic
anti-glare function.
The icons will disappear if a button
is not operated fo r approximately 5
seconds or more.
■Adjusting the display (digital
mirror mode)
●If the displayed image is adjusted,
it may appear distorted. This is not
a malfunction.
●If the brightness of the Digital
Rearview Mirror is set too high, it
may cause eye strain. Adjust the
Digital Rearvie w Mirror to an
appropriate brightness. If your
eyes become tired, change to
optical mirror mode.
●The brightness of the Digital Rear-
view Mirror will ch ange automati-
cally according to the brightness
of the area in front of your vehicle.
■To prevent the light sensors
from malfunctioning
To prevent the light sensors from
malfunctioning, do not touch or
cover them.
WARNING
Observe the following precau-
tions.
Failure to do so may result in
death or serious injury.
■While driving
●Do not adjust the position of the
Digital Rearview Mirror or adjust
the display settings while driv-
ing.
Stop the vehicle and operate
the Digital Rearview Mirror con-
trol switches.
Failure to do so may cause a
steering wheel operation error,
resulting in an unexpected acci-
dent.
●Always pay attention to the
vehicle’s surroundings.
The size of the vehicles and other
objects may look different when in
digital mirror mode and optical
mirror mode.
When backing up, make sure to
directly check the safety of the
area around your vehicle, espe-
cially behind the vehicle.
Additionally, if a vehicle
approaches from the rear in the
dark, such as at night, the sur-
rounding area may appear dim.
■To prevent causes of fire
If the driver continues using the
Digital Rearview Mirror while
smoke or odor comes from the
mirror, it may result in fire. Stop
using the system immediately and
contact your Toyota dealer.