2022 TOYOTA HIGHLANDER engine
[x] Cancel search: enginePage 413 of 568
4136-3. Do-it-yourself maintenance
6
Maintenance and care
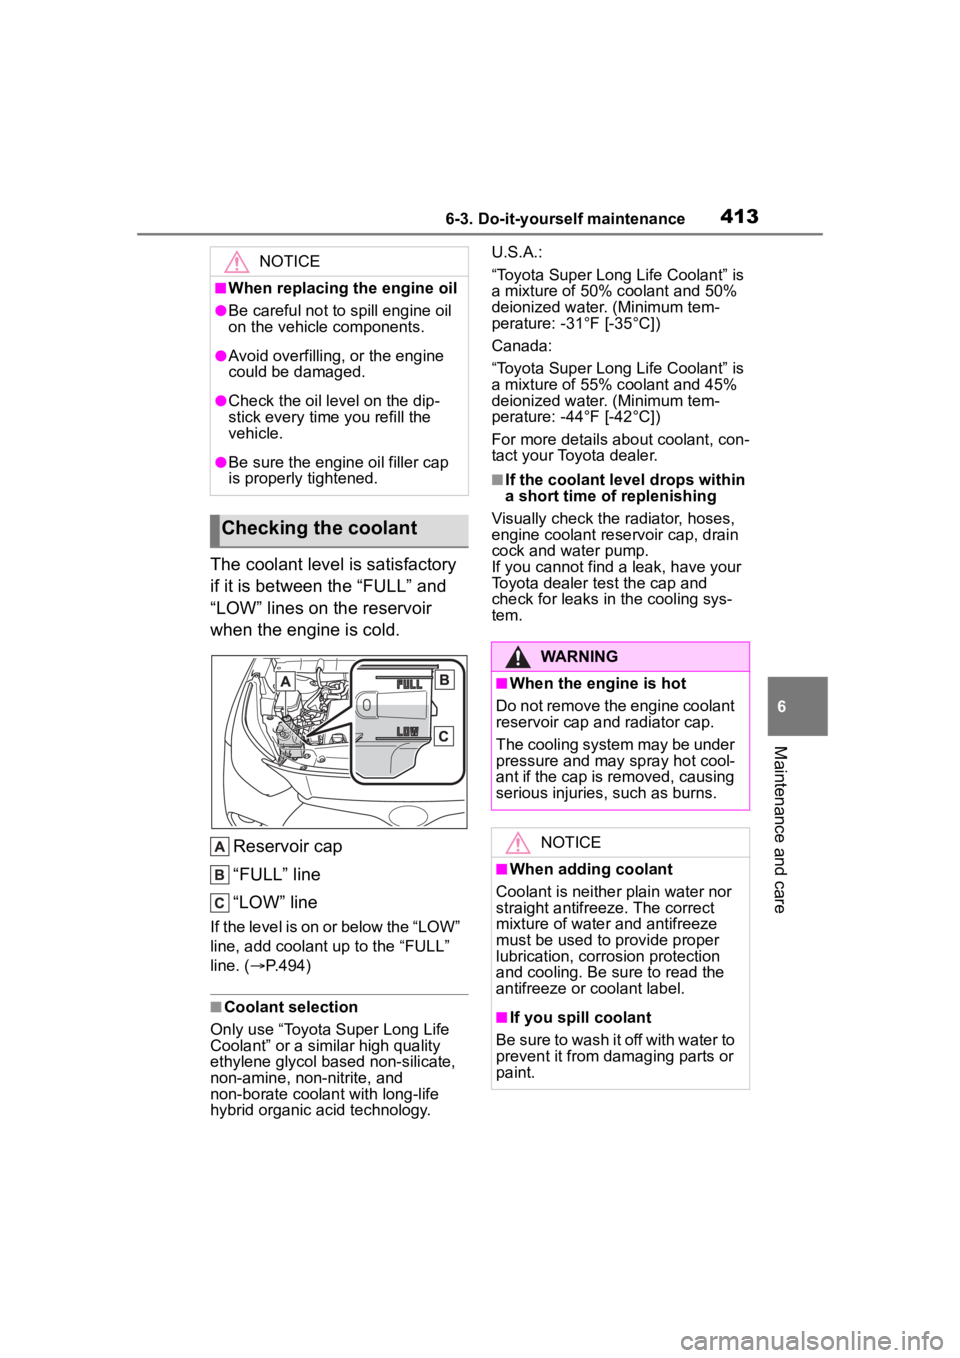
The coolant level is satisfactory
if it is between the “FULL” and
“LOW” lines on the reservoir
when the engine is cold.Reservoir cap
“FULL” line
“LOW” line
If the level is on or below the “LOW”
line, add coolant up to the “FULL”
line. ( P.494)
■Coolant selection
Only use “Toyota Super Long Life
Coolant” or a similar high quality
ethylene glycol based non-silicate,
non-amine, non-nitrite, and
non-borate coolant with long-life
hybrid organic acid technology. U.S.A.:
“Toyota Super Long Life Coolant” is
a mixture of 50% c
oolant and 50%
deionized water. (Minimum tem-
perature: -31°F [-35°C])
Canada:
“Toyota Super Long Life Coolant” is
a mixture of 55% c oolant and 45%
deionized water. (Minimum tem-
perature: -44°F [-42°C])
For more details about coolant, con-
tact your Toyota dealer.
■If the coolant level drops within
a short time of replenishing
Visually check the radiator, hoses,
engine coolant reservoir cap, drain
cock and water pump.
If you cannot find a leak, have your
Toyota dealer test the cap and
check for leaks in the cooling sys-
tem.
NOTICE
■When replacing the engine oil
●Be careful not to spill engine oil
on the vehicle components.
●Avoid overfilling, or the engine
could be damaged.
●Check the oil le vel on the dip-
stick every time you refill the
vehicle.
●Be sure the engine oil filler cap
is properly tightened.
Checking the coolant
WARNING
■When the engine is hot
Do not remove the engine coolant
reservoir cap and radiator cap.
The cooling system may be under
pressure and may spray hot cool-
ant if the cap is removed, causing
serious injuries, such as burns.
NOTICE
■When adding coolant
Coolant is neither plain water nor
straight antifreeze. The correct
mixture of water and antifreeze
must be used to provide proper
lubrication, corrosion protection
and cooling. Be sure to read the
antifreeze or coolant label.
■If you spill coolant
Be sure to wash it off with water to
prevent it from damaging parts or
paint.
Page 414 of 568
4146-3. Do-it-yourself maintenance
Check the radiator and con-
denser and clear away any for-
eign objects. If either of the
above parts is extremely dirty or
you are not sure of their condi-
tion, have your vehicle
inspected by your Toyota dealer.
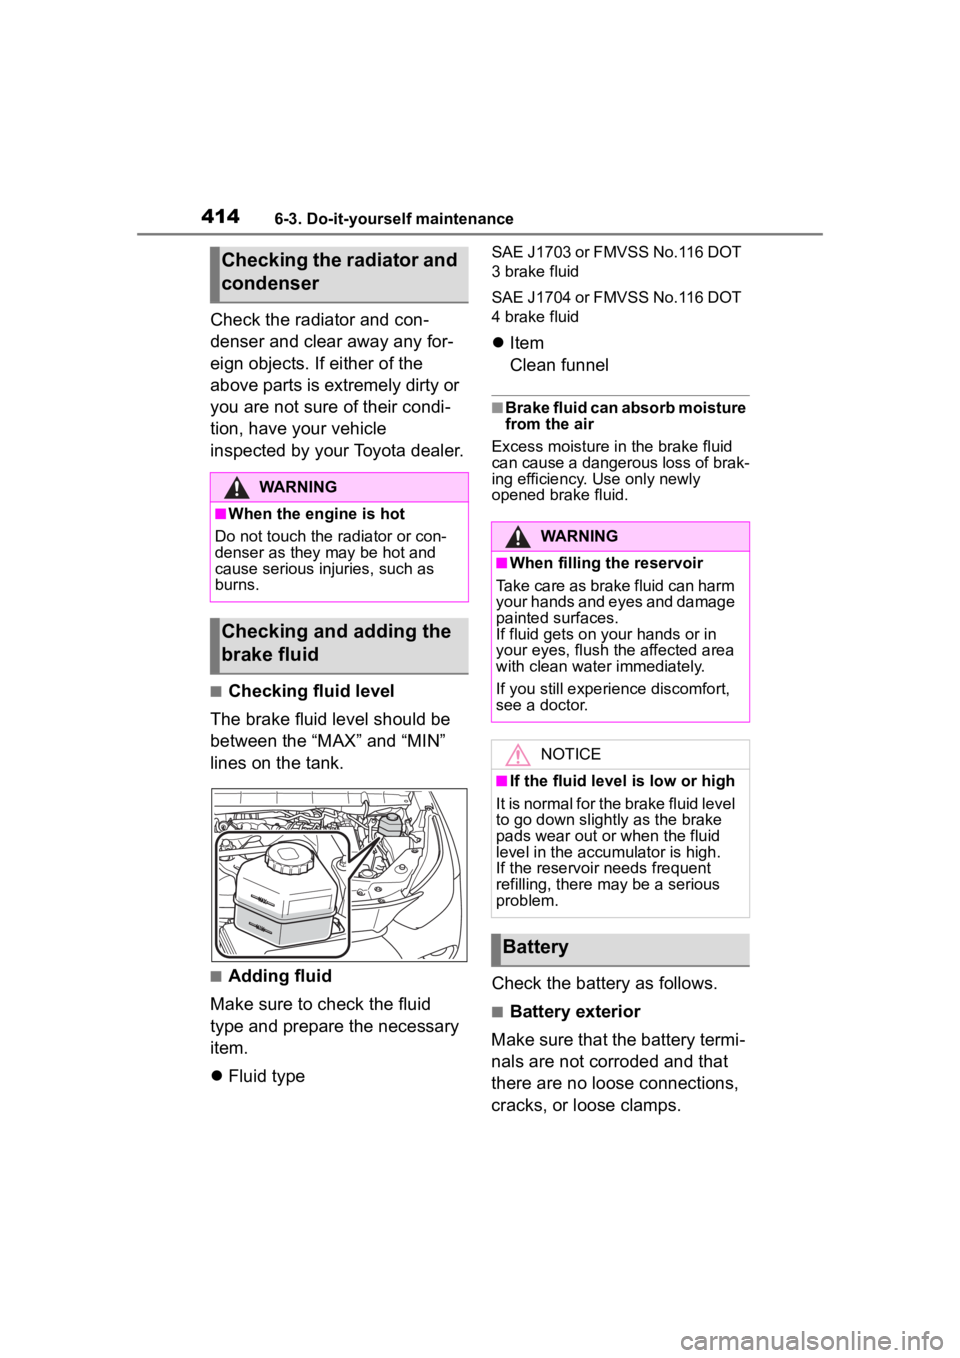
■Checking fluid level
The brake fluid level should be
between the “MAX” and “MIN”
lines on the tank.
■Adding fluid
Make sure to check the fluid
type and prepare the necessary
item.
Fluid type
SAE J1703 or FMVSS No.116 DOT
3 brake fluid
SAE J1704 or FMVSS No.116 DOT
4 brake fluid
Item
Clean funnel
■Brake fluid can absorb moisture
from the air
Excess moisture in the brake fluid
can cause a dangerous loss of brak-
ing efficiency. Use only newly
opened brake fluid.
Check the battery as follows.
■Battery exterior
Make sure that the battery termi-
nals are not corroded and that
there are no loose connections,
cracks, or loose clamps.
Checking the radiator and
condenser
WARNING
■When the engine is hot
Do not touch the r adiator or con-
denser as they may be hot and
cause serious injuries, such as
burns.
Checking and adding the
brake fluid
WARNING
■When filling the reservoir
Take care as brake fluid can harm
your hands and eyes and damage
painted surfaces.
If fluid gets on your hands or in
your eyes, flush the affected area
with clean water immediately.
If you still experi ence discomfort,
see a doctor.
NOTICE
■If the fluid level is low or high
It is normal for the brake fluid level
to go down slight ly as the brake
pads wear out or when the fluid
level in the accumulator is high.
If the reservoir needs frequent
refilling, there m ay be a serious
problem.
Battery
Page 415 of 568
4156-3. Do-it-yourself maintenance
6
Maintenance and care
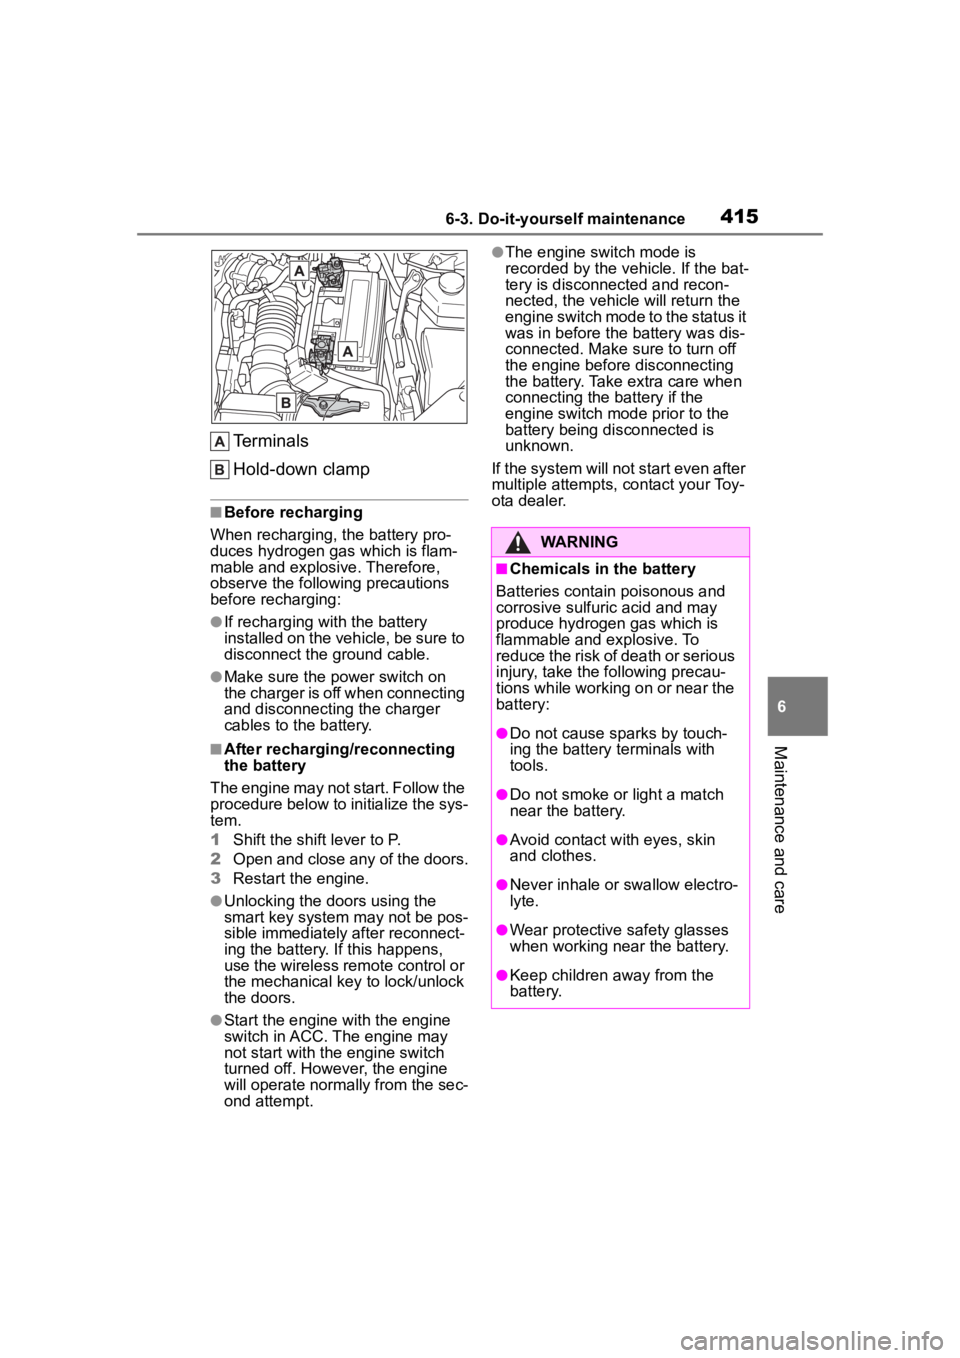
Terminals
Hold-down clamp
■Before recharging
When recharging, t he battery pro-
duces hydrogen ga s which is flam-
mable and explosive. Therefore,
observe the following precautions
before recharging:
●If recharging wi th the battery
installed on the vehicle, be sure to
disconnect the ground cable.
●Make sure the power switch on
the charger is off when connecting
and disconnecting the charger
cables to the battery.
■After recharging/reconnecting
the battery
The engine may not start. Follow the
procedure below to initialize the sys-
tem.
1 Shift the shift lever to P.
2 Open and close any of the doors.
3 Restart the engine.
●Unlocking the doors using the
smart key system may not be pos-
sible immediately after reconnect-
ing the battery. If this happens,
use the wireless remote control or
the mechanical key to lock/unlock
the doors.
●Start the engine with the engine
switch in ACC. The engine may
not start with the engine switch
turned off. However, the engine
will operate normally from the sec-
ond attempt.
●The engine switch mode is
recorded by the vehicle. If the bat-
tery is disconnected and recon-
nected, the vehicle will return the
engine switch mode to the status it
was in before the battery was dis-
connected. Make sure to turn off
the engine before disconnecting
the battery. Take extra care when
connecting the battery if the
engine switch mode prior to the
battery being disconnected is
unknown.
If the system will not start even after
multiple attempts, contact your Toy-
ota dealer.
WARNING
■Chemicals in the battery
Batteries contain poisonous and
corrosive sulfur ic acid and may
produce hydrogen gas which is
flammable and explosive. To
reduce the risk of death or serious
injury, take the following precau-
tions while working on or near the
battery:
●Do not cause sparks by touch-
ing the battery terminals with
tools.
●Do not smoke or light a match
near the battery.
●Avoid contact with eyes, skin
and clothes.
●Never inhale or swallow electro-
lyte.
●Wear protective safety glasses
when working near the battery.
●Keep children away from the
battery.
Page 416 of 568
4166-3. Do-it-yourself maintenance
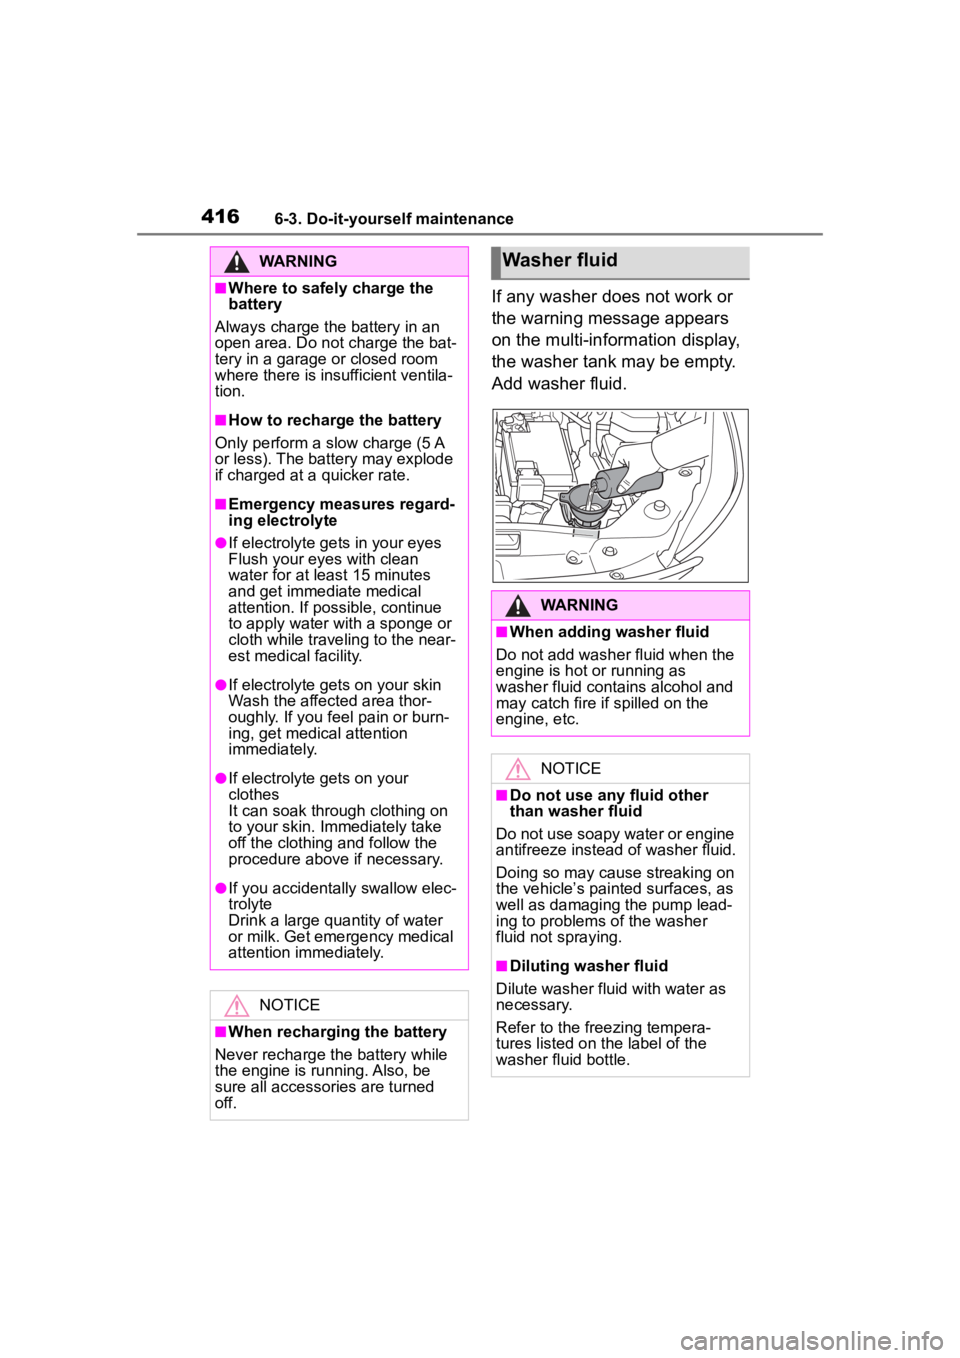
If any washer does not work or
the warning message appears
on the multi-information display,
the washer tank may be empty.
Add washer fluid.
WARNING
■Where to safely charge the
battery
Always charge the battery in an
open area. Do not charge the bat-
tery in a garage or closed room
where there is insufficient ventila-
tion.
■How to recharge the battery
Only perform a slow charge (5 A
or less). The battery may explode
if charged at a quicker rate.
■Emergency measures regard-
ing electrolyte
●If electrolyte gets in your eyes
Flush your eyes with clean
water for at least 15 minutes
and get immediate medical
attention. If possible, continue
to apply water with a sponge or
cloth while traveling to the near-
est medical facility.
●If electrolyte gets on your skin
Wash the affected area thor-
oughly. If you fee l pain or burn-
ing, get medical attention
immediately.
●If electrolyte gets on your
clothes
It can soak through clothing on
to your skin. Immediately take
off the clothing and follow the
procedure above if necessary.
●If you accidentally swallow elec-
trolyte
Drink a large quantity of water
or milk. Get emergency medical
attention immediately.
NOTICE
■When recharging the battery
Never recharge the battery while
the engine is running. Also, be
sure all accessories are turned
off.
Washer fluid
WARNING
■When adding washer fluid
Do not add washer fluid when the
engine is hot or running as
washer fluid contains alcohol and
may catch fire if spilled on the
engine, etc.
NOTICE
■Do not use any fluid other
than washer fluid
Do not use soapy water or engine
antifreeze instead of washer fluid.
Doing so may cause streaking on
the vehicle’s painted surfaces, as
well as damaging the pump lead-
ing to problems of the washer
fluid not spraying.
■Diluting washer fluid
Dilute washer fluid with water as
necessary.
Refer to the freezing tempera-
tures listed on the label of the
washer fluid bottle.
Page 424 of 568

4246-3. Do-it-yourself maintenance
■How to initialize the tire
pressure warning system
4.2-inch display
1 Park the vehicle in a safe
place and turn the engine
switch off.
Initialization cannot be performed
while the vehicle is moving.
2Adjust the tire inflation pres-
sure to the specified cold tire
inflation pressure level.
( P.505)
Make sure to adjust the tire pres-
sure to the specifie d cold tire infla-
tion pressure level. The tire
pressure warning system will oper-
ate based on this pressure level.
3 Turn the engine switch to
ON.
4 Press or of the meter
control switch to select .
5 Press or of the meter
control switch, select and
then press and hold .
6 Press or of the meter
control switch, select “TPWS”
and then press .
7 Press or of the meter
control switch, select “Set
Pressure” and then press
and hold .
7-inch display
1 Park the vehicle in a safe
place and turn the engine
switch off.
Initialization cannot be performed while the vehicle is moving.
2
Adjust the tire inflation pres-
sure to the specified cold tire
inflation pressure level.
( P.505)
Make sure to adjust the tire pres-
sure to the specifie d cold tire infla-
tion pressure level. The tire
pressure warning system will oper-
ate based on this pressure level.
3Turn the engine switch to
ON.
4 Press or of the meter
control switch to select .
5 Press or of the meter
control switch, select and
then press and hold .
6 Press or of the meter
control switch, select “TPWS”
and then press .
7 Press or of the meter
control switch, select “Set
Pressure” and then press
and hold .
“Setting Tire Pressure Warning
System” will be displayed on the
multi-information display and the
tire pressure warning light will
blink 3 times.
When the message disappears,
initialization is complete.
A message is displayed on the
multi-information display. Also,
“--” is displayed for inflation
pressure of each tire on the
multi-information display while
Page 425 of 568

4256-3. Do-it-yourself maintenance
6
Maintenance and care
the tire pressure warning sys-
tem determines the position.
Drive the vehicle at approxi-
mately 25 mph (40 km/h) or
more for approximately 10 to 30
minutes until the inflation pres-
sure of each tire is displayed on
the multi-information display.
When initialization is complete,
the inflation pressure of each
tire will be displayed on the
multi-information display.
Even if the vehicle is not driven
at approximately 25 mph (40
km/h) or more, initialization can
be completed by driving for a
long time. However, if initializa-
tion does not complete after
driving for 1 hour or more, park
the vehicle in a safe place for
approximately 20 minutes and
then drive the vehicle again.
■Initializing the tire pressure
warning system
Initialize the syst em with the tire
inflation pressure adjusted to the
specified level.
■Initialization procedure
●Make sure to carry out initializa-
tion after adjusting the tire inflation
pressure.
Also, make sure the tires are cold
before carrying out initialization or
tire inflation pressure adjustment.
●If you have accidentally turned the
engine switch off during initializa-
tion, it is not necessary to restart
the initialization ag ain as initializa-
tion will restart aut omatically when
the engine switch has been turned
to ON for the next time.
●If you accidentally restart the ini- tialization when initialization is not
necessary, adjust the tire inflation
pressure to the s
pecified level
when the tires are cold, and con-
duct initialization again.
●While the position of each tire is
being determined and the inflation
pressures are not being displayed
on the multi-information display, if
the inflation pressure of a tire
drops, the tire pressure warning
light will come on.
■When initializat ion of the tire
pressure warning system has
failed
Initialization may take longer to
complete if the vehi cle is driven on
an unpaved road. When performing
initialization, drive on a paved road if
possible. Depending on the driving
environment and condition of the
tires, initialization will be completed
in approximately 10 to 30 minutes. If
initialization is not complete after
driving approximately 10 to 30 min-
utes, continue driving for a while.
If the inflation pressure of each tire
is not displayed after driving for
approximately 1 ho ur, perform the
following procedure.
●Park the vehicle in a safe place for
approximately 20 minutes. Then
drive straight (with occasional left
and right turns) at approximately
25 mph (40 km/h) or more for
approximately 10 to 30 minutes.
However, in the following situations,
the tire inflation pr essure will not be
recorded and the system will not
operate properly. Perform initializa-
tion again.
●If the vehicle is reversed during
initialization, the data up to that
point is reset, so p erform the ini-
tialization procedure again from
the beginning.
●When operating the tire pressure
warning reset switch, the tire pres-
sure warning light does not blink 3
times.
Page 426 of 568
4266-3. Do-it-yourself maintenance
●After performing initialization, the
tire pressure warning light blinks
for 1 minute then stays on while
driving.
If the inflation pressure of each tire
is still not displayed, have the vehi-
cle inspected by your Toyota dealer.
Every tire pressure warning
valve and transmitter has a
unique ID code. When replacing
a tire pressure warning valve
and transmitter, it is necessary
to register the ID code. When
registering the ID codes, per-
form the following procedure.
4.2-inch display
1 Park the vehicle in a safe
place and turn the engine
switch off.
Initialization cannot be performed
while the vehicle is moving.
2Adjust the tire inflation pres-
sure to the specified cold tire
inflation pressure level.
( P.505)
Make sure to adjust the tire pres-
sure to the specifie d cold tire infla- tion pressure level. The tire
pressure warning system will oper-
ate based on this
pressure level.
3Turn the engine switch to
ON.
4 Press or of the meter
control switch to select .
5 Press or of the meter
control switch, select and
then press and hold .
6 Press or of the meter
control switch, select “TPWS”
and then press .
7 Press or of the meter
control switch, select
“Change Wheel” and then
press until the tire pres-
sure warning light starts
slowly blinking 3 times.
The change wheel set mode is acti-
vated and registra tion is started.
Then a message will be displayed
on the multi-information display.
When registration is being per-
formed, the tire pressure warning
light will blink for approximately 1
minute then illuminate and “--” will
be displayed for the inflation pres-
sure of each tire on the multi-infor-
mation display.
8 Drive the vehicle at approxi-
mately 25 mph (40 km/h) or
more for approximately 10 to
30 minutes.
When registration is completed, the
tire pressure warni ng light will go off
and the inflation pressure of each
tire will be disp layed on the
multi-information display.
WARNING
■When initializing the tire pres-
sure warning system
Do not initializing tire inflation
pressure without first adjusting
the tire inflation pressure to the
specified level. Otherwise, the tire
pressure warning light may not
come on even if the tire inflation
pressure is low, or it may come on
when the tire inflation pressure is
actually normal.
Registering ID codes
Page 427 of 568

4276-3. Do-it-yourself maintenance
6
Maintenance and care
Even if the vehicle is not driven at
approximately 25 mph (40 km/h) or
more, registration can be com-
pleted by driving for a long time.
However, if registration does not
complete after driving for 1 hour or
more, perform the procedure again
from the beginning.
9 Initialize the tire pressure
warning system. ( P.424)
7-inch display
1 Park the vehicle in a safe
place and turn the engine
switch off.
Initialization cannot be performed
while the vehicle is moving.
2Adjust the tire inflation pres-
sure to the specified cold tire
inflation pressure level.
( P.505)
Make sure to adjust the tire pres-
sure to the specifie d cold tire infla-
tion pressure level. The tire
pressure warning system will oper-
ate based on this pressure level.
3 Turn the engine switch to
ON.
4 Press or of the meter
control switch to select .
5 Press or of the meter
control switch, select and
then press and hold .
6 Press or of the meter
control switch, select “TPWS”
and then press .
7 Press or of the meter
control switch, select
“Change Wheel” and then press until the tire pres-
sure warning light starts
slowly blinking 3 times.
The change wheel set mode is acti-
vated and registra
tion is started.
Then a message will be displayed
on the multi-information display.
When registration is being per-
formed, the tire pressure warning
light will blink for approximately 1
minute then illumi nate and “--” will
be displayed for the inflation pres-
sure of each tire o n the multi-infor-
mation display.
8 Drive the vehicle at approxi-
mately 25 mph (40 km/h) or
more for approximately 10 to
30 minutes.
When registration is completed, the
tire pressure warni ng light will go off
and the inflation pressure of each
tire will be disp layed on the
multi-information display.
Even if the vehicle is not driven at
approximately 25 mph (40 km/h) or
more, registration can be com-
pleted by driving for a long time.
However, if registration does not
complete after driving for 1 hour or
more, perform the p rocedure again
from the beginning.
9 Initialize the tire pressure
warning system. ( P.424)
■When registering ID codes
●ID code registrati on is performed
while driving at a vehicle speed of
approximately 25 mph (40 km/h)
or more.
●Before performing ID code regis-
tration, make sure that no wheels
with tire pressure warning valve
and transmitters installed are near
the vehicle.
●Make sure to initi alize the tire
pressure warning system after