2022 TOYOTA GR YARIS fuel
[x] Cancel search: fuelPage 96 of 470

94
Owner's Manual_Europe_M52P63_en
2-1. Instrument cluster
*: If equipped
■Trip information
1 Press the “MENU” button.
2 Select “Info” on the “Menu”
screen.
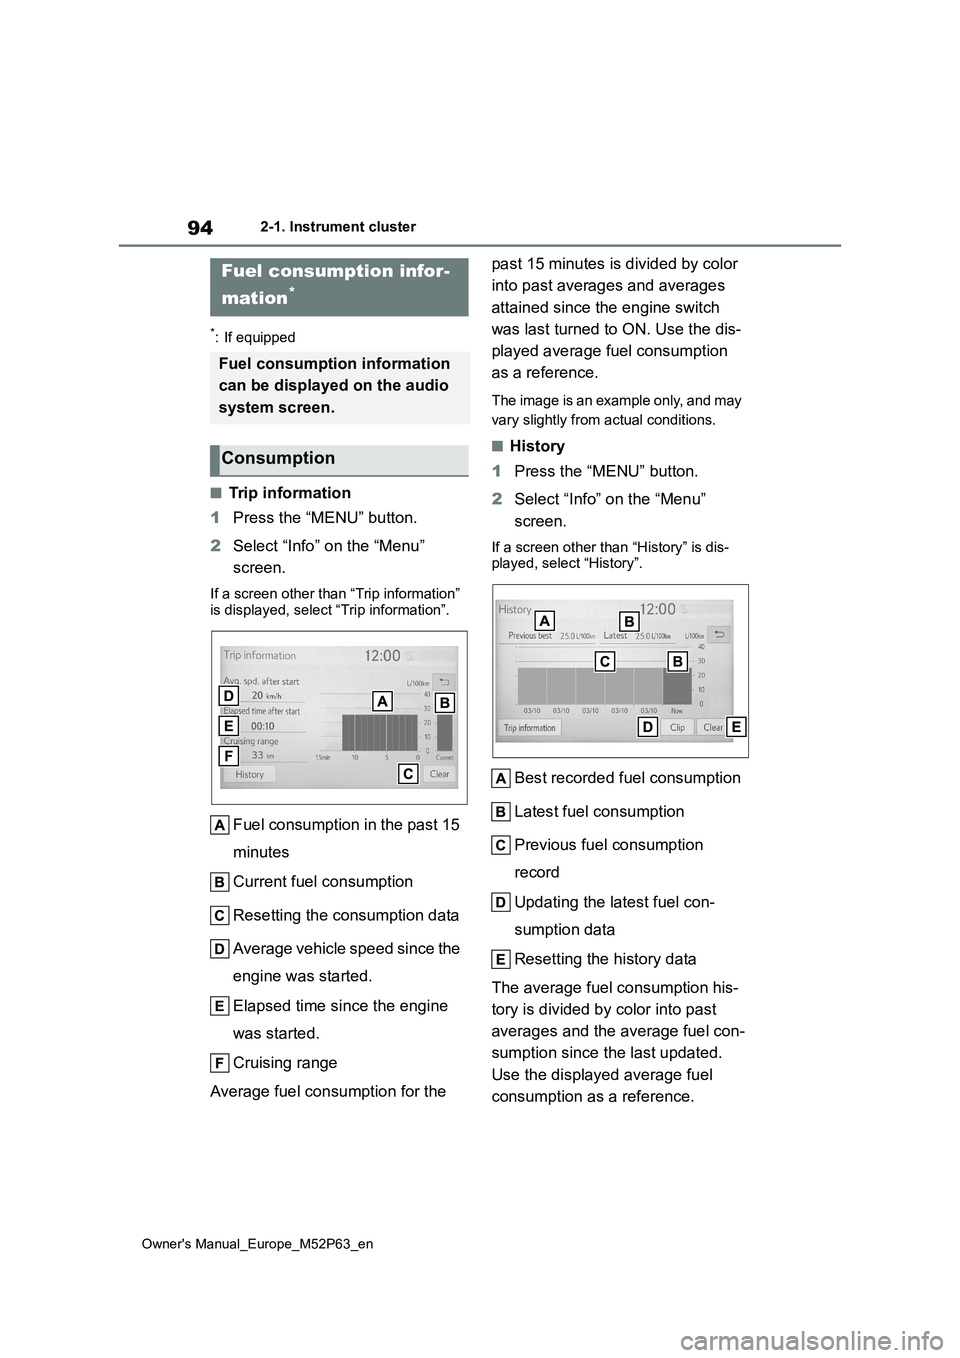
If a screen other than “Trip information” is displayed, select “Trip information”.
Fuel consumption in the past 15
minutes
Current fuel consumption
Resetting the consumption data
Average vehicle speed since the
engine was started.
Elapsed time since the engine
was started.
Cruising range
Average fuel consumption for the
past 15 minutes is divided by color
into past averages and averages
attained since the engine switch
was last turned to ON. Use the dis-
played average fuel consumption
as a reference.
The image is an example only, and may
vary slightly from actual conditions.
■History
1 Press the “MENU” button.
2 Select “Info” on the “Menu”
screen.
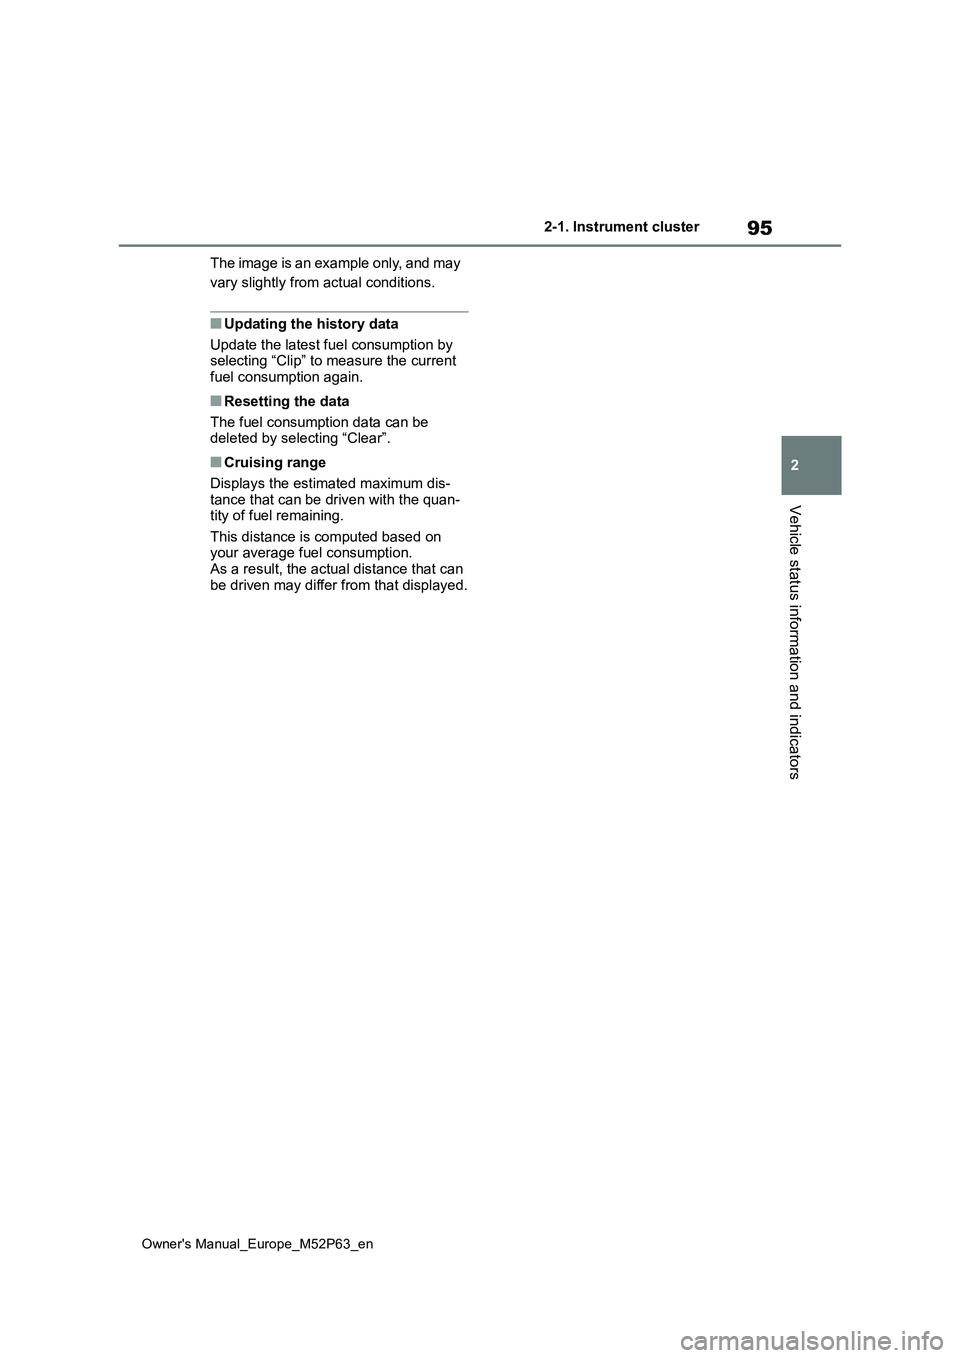
If a screen other than “History” is dis- played, select “History”.
Best recorded fuel consumption
Latest fuel consumption
Previous fuel consumption
record
Updating the latest fuel con-
sumption data
Resetting the history data
The average fuel consumption his-
tory is divided by color into past
averages and the average fuel con-
sumption since the last updated.
Use the displayed average fuel
consumption as a reference.
Fuel consumption infor-
mation*
Fuel consumption information
can be displayed on the audio
system screen.
Consumption
Page 97 of 470

95
2
Owner's Manual_Europe_M52P63_en
2-1. Instrument cluster
Vehicle status information and indicators
The image is an example only, and may
vary slightly from actual conditions.
■Updating the history data
Update the latest fuel consumption by selecting “Clip” to measure the current
fuel consumption again.
■Resetting the data
The fuel consumption data can be deleted by selecting “Clear”.
■Cruising range
Displays the estimated maximum dis- tance that can be driven with the quan-tity of fuel remaining.
This distance is computed based on your average fuel consumption.As a result, the actual distance that can
be driven may differ from that displayed.
Page 127 of 470

4
125
Owner's Manual_Europe_M52P63_en
4
Driving
Driving
4-1. Before driving
Driving the vehicle ............ 126
Cargo and luggage ........... 132
Trailer towing .................... 133
4-2. Driving procedures
Engine (ignition) switch..... 134
Manual transmission......... 137
Turn signal lever ............... 140
Parking brake ................... 141
4-3. Operating the lights and wip-
ers
Headlight switch ............... 142
Automatic High Beam ....... 145
Fog light switch ................. 148
Windshield wipers and washer
....................................... 148
4-4. Refueling
Opening the fuel tank cap. 151
4-5. Using the driving support
systems
Toyota Safety Sense ......... 153
PCS (Pre-Collision System)
........................................ 158
LTA (Lane Tracing Assist) . 170
Dynamic radar cruise control
........................................ 179
RSA (Road Sign Assist) .... 190
Stop & Start system .......... 194
BSM (Blind Spot Monitor) . 199
Toyota parking assist-sensor
........................................ 204
RCTA (Rear Crossing Traffic
Alert) ............................... 210
AWD mode select switch .. 215
GPF (Gasoline Particulate Fil-
ter) system ...................... 216
Driving assist systems ...... 217
4-6. Driving tips
Winter driving tips ............. 224
Page 129 of 470

127
4
Owner's Manual_Europe_M52P63_en
4-1. Before driving
Driving
head-up display (if equipped) while
the system is operating.
■Breaking in your new Toyota
To extend the life of the vehicle, observ- ing the following precautions is recom-
mended:
●For the first 300 km (186 miles):
Avoid sudden stops.
●For the first 1000 km (621 miles): • Do not drive at extremely high
speeds. • Avoid sudden acceleration.• Do not drive continuously in low
gears. • Do not drive at a constant speed for extended periods.
■Brake pads and discs
●The brake pads and discs are designed for use under high load con-
ditions. Therefore, brake noise may be generated depending on the vehi-cle speed, braking force and vehicle
environment (temperature, humidity, etc.).
●The brake pad is easy to be over dust, and life may be short.
●The brake pad may do stick to discs.
●Braking force may decrease by low
temperature, snow, water.
■Drum-in-disc type parking brake system
Your vehicle has a drum-in-disc type
parking brake system. This type of brake system needs bedding-down of the brake shoes periodically or when-
ever the parking brake shoes and/or drum are replaced. Have any authorized Toyota retailer or Toyota authorized
repairer, or any reliable repairer perform the bedding down operation.
■Operating your vehicle in a foreign country
Comply with the relevant vehicle regis- tration laws and confirm the availability of the correct fuel. ( P.350)
■Idling time before engine stop
To prevent damage to the turbocharger, allow the engine to idle immediately after high-load driving.
Driving conditionIdling time
Normal city driving or
high-speed driving (at
the high-way speed
limit or recommended
speed)
Not necessary
Steep hill driving, con-
tinuous driving (race
track driving etc.)
Approximately
1 minute
WARNING
Observe the following precautions. Failure to do so may result in death or
serious injury.
■When driving the vehicle
●Do not drive if you are unfamiliar with the location of the brake and accelerator pedals to avoid
depressing the wrong pedal.
• Accidentally depressing the accel-
erator pedal instead of the brake pedal will result in sudden accelera-tion that may lead to an accident.
• When backing up, you may twist your body around, leading to a diffi-
culty in operating the pedals. Make sure to operate the pedals properly.
• Make sure to keep a correct driving posture even when moving the vehicle only slightly. This allows you
to depress the brake and accelera- tor pedals properly.
• Depress the brake pedal using your right foot. Depressing the brake pedal using your left foot may delay
response in an emergency, result- ing in an accident.
Page 141 of 470

139
4
Owner's Manual_Europe_M52P63_en
4-2. Driving procedures
Driving
gears more smoothly. Additionally,
when the clutch pedal is operated,
the iMT helps reduce shift shock,
allowing for lighter shift operations
when driving on a winding road or
incline.
Press the “iMT” switch.
The “iMT” indicator will illuminate in
green. Press the switch again to cancel
iMT.
■The iMT may not operate when
In the following situations, iMT may not operate.
However, this does not indicate a mal- function.
●The clutch pedal is not fully depressed.
●The clutch pedal is not fully released, such as if a foot is resting on the clutch pedal.
●Shift operation is performed after the vehicle has been coasting with the
shift lever in N.
●The shift lever is not operated for a
long time after the clutch pedal is depressed.
After the shift lever is moved, unless
your foot is completely removed from the clutch pedal, the iMT may not oper-ate and the engine speed may not be
controlled optimally for the next gear change. To enable the iMT, release the clutch pedal completely and then
depress it again before operating the
shift lever.
■If the “iMT” indicator illuminates in
yellow
The iMT may be temporarily unavailable or malfunctioning. Have the vehicle
inspected at any authorized Toyota retailer or Toyota authorized repairer, or any reliable repairer.
The Gear Shift Indicator is a guide
to help the driver achieve improved
fuel economy and reduced exhaust
emissions within limits of engine
performance.
Shift-up indicator
Shift-down indicator
■Gear Shift Indicator display
Gear Shift Indicator may not be dis- played when your foot is placed on the
clutch pedal.
WARNING
■Limitations of the iMT
iMT is not a system that prevents shift lever operation error or engine over
revving. Depending on the situation, iMT may not operate normally and the shift position may not be changed
smoothly. Overly relying on iMT may cause an unexpected accident.
Gear Shift Indicator
Page 153 of 470

151
4
Owner's Manual_Europe_M52P63_en
4-4. Refueling
Driving
4-4.Refuelin g
Turn the engine switch off and
ensure that both side doors and
windows are closed.
Confirm the type of fuel.
■Fuel types
P. 3 5 7
■Fuel tank opening for unleaded gasoline
To help prevent incorrect fueling, your vehicle has a fuel tank opening that only accommodates the special nozzle on
unleaded fuel pumps.
Opening the fuel tank
cap
Perform the following steps to
open the fuel tank cap:
Before refueling the vehicle
WARNING
■When refueling the vehicle
Observe the following precautions
while refueling the vehicle. Failure to do so may result in death or serious injury.
●After exiting the vehicle and before opening the fuel door, touch an
unpainted metal surface to dis- charge any static electricity. It is important to discharge static elec-
tricity before refueling because sparks resulting from static electric-ity can cause fuel vapors to ignite
while refueling.
●Always hold the grips on the fuel tank cap and turn it slowly to remove it.
A whooshing sound may be heard when the fuel tank cap is loosened. Wait until the sound cannot be
heard before fully removing the cap. In hot weather, pressurized fuel may spray out the filler neck
and cause injury.
●Do not allow anyone that has not
discharged static electricity from their body to come close to an open fuel tank.
●Do not inhale vaporized fuel.Fuel contains substances that are
harmful if inhaled.
●Do not smoke while refueling the
vehicle. Doing so may cause the fuel to ignite and cause a fire.
●Do not return to the vehicle or touch any person or object that is stati-
cally charged. This may cause static electricity to build up, resulting in a possible igni-
tion hazard.
■When refueling
Observe the following precautions to prevent fuel overflowing from the fuel tank:
●Securely insert the fuel nozzle into the fuel filler neck.
●Stop filling the tank after the fuel nozzle automatically clicks off.
●Do not top off the fuel tank.
Page 154 of 470

152
Owner's Manual_Europe_M52P63_en
4-4. Refueling
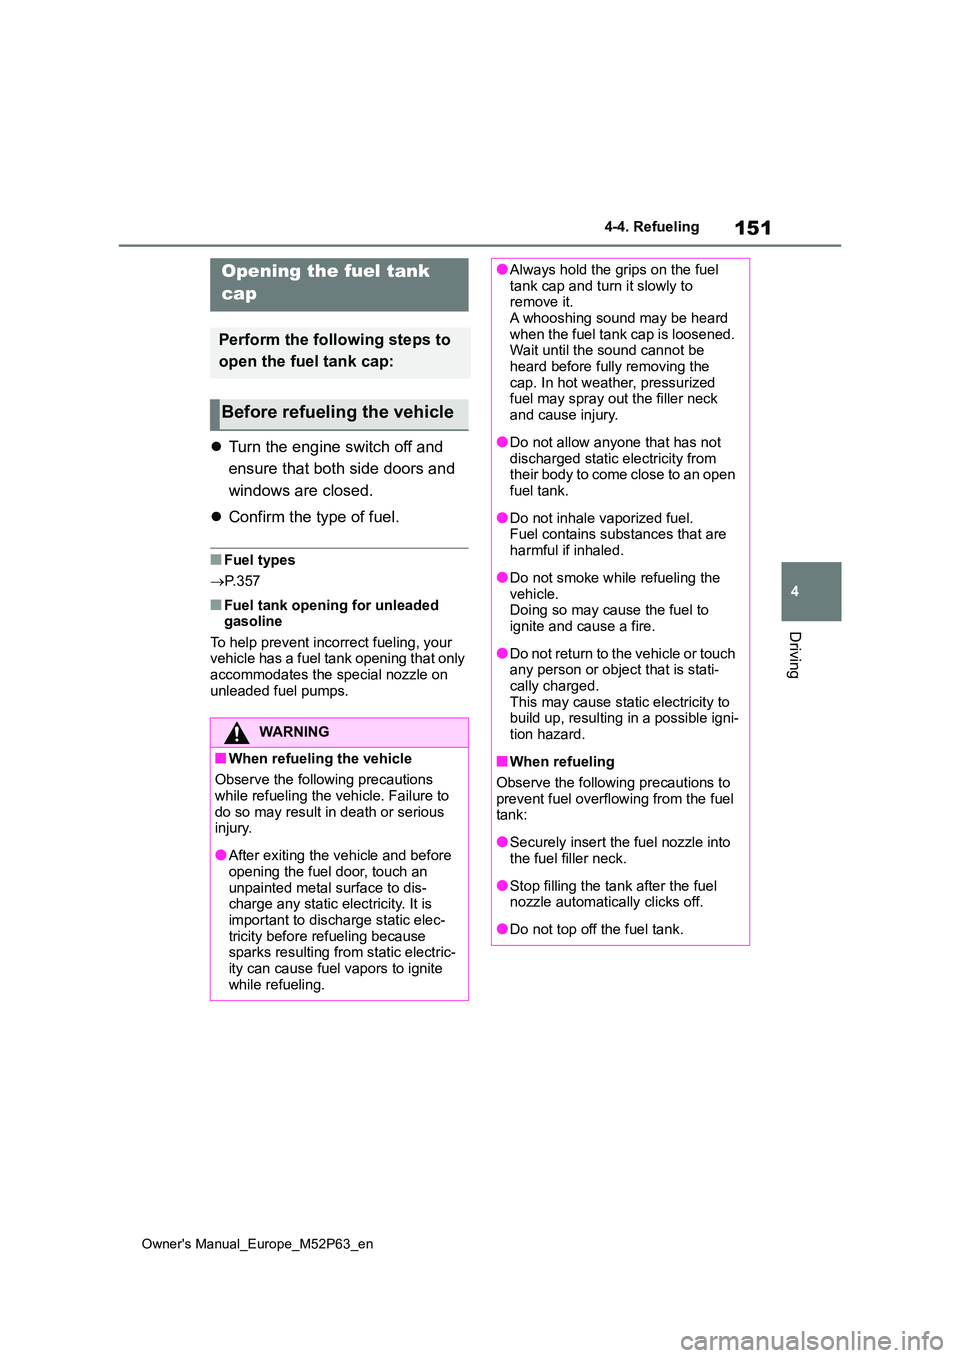
1Pull up the opener to open the
fuel filler door.
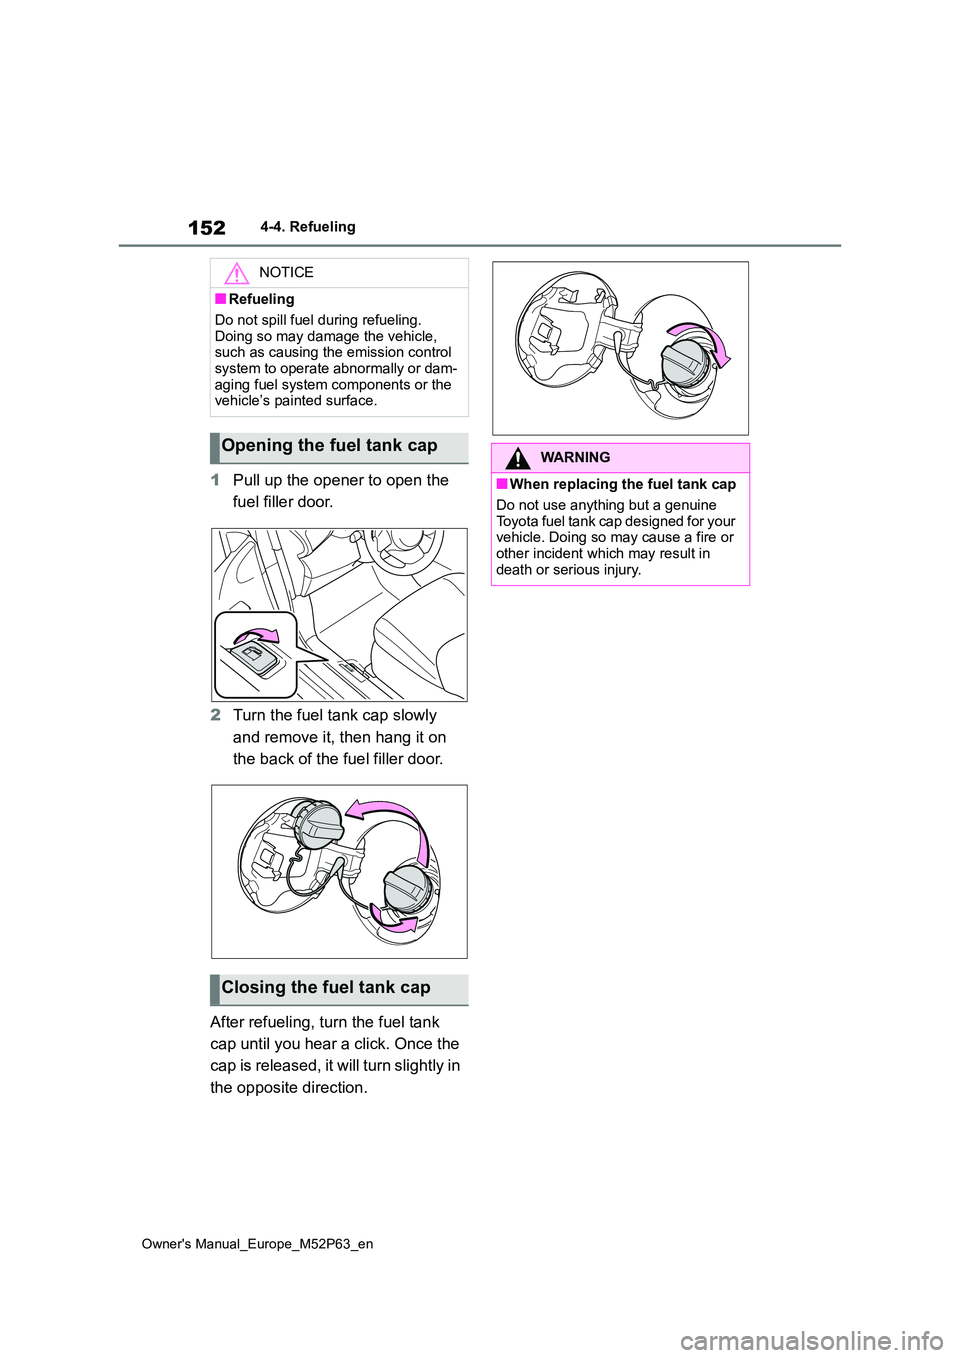
2 Turn the fuel tank cap slowly
and remove it, then hang it on
the back of the fuel filler door.
After refueling, turn the fuel tank
cap until you hear a click. Once the
cap is released, it will turn slightly in
the opposite direction.
NOTICE
■Refueling
Do not spill fuel during refueling.
Doing so may damage the vehicle, such as causing the emission control system to operate abnormally or dam-
aging fuel system components or the vehicle’s painted surface.
Opening the fuel tank cap
Closing the fuel tank cap
WARNING
■When replacing the fuel tank cap
Do not use anything but a genuine
Toyota fuel tank cap designed for your vehicle. Doing so may cause a fire or other incident which may result in
death or serious injury.
Page 196 of 470

194
Owner's Manual_Europe_M52P63_en
4-5. Using the driving support systems
■Stopping the engine
1 Fully depress the clutch pedal
and depress the brake pedal to
stop the vehicle.
2 Move the shift lever to N and
release the clutch pedal. The
engine will stop automatically.
When the engine is stopped by the Stop
& Start system, the Stop & Start indica- tor will illuminate.
■Restarting the engine
With the shift lever in N, depress
the clutch pedal. The engine will
start automatically.
When the engine starts, the Stop &
Start indicator will turn off.
Press the Stop & Start cancel
switch to disable the Stop & Start
system.
The Stop & Start cancel indicator
will illuminate.
Pressing the switch again will enable
the Stop & Start system and the Stop &
Start cancel indicator will turn off.
■Automatic enabling of the Stop & Start system
If the Stop & Start system is disabled
using the Stop & Start cancel switch, it will be automatically re-enabled once the engine switch is turned off and then
the engine is started.
■Points for use
●If the engine switch is pressed when
the engine is stopped by the Stop & Start system, the engine will not be
able to be restarted by the automatic engine start function. In this case, restart the engine using the normal
engine starting procedure. ( P.134)
●When the engine is being restarted by
the Stop & Start system, the power outlets may be temporarily unusable, but this does not indicate a malfunc-
tion.
Stop & Start system
The Stop & Start system stops
and starts the engine accord-
ing to clutch pedal or shift
lever operation when the vehi-
cle is stopped, such as at a
stoplight, inters ection, etc., in
order to improve fuel economy
and reduce noise pollution
caused by the engine idling.
Stop & Start system opera-
tion
Disabling the Stop & Start
system