Page 414 of 678
4127-1. Maintenance and care
NOTICE
●To prevent the wheels from corrod-
ing, remove any dirt and store in a
place with low humidity when stor- ing the wheels.
■Cleaning the exterior lights
●Wash carefully. Do not use organic
substances or scrub with a hard
brush.
This may damage the surfaces of the lights.
●Do not apply wax to the surfaces of the lights.
Wax may cause damage to the
lenses.
■To prevent damage to the wind-
shield wiper arms
When lifting the wiper arms away
from the windshield, pull the driver
side wiper arm upward first, and repeat for the passenger side. When
returning the wipers to their original
position, do so from the passenger side first.
■When using an automatic car wash (vehicles with rain-sensing
windshield wipers)
Set the wiper switch to the off posi- tion. If the wiper switch is in “AUTO”,
the wipers may operate and the wiper
blades may be damaged.
■When using a high pressure car
wash
●Vehicles with rear view monitor sys-
tem: When washing the vehicle, do
not spray the camera or its sur- rounding area directly with a high
pressure washer. Shock applied
from high pressure water may cause the device to not operate
normally.
●Do not bring the nozzle tip close to boots (rubber or resin manufac-
tured cover), connectors or the fol-
lowing parts. The parts may be damaged if they come into contact
with high-pressure water.
• Traction related parts
• Steering parts
• Suspension parts
•Brake parts
●Keep the cleaning nozzle at least
30 cm (11.9 in.) away from the vehi- cle body. Otherwise resin section,
such as moldings and bumpers,
may be deformed and damaged. Also, do not continuously hold the
nozzle in the same place.
●Do not spray the lower part of the
windshield continuously. If water
enters the air c onditioning system intake located near the lower part of
the windshield, the air conditioning
system may not operate correctly.
●Do not wash the underside of the
vehicle using a high pressure car washer.
Page 421 of 678
419
7
7-3. Do-it-yourself maintenance
Maintenance and care
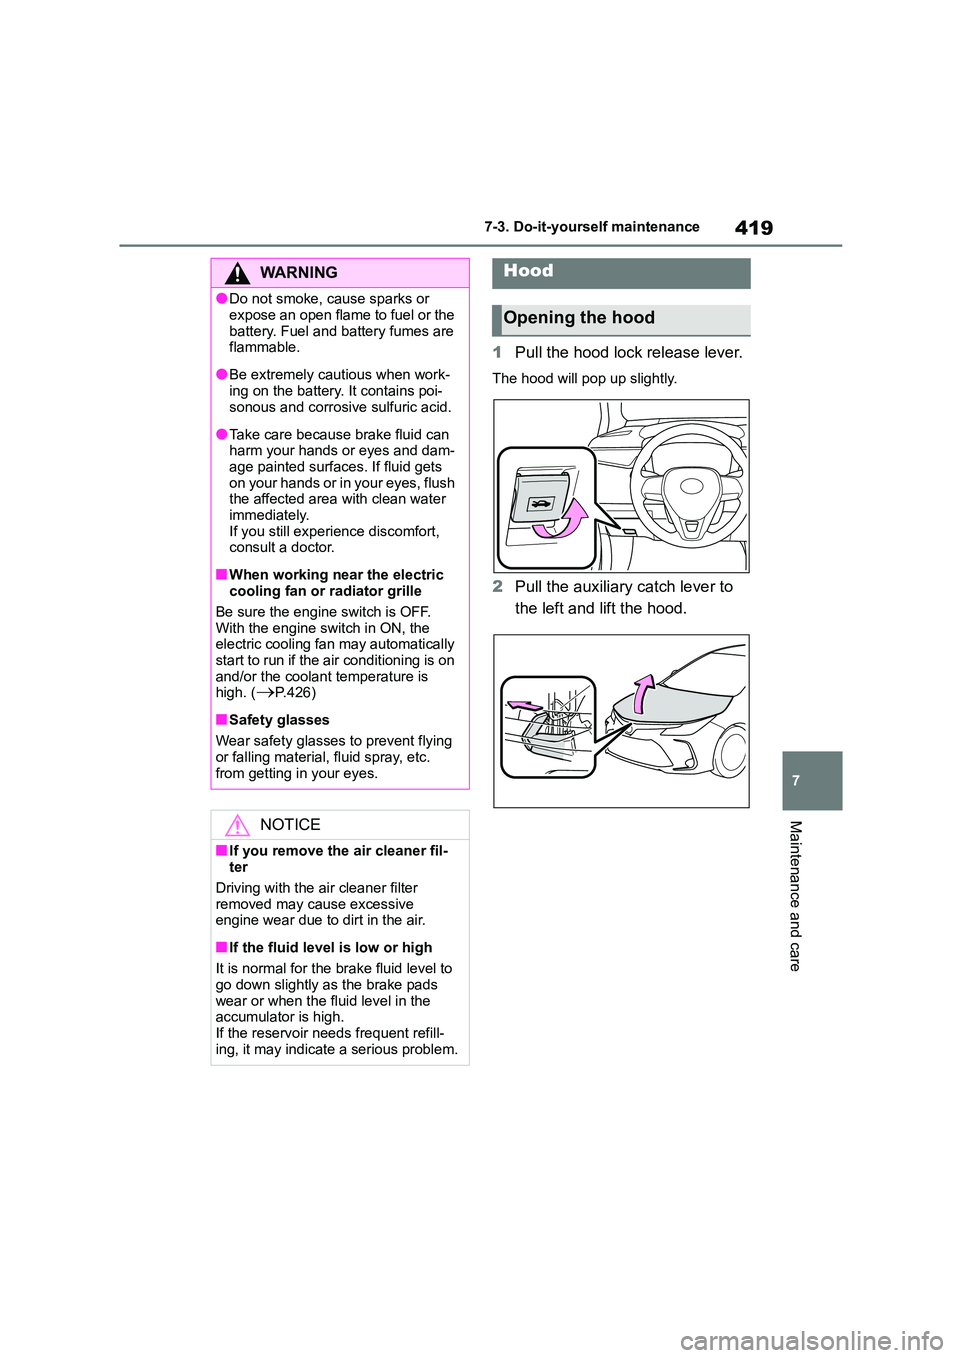
1 Pull the hood lock release lever.
The hood will pop up slightly.
2Pull the auxiliary catch lever to
the left and lift the hood.
WA R N I N G
●Do not smoke, cause sparks or
expose an open flame to fuel or the
battery. Fuel and battery fumes are flammable.
●Be extremely cautious when work-ing on the battery. It contains poi-
sonous and corrosive sulfuric acid.
●Take care because brake fluid can harm your hands or eyes and dam-
age painted surfaces. If fluid gets
on your hands or in your eyes, flush the affected area with clean water
immediately.
If you still experience discomfort, consult a doctor.
■When working near the electric cooling fan or radiator grille
Be sure the engine switch is OFF.
With the engine switch in ON, the electric cooling fan may automatically
start to run if the air conditioning is on
and/or the coolant temperature is high. (P.426)
■Safety glasses
Wear safety glasses to prevent flying
or falling material, fluid spray, etc.
from getting in your eyes.
NOTICE
■If you remove the air cleaner fil- ter
Driving with the air cleaner filter
removed may cause excessive engine wear due to dirt in the air.
■If the fluid level is low or high
It is normal for the brake fluid level to
go down slightly as the brake pads
wear or when the fluid level in the accumulator is high.
If the reservoir needs frequent refill-
ing, it may indicate a serious problem.
Hood
Opening the hood
Page 449 of 678
447
7
7-3. Do-it-yourself maintenance
Maintenance and care
use with your aluminum wheels.
When rotating, repairing or
changing your tires, check that
the wheel nuts ar e still tight after
driving 1600 km (1000 miles).
Be careful not to damage the
aluminum wheels when using
tire chains.
Use only Toyota genuine balance
weights or equivalent and a plas-
tic or rubber hammer when bal-
ancing your wheels.
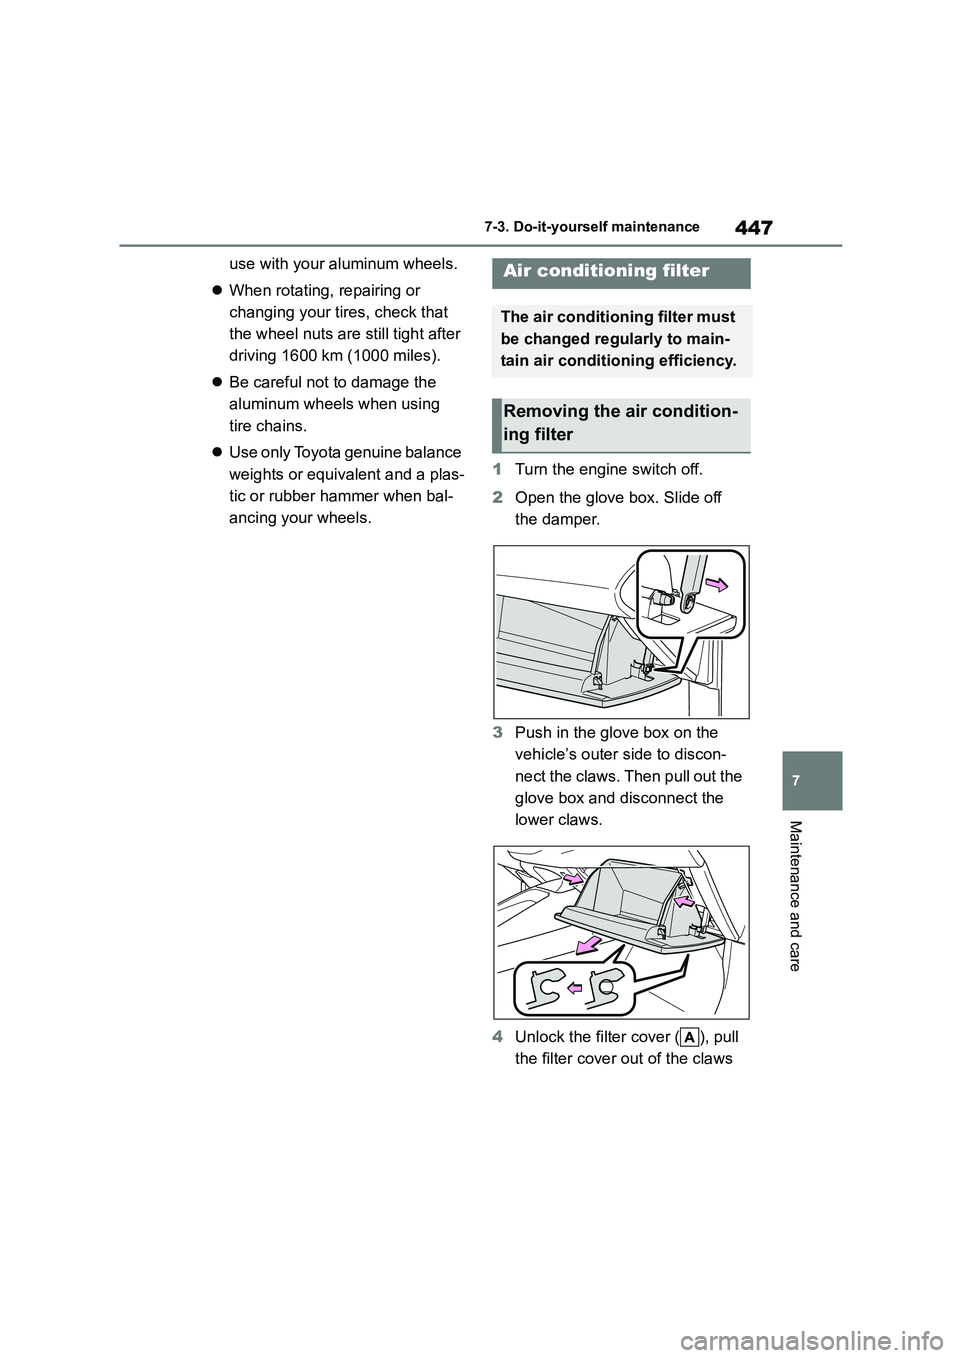
1 Turn the engine switch off.
2 Open the glove box. Slide off
the damper.
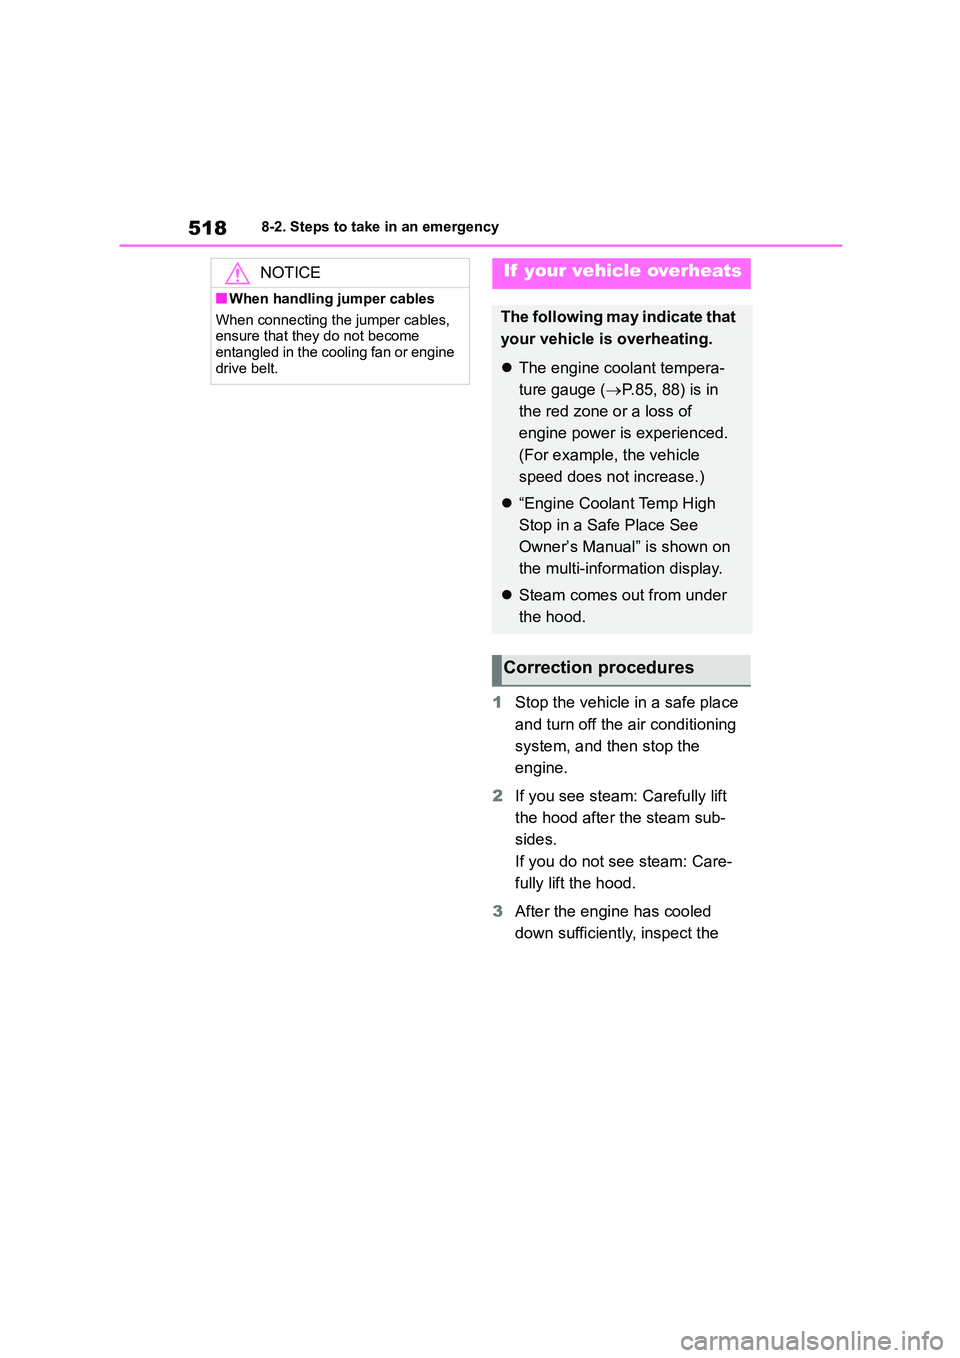
3 Push in the glove box on the
vehicle’s outer side to discon-
nect the claws. Then pull out the
glove box and disconnect the
lower claws.
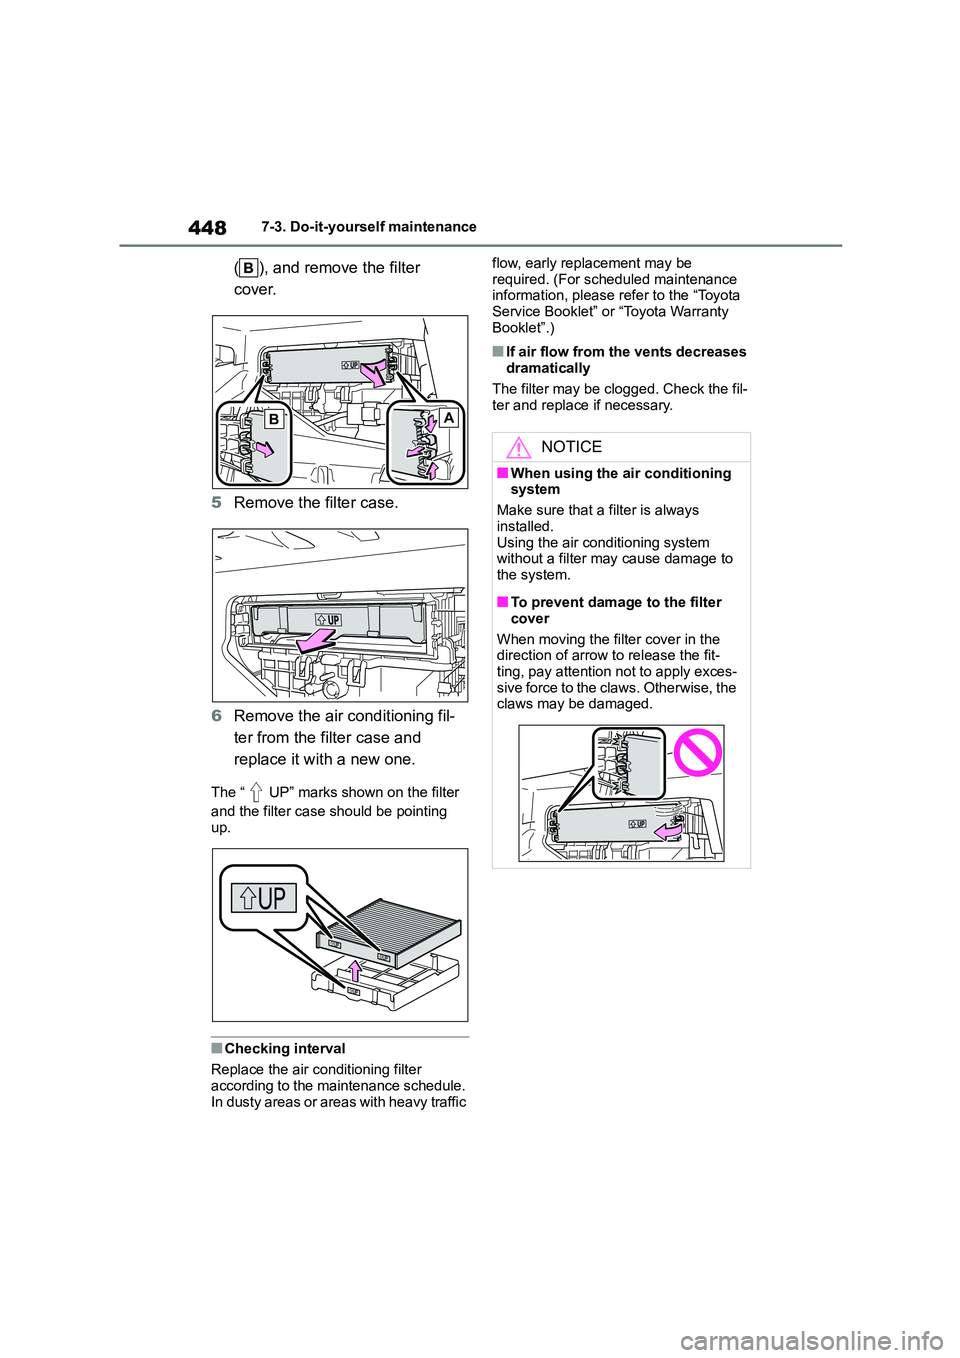
4 Unlock the filter cover ( ), pull
the filter cover out of the claws
Air conditioning filter
The air conditioning filter must
be changed regularly to main-
tain air conditioning efficiency.
Removing the air condition-
ing filter
Page 450 of 678
4487-3. Do-it-yourself maintenance
( ), and remove the filter
cover.
5 Remove the filter case.
6 Remove the air conditioning fil-
ter from the filter case and
replace it with a new one.
The “ UP” marks shown on the filter
and the filter case should be pointing
up.
■Checking interval
Replace the air conditioning filter
according to the maintenance schedule.
In dusty areas or areas with heavy traffic
flow, early replacement may be
required. (For scheduled maintenance information, please refer to the “Toyota
Service Booklet” or “Toyota Warranty
Booklet”.)
■If air flow from the vents decreases dramatically
The filter may be clogged. Check the fil-
ter and replace if necessary.AB
NOTICE
■When using the air conditioning system
Make sure that a filter is always
installed. Using the air conditioning system
without a filter may cause damage to
the system.
■To prevent damage to the filter
cover
When moving the filter cover in the
direction of arrow to release the fit-
ting, pay attention not to apply exces- sive force to the claws. Otherwise, the
claws may be damaged.
Page 520 of 678
5188-2. Steps to take in an emergency
1Stop the vehicle in a safe place
and turn off the air conditioning
system, and then stop the
engine.
2 If you see steam: Carefully lift
the hood after the steam sub-
sides.
If you do not see steam: Care-
fully lift the hood.
3 After the engine has cooled
down sufficiently, inspect the
NOTICE
■When handling jumper cables
When connecting the jumper cables,
ensure that they do not become entangled in the cooling fan or engine
drive belt.
If your vehicle overheats
The following may indicate that
your vehicle is overheating.
The engine coolant tempera-
ture gauge ( P.85, 88) is in
the red zone or a loss of
engine power is experienced.
(For example, the vehicle
speed does not increase.)
“Engine Coolant Temp High
Stop in a Safe Place See
Owner’s Manual” is shown on
the multi-information display.
Steam comes out from under
the hood.
Correction procedures
Page 521 of 678
519
8
8-2. Steps to take in an emergency
When trouble arises
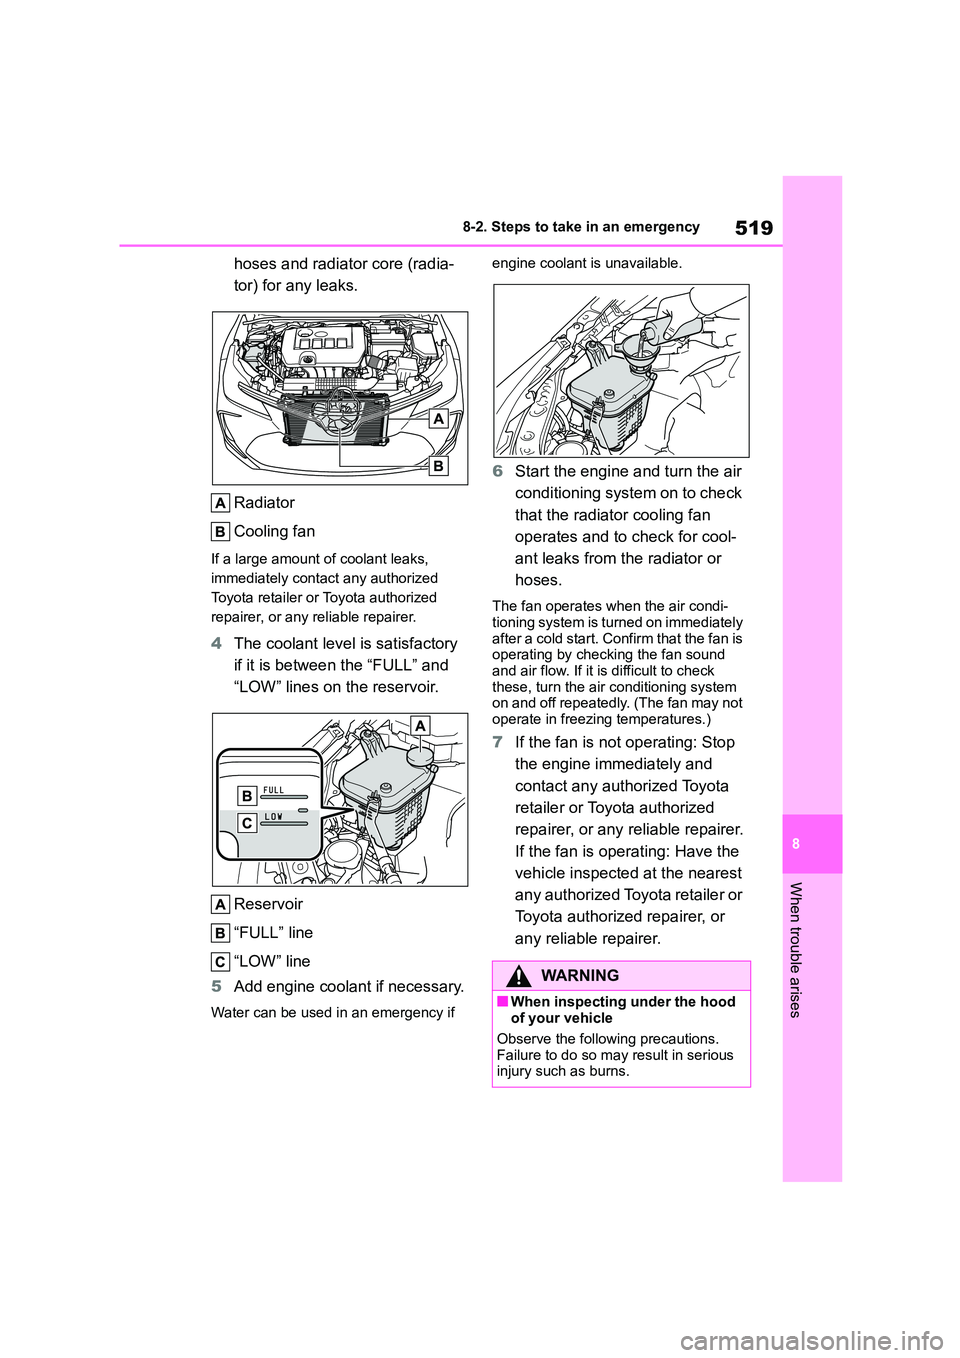
hoses and radiator core (radia-
tor) for any leaks.
Radiator
Cooling fan
If a large amount of coolant leaks,
immediately contact any authorized
Toyota retailer or Toyota authorized
repairer, or any reliable repairer.
4 The coolant level is satisfactory
if it is between the “FULL” and
“LOW” lines on the reservoir.
Reservoir
“FULL” line
“LOW” line
5 Add engine coolant if necessary.
Water can be used in an emergency if
engine coolant is unavailable.
6 Start the engine and turn the air
conditioning system on to check
that the radiator cooling fan
operates and to check for cool-
ant leaks from the radiator or
hoses.
The fan operates when the air condi-
tioning system is turned on immediately
after a cold start. Confirm that the fan is operating by checking the fan sound
and air flow. If it is difficult to check
these, turn the air conditioning system on and off repeatedly. (The fan may not
operate in freezing temperatures.)
7 If the fan is not operating: Stop
the engine immediately and
contact any authorized Toyota
retailer or Toyota authorized
repairer, or any reliable repairer.
If the fan is operating: Have the
vehicle inspected at the nearest
any authorized Toyota retailer or
Toyota authorized repairer, or
any reliable repairer.
WA R N I N G
■When inspecting under the hood of your vehicle
Observe the following precautions.
Failure to do so ma y result in serious injury such as burns.
Page 528 of 678
5269-1. Specifications
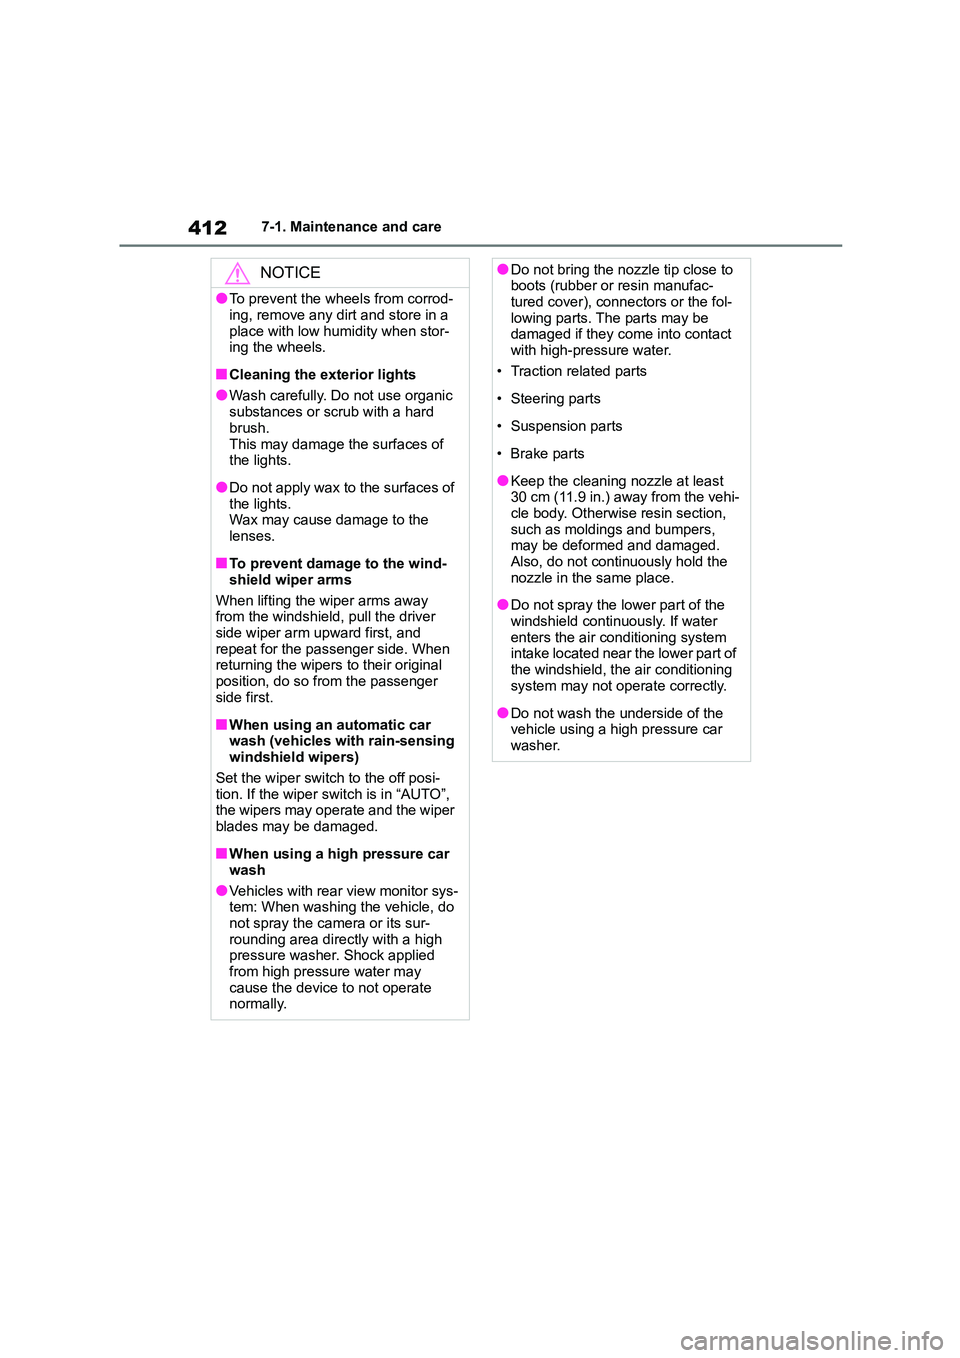
*: Drive belt deflection with 98 N (10 kgf, 22 lbf) thumb force (used belt)
Crankshaft
Generator
Water pump
Air conditioning compressor
Valve clearanceAutomatic adjustment
Drive belt tension
1ZR-FAE engine
7.6 10.0 mm (0.30 0.39 in.)*
M15A-FKS engine
Automatic adjustment
Fuel
Fuel type
When you find these types of fuel label at
the gas station, use only the fuel with one
of the following labels.
EU area:
Unleaded gasoline conforming to Euro-
pean standard EN228 only
Except EU area:
Unleaded gasoline only
Page 548 of 678
5469-2. Customization
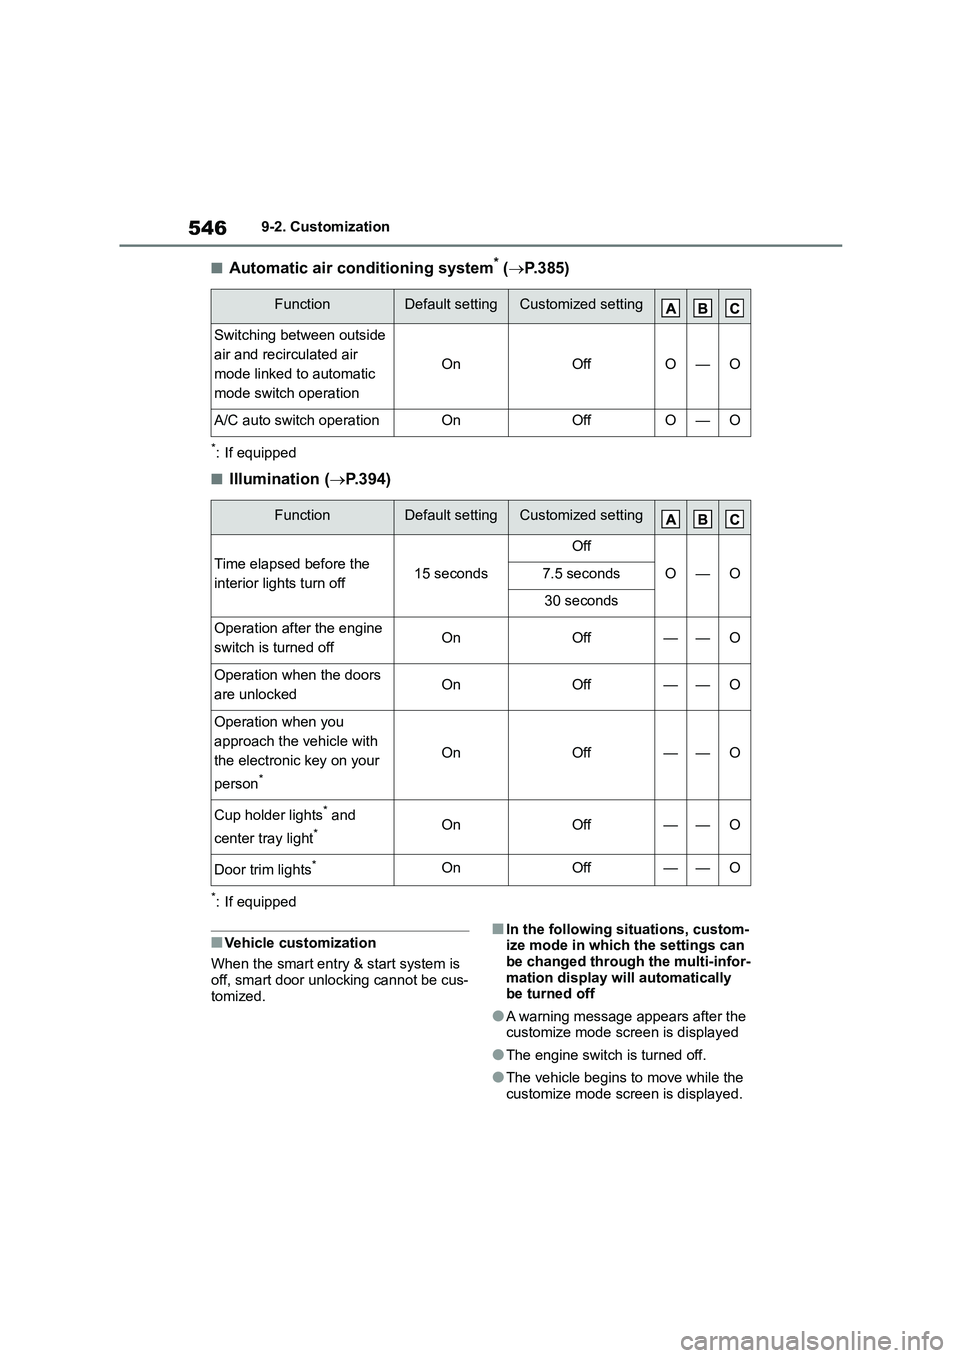
■Automatic air conditioning system* (P. 3 8 5 )
*: If equipped
■Illumination (P.394)
*: If equipped
■Vehicle customization
When the smart entry & start system is
off, smart door unlocking cannot be cus- tomized.
■In the following situations, custom-ize mode in which the settings can
be changed through the multi-infor-
mation display will automatically be turned off
●A warning message appears after the customize mode screen is displayed
●The engine switch is turned off.
●The vehicle begins to move while the
customize mode screen is displayed.
FunctionDefault settingCustomized setting
Switching between outside
air and recirculated air
mode linked to automatic
mode switch operation
OnOffO—O
A/C auto switch operationOnOffO—O
FunctionDefault settingCustomized setting
Time elapsed before the
interior lights turn off15 seconds
Off
O—O7.5 seconds
30 seconds
Operation after the engine
switch is turned offOnOff——O
Operation when the doors
are unlockedOnOff——O
Operation when you
approach the vehicle with
the electronic key on your
person*
OnOff——O
Cup holder lights* and
center tray light*OnOff——O
Door trim lights*OnOff——O