2022 TOYOTA COROLLA roof
[x] Cancel search: roofPage 118 of 678
1163-2. Opening, closing and locking the doors
■If the battery is discharged (vehi-
cles with a smart entry & start sys- tem)
The doors cannot be locked and
unlocked using the entry function (if equipped) or wireless remote control.
Lock or unlock the doors using the
mechanical key. ( P.512)
■Customization
Some functions can be customized.
( P.538)
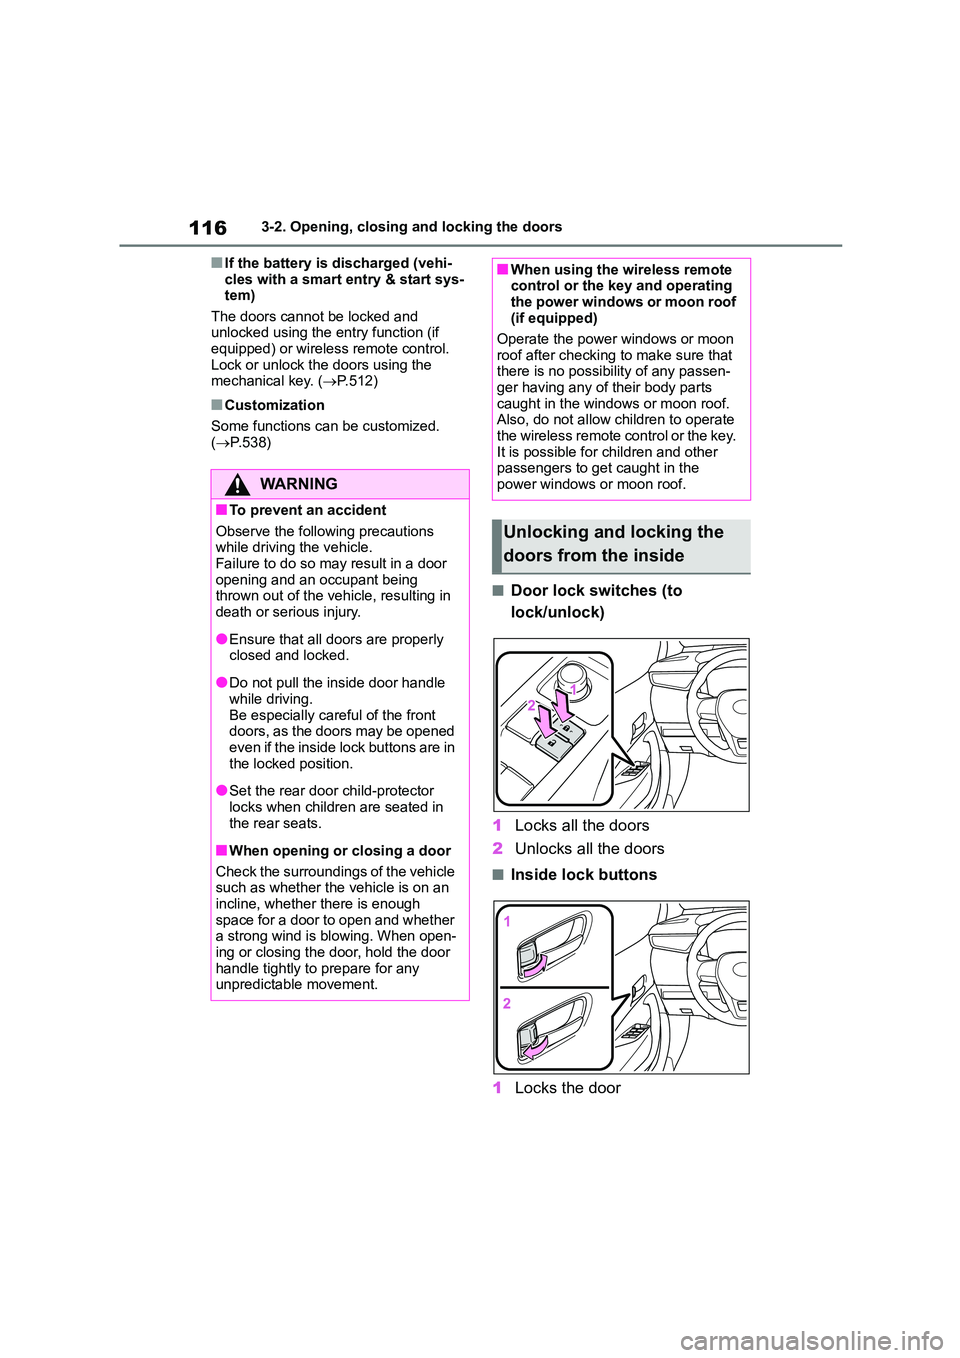
■Door lock switches (to
lock/unlock)
1 Locks all the doors
2 Unlocks all the doors
■Inside lock buttons
1 Locks the door
WA R N I N G
■To prevent an accident
Observe the following precautions while driving the vehicle.
Failure to do so may result in a door
opening and an occupant being thrown out of the vehicle, resulting in
death or serious injury.
●Ensure that all doors are properly
closed and locked.
●Do not pull the inside door handle
while driving.
Be especially careful of the front doors, as the doors may be opened
even if the inside lock buttons are in
the locked position.
●Set the rear door child-protector
locks when children are seated in the rear seats.
■When opening or closing a door
Check the surroundings of the vehicle
such as whether the vehicle is on an
incline, whether there is enough space for a door to open and whether
a strong wind is blowing. When open-
ing or closing the door, hold the door handle tightly to prepare for any
unpredictable movement.
■When using the wireless remote control or the key and operating
the power windows or moon roof
(if equipped)
Operate the power windows or moon
roof after checking to make sure that
there is no possibility of any passen- ger having any of their body parts
caught in the windows or moon roof.
Also, do not allow children to operate the wireless remote control or the key.
It is possible for children and other
passengers to get caught in the power windows or moon roof.
Unlocking and locking the
doors from the inside
Page 141 of 678
139
3
3-5. Opening and closing the windows
Before driving
*: If equipped
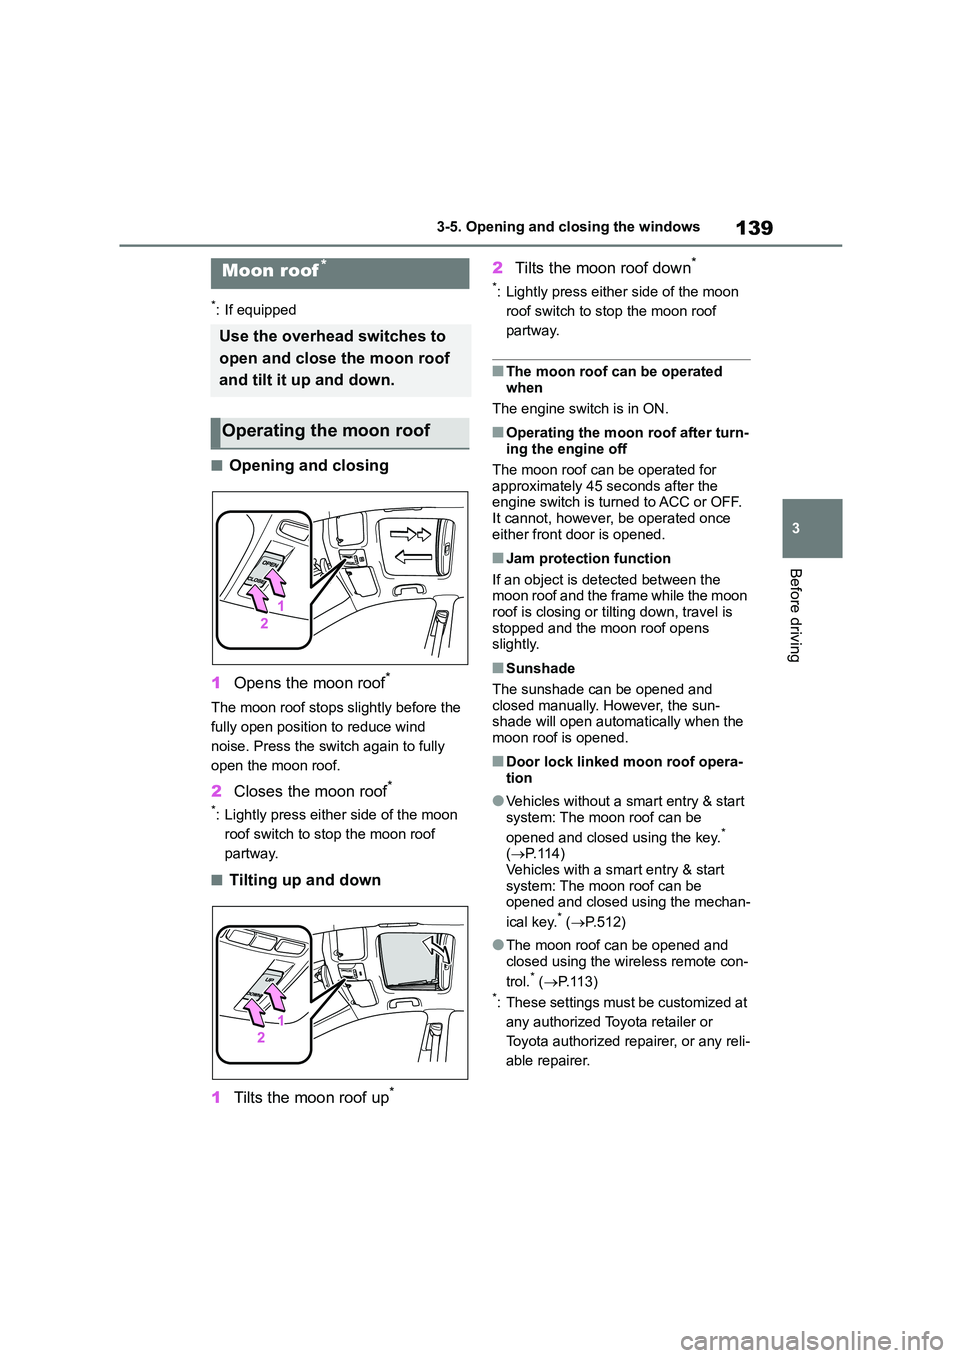
■Opening and closing
1 Opens the moon roof*
The moon roof stops slightly before the
fully open position to reduce wind
noise. Press the switch again to fully
open the moon roof.
2 Closes the moon roof*
*: Lightly press either side of the moon
roof switch to stop the moon roof
partway.
■Tilting up and down
1 Tilts the moon roof up*
2Tilts the moon roof down*
*: Lightly press either side of the moon
roof switch to stop the moon roof
partway.
■The moon roof can be operated
when
The engine switch is in ON.
■Operating the moon roof after turn- ing the engine off
The moon roof can be operated for
approximately 45 seconds after the engine switch is turned to ACC or OFF.
It cannot, however, be operated once
either front door is opened.
■Jam protection function
If an object is detected between the moon roof and the frame while the moon
roof is closing or tilting down, travel is
stopped and the moon roof opens slightly.
■Sunshade
The sunshade can be opened and
closed manually. However, the sun- shade will open automatically when the
moon roof is opened.
■Door lock linked moon roof opera-
tion
●Vehicles without a smart entry & start
system: The moon roof can be
opened and closed using the key.* ( P. 1 1 4 )
Vehicles with a smart entry & start
system: The moon roof can be opened and closed using the mechan-
ical key.* ( P.512)
●The moon roof can be opened and
closed using the wireless remote con-
trol.* ( P.113)*: These settings must be customized at
any authorized Toyota retailer or
Toyota authorized repairer, or any reli-
able repairer.
Moon roof*
Use the overhead switches to
open and close the moon roof
and tilt it up and down.
Operating the moon roof
Page 142 of 678
1403-5. Opening and closing the windows
■When the moon roof does not close
normally
Perform the following procedure:
●If the moon roof closes but then re-opens slightly
1 Stop the vehicle.
2 Press and hold the “CLOSE”
switch.*1
The moon roof will close, reopen and
pause for approximately 10 seconds.*2
Then it will close again, tilt up and pause
for approximately 1 second. Finally, it will tilt down, open and close.
3 Check to make sure that the moon
roof is completely closed and then
release the switch.
●If the moon roof tilts down but then tilts
back up
1 Stop the vehicle.
2 Press and hold the “UP” switch*1 until the moon roof moves into the tilt
up position and stops.
3 Release the “UP” switch once and
then press and hold the “UP” switch
again.*1
The moon roof will pause for approxi-
mately 10 seconds in the tilt up posi-
tion.*2 Then it will adjust slightly and
pause for approximately 1 second.
Finally, it will tilt down, open and close.
4 Check to make sure that the moon roof is completely closed and then
release the switch.*1: If the switch is released at the incor-
rect time, the procedure will have to
be performed again from the begin-
ning.
*2: If the switch is released after the
above mentioned 10 second pause,
automatic operation will be disabled.
In that case, press and hold the
“CLOSE” or “UP” switch, and the
moon roof will tilt up and pause for
approximately 1 second. Then it will
tilt down, open and close. Check to
make sure that the moon roof is com-
pletely closed and then release the
switch.
If the moon roof does not fully close
even after performing the above proce- dure correctly, have the vehicle
inspected by any authorized Toyota
retailer or Toyota authorized repairer, or any reliable repairer.
■Customization
Some functions can be customized.
( P.538)
WA R N I N G
Observe the following precautions. Failure to do so may cause death or
serious injury.
■Opening the moon roof
●Do not allow any passengers to put
their hands or heads outside the vehicle while it is moving.
●Do not sit on top of the moon roof.
■Opening and closing the moon
roof
●The driver is responsible for moon
roof opening and closing opera-
tions. In order to prevent accidental oper-
ation, especially by a child, do not
let a child operate the moon roof. It is possible for children and other
passengers to have body parts
caught in the moon roof.
Page 143 of 678
141
3
3-5. Opening and closing the windows
Before driving
WA R N I N G
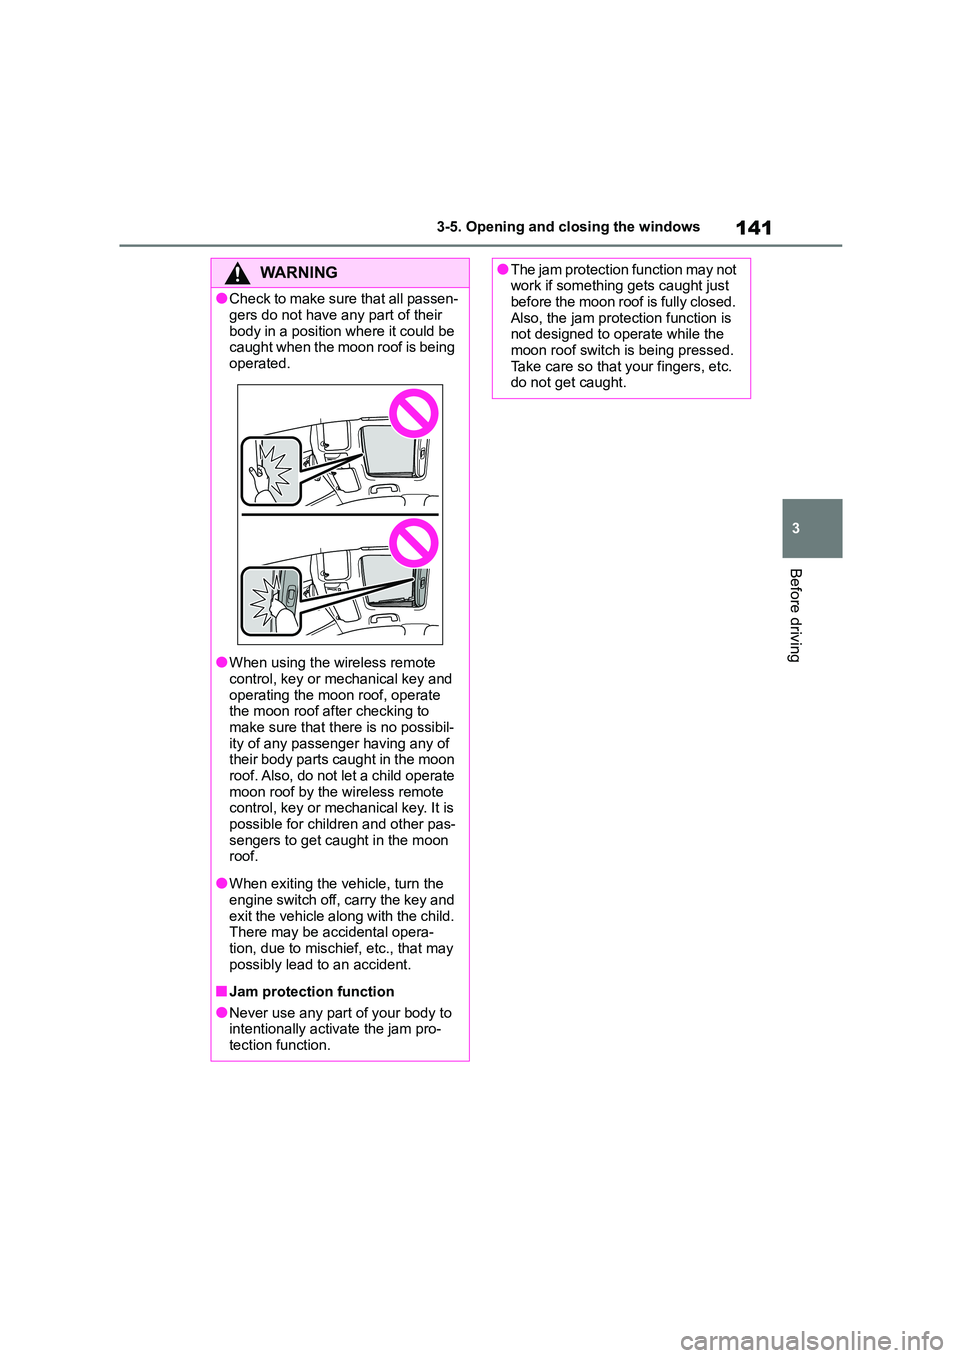
●Check to make sure that all passen-
gers do not have any part of their
body in a position where it could be caught when the moon roof is being
operated.
●When using the wireless remote
control, key or mechanical key and
operating the moon roof, operate the moon roof after checking to
make sure that there is no possibil-
ity of any passenger having any of their body parts caught in the moon
roof. Also, do not let a child operate
moon roof by the wireless remote control, key or mechanical key. It is
possible for children and other pas-
sengers to get caught in the moon roof.
●When exiting the vehicle, turn the engine switch off, carry the key and
exit the vehicle along with the child.
There may be accidental opera- tion, due to mischief, etc., that may
possibly lead to an accident.
■Jam protection function
●Never use any part of your body to
intentionally activate the jam pro- tection function.
●The jam protection function may not work if something gets caught just
before the moon roof is fully closed.
Also, the jam protection function is not designed to operate while the
moon roof switch is being pressed.
Take care so that your fingers, etc. do not get caught.
Page 194 of 678
1924-5. Using the driving support systems
WA R N I N G
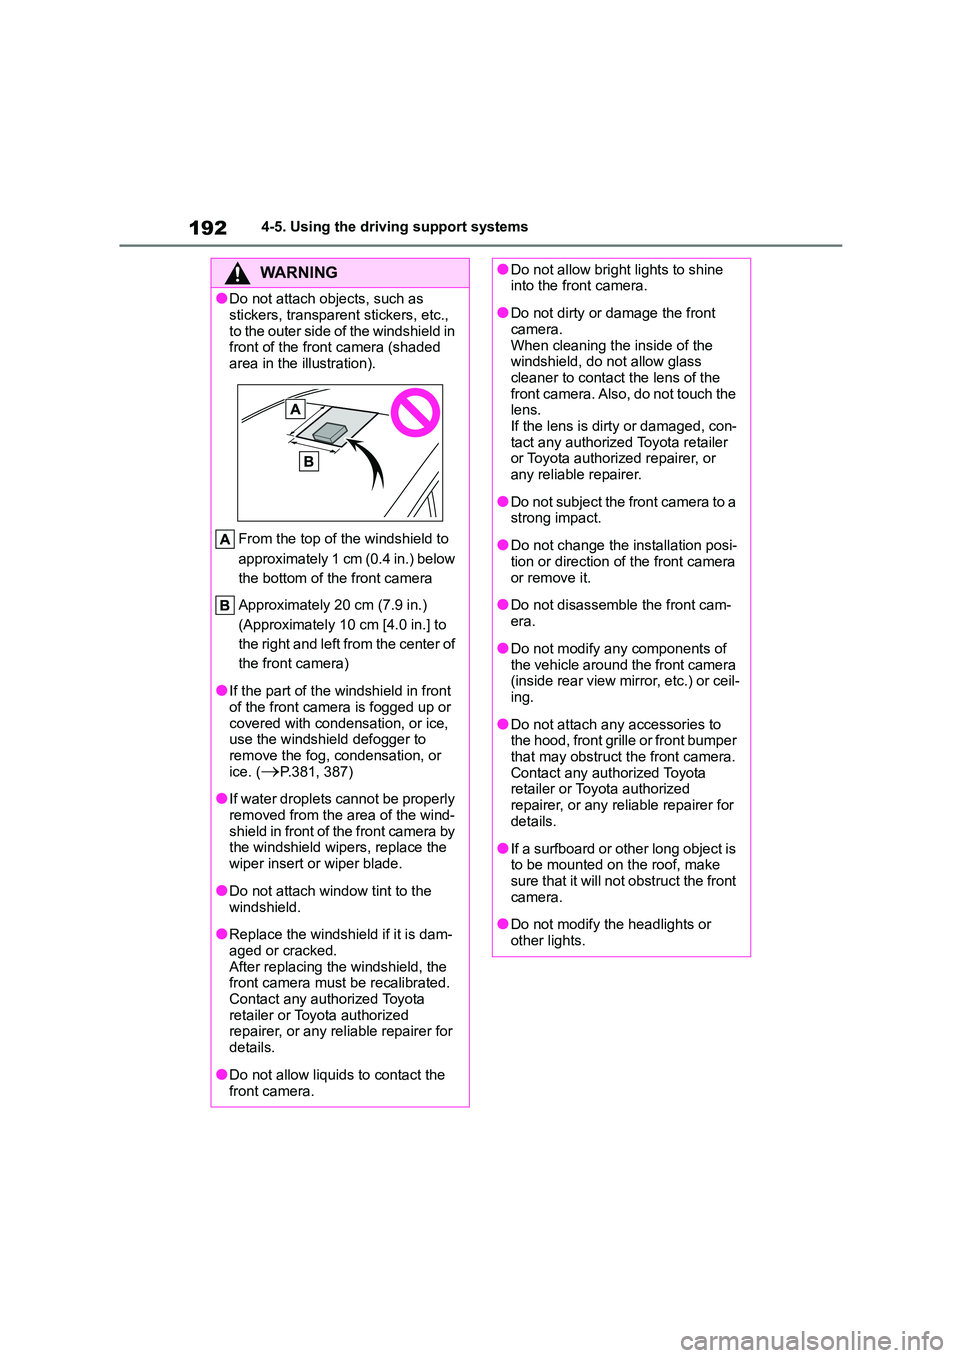
●Do not attach objects, such as
stickers, transparent stickers, etc.,
to the outer side of the windshield in front of the front camera (shaded
area in the illustration).
From the top of the windshield to
approximately 1 cm (0.4 in.) below
the bottom of the front camera
Approximately 20 cm (7.9 in.)
(Approximately 10 cm [4.0 in.] to
the right and left from the center of
the front camera)
●If the part of the windshield in front
of the front camera is fogged up or
covered with condensation, or ice, use the windshield defogger to
remove the fog, condensation, or
ice. (P.381, 387)
●If water droplets cannot be properly
removed from the area of the wind- shield in front of the front camera by
the windshield wipers, replace the
wiper insert or wiper blade.
●Do not attach window tint to the
windshield.
●Replace the windshield if it is dam-
aged or cracked. After replacing the windshield, the
front camera must be recalibrated.
Contact any authorized Toyota retailer or Toyota authorized
repairer, or any reliable repairer for
details.
●Do not allow liquids to contact the
front camera.
●Do not allow bright lights to shine into the front camera.
●Do not dirty or damage the front camera.
When cleaning the inside of the
windshield, do not allow glass cleaner to contact the lens of the
front camera. Also, do not touch the
lens. If the lens is dirty or damaged, con-
tact any authorized Toyota retailer
or Toyota authorized repairer, or any reliable repairer.
●Do not subject the front camera to a strong impact.
●Do not change the installation posi-tion or direction of the front camera
or remove it.
●Do not disassemble the front cam-
era.
●Do not modify any components of
the vehicle around the front camera
(inside rear view mirror, etc.) or ceil- ing.
●Do not attach any accessories to the hood, front grille or front bumper
that may obstruct the front camera.
Contact any authorized Toyota retailer or Toyota authorized
repairer, or any reliable repairer for
details.
●If a surfboard or other long object is
to be mounted on the roof, make sure that it will not obstruct the front
camera.
●Do not modify the headlights or
other lights.
Page 324 of 678
3224-6. Driving tips
Perform the following according to
the driving conditions:
Do not try to forcibly open a win-
dow or move a wiper that is fro-
zen. Pour warm water over the
frozen area to melt the ice. Wipe
away the water immediately to
prevent it from freezing.
To ensure proper operation of
the climate control system fan,
remove any snow that has accu-
mulated on the air inlet vents in
front of the windshield.
Check for and remove any
excess ice or snow that may
have accumulated on the exte-
rior lights, vehicle’s roof, chassis,
around the tires or on the brakes.
Remove any snow or mud from
the bottom of your shoes before
getting in the vehicle.
Accelerate the vehicle slowly, keep
a safe distance between you and
the vehicle ahead, and drive at a
reduced speed suitable to road
conditions.
Park the vehicle and shift the
shift lever to P (Multidrive), or 1
or R (manual transmission) with-
out setting the parking brake.
The parking brake may freeze
up, preventing it from being
released. If the vehicle is parked
without setting the parking brake,
make sure to block the wheels.
Failure to do so may be danger-
ous because it may cause the
vehicle to move unexpectedly,
possibly leading to an accident.
Vehicles with a Multidrive: If the
vehicle is parked without setting
the parking brake, confirm that
the shift lever cannot be moved
out of P*.
*: The shift lever will be locked if it is
attempted to be shifted from P to any
other position without depressing the
brake pedal. If the shift lever can be
shifted from P, there may be a prob-
lem with the shift lock system. Have
the vehicle inspected by any author-
ized Toyota retailer or Toyota author-
ized repairer, or any reliable repairer
or legitimate tire retailers immedi-
ately.
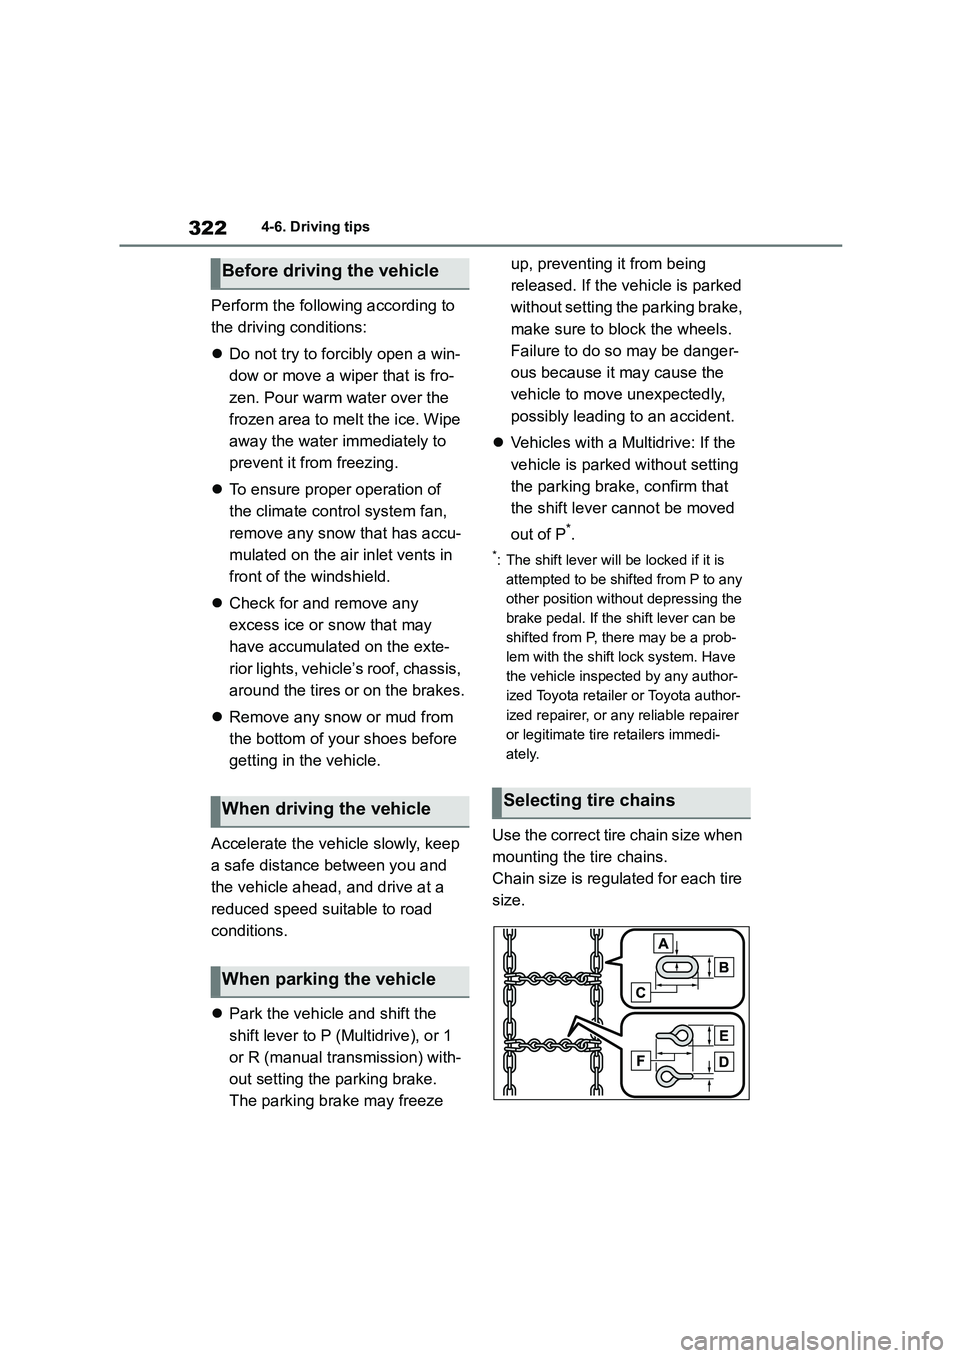
Use the correct tire chain size when
mounting the tire chains.
Chain size is regulated for each tire
size.
Before driving the vehicle
When driving the vehicle
When parking the vehicle
Selecting tire chains
Page 412 of 678
4107-1. Maintenance and care
7-1.Maintenance and care
Working from top to bottom, lib-
erally apply water to the vehicle
body, wheel wells and underside
of the vehicle to remove any dirt
and dust.
Wash the vehicle body using a
sponge or soft cloth, such as a
chamois.
For hard-to-remove marks, use
car wash soap and rinse thor-
oughly with water.
Wipe away any water.
Wax the vehicle when the water-
proof coating deteriorates.
If water does not bead on a clean sur-
face, apply wax when the vehicle body
is cool.
■Automatic car washes
●Fold the mirrors before washing the
vehicle. Start washing from the front of
the vehicle. Make sure to extend the mirrors before driving.
●Brushes used in automatic car washes may scratch the vehicle sur-
face, parts (wheel, etc.) and harm
your vehicle’s paint.
■High pressure car washes
As water may enter the cabin, do not
bring the nozzle tip near the gaps
around the doors or perimeter of the
windows, or spray these areas continu-
ously.
■When using a car wash (vehicles with entry function)
If the door handle becomes wet while
the electronic key is within the effective range, the door may lock and unlock
repeatedly. In that case, follow the fol-
lowing correction procedures to wash the vehicle:
●Place the key in a position 2 m (6 ft.) or more separate from the vehicle
while the vehicle is being washed.
(Take care to ensure that the key is not stolen.)
●Set the electronic key to battery-sav-ing mode to disable the smart entry &
start system. ( P.122)
■Wheels and wheel ornaments
●Remove any dirt immediately by using
a neutral detergent.
●Wash detergent off with water immedi-
ately after use.
●To protect the paint from damage,
make sure to observe the following
precautions. • Do not use acidic, alkaline or abrasive
detergent
• Do not use hard brushes • Do not use detergent on the wheels
when they are hot, such as after driv-
ing or parking in hot weather
■Brake pads and calipers
Rust may form if the vehicle is parked
with wet brake pads or disc rotors, caus-
ing them to stick. Before parking the vehicle after it is washed, drive slowly
and apply the brakes several times to
dry the parts.
■Bumpers
Do not scrub with abrasive cleaners.
■Plated portions
If dirt cannot be removed, clean the
parts as follows:
●Use a soft cloth dampened with an
approximately 5% solution of neutral
detergent and water to clean the dirt
Cleaning and protecting
the vehicle exterior
Perform cleaning in a manner
appropriate to each compo-
nent and its material.
Cleaning instructions
Page 499 of 678
497
8
8-2. Steps to take in an emergency
When trouble arises
WA R N I N G
●To avoid risk of burst or severe
leakage, do not drop or damage the
bottle. Visually inspect the bottle before use. Do not use a bottle with
shock, crack, scratch, leakage or
any other damage. In such case, immediately replace.
■Driving to spread the liquid seal-
ant evenly
Observe the following precautions to
reduce the risk of accidents.
Failing to do so may result in a loss of vehicle control and cause death or
serious injury.
●Drive the vehicle carefully at a low
speed. Be especially careful when
turning and cornering.
●If the vehicle does not drive straight
or you feel a pull through the steer- ing wheel, stop the vehicle and
check the following.
• Tire condition. The tire may have separated from the wheel.
• Tire inflation pressure. If the tire inflation pressure is 130 kPa (1.3
kgf/cm2 or bar, 19 psi) or less, the
tire may be severely damaged.
NOTICE
■When performing an emergency repair
●A tire should only be repaired with
the emergency tire puncture repair kit if the damage is caused by a
sharp object such as nail or screw
passing through the tire tread. Do not remove the sharp object
from the tire. Removing the object
may widen the opening and disenable emergency repair with
the repair kit.
●The repair kit is not waterproof. Make sure that the repair kit is not
exposed to water, such as when it
is being used in the rain.
●Do not put the repair kit directly
onto dusty ground such as sand at the side of the road. If the repair kit
vacuums up dust etc., a malfunc-
tion may occur.
●Do not turn the bottle upside down
when using it, as doing so may cause damage to the compressor.
■Precautions for the emergency tire puncture repair kit
●The repair kit power source should
be 12 V DC suitable for vehicle use. Do not connect the repair kit to any
other source.
●If fuel splatters on the repair kit, the
repair kit may deteriorate. Take
care not to allow fuel to contact it.
●Place the repair kit in a storage to
prevent it from being exposed to dirt or water.
●Store the repair kit in the tool tray under the deck mat out of reach of
children.
●Do not disassemble or modify the
repair kit. Do not subject parts such
as the air pressure indicator to impacts. This may cause a malfunc-
tion.