2022 TOYOTA AVALON HYBRID change time
[x] Cancel search: change timePage 107 of 584
1072. Instrument cluster
2
Instrument cluster
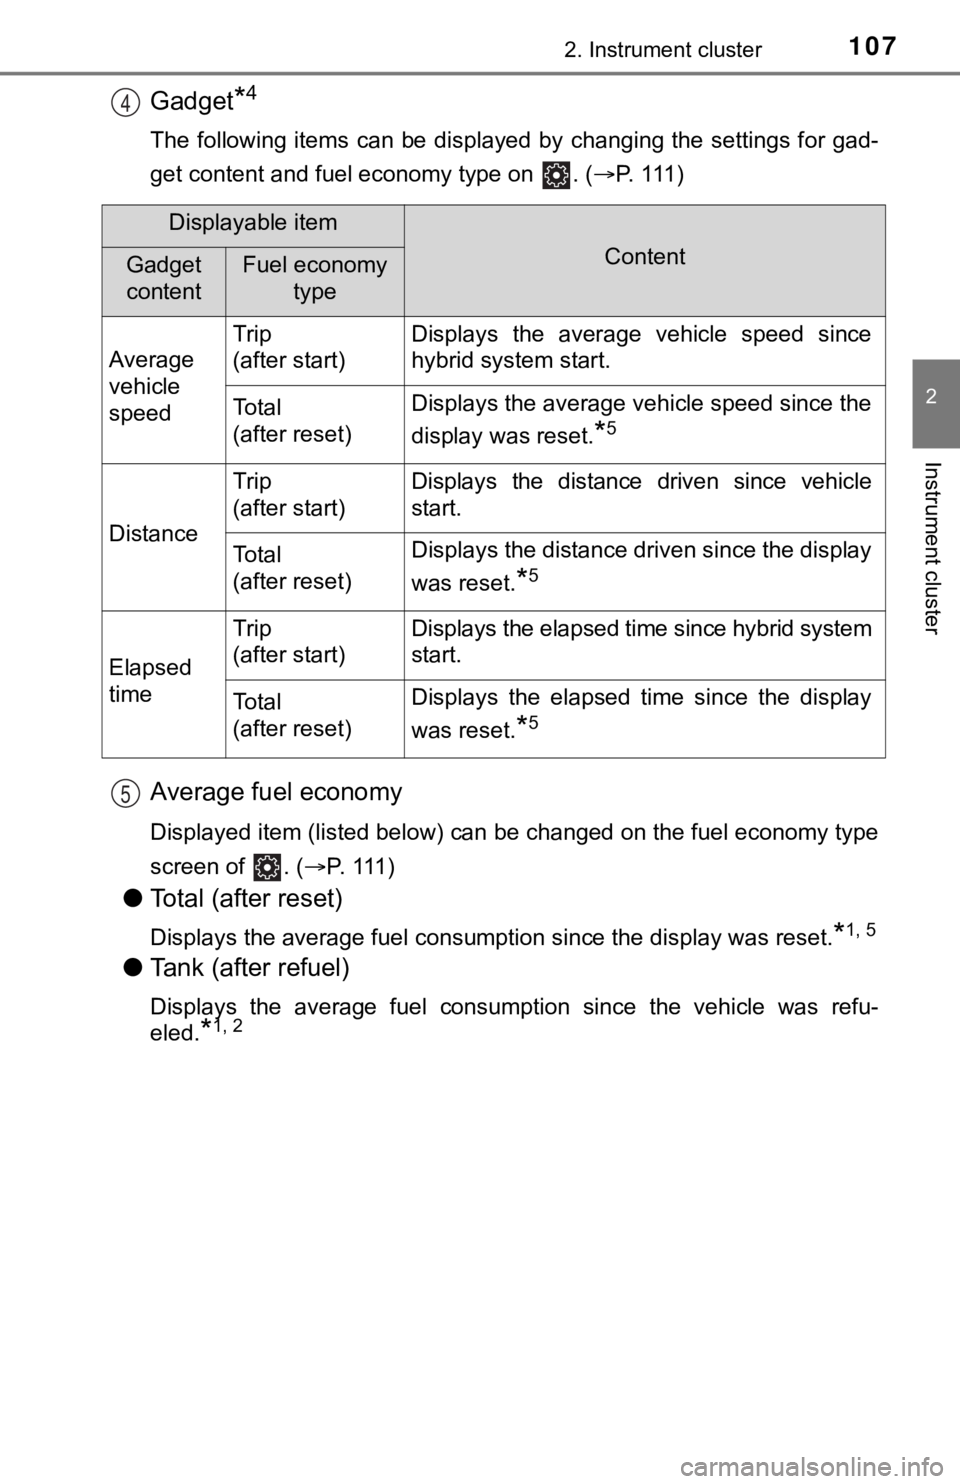
Gadget*4
The following items can be displayed by changing the settings for gad-
get content and fuel economy type on . ( P. 1 1 1 )
Average fuel economy
Displayed item (listed below) can be changed on the fuel econom y type
screen of . ( P. 111 )
●Total (after reset)
Displays the average fuel consumption since the display was res et.*1, 5
●Tank (after refuel)
Displays the average fuel consumption since the vehicle was ref u-
eled.
*1, 2
4
Displayable item
ContentGadget
contentFuel economy type
Average
vehicle
speed Trip
(after start)
Displays the average vehicle speed since
hybrid system start.
To t a l
(after reset)Displays the average vehicle speed since the
display was reset.
*5
Distance
Trip
(after start)Displays the distance driven since vehicle
start.
To t a l
(after reset)Displays the distance driven since the display
was reset.
*5
Elapsed
time
Trip
(after start)Displays the elapsed time since hybrid system
start.
To t a l
(after reset)Displays the elapsed time since the display
was reset.
*5
5
Page 118 of 584

1182. Instrument cluster
■ Meter settings
Press and hold to change the se ttings of the following items:
*1: Selecting this item will only change the gadget.
*2: Selecting this item will turn the display of the gadget off.
ItemSettingsDetails
Language Select to change the language
displayed.
UnitsSelect to change the units of
measure displayed.
(EV indicator)
OnSelect to enable/disable the EV
indicator. (
P. 77)
Off
SpeedometerOnSelect to enable/disable the
speedometer display.
Off
Gadget content
OffNo display
Average vehicle
speed
Select to turn the display of a
gadget.
Distance
Elapsed time
Fuel economy type
Trip (after start)*1
Select to change the average
fuel consumption display and an
item to be displayed as gadget.Total (after reset)
Tank
(after refuel)
*2
Multi-information display off
Select to turn the multi-informa-
tion display off.
To turn the multi-information dis-
play on again, press any direc-
tion switch ( /
//).
Pop-up display
Intersection guid-
ance (if equipped)
Select to enable/disable the pop-
up display.Incoming calls
Brightness adjust-
ment
Default settingSelect to reset the meter display
settings to the default setting.
Page 132 of 584
1322. Instrument cluster
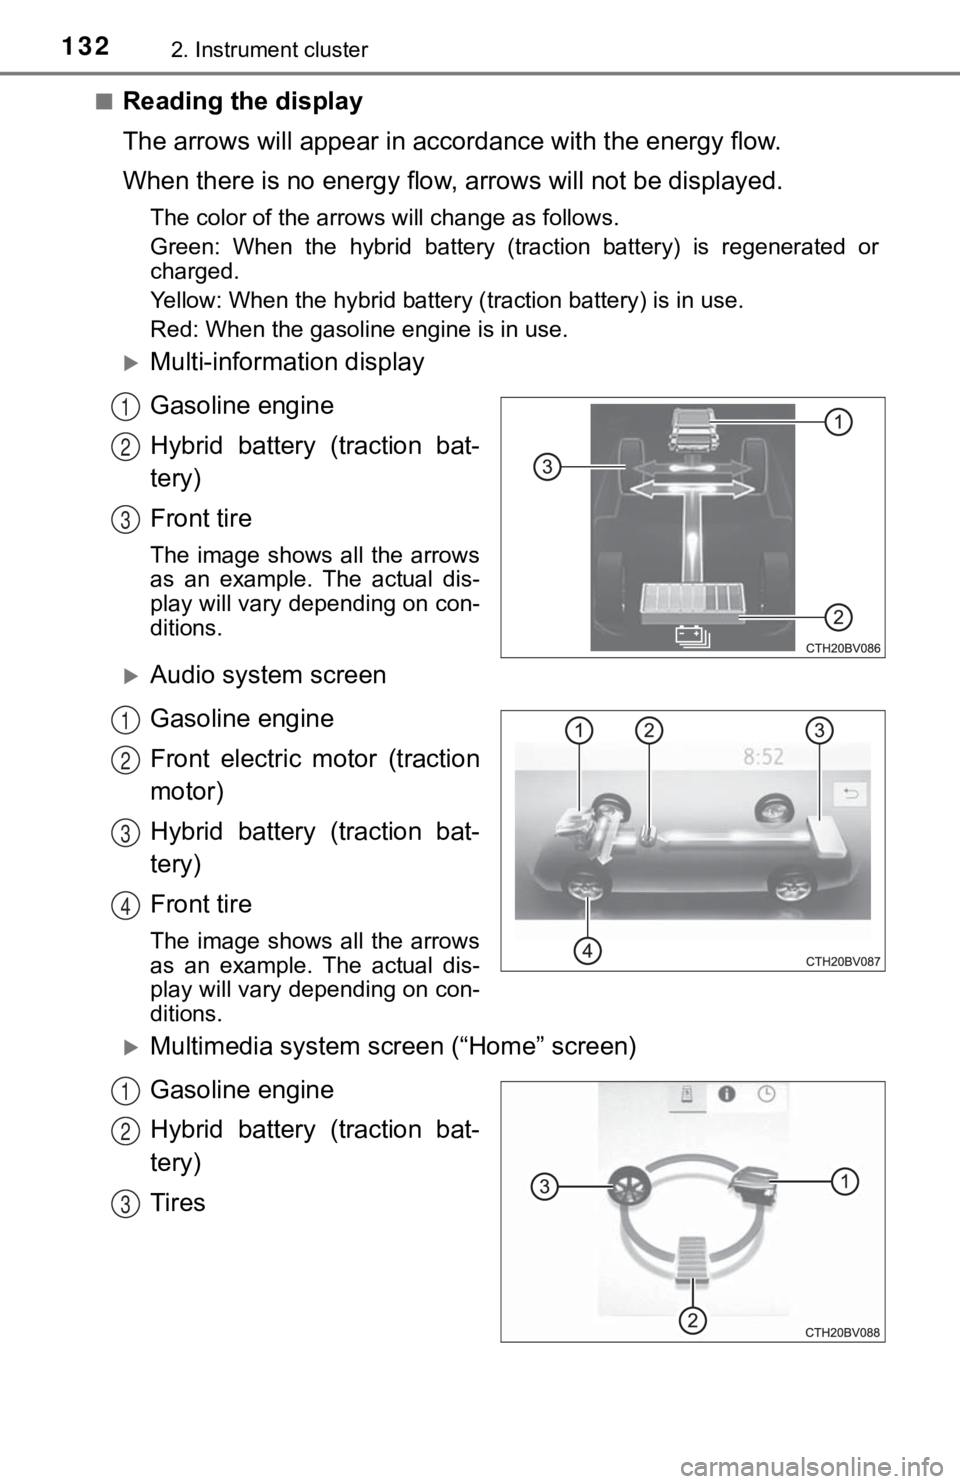
■Reading the display
The arrows will appear in accordance with the energy flow.
When there is no energy flow, a rrows will not be displayed.
The color of the arrows will change as follows.
Green: When the hybrid battery (traction battery) is regenerate d or
charged.
Yellow: When the hybrid battery (traction battery) is in use.
Red: When the gasoline engine is in use.
Multi-information display
Gasoline engine
Hybrid battery (traction bat-
tery)
Front tire
The image shows all the arrows
as an example. The actual dis-
play will vary depending on con-
ditions.
Audio system screen
Gasoline engine
Front electric motor (traction
motor)
Hybrid battery (traction bat-
tery)
Front tire
The image shows all the arrows
as an example. The actual dis-
play will vary depending on con-
ditions.
Multimedia system screen (“Home” screen)
Gasoline engine
Hybrid battery (traction bat-
tery)
Tires
1
2
3
1
2
3
4
1
2
3
Page 146 of 584
1463-2. Opening, closing and locking the doors
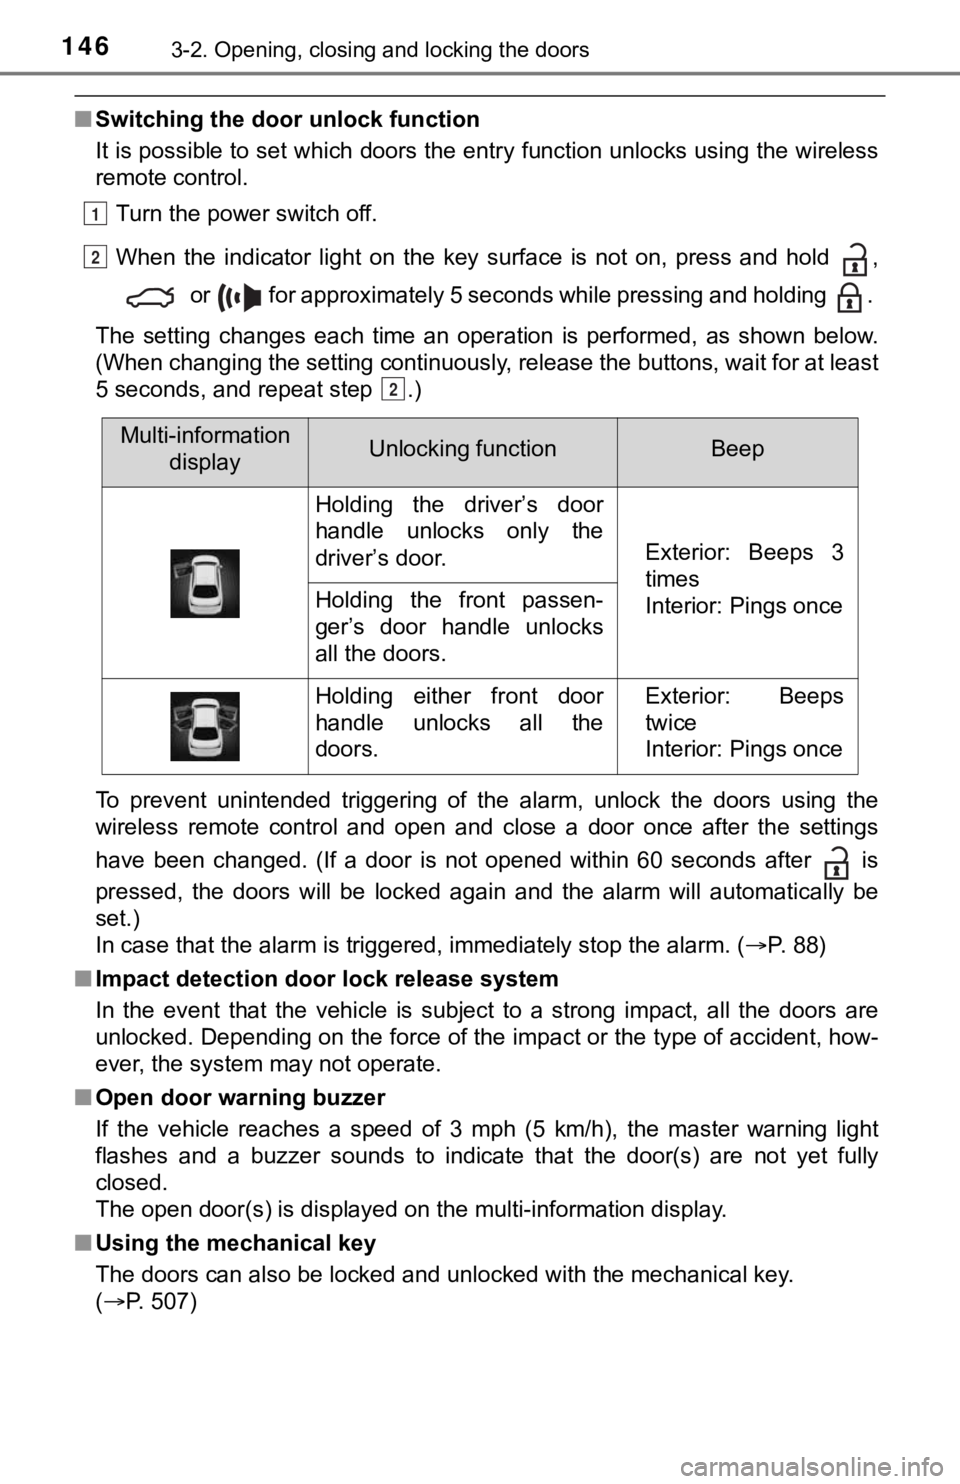
■Switching the door unlock function
It is possible to set which doors the entry function unlocks us ing the wireless
remote control.
Turn the power switch off.
When the indicator light on the key surface is not on, press and hold ,
or for approximately 5 seconds while pressing and holding .
The setting changes each time an operation is performed, as sho wn below.
(When changing the setting continuously, release the buttons, w ait for at least
5 seconds, and repeat step .)
To prevent unintended triggering of the alarm, unlock the doors using the
wireless remote control and open and close a door once after th e settings
have been changed. (If a door is not opened within 60 seconds a fter is
pressed, the doors will be locked again and the alarm will auto matically be
set.)
In case that the alarm is triggered, immediately stop the alarm . ( P. 88)
■ Impact detection door lock release system
In the event that the vehicle is subject to a strong impact, all the doors are
unlocked. Depending on the force of the impact or the type of a ccident, how-
ever, the system may not operate.
■ Open door warning buzzer
If the vehicle reaches a speed of 3 mph (5 km/h), the master warning light
flashes and a buzzer sounds to indicate that the door(s) are no t yet fully
closed.
The open door(s) is displayed on the multi-information display.
■ Using the mechanical key
The doors can also be locked and unlocked with the mechanical key.
(P. 507)
1
2
2
Multi-information
displayUnlocking functionBeep
Holding the driver’s door
handle unlocks only the
driver’s door.
Exterior: Beeps 3
times
Interior: Pings once
Holding the front passen-
ger’s door handle unlocks
all the doors.
Holding either front door
handle unlocks all the
doors.Exterior: Beeps
twice
Interior: Pings once
Page 156 of 584

1563-2. Opening, closing and locking the doors
■Note for the entry function
●Even when the electronic key is within the effective range (detection areas),
the system may not operate properly in the following cases:
• The electronic key is too close to the window or outside door handle, near
the ground, or in a high place when the doors are locked or unl ocked.
• The electronic key is near the ground or in a high place, or t oo close to
the rear bumper center when the trunk is opened.
• The electronic key is on the instrument panel, rear package tray or floor, or in the door pockets or glove box when the hybrid system is s tarted or
power switch modes are changed.
● Do not leave the electronic key on top of the instrument panel or near the
door pockets when exiting the vehicle. Depending on the radio w ave recep-
tion conditions, it may be detected by the antenna outside the cabin and the
door will become lockable from the outside, possibly trapping the electronic
key inside the vehicle.
● As long as the electronic key is within the effective range, th e doors may be
locked or unlocked by anyone. However, only the doors detecting the elec-
tronic key can be used to unlock the vehicle.
● Even if the electronic key is not inside the vehicle, it may be possible to start
the hybrid system if the electronic key is near the window.
● The doors may unlock or lock if a large amount of water splashes on the
door handle, such as in the rain or in a car wash, when the electronic key is
within the effective range. (The doors will automatically be lo cked after
approximately 60 seconds if the doors are not opened and closed.)
● If the wireless remote control is used to lock the doors when t he electronic
key is near the vehicle, there is a possibility that the door m ay not be
unlocked by the entry function. (Use the wireless remote contro l to unlock
the doors.)
● Touching the door lock sensor while wearing gloves may delay or prevent
lock operation. Remove the gloves and touch the lock sensor aga in.
● When the lock operation is performed using the lock sensor, rec ognition sig-
nals will be shown up to two consecutive times. After this, no recognition
signals will be given.
*
● If the door handle becomes wet while the electronic key is with in the effec-
tive range, the door may lock and unlock repeatedly. In this case, follow the
following correction procedures to wash the vehicle:
• Place the electronic key in a location 6 ft. (2 m) or more awa y from the
vehicle. (Take care to ensure that the key is not stolen.)
• Set the electronic key to battery-saving mode to disable the s mart key
system. ( P. 154)
● If the electronic key is inside the vehicle and a door handle b ecomes wet
during a car wash, a message may be shown on the multi-informat ion dis-
play and a buzzer will sound outside the vehicle. To turn off t he alarm, lock
all the doors.
Page 175 of 584
1753-4. Adjusting the steering wheel and mirrors
3
Operation of each component
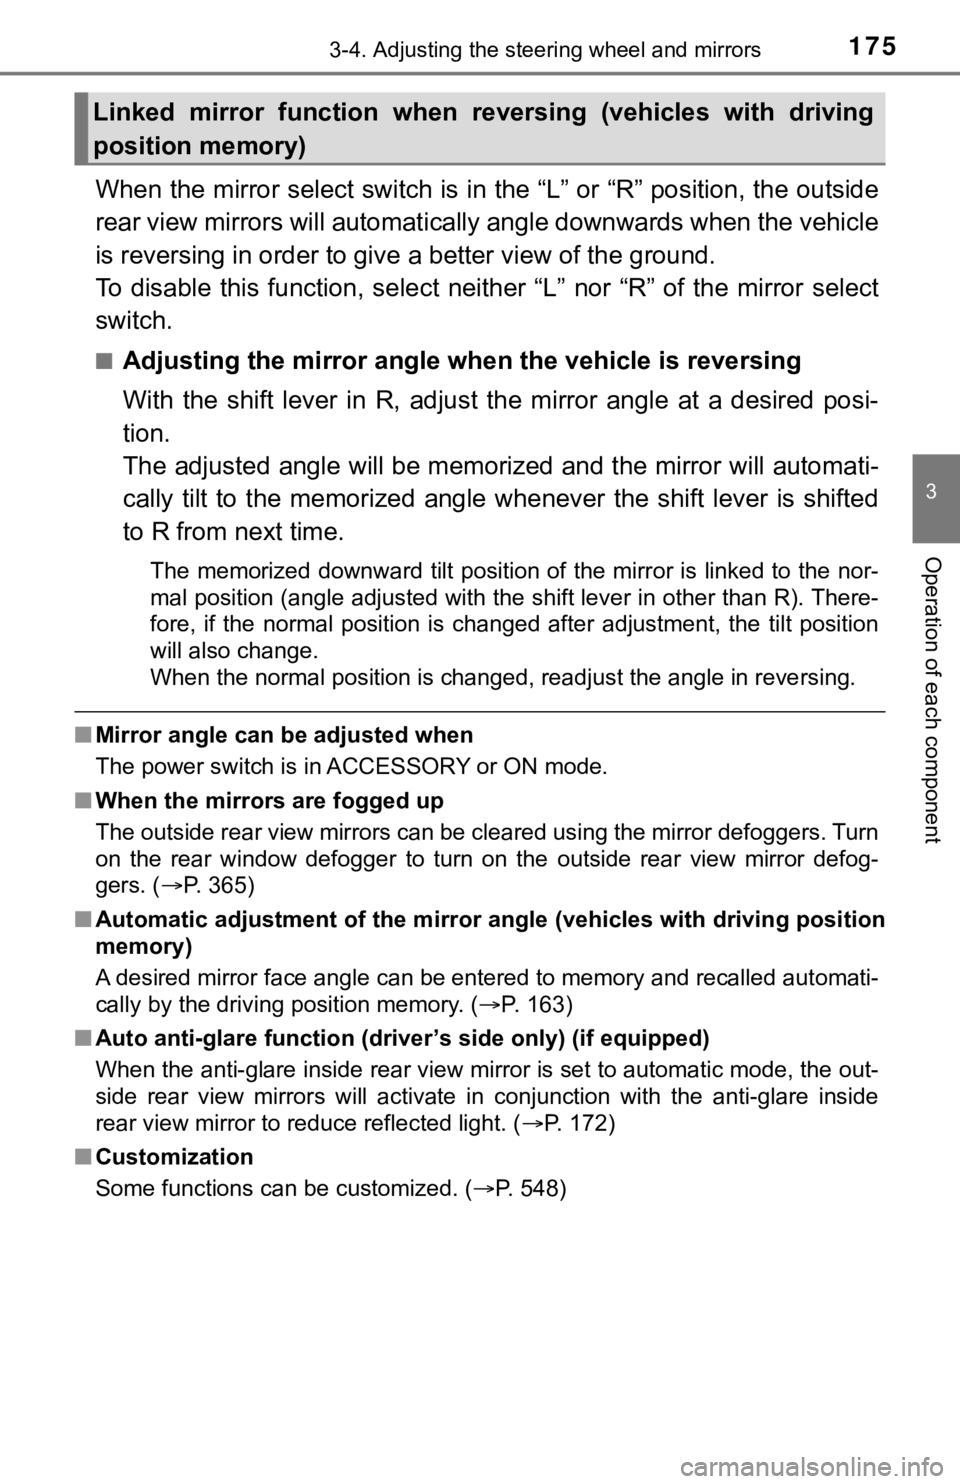
When the mirror select switch is in the “L” or “R” position, th e outside
rear view mirrors will automati cally angle downwards when the v ehicle
is reversing in order to give a better view of the ground.
To disable this function, select neither “L” nor “R” of the mirror select
switch.
■Adjusting the mirror angle when the vehicle is reversing
With the shift lever in R, adjust the mirror angle at a desired posi-
tion.
The adjusted angle will be memori zed and the mirror will automati-
cally tilt to the memorized angle whenever the shift lever is s hifted
to R from next time.
The memorized downward tilt position of the mirror is linked to the nor-
mal position (angle adjusted with the shift lever in other than R). There-
fore, if the normal position is changed after adjustment, the t ilt position
will also change.
When the normal position is changed, readjust the angle in reve rsing.
■Mirror angle can be adjusted when
The power switch is in ACCESSORY or ON mode.
■ When the mirrors are fogged up
The outside rear view mirrors can be cleared using the mirror d efoggers. Turn
on the rear window defogger to turn on the outside rear view mi rror defog-
gers. ( P. 365)
■ Automatic adjustment of the mirr or angle (vehicles with driving position
memory)
A desired mirror face angle can be entered to memory and recall ed automati-
cally by the driving position memory. ( P. 163)
■ Auto anti-glare function (driver’s side only) (if equipped)
When the anti-glare inside rear view mirror is set to automatic mode, the out-
side rear view mirrors will activate in conjunction with the an ti-glare inside
rear view mirror to reduce reflected light. ( P. 172)
■ Customization
Some functions can be customized. ( P. 548)
Linked mirror function when reversing (vehicles with driving
position memory)
Page 193 of 584
1934-1. Before driving
4
Driving
NOTICE
■When driving the vehicle
● Do not depress the accelerator and brake pedals at the same tim e during
driving, as this may restrain the hybrid system output.
● Do not use the accelerator pedal or depress the accelerator and brake
pedals at the same time to hold the vehicle on a hill.
■ When parking the vehicle
Always set the parking brake and shift the shift lever to P. Failure to do so
may cause the vehicle to move or the vehicle may accelerate sud denly if
the accelerator pedal is accidentally depressed.
■ Avoiding damage to vehicle parts
● Do not turn the steering wheel fully in either direction and ho ld it there for
an extended period of time.
Doing so may damage the power steering motor.
● When driving over bumps in the road, drive as slowly as possible to avoid
damaging the wheels, underside of the vehicle, etc.
■ If you get a flat tire while driving
A flat or damaged tire may cause the following situations. Hold the steering
wheel firmly and gradually depress the brake pedal to slow down the vehi-
cle.
● It may be difficult to control your vehicle.
● The vehicle will make abnormal sounds or vibrations.
● The vehicle will lean abnormally.
Information on what to do in case of a flat tire ( P. 494)
■ When encountering flooded roads
Do not drive on a road that has flooded after heavy rain etc. D oing so may
cause the following serious damage to the vehicle:
● Engine stalling
● Short in electrical components
● Engine damage caused by water immersion
In the event that you drive on a flooded road and the vehicle i s flooded, be
sure to have your Toyota dealer check the following:
● Brake function
● Changes in quantity and quality of oil and fluid used for the engine, hybrid
transmission, etc.
● Lubricant condition for the bearings and suspension joints (where possi-
ble), and the function of all joints, bearings, etc.
Page 201 of 584

2014-2. Driving procedures
4
Driving
Modes can be changed by pressing the power switch with brake pedal
released. (The mode changes each time the switch is pressed.)
Off
*
The emergency flashers can be
used.
ACCESSORY mode
Some electrical components such
as the audio system can be used.
A message indicating how to start
the hybrid system will be displayed
on the multi-information display.
ON mode
All electrical components can be
used.
A message indicating how to start
the hybrid system will be displayed
on the multi-information display.
*: If the shift lever is in a position other than P when turning off the hybrid sys-
tem, the power switch will be turned to ACCESSORY mode, not to off.
If the hybrid system is stopped with the shift lever in a position other
than P, a message indicating to shift the shift lever to P will be dis-
played on the multi-information display. At this time, the powe r switch
will not be turned off but instead be turned to ACCESSORY mode.
Perform the following procedure to turn the switch off:
Check that the park ing brake is set.
Shift the shift lever to P.
Check that “Turn Power Off” is displayed on the multi-informati on
display and then press the power switch once.
Check that “Turn Power Off” on the multi-information display is
turned off.
Changing power switch modes
1
2
3
When stopping the hybrid system with the shift lever in a posi-
tion other than P
1
2
3
4