2022 TESLA MODEL Y tow
[x] Cancel search: towPage 76 of 250

The towing package includes a 2" x 2" (5 cm x 5 cm)
hitch receiver that can support an accessory carrier (for bicycles, skis, snowboards, etc.) or tow a trailer.
Installing and Using a Carrier
When using the tow package to carry accessories, the 2"
x 2" (5 cm x 5 cm) square hitch receiver is designed to
support vertical loads of up to
160 lbs (72 kg). Ball
mounts that are compatible with the square receiver
must be purchased separately.
To install and use an accessory carrier, you must first
attach the ball mount to the hitch receiver (see
Attaching and Removing the Ball Mount on page 78).
Then, follow the instructions provided by your accessory
carrier. Observe all regulations and legal requirements in your state or region that apply to carrying accessories.
The Model Y towing package includes the wiring
necessary for using an accessory carrier equipped with
lights (see
Electrical Connections on page 78). The
package also includes Trailer Mode software compatibility (see
Trailer Mode on page 76).
NOTE: Go to http://www.tesla.com to purchase
accessories for your vehicle. Although third-party products are available, Tesla recommends and supports
only Tesla-approved products (see
Parts and
Accessories on page 179). The accessory products
available for your vehicle may vary based on market
region. Before attempting to install a non Tesla-
approved carrier, review the product information to ensure compatibility.
NOTE: When not in use, the ball mount should be
removed and stored in a dry location to prevent dust and corrosion. Keep the dust cover over the hitch housing to prevent dirt and debris from entering (see
Attaching and Removing the Ball Mount on page 78).
NOTE: Tesla assumes no responsibility for damage or
injuries resulting from installing and using an accessory carrier, for any omissions in the instructions
accompanying an accessory carrier, or for your failure to follow the instructions. Damage caused by using an
accessory carrier is not covered by the warranty.
Carrying Accessories
The hitch receiver is designed to support vertical loads
up to
160 lbs (72 kg). When carrying bicycles, skis, or
other items on the
Model Y hitch, always check to
ensure that the maximum weight is not exceeded. When calculating weight, remember to include the weight of
the accessory carrier.
For example, assuming the carrier
weighs 40 lbs (18 kg), the weight threshold is sufficient
for carrying two bicycles weighing approximately 60 lbs
(27 kg) each, or four items weighing approximately 30
lbs (14 kg) each.
NOTE: Consult the product details of your accessory
carrier for more information, such as additional weight or load limits. Damage caused by non Tesla-approved
accessories is not covered by the warranty.CAUTION: Exceeding the maximum weight the
Model Y hitch is designed to support (as
previously described) can cause significant
damage.
CAUTION: Do not attempt to install an accessory
carrier on Model Y that is not equipped with the
tow package. Doing so can cause significant
damage.
Trailer Towing
The maximum trailer weight (including all cargo and
additional equipment), and the trailer tongue weight
depend on the number of occupants in your vehicle and the tires being used. The maximum towing capacity and
trailer tongue weight must never exceed the following:
Tire
Size# of
PassengersMaximum
Towing
CapacityMaximum
Tongue
Weight19",
20"
and
21"up to 33,500 lbs
(1,588 kg)350 lbs (159
kg)19"
and
21"4 - 53,500 lbs
(1,588 kg)350 lbs (159
kg)20"4 - 52,300 lbs
(1,043 kg)**230 lbs (104
kg)**19"6 - 7*2000 lbs (907
kg)**200 lbs (91
kg)**20"6 - 7*Towing not
permitted-21"6 - 7*1200 lbs (544
kg)**120 lbs (54
kg)**
*Applicable only to vehicles with seven seating
positions.
** You must operate within the speed limitations of your trailer and tires, and only drive at speeds appropriate for
the load you are towing, the weather, road and
traffic
conditions, and your level of towing experience. Always
obey posted speed limits and local regulations regarding
speed.
NOTE: In Canada, towing is limited to 55 mph (89 km/h).
Towing and Accessories
74MODEL Y Owner
Page 77 of 250

For trailers with a combined loading of more than 1650
lbs (750 kg), Tesla recommends using a separate braking
system with an independent controller (see
Trailer
Brakes on page 77). Carefully follow the instructions
provided by the trailer brake manufacturer to ensure that trailer brakes are properly installed, adjusted, and maintained.
The tongue weight is the downward force that the weight of the trailer exerts on the hitch. This must not exceed 10% of the maximum trailer weight. Carrying a
significant amount of equipment, passengers, or cargo
in the tow vehicle can reduce the towing capacity it can handle, which also reduces the tongue weight. Maximum towing capacity is calculated assuming the
GVWR
(Gross Vehicle Weight Rating) is not exceeded (see
Vehicle Loading on page 182).
NOTE: If the information on the hitch label conflicts with
the information provided in this Owner
Page 79 of 250

Trailer Brakes
When towing a loaded trailer that weighs more than
1650 lbs (750 kg), Tesla recommends that the trailer be
equipped with its own brake system adequate for the weight of the trailer. Ensure compliance with local regulations. A brake controller must be purchased separately, and the required 4-pin pigtail connector can be ordered from Tesla Service.
Follow these steps to connect a brake controller:
1.
Connect the wiring on the brake controller to the
appropriate locations on the 4-pin pigtail connector.
2.
Remove the cover located under the dashboard in the driver
Page 80 of 250

NOTE: When testing chocks, ensure that Vehicle Hold
(see
Vehicle Hold on page 66) is not engaged. If
Vehicle Hold is braking
Model Y, the Vehicle Hold
indicator light displays on the touchscreen. To
disengage Vehicle Hold, press and release the brake
pedal.
4.
Place the vehicle in Park.
WARNING: If parking on a grade is necessary,
always ensure that all trailer wheels have been
securely chocked. Failure to do so can result in
serious damage or injury.
Trailer Sway Mitigation
When trailer sway is detected, the electronic stability control system attempts to apply the appropriate amount of braking to minimize trailer sway. The touchscreen
briefly displays the traction control system
indicator. Pressing the brake pedal when the system is actively braking to mitigate trailer sway does not cancel this automatic braking.
Attaching and Removing the Ball
Mount
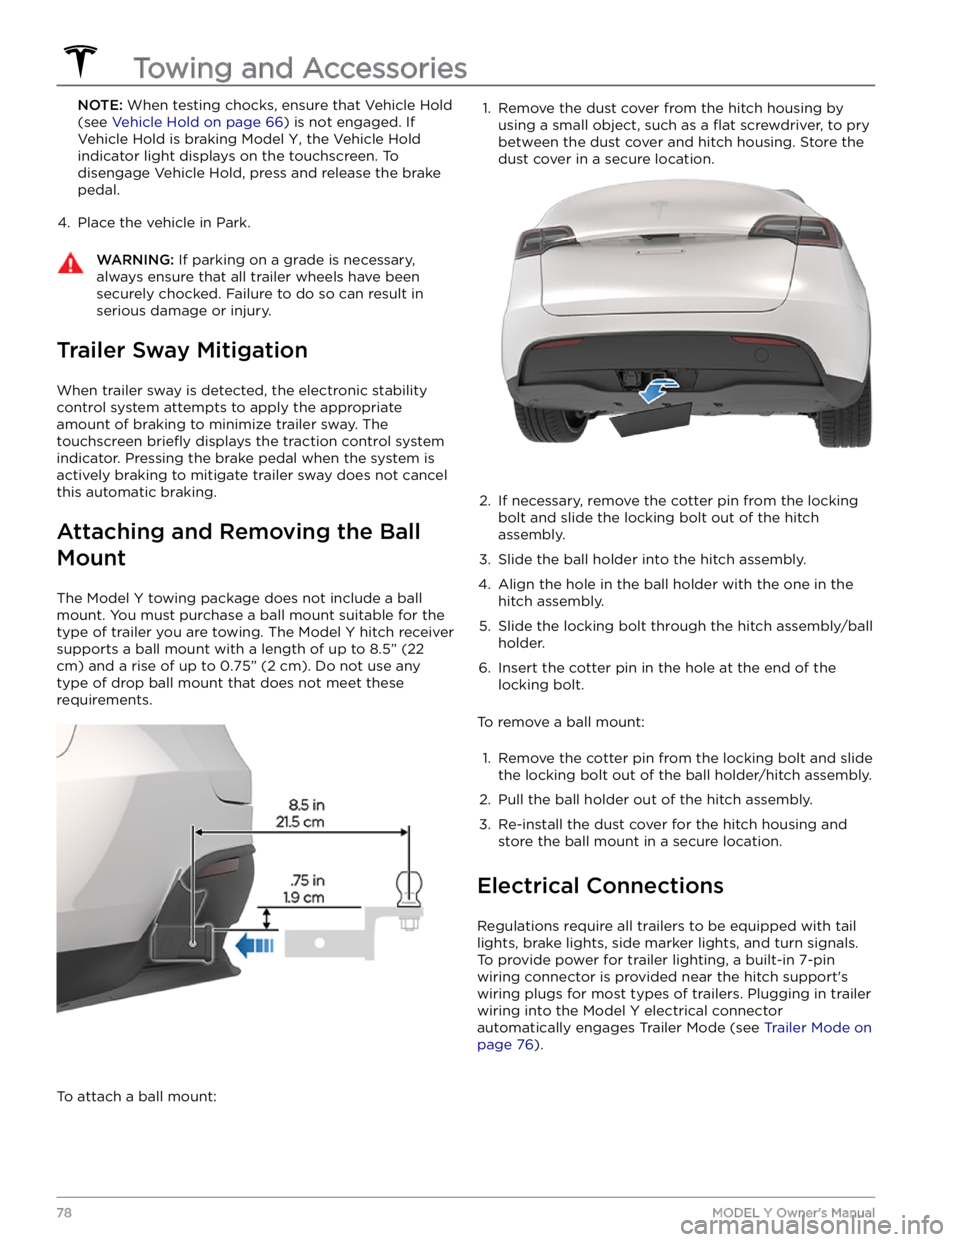
The Model Y towing package does not include a ball
mount. You must purchase a ball mount suitable for the type of trailer you are towing. The
Model Y hitch receiver
supports a ball mount with a length of up to
8.5” (22
cm) and a rise of up to 0.75” (2 cm). Do not use any
type of drop ball mount that does not meet these requirements.
To attach a ball mount:
1. Remove the dust cover from the hitch housing by
using a small object, such as a
flat screwdriver, to pry
between the dust cover and hitch housing. Store the dust cover in a secure location.
2.
If necessary, remove the cotter pin from the locking
bolt and slide the locking bolt out of the hitch assembly.
3.
Slide the ball holder into the hitch assembly.
4.
Align the hole in the ball holder with the one in the hitch assembly.
5.
Slide the locking bolt through the hitch assembly/ball holder.
6.
Insert the cotter pin in the hole at the end of the
locking bolt.
To remove a ball mount:
1.
Remove the cotter pin from the locking bolt and slide
the locking bolt out of the ball holder/hitch assembly.
2.
Pull the ball holder out of the hitch assembly.
3.
Re-install the dust cover for the hitch housing and store the ball mount in a secure location.
Electrical Connections
Regulations require all trailers to be equipped with tail lights, brake lights, side marker lights, and turn signals.
To provide power for trailer lighting, a built-in 7-pin wiring connector is provided near the hitch support
Page 87 of 250

Cleaning Cameras and Sensors
To ensure the various Autopilot components can provide
information that is as accurate as possible, keep them
clean and free of obstructions, condensation, or damage. See
Cleaning on page 172.
Condensation can form inside the camera enclosures,
especially if you park your vehicle outside in cold or wet
conditions. The
touchscreen may display an alert stating
that a camera is blocked and that some or all Autopilot
features may be temporarily restricted until the camera vision is clear. To proactively dry the condensation, precondition the cabin by setting it to a warm temperature, turning the windshield defroster on, and directing the front air vents toward the door pillars (see
Mobile App on page 154).
CAUTION: Do not wipe an exposed lens with your
hands or a cloth in an attempt to remove dirt or
debris. The debris can damage the surface of the
lens when wiped.
CAUTION: Do not use chemical-based or abrasive
cleaners. Doing so can damage surfaces.
CAUTION: Do not clean an ultrasonic sensor or
camera lens with a sharp or abrasive object that
can scratch or damage its surface.
About Autopilot
85Autopilot
Page 126 of 250

NOTE: When Chill is selected, Chill displays on the
touchscreen above the driving speed.
Steering Mode: Adjust the amount of effort required to
turn the steering wheel.
Sport feels more responsive
whereas
Comfort feels easier to drive and park (see
Adjusting Steering Effort on page 47).
Stopping Mode: Choose how you want Model Y to
behave once regenerative braking has reduced the driving speed to a very low speed, a driving gear is still
engaged, and both the accelerator and brake pedals are
released. See
Stopping Mode on page 61. You can adjust
this setting only when
Model Y is in Park.
Slip Start: Turn Slip Start ON to disable traction control
and allow wheels to spin to make it easier to dislodge the vehicle when stuck in mud, snow, ice, etc. (see
Traction Control on page 63).
Off-Road Assist: Turn Off-Road Assist ON to disable
traction control and allow wheels to spin when driving
off-road (see Traction Control on page 63).
Trailer Mode (available only if equipped with a tow
package): Must always be active when towing a trailer.
Some Autopilot features and rear sensor functionality may not be available. See
Trailer Mode on page 76).
Autopilot
Autopilot features that provide a safer and more
convenient driving experience. Some Autopilot features
are not controlled through
Controls. See About
Autopilot on page 83 for more information.
NOTE: Depending on market region, vehicle
configuration, options purchased, and software version,
your vehicle may not be equipped with all Autopilot
features, or a feature may not operate exactly as
described.
Page 167 of 250

*If the vehicle is used for towing, the brake fluid should
be replaced every 2 years regardless of the health check.
NOTE: Any damage caused by opening the Battery
coolant reservoir is excluded from the warranty.
High Voltage Safety
Your Model Y has been designed and built with safety as
a priority. However, be aware of these precautions to protect yourself from the risk of injury inherent in all high-voltage systems:
Page 168 of 250

Maintaining Tire Pressures
If you are not towing a trailer, keep tires inflated to the
pressures shown on the Tire and Loading Information label, even if it
differs from the pressure printed on the
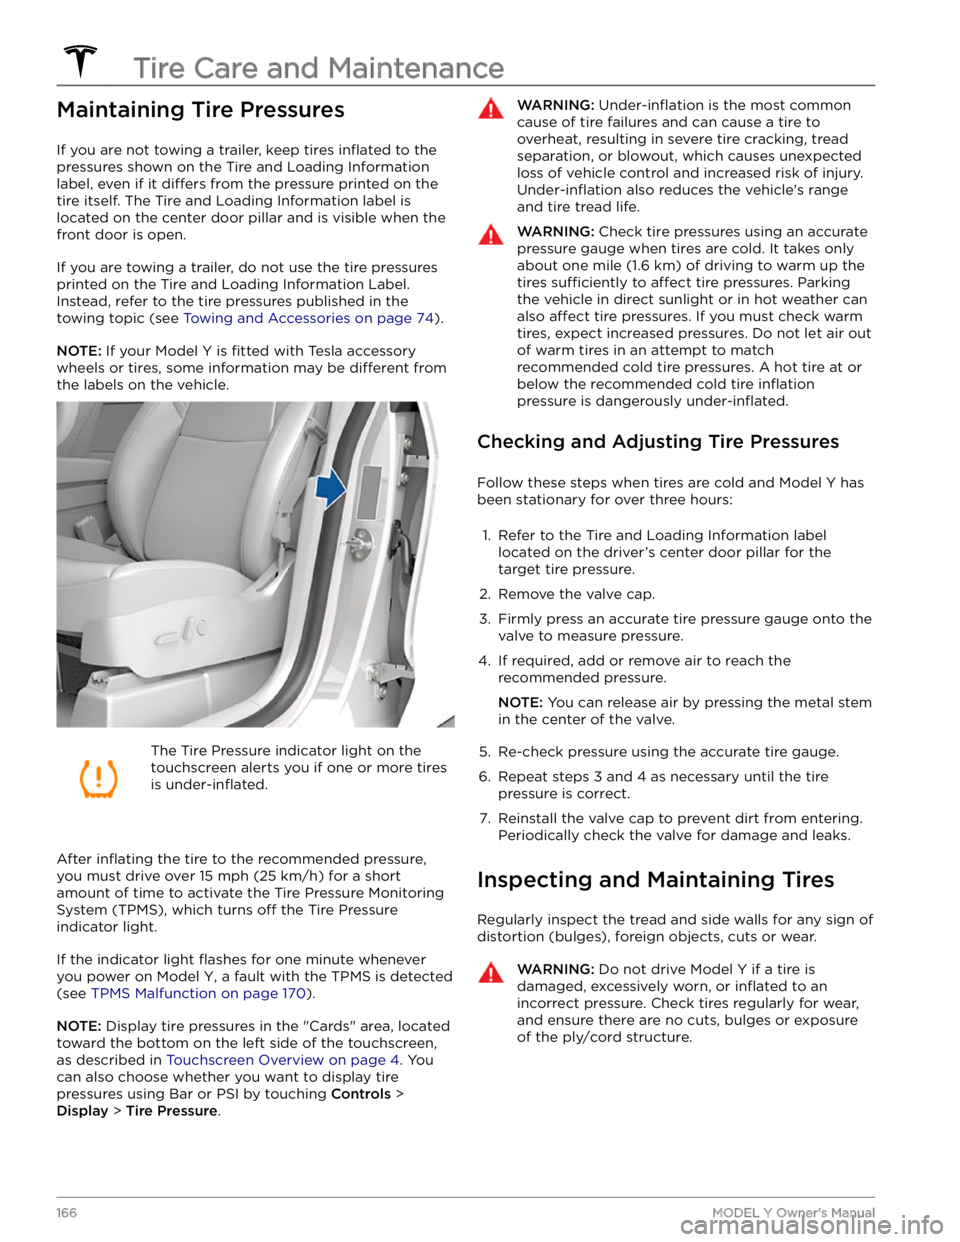
tire itself. The Tire and Loading Information label is located on the center door pillar and is visible when the
front door is open.
If you are towing a trailer, do not use the tire pressures printed on the Tire and Loading Information Label.
Instead, refer to the tire pressures published in the towing topic
(see Towing and Accessories on page 74).
NOTE: If your Model Y is fitted with Tesla accessory
wheels or tires, some information may be
different from
the labels on the vehicle.
The Tire Pressure indicator light on the
touchscreen alerts you if one or more tires
is
under-inflated.
After inflating the tire to the recommended pressure,
you must drive over
15 mph (25 km/h) for a short
amount of time to activate the Tire Pressure Monitoring
System (TPMS), which turns
off the Tire Pressure
indicator light.
If the indicator light flashes for one minute whenever
you power on
Model Y, a fault with the TPMS is detected
(see
TPMS Malfunction on page 170).
NOTE: Display tire pressures in the "Cards" area, located
toward the bottom on the left side of the touchscreen
,
as described in Touchscreen Overview on page 4. You
can also choose whether you want to display tire pressures using Bar or PSI by touching
Controls >
Display > Tire Pressure.
WARNING: Under-inflation is the most common
cause of tire failures and can cause a tire to
overheat, resulting in severe tire cracking, tread
separation, or blowout, which causes unexpected
loss of vehicle control and increased risk of injury.
Under-inflation also reduces the vehicle