Page 59 of 212
Lights
Controlling Lights Touch Controls on the bottom corner of the touchscreen to control most of the lights.
In addition to the lights that you can control from the touchscreen, Model X has convenience
lights that turn on and off automatically based on what you are doing. For example, you will
notice interior lights, marker lights, tail lights, door handle lights, and puddle lights that turn on
when you unlock Model X, when you open a door, and when you shift into Park. They turn off
automatically after a minute or two or when you shift into a driving gear or lock Model X.
Lights
Driving59
Page 60 of 212
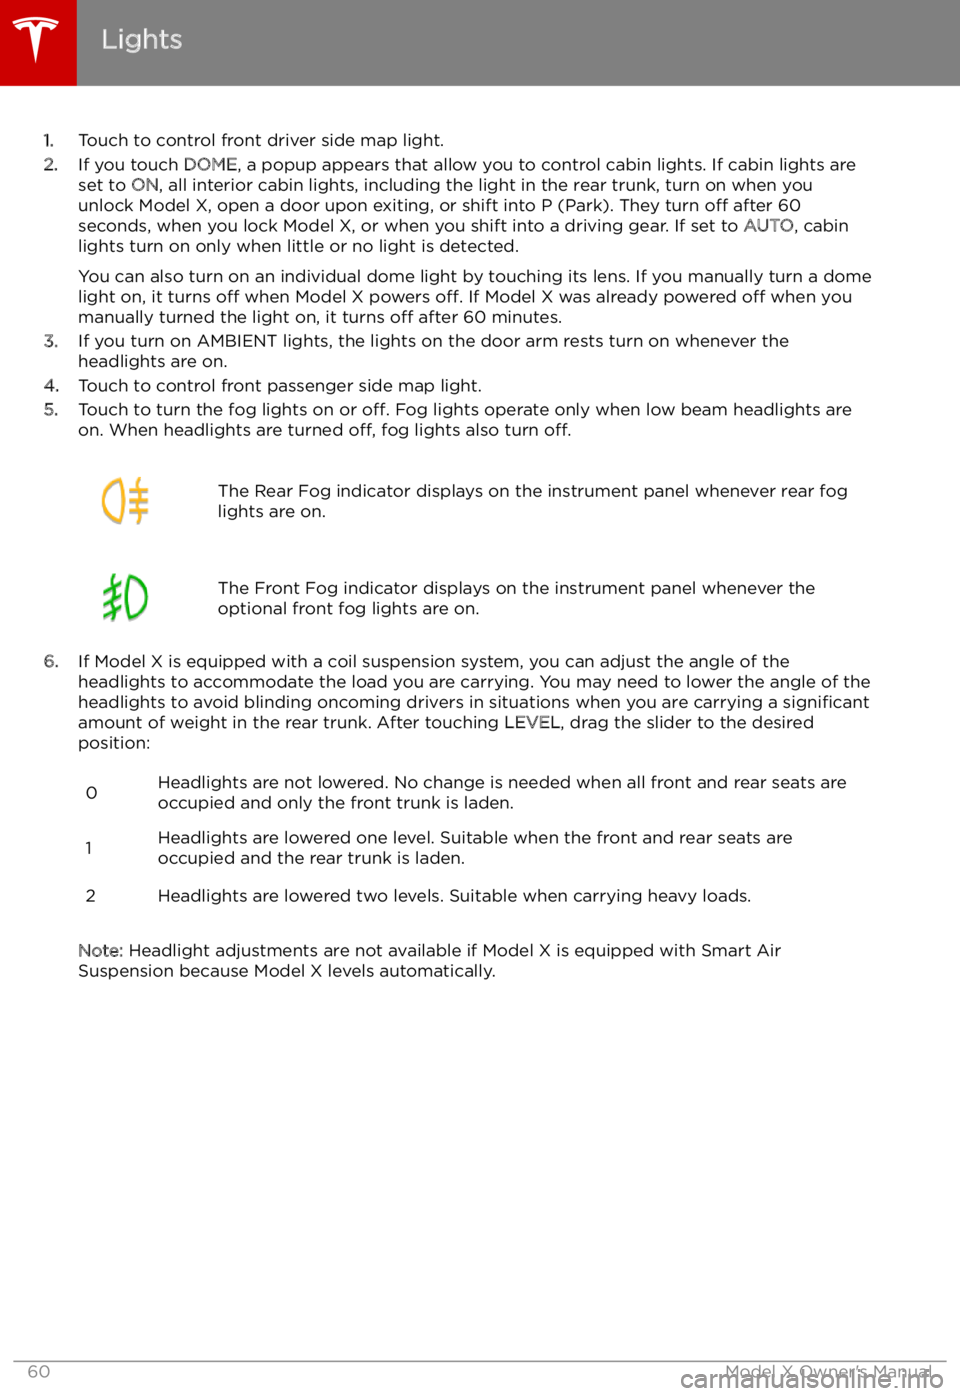
1.Touch to control front driver side map light.
2. If you touch DOME, a popup appears that allow you to control cabin lights. If cabin lights are
set to ON, all interior cabin lights, including the light in the rear trunk, turn on when you
unlock Model X, open a door upon exiting, or shift into P (Park). They turn off after 60
seconds, when you lock Model X, or when you shift into a driving gear. If set to AUTO, cabin
lights turn on only when little or no light is detected.
You can also turn on an individual dome light by touching its lens. If you manually turn a domelight on, it turns off when Model X powers off. If Model X was already powered off when you
manually turned the light on, it turns off after 60 minutes.
3. If you turn on AMBIENT lights, the lights on the door arm rests turn on whenever the
headlights are on.
4. Touch to control front passenger side map light.
5. Touch to turn the fog lights on or off. Fog lights operate only when low beam headlights are
on. When headlights are turned off, fog lights also turn off.
The Rear Fog indicator displays on the instrument panel whenever rear fog
lights are on.The Front Fog indicator displays on the instrument panel whenever the
optional front fog lights are on.
6. If Model X is equipped with a coil suspension system, you can adjust the angle of the
headlights to accommodate the load you are carrying. You may need to lower the angle of theheadlights to avoid blinding oncoming drivers in situations when you are carrying a significant
amount of weight in the rear trunk. After touching LEVEL, drag the slider to the desired
position:
0Headlights are not lowered. No change is needed when all front and rear seats are
occupied and only the front trunk is laden.1Headlights are lowered one level. Suitable when the front and rear seats are occupied and the rear trunk is laden.2Headlights are lowered two levels. Suitable when carrying heavy loads.
Note: Headlight adjustments are not available if Model X is equipped with Smart Air
Suspension because Model X levels automatically.
Lights
60Model X Owner
Page 61 of 212
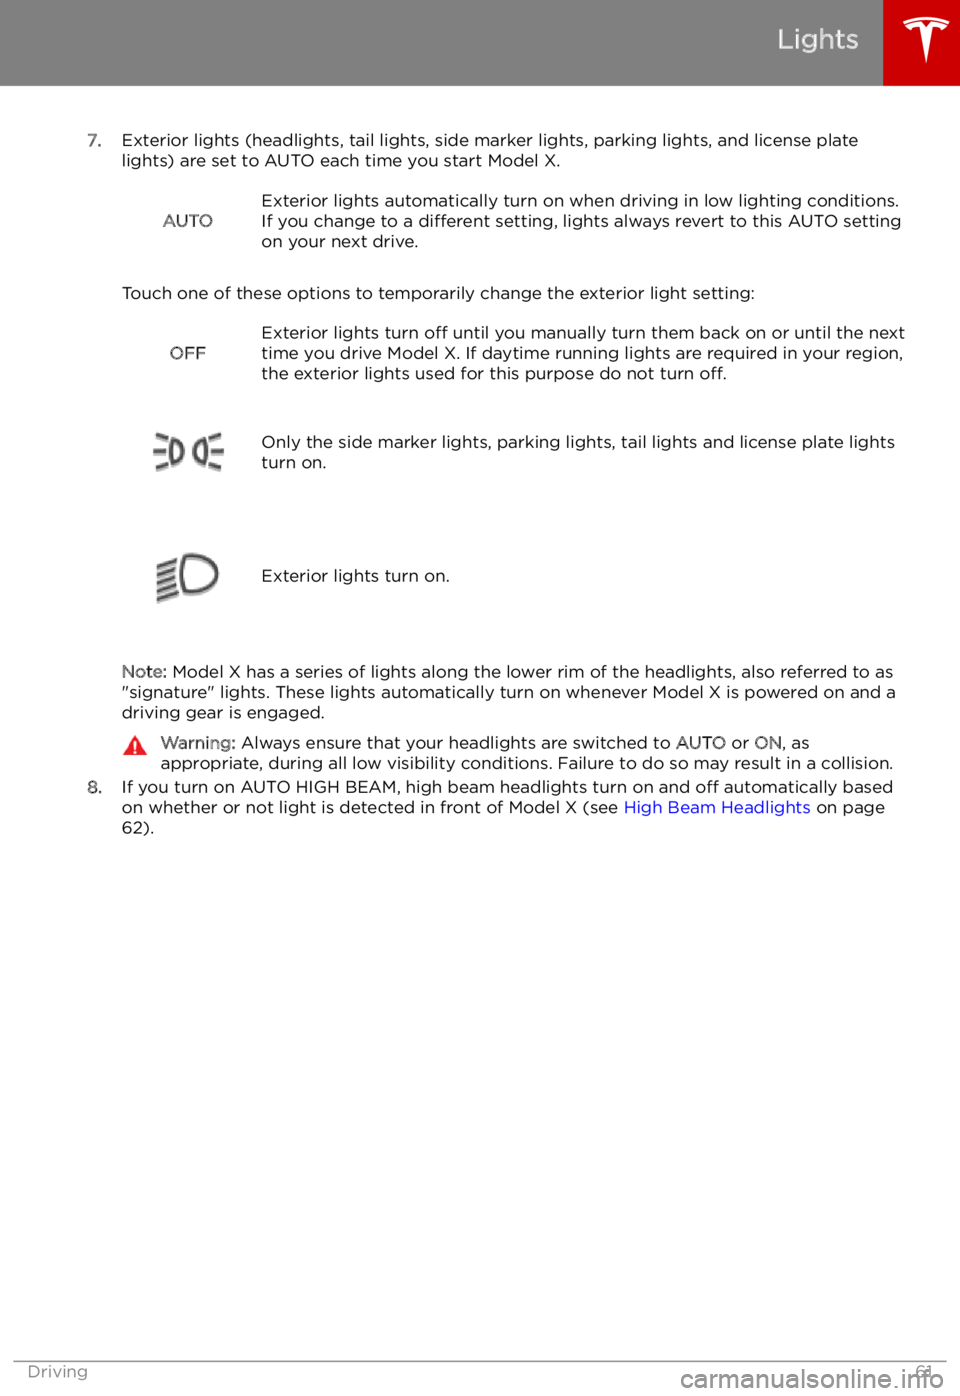
7.Exterior lights (headlights, tail lights, side marker lights, parking lights, and license plate
lights) are set to AUTO each time you start Model X.
AUTOExterior lights automatically turn on when driving in low lighting conditions.
If you change to a different setting, lights always revert to this AUTO setting
on your next drive.
Touch one of these options to temporarily change the exterior light setting:
OFFExterior lights turn off until you manually turn them back on or until the next
time you drive Model X. If daytime running lights are required in your region,
the exterior lights used for this purpose do not turn off.
Only the side marker lights, parking lights, tail lights and license plate lights
turn on.Exterior lights turn on.
Note: Model X has a series of lights along the lower rim of the headlights, also referred to as
"signature" lights. These lights automatically turn on whenever Model X is powered on and a driving gear is engaged.
Warning: Always ensure that your headlights are switched to AUTO or ON, as
appropriate, during all low visibility conditions. Failure to do so may result in a collision.
8. If you turn on AUTO HIGH BEAM, high beam headlights turn on and off automatically based
on whether or not light is detected in front of Model X (see High Beam Headlights on page
62).
Lights
Driving61
Page 62 of 212
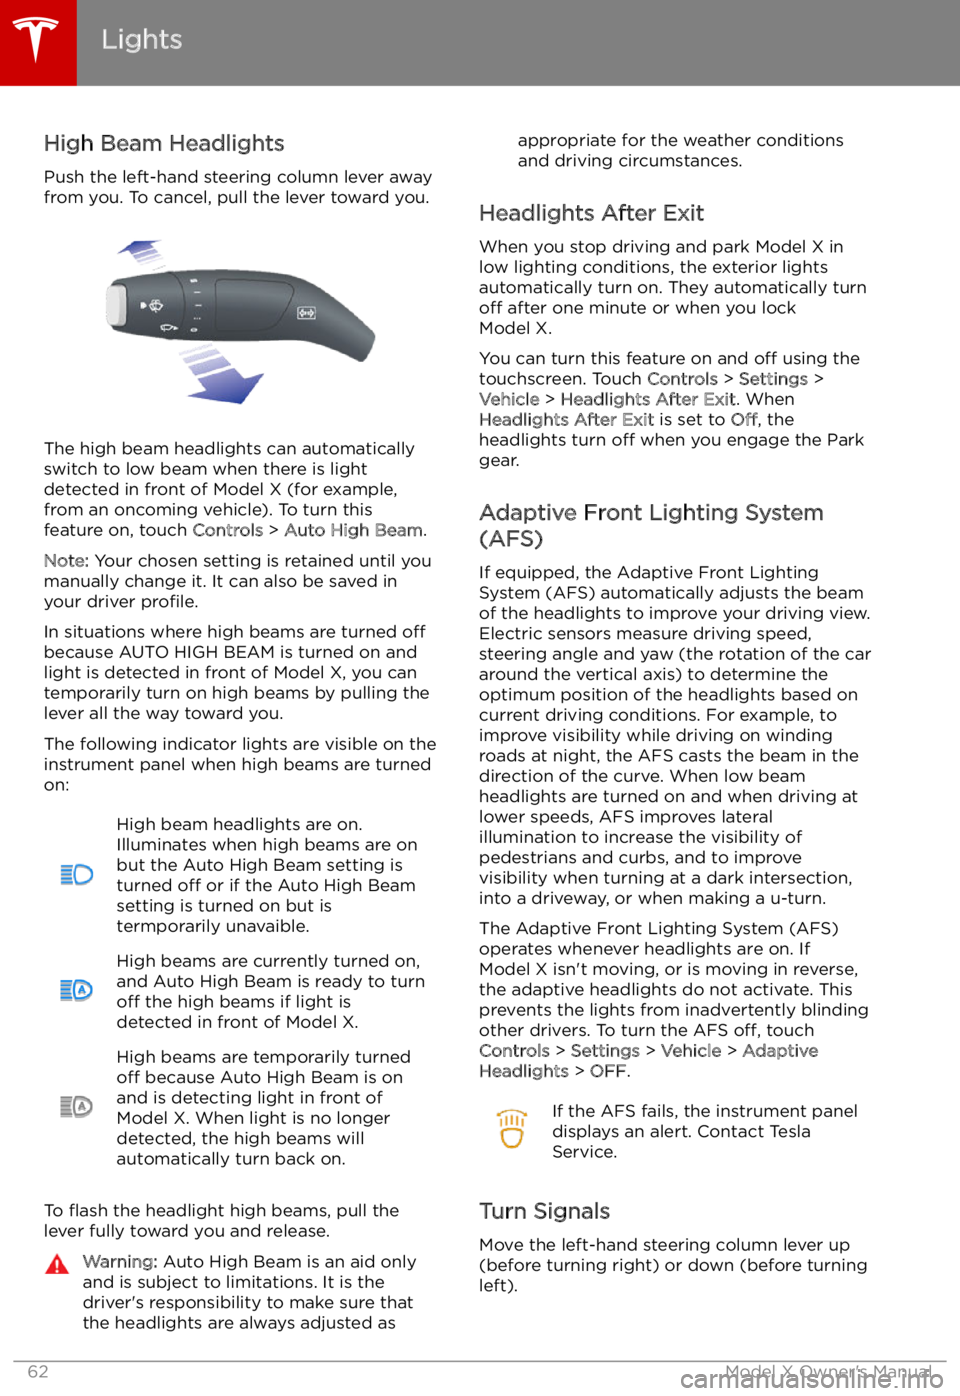
High Beam HeadlightsPush the left-hand steering column lever away
from you. To cancel, pull the lever toward you.
The high beam headlights can automatically
switch to low beam when there is light
detected in front of Model X (for example,
from an oncoming vehicle). To turn this
feature on, touch Controls > Auto High Beam .
Note: Your chosen setting is retained until you
manually change it. It can also be saved in
your driver profile.
In situations where high beams are turned off
because AUTO HIGH BEAM is turned on and light is detected in front of Model X, you cantemporarily turn on high beams by pulling the
lever all the way toward you.
The following indicator lights are visible on the
instrument panel when high beams are turned
on:
High beam headlights are on.
Illuminates when high beams are on but the Auto High Beam setting is
turned off or if the Auto High Beam
setting is turned on but is
termporarily unavaible.High beams are currently turned on,
and Auto High Beam is ready to turn
off the high beams if light is
detected in front of Model X.High beams are temporarily turned
off because Auto High Beam is on
and is detecting light in front of
Model X. When light is no longer
detected, the high beams will
automatically turn back on.
To
Page 63 of 212
The turn signals stop operating when canceledby the steering wheel, or when you return the
lever to the central position.
The corresponding turn signal
indicator lights up on the instrument
panel when a turn signal is
operating. You also hear a clicking
sound.Warning: If you have purchased the
optional Enhanced Autopilot or Full Self-
Driving Capability packages and Traffic-
Aware Cruise Control is active, engaging
a turn signal can cause Model X to
accelerate when using Traffic-Aware
Cruise Control in specific situations (see
Overtake Acceleration on page 92).Warning: If you have purchased the
optional Enhanced Autopilot or Full Self-
Driving Capability packages and
Autosteer is active, engaging a turn signal
may cause Model X to change lanes (see Auto Lane Change on page 98).
Lane Change Flash
To indicate a lane change, quickly press the
lever up or down against the spring pressure,
then release. The corresponding turn signal
Page 78 of 212
Towing and Accessories
The towing package allows you to tow a trailer
with your Model X. It also allows you to carry skis, snowboards, bicycles, etc. by attaching
an accessory carrier to the hitch.
Carrying Accessories The Model X towing package has a 50 mm ball
coupling that can support an accessory
carrier.
The ball coupling is designed to support vertical loads of up to 54 kg. When carrying
bicycles or other items on the Model X hitch, always check to ensure that the maximum
weight is not exceeded. When calculating
weight, remember to include the weight of the
accessory carrier. For example, assuming the
carrier weighs 14 kg, the weight threshold is sufficient for carrying two bicycles weighing
approximately 20 kg each, or four bicycles
weighing approximately 10 kg each.
Caution: The Model X hitch is designed to
support up to 54 kg. Exceeding this
maximum weight can cause significant
damage.Caution: Do not attempt to install a
carrier on a Model X that is not equipped
with the towing package. Doing so can
cause significant damage.
To install and use an accessory carrier, the tow
hitch must be connected (see Connecting the
Tow Hitch on page 83). Then follow the
instructions provided with your accessory
carrier. Observe all regulations and legal requirements in your state/region that apply
to carrying accessories.
The Model X towing package includes the
wiring necessary for using an accessory carrier
equipped with lights (see Electrical
Connections on page 85). The package also
includes Trailer Mode software (see Trailer
Mode on page 81).
When you connect an accessory
carrier
Page 112 of 212
Using the Touchscreen
Touchscreen Overview
The Big Picture The main components of the touchscreen are shown here. To manually control the brightness and
contrast, touch Controls > Displays . When set to Auto, the touchscreen changes between the Day
(light background) and Night (dark background) setting depending on ambient lighting conditions.
Note: The following illustration is provided for demonstration purposes only. Depending on vehicle
options, software version and market region, your touchscreen may appear slightly different.
Touchscreen Overview
112Model X Owner
Page 126 of 212
Climate Controls
Overview of Climate Controls
The climate controls are always available at the bottom of the touchscreen. By default, climate control is set to Auto, which maintains optimum comfort in all but the most severe weather conditions. When you adjust the temperature, the system automatically adjusts the heating, air
conditioning, air distribution, air circulation, and fan speed to maintain your selected temperature.
To override these settings, touch Auto (see Customizing Climate Control on page 128).
The fan, heating, and air conditioning systems are powered by the Battery. Therefore, prolonged
use decreases driving range.
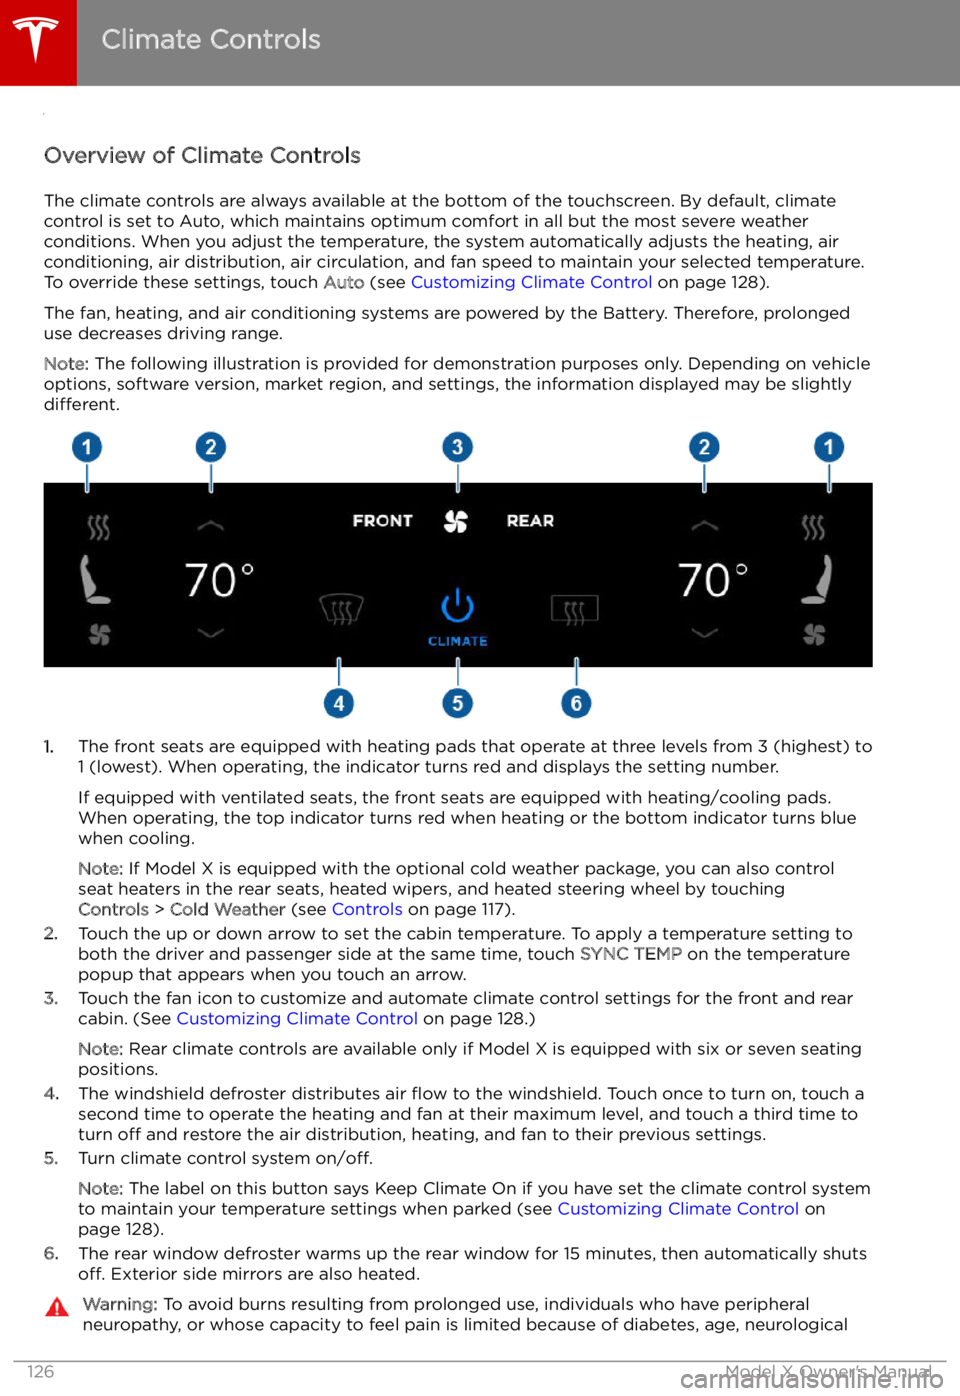
Note: The following illustration is provided for demonstration purposes only. Depending on vehicle
options, software version, market region, and settings, the information displayed may be slightly
different.
1. The front seats are equipped with heating pads that operate at three levels from 3 (highest) to
1 (lowest). When operating, the indicator turns red and displays the setting number.
If equipped with ventilated seats, the front seats are equipped with heating/cooling pads.
When operating, the top indicator turns red when heating or the bottom indicator turns blue
when cooling.
Note: If Model X is equipped with the optional cold weather package, you can also control
seat heaters in the rear seats, heated wipers, and heated steering wheel by touching Controls > Cold Weather (see Controls on page 117).
2. Touch the up or down arrow to set the cabin temperature. To apply a temperature setting to
both the driver and passenger side at the same time, touch SYNC TEMP on the temperature
popup that appears when you touch an arrow.
3. Touch the fan icon to customize and automate climate control settings for the front and rear
cabin. (See Customizing Climate Control on page 128.)
Note: Rear climate controls are available only if Model X is equipped with six or seven seating
positions.
4. The windshield defroster distributes air