2022 TESLA MODEL S lights
[x] Cancel search: lightsPage 64 of 281

WARNING: Although the instrument panel shows surrounding traffic, some vehicles may not be displayed. Never rely on the instrument panel to determine if a vehicle is present (for example, in your blind spot). Always use your mirrors and perform shoulder checks.
9.
Your Model S.
10.
The energy bar (a thin horizontal line at the bottom center of the instrument panel) displays
real-time energy usage. The bar is colored gray (or white if the display is in Dark mode) and moves to the right to represent energy being used during acceleration. The bar is green and
moves to the left to represent energy being gained through regenerative braking.
11.
When Autosteer is active and detects the driving lane, it is highlighted in blue (see Autosteer on page 93). Depending on the current driving scenario, you may see
neighboring lanes.
NOTE: In situations where Autosteer is unable to detect lane markings, the driving lane is
determined based on the vehicle you are following.
NOTE: If Navigate on Autopilot is active, the driving lane displays as a single blue line in
front of Model S (see Navigate on Autopilot on page 98).
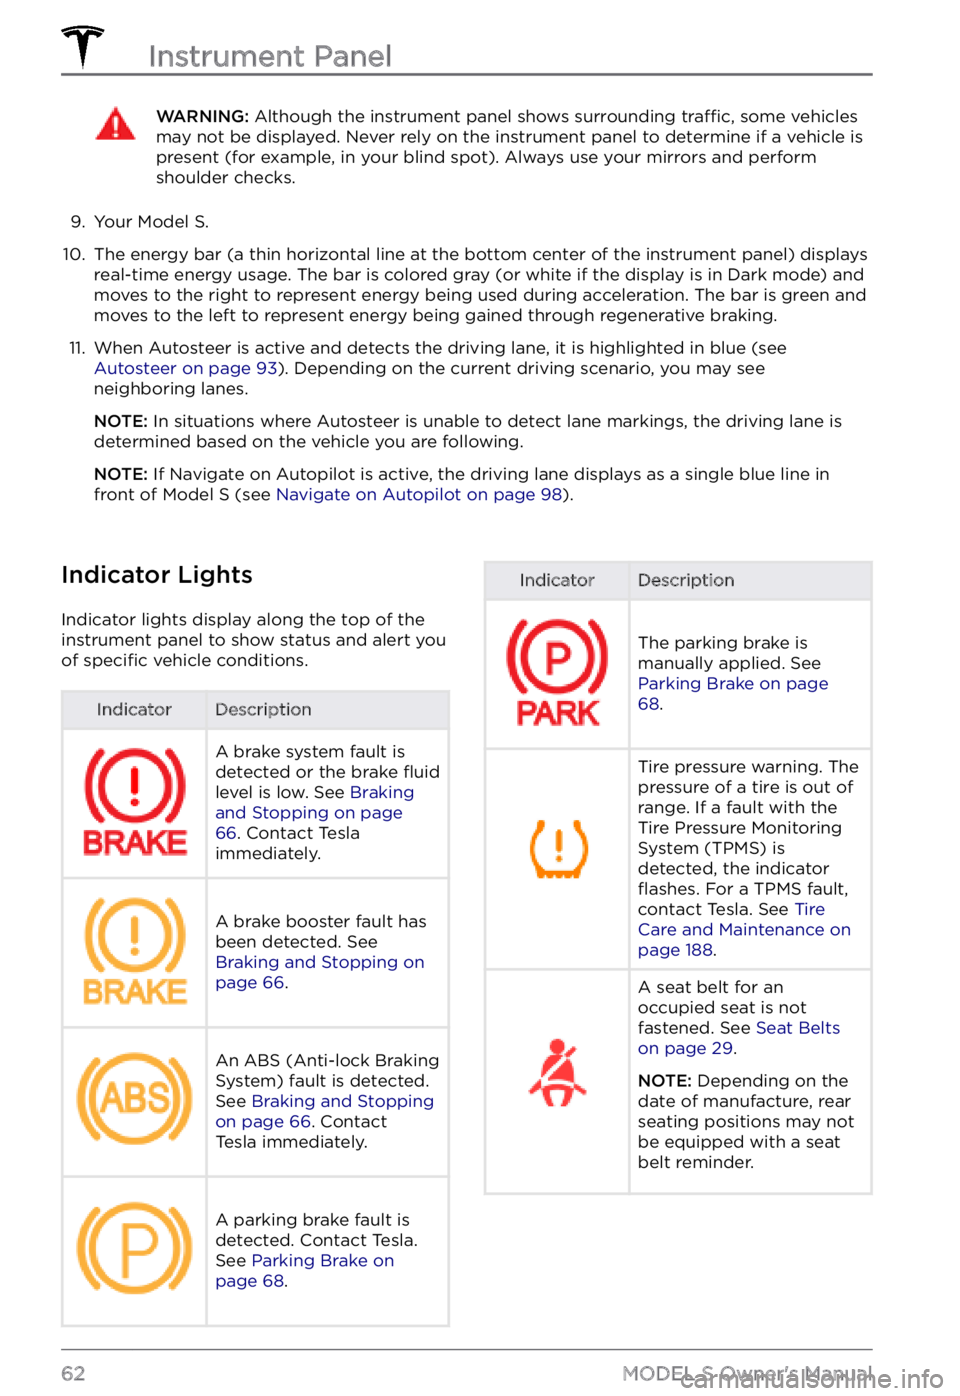
Indicator Lights
Indicator lights display along the top of the
instrument panel to show status and alert you
of
specific vehicle conditions.
IndicatorDescriptionA brake system fault is
detected or the brake fluid
level is low. See Braking and Stopping on page 66. Contact Tesla
immediately.
A brake booster fault has
been detected. See
Braking and Stopping on page 66.
An ABS (Anti-lock Braking
System) fault is detected.
See
Braking and Stopping on page 66. Contact
Tesla immediately.
A parking brake fault is
detected. Contact Tesla.
See
Parking Brake on page 68.
IndicatorDescription
The parking brake is
manually applied. See
Parking Brake on page 68.
Tire pressure warning. The
pressure of a tire is out of
range. If a fault with the
Tire Pressure Monitoring
System (TPMS) is
detected, the indicator
flashes. For a TPMS fault,
contact Tesla. See Tire Care and Maintenance on page 188.
A seat belt for an
occupied seat is not
fastened. See
Seat Belts on page 29.
NOTE: Depending on the
date of manufacture, rear seating positions may not be equipped with a seat
belt reminder.
Instrument Panel
62MODEL S Owner
Page 65 of 281

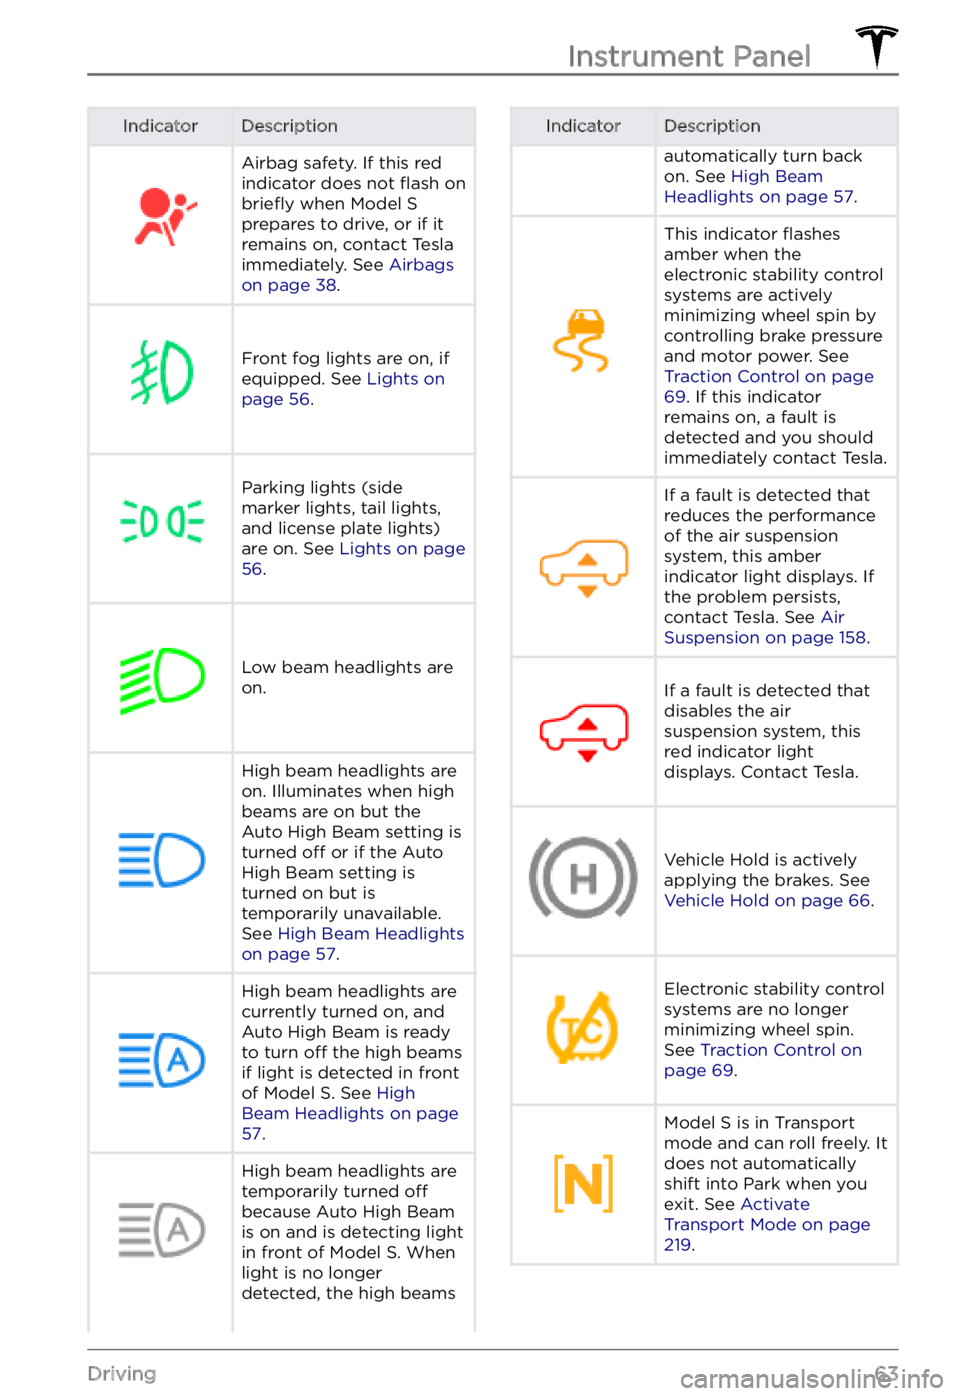
IndicatorDescriptionAirbag safety. If this red
indicator does not flash on briefly when Model S prepares to drive, or if it
remains on, contact Tesla
immediately. See
Airbags on page 38.
Front fog lights are on, if
equipped. See Lights on page 56.
Parking lights (side
marker lights, tail lights,
and license plate lights)
are on. See
Lights on page 56.
Low beam headlights are
on.
High beam headlights are on. Illuminates when high
beams are on but the
Auto High Beam setting is
turned
off or if the Auto
High Beam setting is
turned on but is
temporarily unavailable.
See
High Beam Headlights on page 57.
High beam headlights are currently turned on, and
Auto High Beam is ready
to turn
off the high beams
if light is detected in front
of
Model S. See High Beam Headlights on page 57.
High beam headlights are temporarily turned off
because Auto High Beam
is on and is detecting light
in front of
Model S. When
light is no longer
detected, the high beams
IndicatorDescriptionautomatically turn back
on. See High Beam Headlights on page 57.
This indicator flashes
amber when the
electronic stability control
systems are actively
minimizing wheel spin by
controlling brake pressure
and motor power. See
Traction Control on page 69. If this indicator
remains on, a fault is
detected and you should
immediately contact Tesla.
If a fault is detected that
reduces the performance
of the air suspension
system, this amber
indicator light displays. If
the problem persists,
contact Tesla. See
Air Suspension on page 158.
If a fault is detected that
disables the air
suspension system, this
red indicator light
displays. Contact Tesla.Vehicle Hold is actively
applying the brakes. See
Vehicle Hold on page 66.
Electronic stability control
systems are no longer
minimizing wheel spin.
See
Traction Control on page 69.
Model S is in Transport
mode and can roll freely. It
does not automatically
shift into Park when you
exit. See
Activate Transport Mode on page 219.
Instrument Panel
63Driving
Page 95 of 281

NOTE: Depending on market region, vehicle configuration, options purchased, and software version, your vehicle may not be equipped with Autosteer, or the feature may not operate exactly as described.
NOTE: Autosteer is a BETA feature.
Autosteer builds upon Traffic-Aware Cruise
Control (see Traffic-Aware Cruise Control on page 87), intelligently keeping Model S in its
driving lane when cruising at a set speed.
Autosteer also allows you to use the turn signals to move Model S into an adjacent lane (see Auto Lane Change on page 95). Autosteer detects lane markings and the
presence of vehicles and objects to steer Model S.
NOTE: To display more details about the
roadway and its surroundings, such as road markings, stop lights, objects (such as trash cans and poles), etc., touch
Controls > Autopilot > Full Self-Driving Visualization Preview (if equipped).
CAUTION: Ensure all cameras and sensors are clean. Dirty cameras and sensors, as well as environmental conditions such as rain and faded lane markings, affect performance.
WARNING: Autosteer is a hands-on feature. You must keep your hands on the steering yoke at all times.
WARNING: Autosteer is intended for use on highways and limited-access roads with a fully attentive driver. When using Autosteer, hold the steering yoke and be mindful of road conditions and surrounding traffic. Do not use Autosteer on city streets, in construction zones, or in areas where bicyclists or pedestrians may be present. Never depend on Autosteer to determine an appropriate driving path. Always be prepared to take immediate action. Failure to follow these instructions could cause damage, serious injury or death.
Operating Autosteer
Before you can operate Autosteer, you must
enable it by touching Controls > Autopilot > Autosteer (Beta).
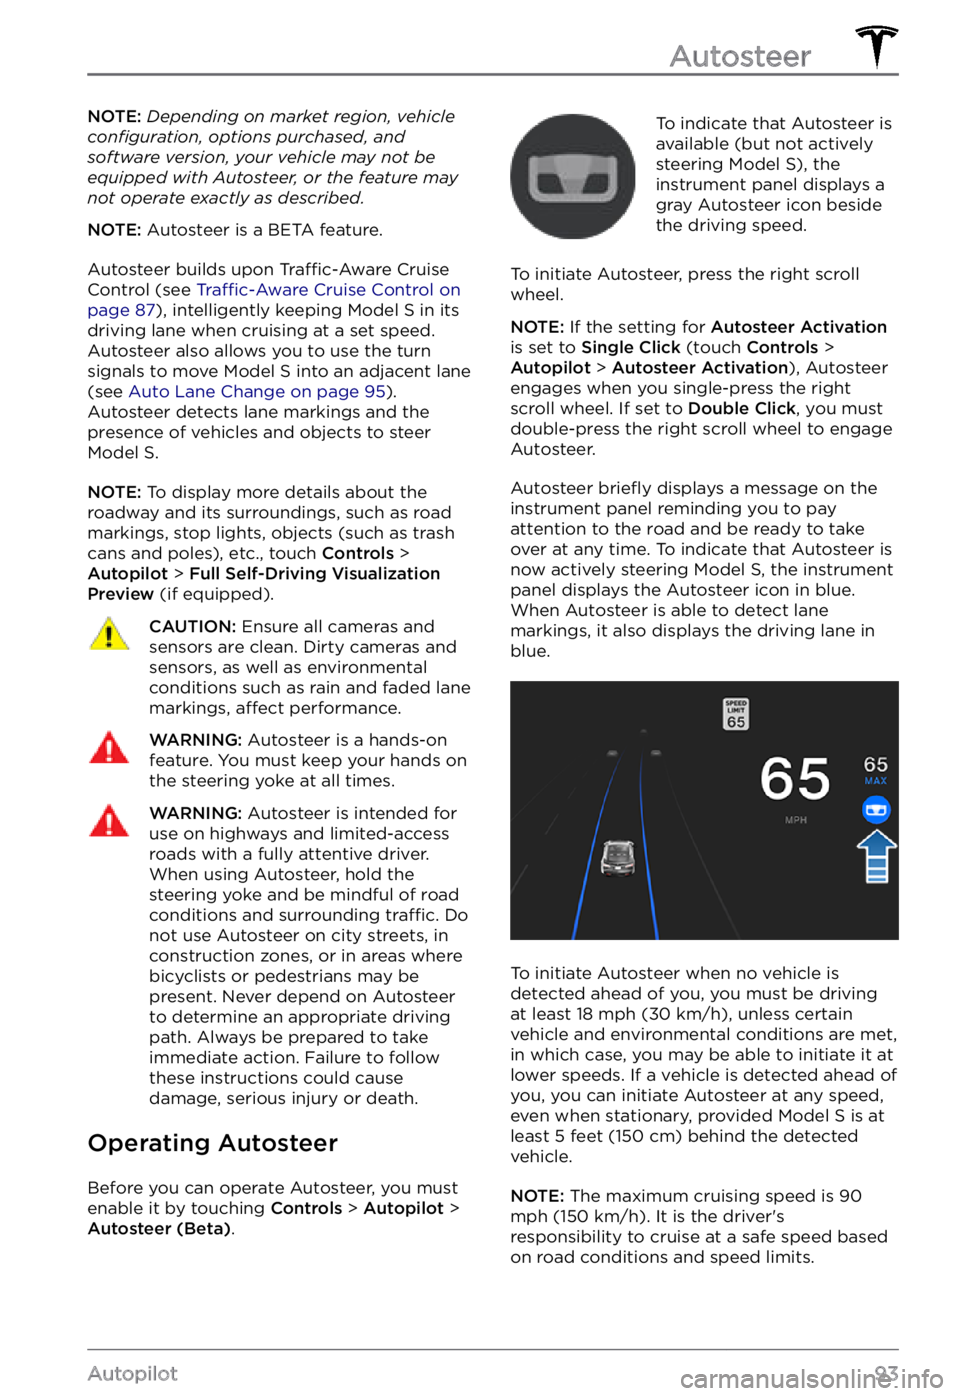
To indicate that Autosteer is
available (but not actively
steering
Model S), the instrument panel displays a
gray Autosteer icon beside the driving speed.
To initiate Autosteer, press the right scroll wheel.
NOTE: If the setting for Autosteer Activation is set to Single Click (touch Controls > Autopilot > Autosteer Activation), Autosteer
engages when you single-press the right
scroll wheel. If set to
Double Click, you must
double-press the right scroll wheel to engage
Autosteer.
Autosteer briefly displays a message on the instrument panel reminding you to pay
attention to the road and be ready to take over at any time. To indicate that Autosteer is
now actively steering Model S, the instrument panel displays the Autosteer icon in blue.
When Autosteer is able to detect lane markings, it also displays the driving lane in blue.
To initiate Autosteer when no vehicle is
detected ahead of you, you must be driving
at least
18 mph (30 km/h), unless certain
vehicle and environmental conditions are met,
in which case, you may be able to initiate it at
lower speeds. If a vehicle is detected ahead of you, you can initiate Autosteer at any speed,
even when stationary, provided
Model S is at
least 5 feet (150 cm) behind the detected
vehicle.
NOTE: The maximum cruising speed is 90 mph (150 km/h). It is the driver
Page 99 of 281

NOTE: Touch Controls > Autopilot > Full Self-Driving Visualization Preview (if equipped) to
display more details about the roadway and
its surroundings, such as road markings, stop
lights, objects (such as trash cans and poles),
etc.CAUTION: Stop Light and Stop Sign Warning requires the vehicle
Page 103 of 281

NOTE: Depending on market region, vehicle configuration, options purchased, and software version, your vehicle may not be equipped with Traffic Light and Stop Sign Control, or the feature may not operate exactly as described.
NOTE: Traffic Light and Stop Sign Control is a BETA feature and works best on roads that are frequently driven by Tesla vehicles. Traffic Light and Stop Sign Control attempts to stop at all traffic lights and may also stop at green lights.
Traffic Light and Stop Sign Control is
designed to recognize and respond to traffic lights and stop signs, slowing Model S to a
stop when using Traffic-Aware cruise control
or Autosteer. This feature uses the vehicle
Page 163 of 281

About the Security System
If Model S does not detect a key nearby and a
locked door or trunk is opened, an alarm
sounds and the headlights and turn signals
flash. To deactivate the alarm, press any
button on the key.
To manually enable or disable the alarm
system, touch Controls > Safety > Security Alarm. When enabled, Model S activates its
alarm one minute after you exit, the doors
lock, and a recognized key is no longer
detected.
A battery-backed siren sounds in situations where a locked door or trunk is opened and
Model S does not detect a key nearby (if
equipped). If you also want this siren to sound
in situations where
Model S detects motion
inside the cabin, or is moved or tilted (for
example, with a tow truck or jack), turn on the
Tilt/Intrusion setting (touch Controls > Safety > Tilt/Intrusion) (if equipped).
NOTE: If you plan to leave something that
moves inside your locked Model S, remember
to turn off Tilt/Intrusion. If this setting is on,
any motion detected inside Model S activates
the intrusion alarm.
NOTE: If Model S is in Sentry Mode (see Sentry Mode on page 162), you must disable
Sentry Mode before you can disable the
Security alarm or the Tilt/Intrusion alarm.
NOTE: The Security Alarm must be on to
enable Tilt/Intrusion.
NOTE: The Intrusion Sensor automatically
disables in situations where the climate
control system is operating when you have
left your vehicle (see
Keep Climate On, Dog Mode, and Camp Mode on page 139). To
override, you can manually turn the Intrusion
Sensor on again after choosing Keep Climate On, Dog, or Camp Mode (touch
Controls > Safety > Tilt/Intrusion).
If your Model S is equipped with the
Enhanced Anti-Theft upgrade, the horn
sounds in situations where a locked door or trunk is opened and
Model S does not detect
a key nearby. If the Tilt/Intrusion setting is on,
the horn also sounds if Model S detects
motion inside the cabin, or if the vehicle is moved or tilted (for example, with a tow truck
or jack). To turn the Tilt/Intrusion detection system on or
off, touch Controls > Safety > Tilt/Intrusion.
PIN to Drive
To increase security, you can prevent Model S from being driven until a 4-digit PIN (Personal Identification Number) is entered. To enable
this setting, touch Controls > Safety > PIN to Drive and follow the on-screen prompts to
create a driving PIN.
NOTE: When enabled, in addition to entering
the 4-digit driving PIN to drive, you must also
use it to enter Valet mode for the
first time
and create the 4-digit valet PIN that you can
use to enter and exit Valet mode. When in
Valet mode,
Model S can be driven without
the need for the valet to enter a driving PIN.
In addition, the
PIN to Drive setting is
disabled whenever Valet mode is active.
If you forget your driving PIN, or to disable PIN to Drive, return to this setting, touch the
link to enter your Tesla login credentials, then
follow the on-screen prompts.
NOTE: In the unlikely event that your
touchscreen is unresponsive, you may be
unable to enter the PIN. In this case,
first try
to restart the touchscreen (see Restarting the Touchscreen on page 52). If the touchscreen
is still unresponsive, you can still bypass PIN
to Drive by turning on Keyless Driving in the
Tesla mobile app.
Glovebox PIN
For additional security, you can protect the contents in your glovebox with a 4-digit PIN. To enable this setting, touch
Controls > Safety > Glovebox PIN and follow the on-
screen prompts. When enabled, you are
prompted to enter the PIN to open the
glovebox. To disable this setting, select the
toggle to disable and then enter the PIN.
If you forget your glovebox PIN, reset it by
entering your Tesla login credentials, then
follow the on-screen prompts.
NOTE: When you open the glovebox with
both Glovebox PIN and Valet mode enabled,
you are prompted for the glovebox PIN and taken out of Valet mode after the glovebox
opens.
Security Settings
161Using the Touchscreen
Page 170 of 281

Model S has learned the remote control and
you can touch Continue on the touchscreen.
If the headlights do not flash:
Page 250 of 281

For more information on troubleshooting Mobile Connector or Wall Connector status lights, refer to the product