2022 TESLA MODEL 3 tow
[x] Cancel search: towPage 4 of 248

1.
Exterior lights (Lights on page 51)
2.
Autopilot camera (About Autopilot on page 78)
3.
Front door handle (Using Exterior Door Handles on page 11)
4.
Key card sensor (Keys on page 6), Autopilot camera (About Autopilot on page 78)
5.
Rear door handle (Using Exterior Door Handles on page 11)
6.
Charge port (Charging Instructions on page 154)
7.
Autopilot cameras (About Autopilot on page 78)
8.
Exterior mirrors (Mirrors on page 47)
9.
Radar sensor, if equipped (hidden from view) (About Autopilot on page 78)
10.
Hood/front trunk (Front Trunk on page 16)
11.
Tow eye cover (Instructions for Transporters on page 194)
12.
Wheels and tires (Wheels and Tires on page 186)
13.
Rear view camera (Rear View Camera on page 69)
14.
Rear trunk (Rear Trunk on page 14)
Exterior Overview
2MODEL 3 Owner
Page 13 of 248
Using Exterior Door Handles
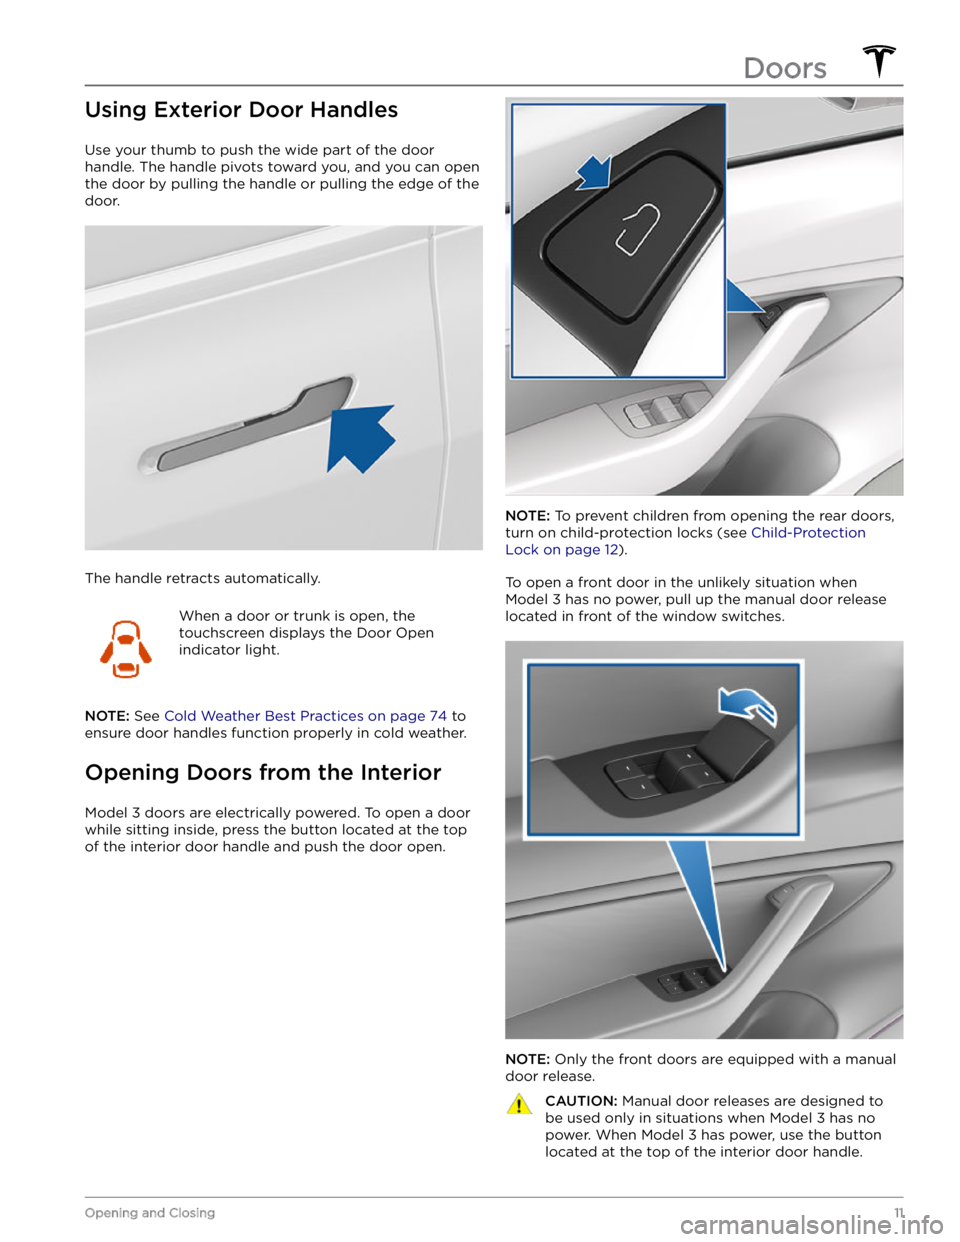
Use your thumb to push the wide part of the door
handle. The handle pivots toward you, and you can open
the door by pulling the handle or pulling the edge of the door.
The handle retracts automatically.
When a door or trunk is open, the
touchscreen displays the Door Open
indicator light.
NOTE: See Cold Weather Best Practices on page 74 to
ensure door handles function properly in cold weather.
Opening Doors from the Interior
Model 3 doors are electrically powered. To open a door
while sitting inside, press the button located at the top of the interior door handle and push the door open.
NOTE: To prevent children from opening the rear doors,
turn on child-protection locks (see
Child-Protection
Lock on page 12).
To open a front door in the unlikely situation when
Model 3 has no power, pull up the manual door release
located in front of the window switches.
NOTE: Only the front doors are equipped with a manual
door release.
CAUTION: Manual door releases are designed to
be used only in situations when Model 3 has no
power. When Model 3 has power, use the button
located at the top of the interior door handle.Doors
11Opening and Closing
Page 19 of 248
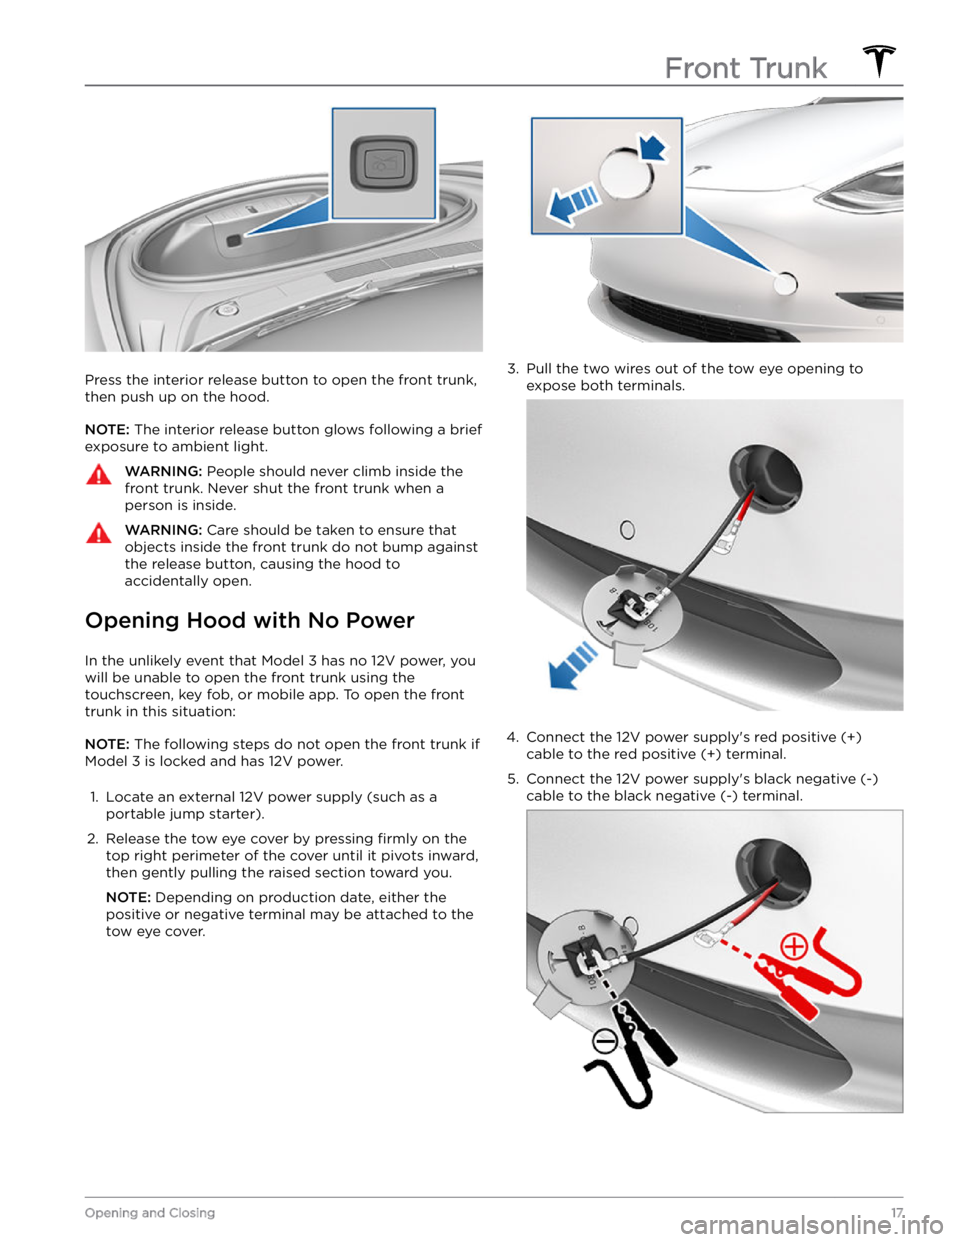
Press the interior release button to open the front trunk, then push up on the hood.
NOTE: The interior release button glows following a brief
exposure to ambient light.
WARNING: People should never climb inside the
front trunk. Never shut the front trunk when a
person is inside.
WARNING: Care should be taken to ensure that
objects inside the front trunk do not bump against
the release button, causing the hood to
accidentally open.
Opening Hood with No Power
In the unlikely event that Model 3 has no 12V power, you
will be unable to open the front trunk using the touchscreen, key fob, or mobile app. To open the front
trunk in this situation:
NOTE: The following steps do not open the front trunk if
Model 3 is locked and has 12V power.
1.
Locate an external 12V power supply (such as a
portable jump starter).
2.
Release the tow eye cover by pressing firmly on the
top right perimeter of the cover until it pivots inward, then gently pulling the raised section toward you.
NOTE: Depending on production date, either the
positive or negative terminal may be attached to the tow eye cover.
3.
Pull the two wires out of the tow eye opening to
expose both terminals.
4.
Connect the 12V power supply
Page 29 of 248

Wearing Seat Belts
Using seat belts and child safety seats is the most
effective way to protect occupants if a collision occurs.
Therefore, wearing a seat belt is required by law in most jurisdictions.
Both the driver and passenger seats are equipped with three-point inertia reel seat belts. Inertia reel belts are automatically tensioned to allow occupants to move
comfortably during normal driving conditions.
To
securely hold child safety seats, all passenger seating
positions are equipped with an automatic locking
retractor (ALR) feature that, by fully extracting the seat
belt (beyond the length needed for a typical adult
occupant), locks the belt into place until the seat belt is
unbuckled.
The seat belt reel automatically locks to prevent
movement of occupants if
Model 3 experiences a force
associated with hard acceleration, braking, cornering, or
an impact in a collision.
Seat Belt Reminders
The seat belt reminder on the touchscreen
alerts you if a seat belt for an occupied driver or passenger seat is unbuckled. If
the belt remains unbuckled, the reminder
flashes and an intermittent chime sounds.
If all occupants are buckled up and the
reminder stays on, re-buckle seat belts to
ensure they are correctly latched. Also
remove any heavy objects (such as a
briefcase) from an unoccupied seat. If the
reminder light continues to stay on,
contact Tesla.
You can temporarily mute a seat belt reminder
associated with a rear seating position. This is useful in situations when you are carrying an object in a rear seat
that triggers the seat belt reminder alert. To mute the reminder, touch the associated seat on the seat belt reminder card that displays on the touchscreen when a seat belt reminder alert is active. When a reminder is muted, the seat belt reminder icon is replaced by a seat icon. Touch the seat again to unmute the reminder. The reminder is disabled for the current drive only.
WARNING: Seat belts must be worn by passengers
in all seating positions. Do not disable a seat belt
reminder when the seating position is occupied by
a passenger.
To Fasten a Belt
1.
Ensure correct positioning of the seat (see Correct
Driving Position on page 23).
2. Draw the belt out smoothly, ensuring the belt lays flat
across the pelvis, chest and mid-point of your collar
bone, between the neck and shoulder.
3.
Insert the latch plate into the buckle and press together until you hear a click indicating it is locked
in place.
4.
Pull the belt to check that it is securely fastened.
5.
Pull the diagonal part of the belt toward the reel to
remove excess slack.
To Adjust the Shoulder Anchor
Height
Model 3 is equipped with an adjustable shoulder anchor
for each front seat to ensure that the seat belt is positioned correctly. The seat belt should lay
flat across
the mid-point of your collar bone while in the correct driving position
(see Correct Driving Position on page
23. Adjust the height of the shoulder anchor if the seat
belt is not positioned correctly:
1.
Press and hold the button on the shoulder anchor to release the locking mechanism.
2.
While holding the button, move the shoulder anchor up or down as necessary so that the seat belt is
positioned correctly.
3.
Release the button on the shoulder anchor so that it
locks into position.
Seat Belts
27Seating and Safety Restraints
Page 54 of 248
5. If you turn on Auto High Beam, your vehicle
automatically switches from high beam headlights to low beam headlights when light is detected in front of
Model 3. See High Beam Headlights on page 52.
6.
If you turn on Headlights after Exit, the exterior lights
remain on for a short period of time after you stop driving and park
Model 3 in low lighting conditions.
See
Headlights After Exit on page 52.
7.
If you turn on Steering Wheel Lights, the arrows
associated with the scroll buttons are backlit in low ambient lighting conditions.
High Beam Headlights
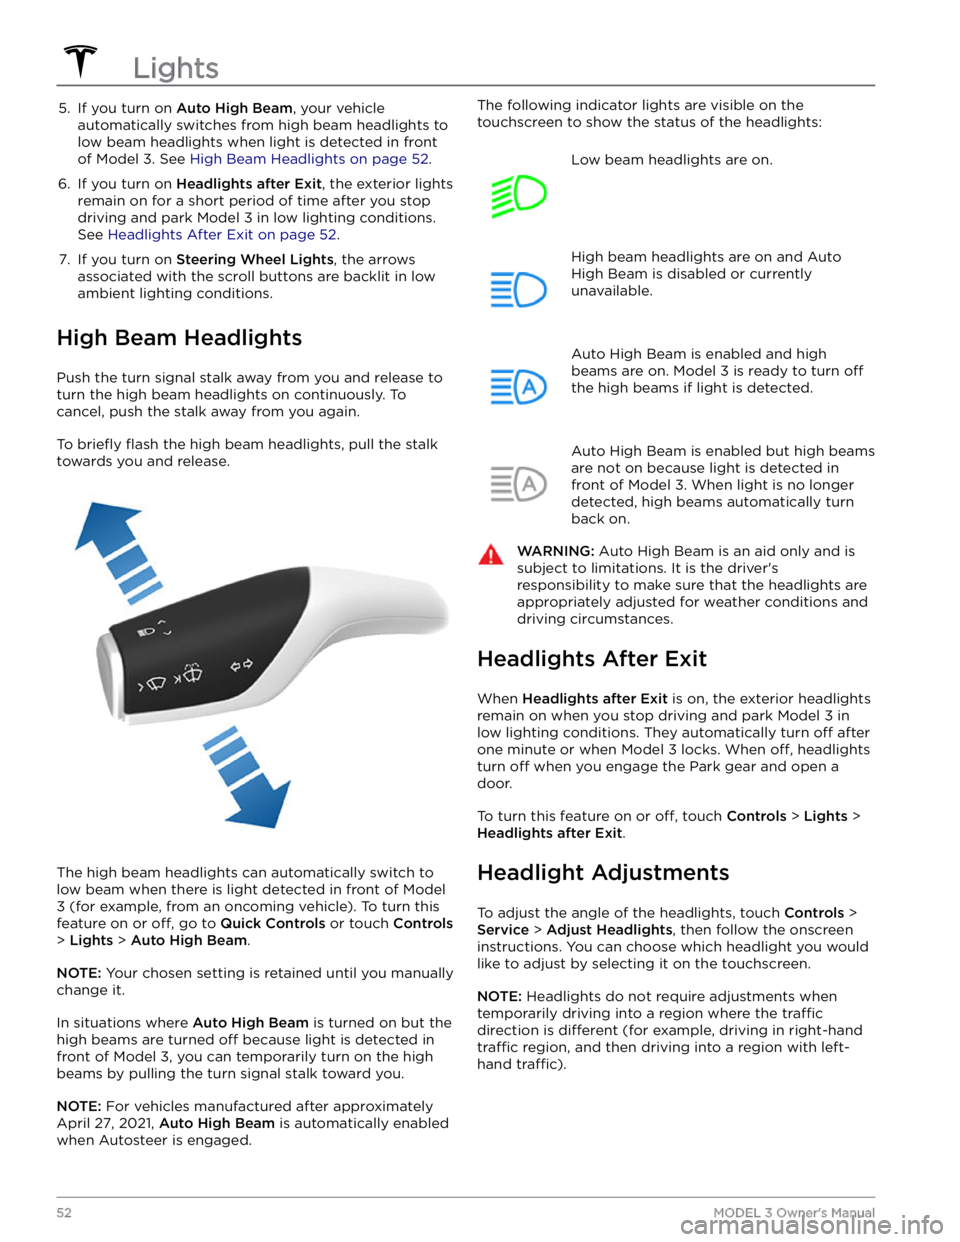
Push the turn signal stalk away from you and release to turn the high beam headlights on continuously. To cancel, push the stalk away from you again.
To briefly flash the high beam headlights, pull the stalk
towards you and release.
The high beam headlights can automatically switch to low beam when there is light detected in front of
Model
3 (for example, from an oncoming vehicle). To turn this
feature on or
off, go to Quick Controls or touch Controls
> Lights > Auto High Beam.
NOTE: Your chosen setting is retained until you manually
change it.
In situations where Auto High Beam is turned on but the
high beams are turned
off because light is detected in
front of
Model 3, you can temporarily turn on the high
beams by pulling the turn signal stalk toward you.
NOTE: For vehicles manufactured after approximately
April 27, 2021,
Auto High Beam is automatically enabled
when Autosteer is engaged.
The following indicator lights are visible on the
touchscreen to show the status of the headlights:Low beam headlights are on.High beam headlights are on and Auto
High Beam is disabled or currently
unavailable.Auto High Beam is enabled and high
beams are on.
Model 3 is ready to turn off
the high beams if light is detected.
Auto High Beam is enabled but high beams
are not on because light is detected in front of
Model 3. When light is no longer
detected, high beams automatically turn
back on.
WARNING: Auto High Beam is an aid only and is
subject to limitations. It is the driver
Page 79 of 248

5.
Remove the towel or other soft material used to prop the door handle open.
6.
Pivot the door handle in and out approximately ten times.
7.
For a second time, place the end of the straw next to the pivot pin and spray it for approximately one
second, taking care not to accidentally spray other components.
NOTE: Rest the end of the straw on the top of the
spring around the pivot pin to better aim the spray.
8.
Remove the towel or other soft material used to prop the door handle open.
9.
Pivot the door handle in and out approximately ten times.
10.
Perform this procedure on the other three door handles.
Cold Weather Best Practices
77Driving
Page 82 of 248
Cleaning Cameras and Sensors
To ensure the various Autopilot components can provide
information that is as accurate as possible, keep them
clean and free of obstructions, condensation, or damage. See
Cleaning on page 167.
Condensation can form inside the camera enclosures,
especially if you park your vehicle outside in cold or wet
conditions. The
touchscreen may display an alert stating
that a camera is blocked and that some or all Autopilot
features may be temporarily restricted until the camera vision is clear. To proactively dry the condensation, precondition the cabin by setting it to a warm temperature, turning the windshield defroster on, and directing the front air vents toward the door pillars (see
Mobile App on page 149).
CAUTION: Do not wipe an exposed lens with your
hands or a cloth in an attempt to remove dirt or
debris. The debris can damage the surface of the
lens when wiped.
CAUTION: Do not use chemical-based or abrasive
cleaners. Doing so can damage surfaces.
CAUTION: Do not clean an ultrasonic sensor or
camera lens with a sharp or abrasive object that
can scratch or damage its surface.
About Autopilot
80MODEL 3 Owner
Page 163 of 248
Maintaining Tire Pressures
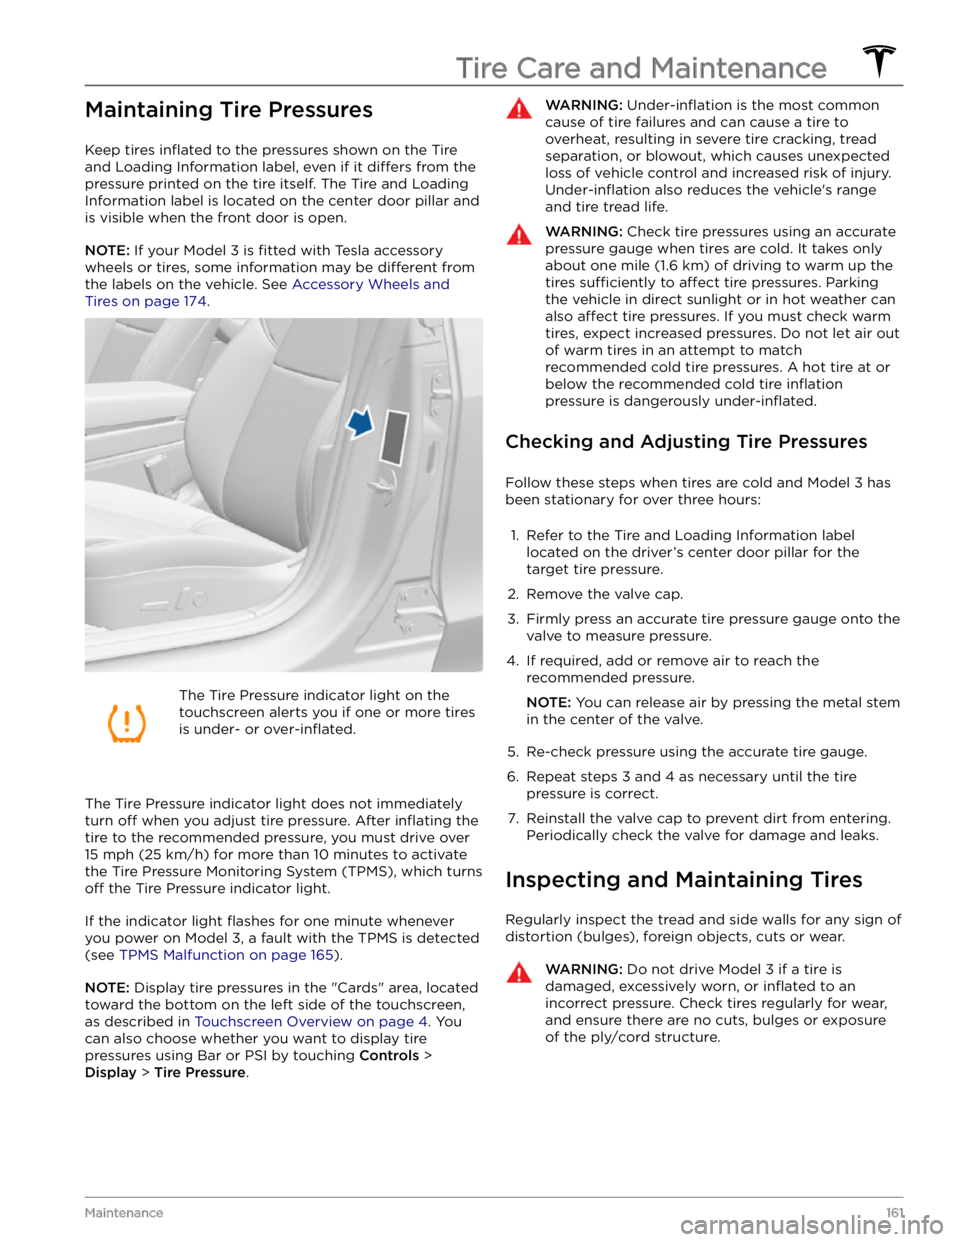
Keep tires inflated to the pressures shown on the Tire
and Loading Information label, even if it
differs from the
pressure printed on the tire itself. The Tire and Loading
Information label is located on the center door pillar and
is visible when the front door is open.
NOTE: If your Model 3 is fitted with Tesla accessory
wheels or tires, some information may be
different from
the labels on the vehicle.
See Accessory Wheels and
Tires on page 174.
The Tire Pressure indicator light on the
touchscreen alerts you if one or more tires
is under-
or over-inflated.
The Tire Pressure indicator light does not immediately
turn off when you adjust tire pressure. After inflating the
tire to the recommended pressure, you must drive over
15 mph (25 km/h) for more than 10 minutes to activate
the Tire Pressure Monitoring System (TPMS), which turns
off the Tire Pressure indicator light.
If the indicator light flashes for one minute whenever
you power on
Model 3, a fault with the TPMS is detected
(see
TPMS Malfunction on page 165).
NOTE: Display tire pressures in the "Cards" area, located
toward the bottom on the left side of the touchscreen
,
as described in Touchscreen Overview on page 4. You
can also choose whether you want to display tire pressures using Bar or PSI by touching
Controls >
Display > Tire Pressure.
WARNING: Under-inflation is the most common
cause of tire failures and can cause a tire to
overheat, resulting in severe tire cracking, tread
separation, or blowout, which causes unexpected
loss of vehicle control and increased risk of injury.
Under-inflation also reduces the vehicle