2022 SUBARU OUTBACK lights
[x] Cancel search: lightsPage 3 of 172

PURPOSE OF THIS GUIDE
WELCOME................. 4
IMPORTANT SAFETY
INFORMATION.............. 4
OWNER’S RESOURCES....... 4
IN CASE OF EMERGENCY..... 5
TOWING YOUR ALL-WHEEL
DRIVE SUBARU............. 6
ENTRY AND EXIT
KEYLESS ENTRY............ 7
KEYLESS ACCESS WITH
PUSH BUTTON START....... 8
POWER REAR GATE (PRG)....10
INSTRUMENT PANEL........14
GETTING COMFORTABLE
SEATING...................16
TILT AND TELESCOPIC
STEERING COLUMN.........19
POWER EXTERIOR MIRRORS . . . 20
REAR VIEW MIRROR.........22
POWER WINDOWS..........23
CENTER CONSOLE
STORAGE..................23
POWER MOONROOF........24
CLIMATE CONTROL..........25
ACCESSORY CONNECTIONS . . . 33
CONTROLS
INSTRUMENT PANEL SWITCHES
(LOWER LEFT)..............34
AUDIO CONTROLS...........34
ADVANCED ADAPTIVE CRUISE
CONTROL..................35
I SWITCH...................35
LIGHT CONTROLS...........36
TURN SIGNALS.............37
WINDSHIELD WIPERS........37
REAR WINDOW WIPER.......38
OVERHEAD CONSOLE........39
GAUGES AND WARNING
LIGHTS
COMBINATION METER.......40
WARNING AND INDICATOR
LIGHTS....................41
OPERATING THE VEHICLE
IGNITION SWITCH...........42
PUSH-BUTTON IGNITION
SWITCH...................42
STARTING THE VEHICLE......42
DRIVING THE VEHICLE.......43
AUTO START–STOP..........44
ELECTRONIC PARKING BRAKE
(EPB).....................46
X-MODE
®..................48
TURNING OFF THE VEHICLE...50
TABLE OF CONTENTS
Page 5 of 172

DRIVER ASSIST
TECHNOLOGIES
REAR-VISION CAMERA......111
FRONT VIEW MONITOR.....112
BLIND SPOT DETECTION (BSD) /
REAR CROSS TRAFFIC ALERT
(RCTA)...................113
HIGH BEAM ASSIST (HBA)...114
STEERING RESPONSIVE
HEADLIGHTS (SRH).........115
REVERSE AUTOMATIC BRAKING
(RAB)....................115
DRIVERFOCUS DISTRACTION
MITIGATION SYSTEM
DRIVERFOCUS®OVERVIEW . . . 116
DRIVERFOCUS®
COMPONENTS.............116
DROWSY/INATTENTIVE
WARNINGS................118
DRIVER PROFILE/CONVENIENCE
SETTINGS.................118
DRIVER MONITORING
SYSTEM OFF..............120
CARE AND LIMITATIONS
STEREO CAMERA
PRECAUTIONS.............121
WINDSHIELD GLASS AND
DASHBOARD..............121
FRONT VIEW
OUTBACK.................122
EYESIGHT DISCLAIMER
EYESIGHT®DISCLAIMER....123
HOW TO APPENDIX
HOW TO OVERVIEW.........124
SETTING THE CLOCK.......124
MEMORY HEIGHT..........128
MEMORY DRIVER’S SEAT....130
BLUETOOTH
®PAIRING......131
ANDROID AUTO™..........137
APPLE CARPLAY
®..........139
WI-FI.....................141
MAPS....................144
FIRMWARE AND SOFTWARE
UPDATES.................164
INDEX.....................165
TABLE OF CONTENTS
3
Page 9 of 172

KEYLESS ENTRY
1Lock/Arm
• Press the lock/arm button to lock the doors, the rear gate,
and the fuel door and to activate the security alarm. A chirp
sounds and the hazard warning lights flash once.
• If any of the doors or the rear gate are not fully closed, five
rapid chirps sound and the hazard warning lights flash to
alert you.
• Press the lock/arm button three times to activate the vehicle
finder function. If you are within 30 feet of your Subaru, the
horn sounds once, and the hazard warning lights flash three
times.
2Unlock/Disarm
• Press the unlock/disarm button once to unlock the driver’s
door and fuel door. Two chirps sound and the hazard
warning lights flash twice. To unlock all the doors and the
rear gate, briefly press the button twice.
• The interior lights will illuminate when you press the
unlock/disarm button if they are set to the “DOOR” position
on the overhead console.
3Rear Gate
• Press the rear gate button to unlock the rear gate.
• If your Subaru has a Power Rear Gate, press and hold this
button to open or close the rear gate.
4Panic Alarm
• Press the panic alarm button to sound the horn and flash
the hazard warning lights.
•
Press any button on the access key fob or transmitter to deactivate the panic alarm.
Automatic Door Locking/Unlocking
This feature allows you to set when your Subaru automatically locks or unlocks the doors
through the STARLINK®Touchscreen (select “Settings”, then select the “Car” menu in the
top bar). The available settings are listed in the table below.
AVAILABLE SETTINGS
AUTO DOOR LOCK
Vehicle Speed
(12 mph)Shift into or
out of PARKOFF
AUTO DOOR UNLOCK
Ignition OFF Driver’s Door
OpenShift into or
out of PARKOFF
Transmitter
Access Key Fob
ENTRY AND EXIT
7
Page 10 of 172

KEYLESS ACCESS WITH PUSH BUTTON START
(if equipped)
The Keyless Access with Push-Button Start system features the following touch-activated
door locking or unlocking functions without the key ever leaving your pocket or purse.
You can customize the touch-activated door locking or unlocking settings using the
STARLINK
®Touchscreen by selecting “Settings” then selecting the “Car” menu in the
top bar.
Unlocking Using Door Handles
Grip the driver’s door handle to
unlock the driver’s door (or all
doors depending on the setting).
Grip the front passenger’s door
handle to unlock all doors and the
rear gate. Two chirps sound and
the hazard warning lights flash
twice.
Locking Using Door Handles
Close all the doors and the rear
gate and touch the door lock
sensor (two lines) on either front
door handle. All doors and the
rear gate lock. One chirp sounds
and the hazard warning lights
flash once.
Door Unlock Sensor
Door Lock Sensor
ENTRY AND EXIT
8
Page 11 of 172

Unlocking Using the Rear Gate
Press the rear gate opener button
to unlock and open the rear gate
(or also unlock all doors
depending on the setting).
Two chirps sound and the hazard
warning lights flash twice.
Locking Using the Rear Gate
Close all the doors and the rear
gate and press the rear lock
button. All doors and the rear
gate lock. One chirp sounds and
the hazard warning lights flash
once.
Rear Gate Opener Button
Rear Lock Button
ENTRY AND EXIT
9
Page 12 of 172

POWER REAR GATE (PRG)(if equipped)
The Power Rear Gate allows automatic opening, even when your
arms are full, and a single touch of a button can close the gate and
lock the entire vehicle. The opening height can also be adjusted for
spaces where clearance is limited.
Power Rear Gate Button
Opening the Power Rear Gate
Press and hold the Power Rear
Gate Button on the instrument
panel to automatically open the
rear gate. Two chirps sound and
the hazard warning lights flash
twice.
Stopping the Power Rear Gate
If you briefly press the Power
Rear Gate Button while the rear
gate is opening, it will stop. Press
and briefly hold the button again
to close the rear gate.
Closing the Power Rear Gate
Press and hold the Power Rear Gate Button on the instrument panel to close the rear gate.
If you briefly press the button while the rear gate is closing, it will open.
The operation of the Power Rear Gate is the same using the Power Rear Gate Button on
the access key fob or transmitter.
NOTE: If the doors are locked when you operate the Power Rear Gate, you may hear three
rapid beeps from the vehicle. In this case, unlock the doors and then operate the Power
Rear Gate.
Power Rear Gate Button
ENTRY AND EXIT
10
Page 38 of 172

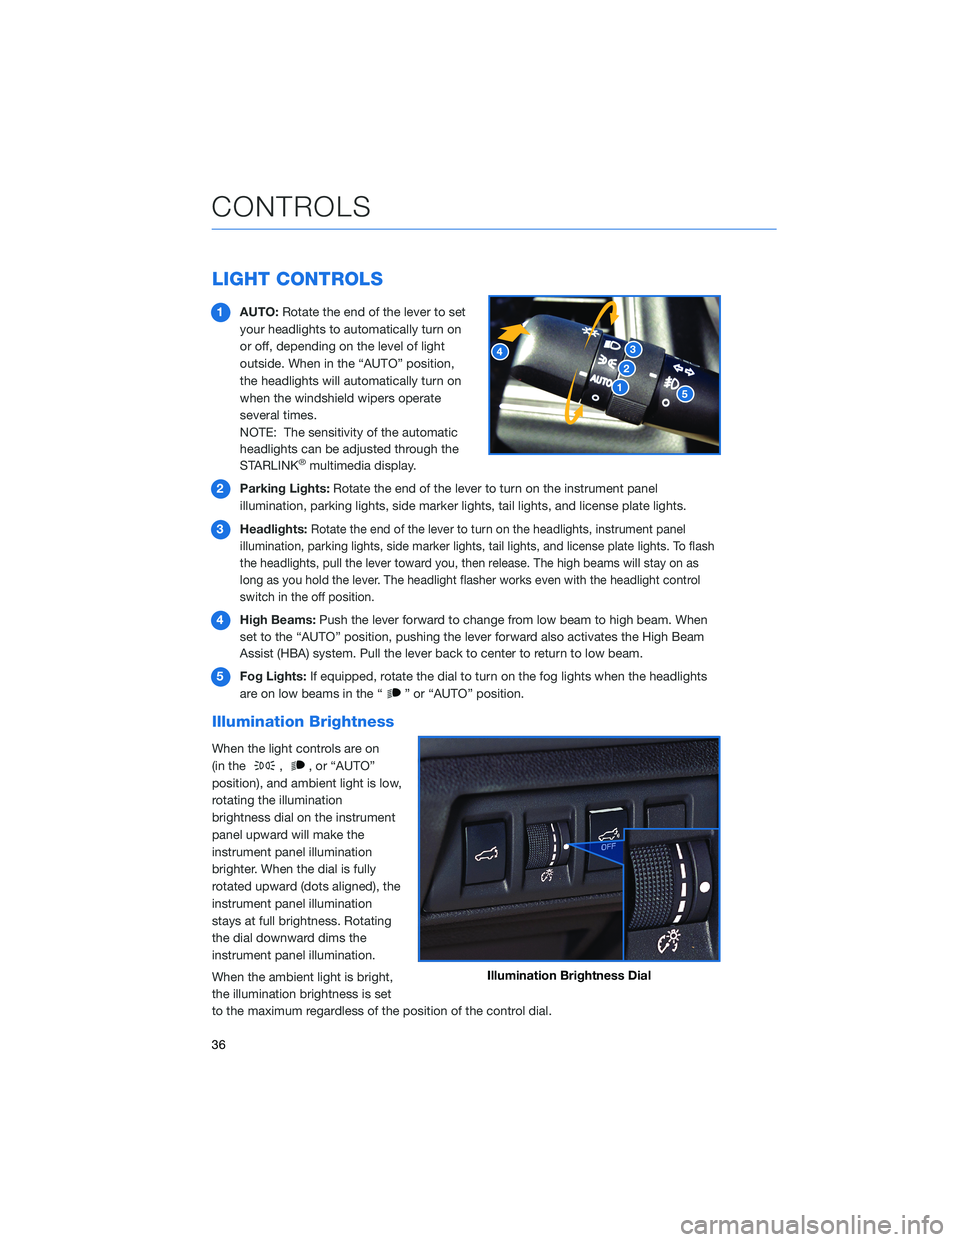
LIGHT CONTROLS
1AUTO:Rotate the end of the lever to set
your headlights to automatically turn on
or off, depending on the level of light
outside. When in the “AUTO” position,
the headlights will automatically turn on
when the windshield wipers operate
several times.
NOTE: The sensitivity of the automatic
headlights can be adjusted through the
STARLINK
®multimedia display.
2Parking Lights:Rotate the end of the lever to turn on the instrument panel
illumination, parking lights, side marker lights, tail lights, and license plate lights.
3Headlights:
Rotate the end of the lever to turn on the headlights, instrument panel
illumination, parking lights, side marker lights, tail lights, and license plate lights. To flash
the headlights, pull the lever toward you, then release. The high beams will stay on as
long as you hold the lever. The headlight flasher works even with the headlight control
switch in the off position.
4High Beams:Push the lever forward to change from low beam to high beam. When
set to the “AUTO” position, pushing the lever forward also activates the High Beam
Assist (HBA) system. Pull the lever back to center to return to low beam.
5Fog Lights:If equipped, rotate the dial to turn on the fog lights when the headlights
are on low beams in the “
” or “AUTO” position.
Illumination Brightness
When the light controls are on
(in the
,, or “AUTO”
position), and ambient light is low,
rotating the illumination
brightness dial on the instrument
panel upward will make the
instrument panel illumination
brighter. When the dial is fully
rotated upward (dots aligned), the
instrument panel illumination
stays at full brightness. Rotating
the dial downward dims the
instrument panel illumination.
When the ambient light is bright,
the illumination brightness is set
to the maximum regardless of the position of the control dial.
Illumination Brightness Dial
CONTROLS
36
Page 39 of 172

Daytime Running Lights
The daytime running lights automatically turn on when the engine is running, the parking
brake is fully released, the select lever is out of the “P” position, and the light switch is set
to Off, “AUTO”, or “
”. Always turn on the headlights when it’s dark outside by rotating
the dial to the “
” or “AUTO” position.
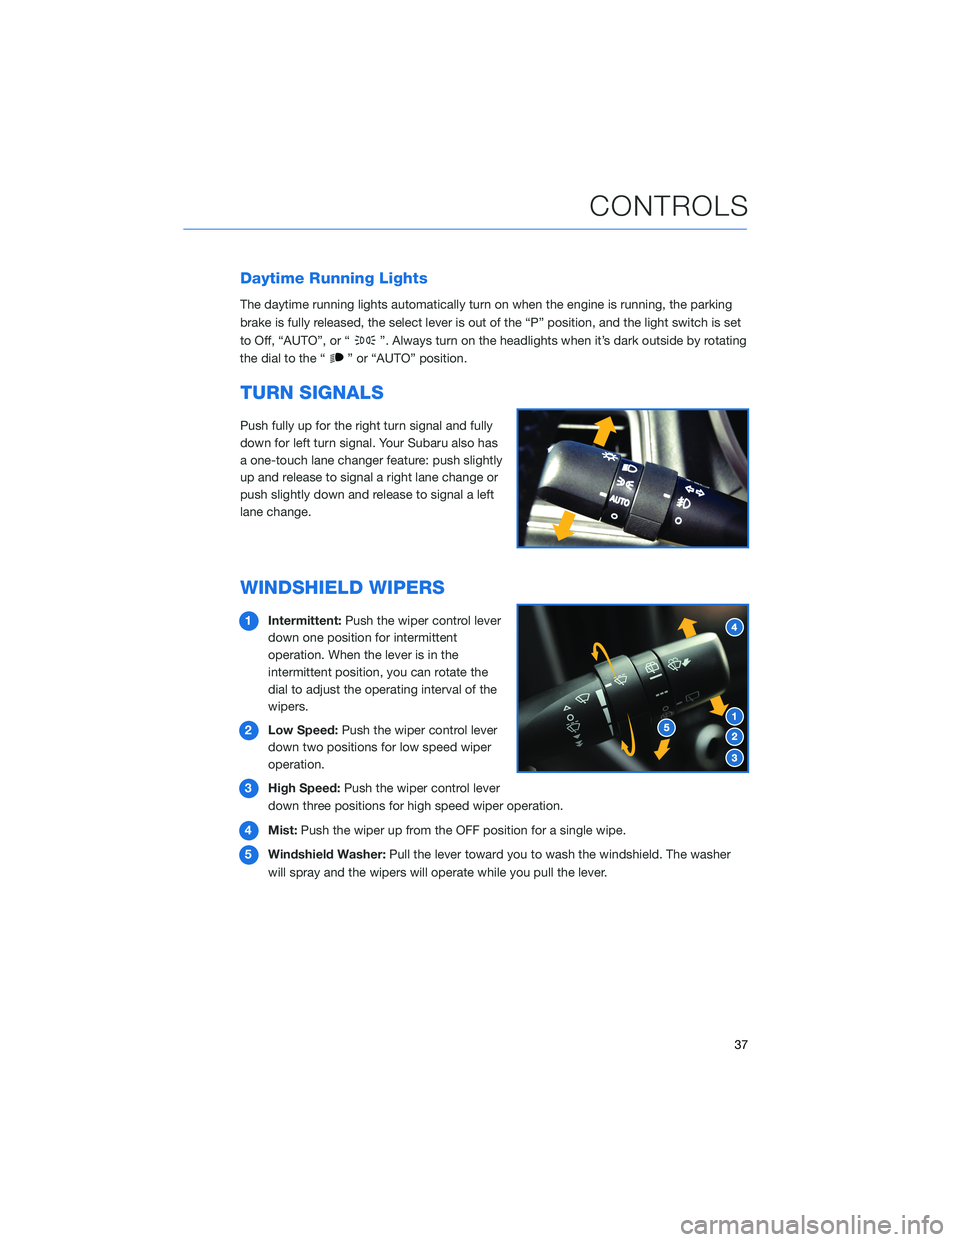
TURN SIGNALS
Push fully up for the right turn signal and fully
down for left turn signal. Your Subaru also has
a one-touch lane changer feature: push slightly
up and release to signal a right lane change or
push slightly down and release to signal a left
lane change.
WINDSHIELD WIPERS
1Intermittent:Push the wiper control lever
down one position for intermittent
operation. When the lever is in the
intermittent position, you can rotate the
dial to adjust the operating interval of the
wipers.
2Low Speed:Push the wiper control lever
down two positions for low speed wiper
operation.
3High Speed:Push the wiper control lever
down three positions for high speed wiper operation.
4Mist:Push the wiper up from the OFF position for a single wipe.
5Windshield Washer:Pull the lever toward you to wash the windshield. The washer
will spray and the wipers will operate while you pull the lever.
CONTROLS
37