Page 61 of 124
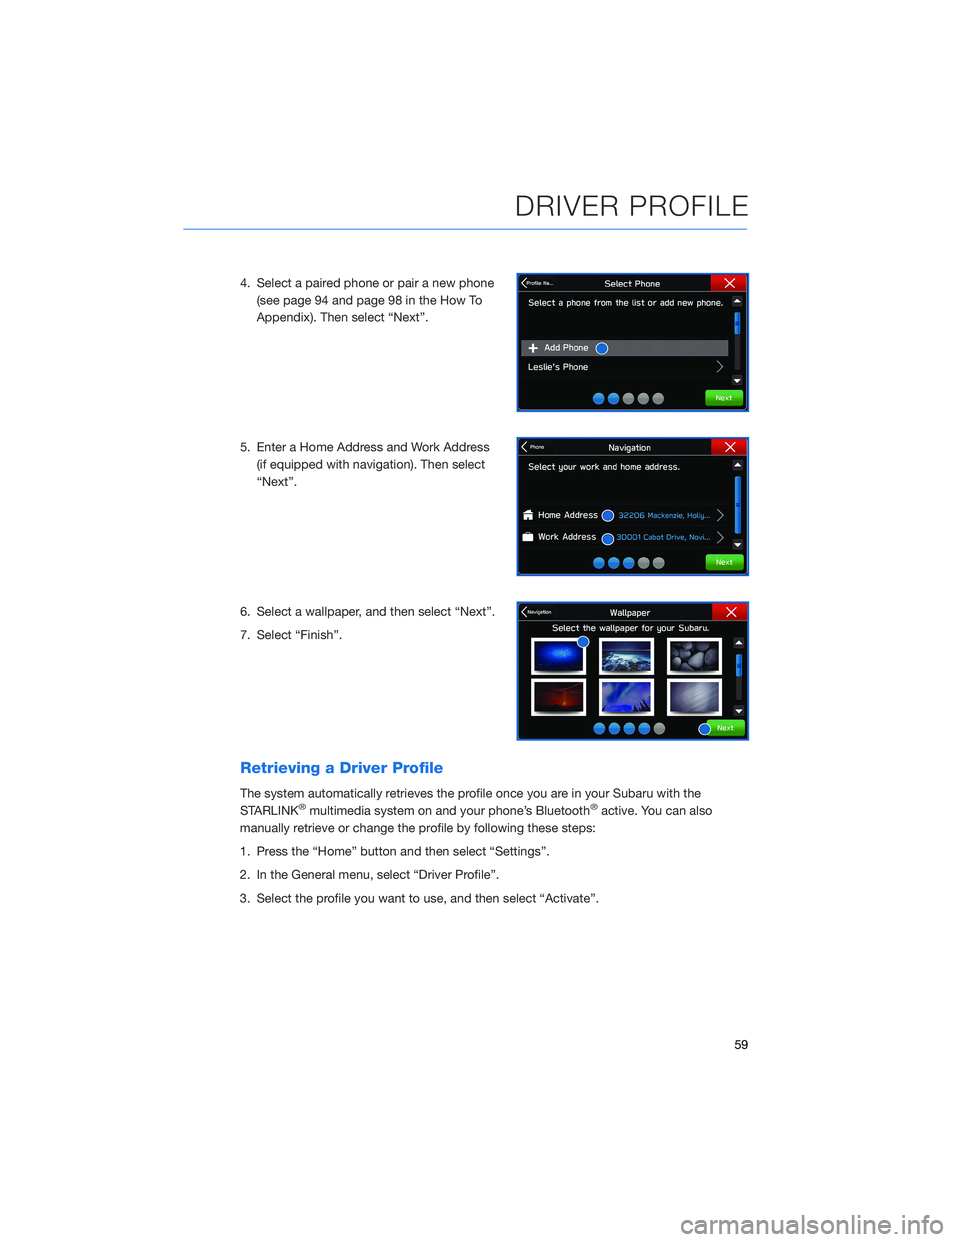
4. Select a paired phone or pair a new phone(see page 94 and page 98 in the How To
Appendix). Then select “Next”.
5. Enter a Home Address and Work Address (if equipped with navigation). Then select
“Next”.
6. Select a wallpaper, and then select “Next”.
7. Select “Finish”.
Retrieving a Driver Profile
The system automatically retrieves the profile once you are in your Subaru with the
STARLINK®multimedia system on and your phone’s Bluetooth®active. You can also
manually retrieve or change the profile by following these steps:
1. Press the “Home” button and then select “Settings”.
2. In the General menu, select “Driver Profile”.
3. Select the profile you want to use, and then select “Activate”.
DRIVER PROFILE
59
Page 70 of 124

MYSUBARU
Whether you’re on the road or planning adventures, the MySubaru app makes loving every
part of owning your Subaru easy. Although the mobile app is great when you are on the go,
you can also visitwww.MySubaru.com from your computer to access the same functions
and to aid in planning your trip before you leave.
You can download the MySubaru app from the Google Play Store or
the Apple App Store on your phone by searching MySubaru.
By creating an account, you can:
• Schedule service with a preferred Subaru retailer
• Get vehicle service reminders, recall alerts, and exclusive coupons
• Track and record your service history
• Access resources like your owner’s manuals, how to videos and more
• Access SUBARU STARLINK
®Safety and Security features (must have an active
SUBARU STARLINK®subscription)
• Get help from 24-hour roadside assistance (24-hour roadside is included in standard 3-year warranty, and after 3 years with a Concierge package)
Service Appointment Scheduler
The SUBARU STARLINK®Service
Appointment Scheduler can help you set an
appointment from the MySubaru website,
Mobile App or the vehicle’s Touchscreen.
Getting your Subaru vehicle to the Subaru
professionals for service is easy, no matter
where you are. If you are away from your
preferred Subaru retailer for service, you can
always use Service Appointment Scheduler to locate any of our certified Subaru retailers
near your location.
STARLINK
®Service Appointment Scheduler on your Touchscreen is a convenient way to
set a service appointment. Simply select the MySubaru icon on the home screen and
choose “Make an Appointment” to get started.
APPS
68
Page 71 of 124
MAPS OVERVIEW
Your new SUBARU STARLINK®comes equipped with an integrated navigation system,
powered by TomTom. We hope you enjoy the state-of-the-art navigation technology and
optimized mapping routes to guide you on safer, better, and more enjoyable journeys.
With your integrated navigation system, you can find destinations by address or search by
points of interest, as well as save destinations in the system as favorites. You can also
customize route options and settings and find the nearest gas station along your route with
the touch of a button.
For more information and step by step directions on using your navigation system,
please refer to page 108 in this Getting Started Guide or “Navigation System (8-inch with
Navi system only)” in your STARLINK
®Owner’s Manual.
CREATING HOME AND WORK PROFILES
Creating a driver profile allows you to save your home address and work address in the
navigation system for ease of use.
For step by step instructions on creating a driver profile, please refer to page 58.
MAPS (if equipped)
69
Page 73 of 124
Head towww.Subaru.com/STARLINK to see all the SUBARU
STARLINK®subscription services and packages.
* Access to STARLINK®Safety and Security services requires an active
STARLINK®subscription. Not available in all States. See retailer for details.
Remote Engine Start available on keyless access with push-button start
vehicles. Remote Engine Start with Climate Control is available on select
models only. Not available on vehicles with manual transmission. See
Retailer for details or visit the STARLINK
®page on Subaru.com to learn
more.
ENROLLMENT
To enroll in SUBARU STARLINK®and access remote services, a MySubaru account is
required. MySubaru is the Subaru owner website that allows you to access vehicle remote
services, user preferences, diagnostic alerts and other useful features enabled by your
STARLINK
®Safety Plus, STARLINK®Security Plus and STARLINK®Concierge
subscription.
Your retailer may have created an account for you during the delivery process. However,
you can also create a MySubaru account at www.mysubaru.com.
Enrollment in SUBARU STARLINK
®can be done online at MySubaru.com, through the
MySubaru Mobile App, at your Subaru retailer or by calling a STARLINK®Customer Care
Representative at: 1-855-753-2495
NOTE: Please have your Vehicle Identification Number (VIN) available, as you will need it
to complete this step. After the enrollment process, you will learn more about the features
in detail at MySubaru.com.
STARLINK SAFETY AND SECURITY
71
Page 75 of 124
SETTINGS AND UPDATES OVERVIEW
Many settings can be customized for different features in your Subaru. In this section you
will find examples and instructions for some of the settings you can tailor to fit your
preferences, as well as ways to keep your system updated.
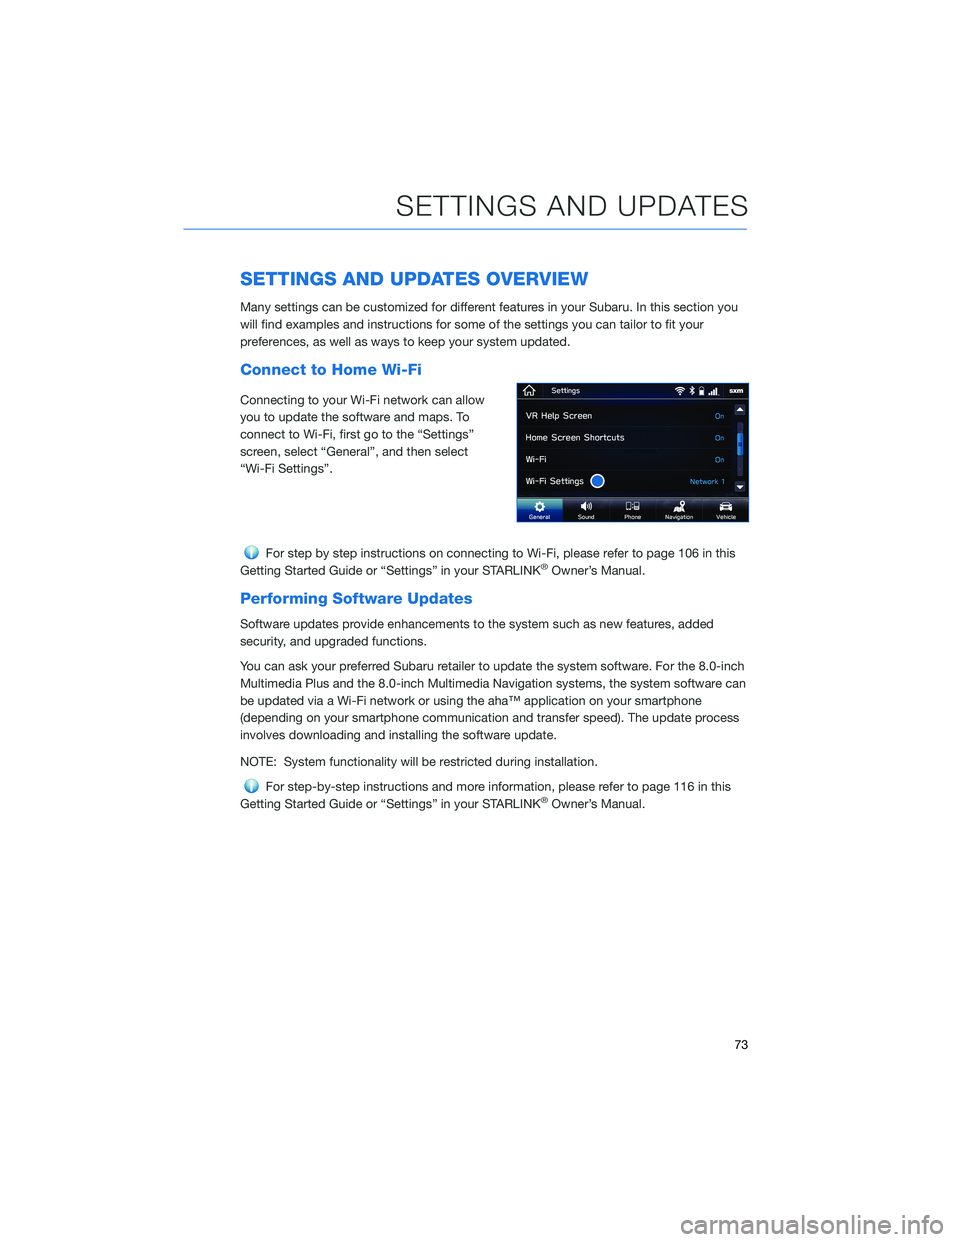
Connect to Home Wi-Fi
Connecting to your Wi-Fi network can allow
you to update the software and maps. To
connect to Wi-Fi, first go to the “Settings”
screen, select “General”, and then select
“Wi-Fi Settings”.
For step by step instructions on connecting to Wi-Fi, please refer to page 106 in this
Getting Started Guide or “Settings” in your STARLINK®Owner’s Manual.
Performing Software Updates
Software updates provide enhancements to the system such as new features, added
security, and upgraded functions.
You can ask your preferred Subaru retailer to update the system software. For the 8.0-inch
Multimedia Plus and the 8.0-inch Multimedia Navigation systems, the system software can
be updated via a Wi-Fi network or using the aha™ application on your smartphone
(depending on your smartphone communication and transfer speed). The update process
involves downloading and installing the software update.
NOTE: System functionality will be restricted during installation.
For step-by-step instructions and more information, please refer to page 116 in this
Getting Started Guide or “Settings” in your STARLINK®Owner’s Manual.
SETTINGS AND UPDATES
73
Page 78 of 124
Updating Maps Using Your PC/MAC
Maps can also be updated using a USB memory device, which will
allow the entire map program to be updated at one time. This is a
great option if you are going to take a cross-country trip and your
maps have not been updated in a while.
To update the map using a USB memory device, start by going to
www.subaru-maps.com.
CLOCK
You can adjust the clock manually or set the clock to update
automatically. When set to “Auto,” the clock automatically adjusts
when a Bluetooth
®connected phone is paired (vehicles without
navigation), or through the GPS signal (vehicles with navigation
system).
The following sections contain step-by-step instructions for setting
the clock, and you can scan the QR codes for a helpful “how to”
video. Choose the appropriate QR code based on your
Multi-Function Display (Color LCD or Black and White LCD).
SETTINGS AND UPDATES
76
Page 79 of 124
Manually
Use the STARLINK®Touchscreen to set the clock:
1 Press the “Home” button.
2 Select “Settings”.
3 Select “Vehicle”.
4 Select “Time/Date”.
5 Select “Mode”.
6 Select “Manual”.
7 Now adjust the time and date using the “+” and
“-” buttons. Select the check mark when finished.
For black-and-white Multi-Function Display
(MFD), use the “+” and “-” buttons next to the
clock.
SETTINGS AND UPDATES
77
Page 89 of 124
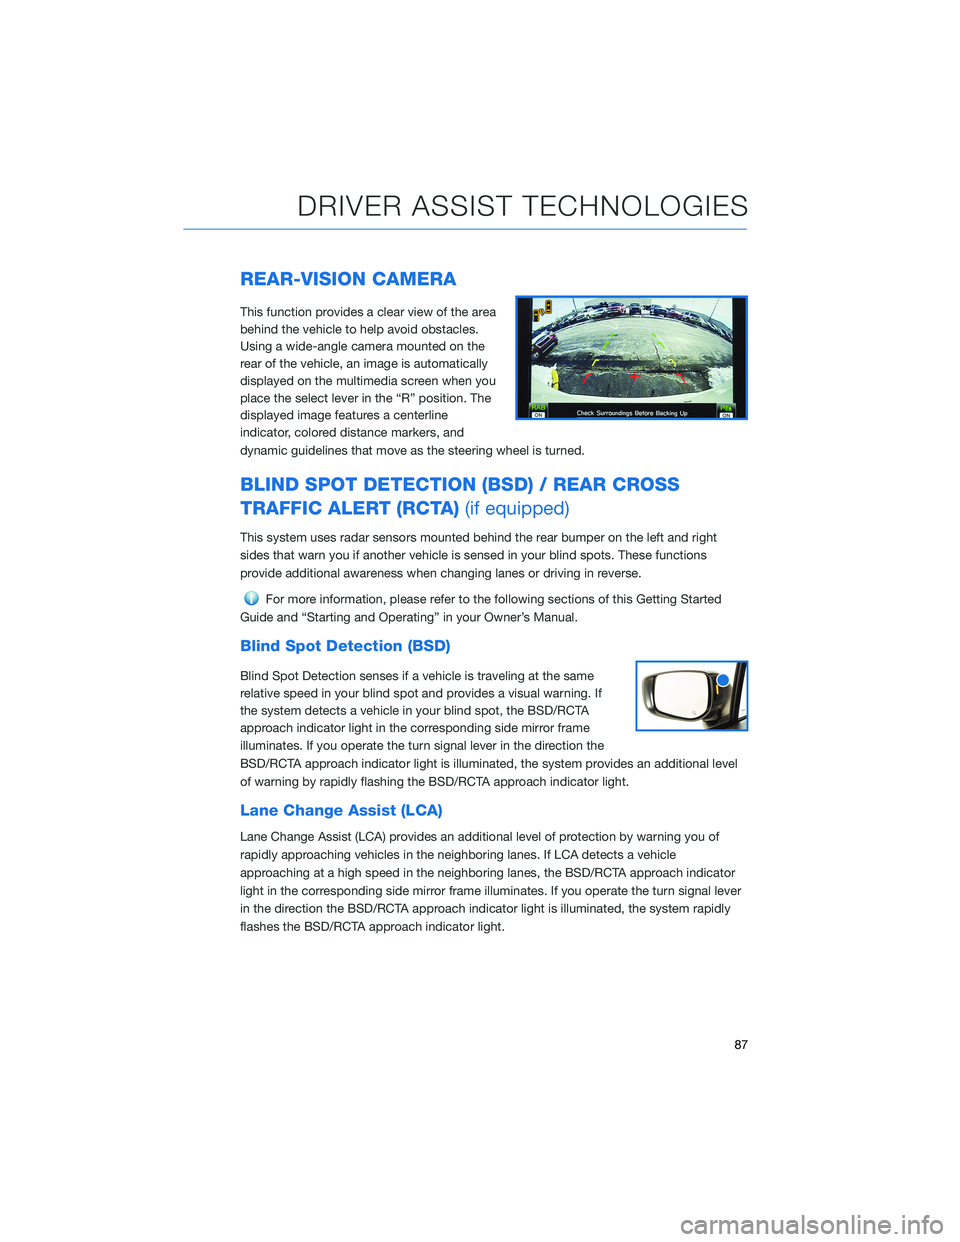
REAR-VISION CAMERA
This function provides a clear view of the area
behind the vehicle to help avoid obstacles.
Using a wide-angle camera mounted on the
rear of the vehicle, an image is automatically
displayed on the multimedia screen when you
place the select lever in the “R” position. The
displayed image features a centerline
indicator, colored distance markers, and
dynamic guidelines that move as the steering wheel is turned.
BLIND SPOT DETECTION (BSD) / REAR CROSS
TRAFFIC ALERT (RCTA)(if equipped)
This system uses radar sensors mounted behind the rear bumper on the left and right
sides that warn you if another vehicle is sensed in your blind spots. These functions
provide additional awareness when changing lanes or driving in reverse.
For more information, please refer to the following sections of this Getting Started
Guide and “Starting and Operating” in your Owner’s Manual.
Blind Spot Detection (BSD)
Blind Spot Detection senses if a vehicle is traveling at the same
relative speed in your blind spot and provides a visual warning. If
the system detects a vehicle in your blind spot, the BSD/RCTA
approach indicator light in the corresponding side mirror frame
illuminates. If you operate the turn signal lever in the direction the
BSD/RCTA approach indicator light is illuminated, the system provides an additional level
of warning by rapidly flashing the BSD/RCTA approach indicator light.
Lane Change Assist (LCA)
Lane Change Assist (LCA) provides an additional level of protection by warning you of
rapidly approaching vehicles in the neighboring lanes. If LCA detects a vehicle
approaching at a high speed in the neighboring lanes, the BSD/RCTA approach indicator
light in the corresponding side mirror frame illuminates. If you operate the turn signal lever
in the direction the BSD/RCTA approach indicator light is illuminated, the system rapidly
flashes the BSD/RCTA approach indicator light.
DRIVER ASSIST TECHNOLOGIES
87