2022 SUBARU FORESTER sound
[x] Cancel search: soundPage 4 of 156
OPERATING THE VEHICLE
IGNITION SWITCH...........39
PUSH-BUTTON IGNITION
SWITCH ...................39
STARTING THE VEHICLE ......39
DRIVING THE VEHICLE .......40
AUTO START–STOP .........42
ELECTRONIC PARKING BRAKE
(EPB) .....................44
X-MODE
®..................45
TURNING OFF THE VEHICLE ...48
REFUELING
FUEL FILLER LID............49
FUEL SPECIFICATIONS AND
CAPACITY ..................49
PASSENGER/CARGO AREAS
FOLDING THE REAR SEATS ...50
CHILD SAFETY LOCKS .......50
LATCH/ANCHOR ............51
REAR SEAT REMINDER .......52
CARGO AREA AND COVER ...53
SPARE TIRE AND JACK .......53
ENGINE COMPARTMENT
HOOD PROP................54
2.5 L ENGINE ...............55
ADDITIONAL SPECIFICATIONS
NEW VEHICLE BREAK-IN ......56
ENGINE OIL ................56
ENGINE OIL CAPACITY .......56
ROOF RAIL CAPACITY .......57
TRAILER TOWING CAPACITY . . 57
TIRE PRESSURE MONITORING
SYSTEM (TPMS) .............58
STARLINK OVERVIEW
OVERVIEW OF YOUR
MULTIMEDIA SYSTEM ........60
BUTTONS ..................60
TOUCHSCREEN .............62
STEERING WHEEL CONTROLS . 63
VOICE RECOGNITION ........64
STARLINK HOME
HOME SCREEN ICONS .......66
REARRANGING ICONS .......66
ADDING SHORTCUTS ........67
DRIVER PROFILE
CREATING A DRIVER PROFILE . . 68
MULTIMEDIA
RADIO.....................70
MEDIA .....................71
PHONE
PAIRING A PHONE ...........72
MAKING A CALL .............72
RECEIVING A CALL ..........73
TEXT MESSAGES ............74
APPS
SUBARU STARLINK®
IN-VEHICLE APPS ...........75
SUBARU STARLINK®
MOBILE APP ................77
MYSUBARU ................77
MAPS (if equipped)
MAPS OVERVIEW ............79
CREATING HOME AND
WORK PROFILES ............79
STARLINK SAFETY AND
SECURITY
SAFETY AND SECURITY
OVERVIEW.................80
ENROLLMENT ..............81
MYSUBARU INTEGRATION ....82
SUBARU STARLINK
®
WI-FI HOTSPOT .............82
SETTINGS AND UPDATES
SETTINGS AND UPDATES
OVERVIEW.................83
SOUND ....................84
PHONE ....................84
MAPS/NAVIGATION ..........85
CLOCK ....................87
TABLE OF CONTENTS
2
Page 9 of 156
KEYLESS ENTRY
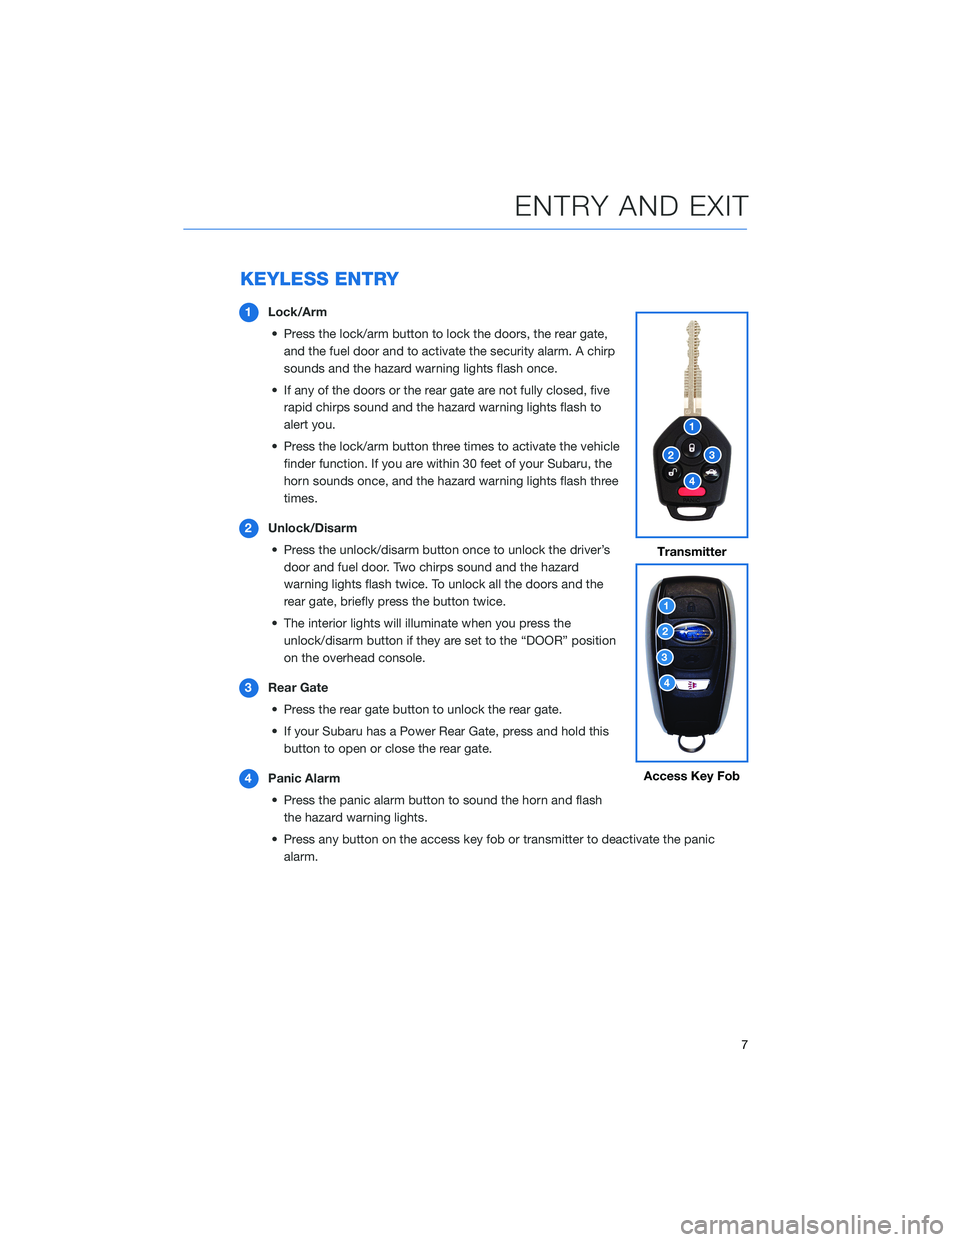
1Lock/Arm
• Press the lock/arm button to lock the doors, the rear gate, and the fuel door and to activate the security alarm. A chirp
sounds and the hazard warning lights flash once.
• If any of the doors or the rear gate are not fully closed, five rapid chirps sound and the hazard warning lights flash to
alert you.
• Press the lock/arm button three times to activate the vehicle finder function. If you are within 30 feet of your Subaru, the
horn sounds once, and the hazard warning lights flash three
times.
2 Unlock/Disarm
• Press the unlock/disarm button once to unlock the driver’s door and fuel door. Two chirps sound and the hazard
warning lights flash twice. To unlock all the doors and the
rear gate, briefly press the button twice.
• The interior lights will illuminate when you press the unlock/disarm button if they are set to the “DOOR” position
on the overhead console.
3 Rear Gate
• Press the rear gate button to unlock the rear gate.
• If your Subaru has a Power Rear Gate, press and hold this button to open or close the rear gate.
4 Panic Alarm
• Press the panic alarm button to sound the horn and flash the hazard warning lights.
• Press any button on the access key fob or transmitter to deactivate the panic alarm.
Transmitter
Access Key Fob
ENTRY AND EXIT
7
Page 11 of 156
KEYLESS ACCESS WITH PUSH BUTTON START
(if equipped)
The Keyless Access with Push-Button Start system features the following touch-activated
door locking or unlocking functions without the key ever leaving your pocket or purse;
simply carry the access key fob with you. You can customize the touch-activated door
locking or unlocking settings using the Combination Meter Display or through the
STARLINK
®Touchscreen by selecting “Settings” then “Vehicle”.
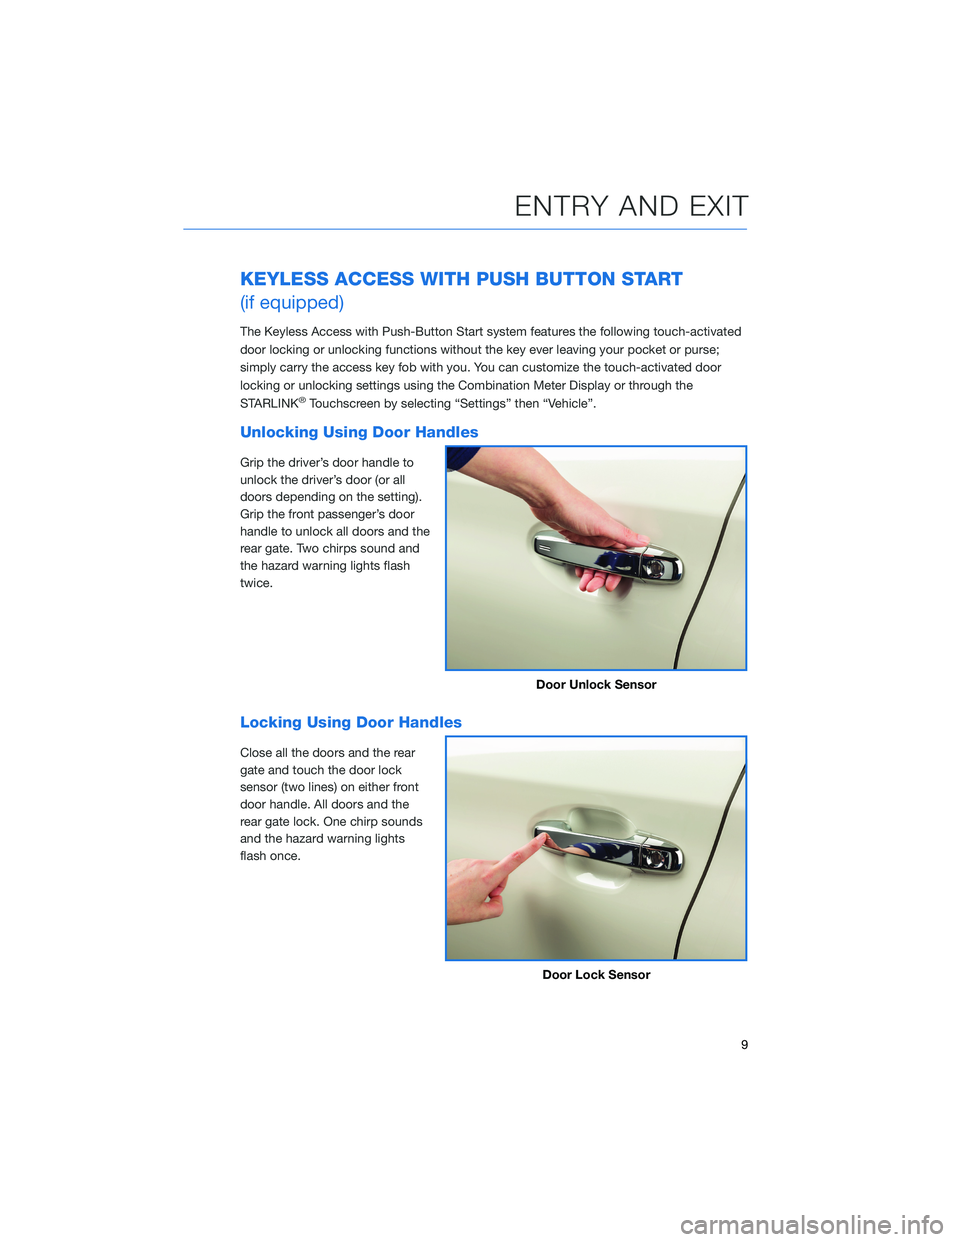
Unlocking Using Door Handles
Grip the driver’s door handle to
unlock the driver’s door (or all
doors depending on the setting).
Grip the front passenger’s door
handle to unlock all doors and the
rear gate. Two chirps sound and
the hazard warning lights flash
twice.
Locking Using Door Handles
Close all the doors and the rear
gate and touch the door lock
sensor (two lines) on either front
door handle. All doors and the
rear gate lock. One chirp sounds
and the hazard warning lights
flash once.
Door Unlock Sensor
Door Lock Sensor
ENTRY AND EXIT
9
Page 12 of 156

Unlocking Using the Rear Gate
Press the rear gate opener button
to unlock and open the rear gate
(or also unlock all doors
depending on the setting). Two
chirps sound and the hazard
warning lights flash twice.
Locking Using the Rear Gate
Close all the doors and the rear
gate and press the rear lock
button. All doors and the rear gate
lock. One chirp sounds and the
hazard warning lights flash once.
Rear Gate Opener Button
Rear Lock Button
ENTRY AND EXIT
10
Page 13 of 156
POWER REAR GATE (PRG)(if equipped)
The Power Rear Gate allows automatic opening, and a single touch
of a button can close the gate and lock the entire vehicle. The
opening height can also be adjusted for spaces where clearance is
limited.
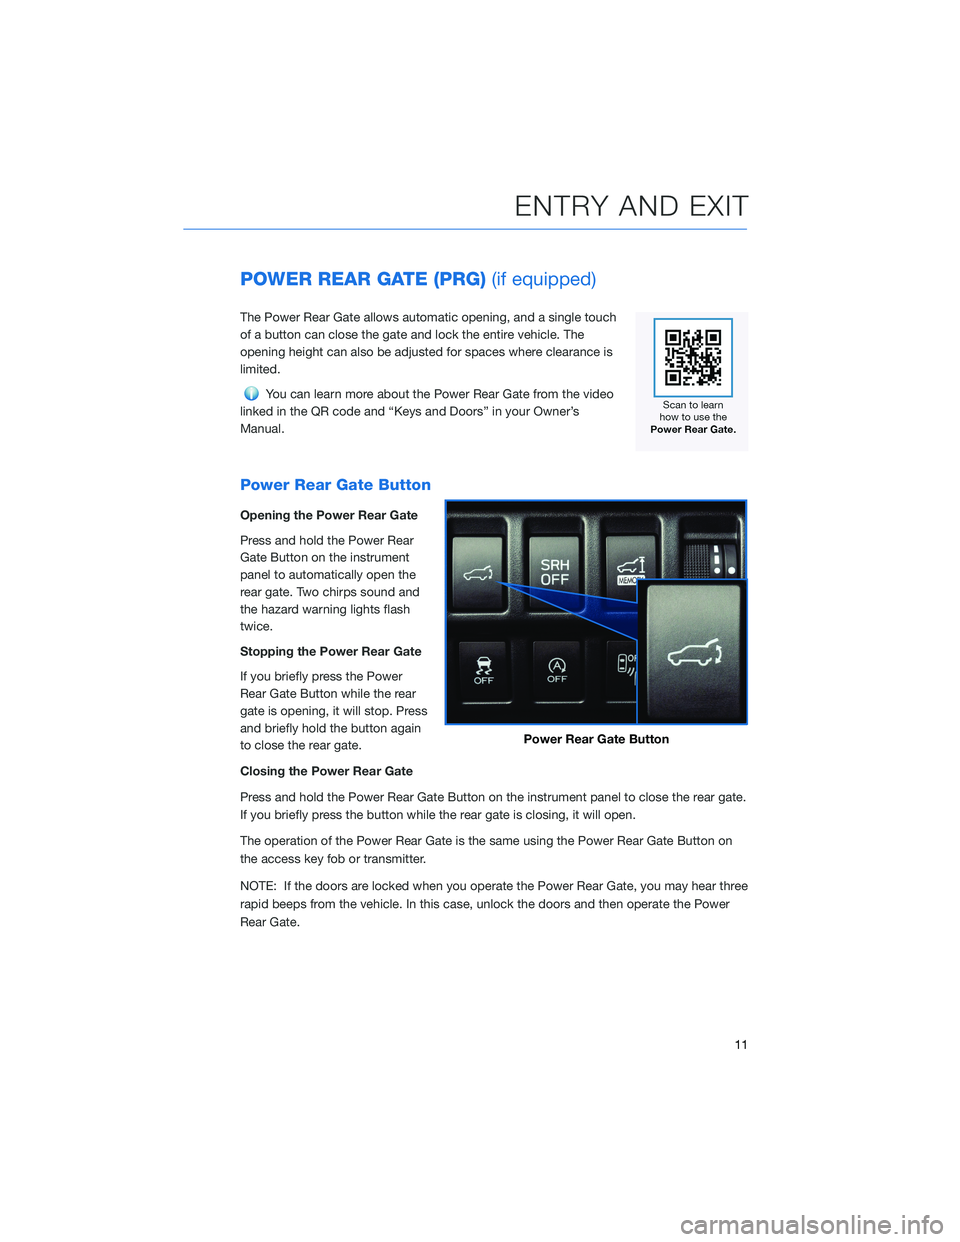
You can learn more about the Power Rear Gate from the video
linked in the QR code and “Keys and Doors” in your Owner’s
Manual.
Power Rear Gate Button
Opening the Power Rear Gate
Press and hold the Power Rear
Gate Button on the instrument
panel to automatically open the
rear gate. Two chirps sound and
the hazard warning lights flash
twice.
Stopping the Power Rear Gate
If you briefly press the Power
Rear Gate Button while the rear
gate is opening, it will stop. Press
and briefly hold the button again
to close the rear gate.
Closing the Power Rear Gate
Press and hold the Power Rear Gate Button on the instrument panel to close the rear gate.
If you briefly press the button while the rear gate is closing, it will open.
The operation of the Power Rear Gate is the same using the Power Rear Gate Button on
the access key fob or transmitter.
NOTE: If the doors are locked when you operate the Power Rear Gate, you may hear three
rapid beeps from the vehicle. In this case, unlock the doors and then operate the Power
Rear Gate.
Power Rear Gate Button
ENTRY AND EXIT
11
Page 54 of 156
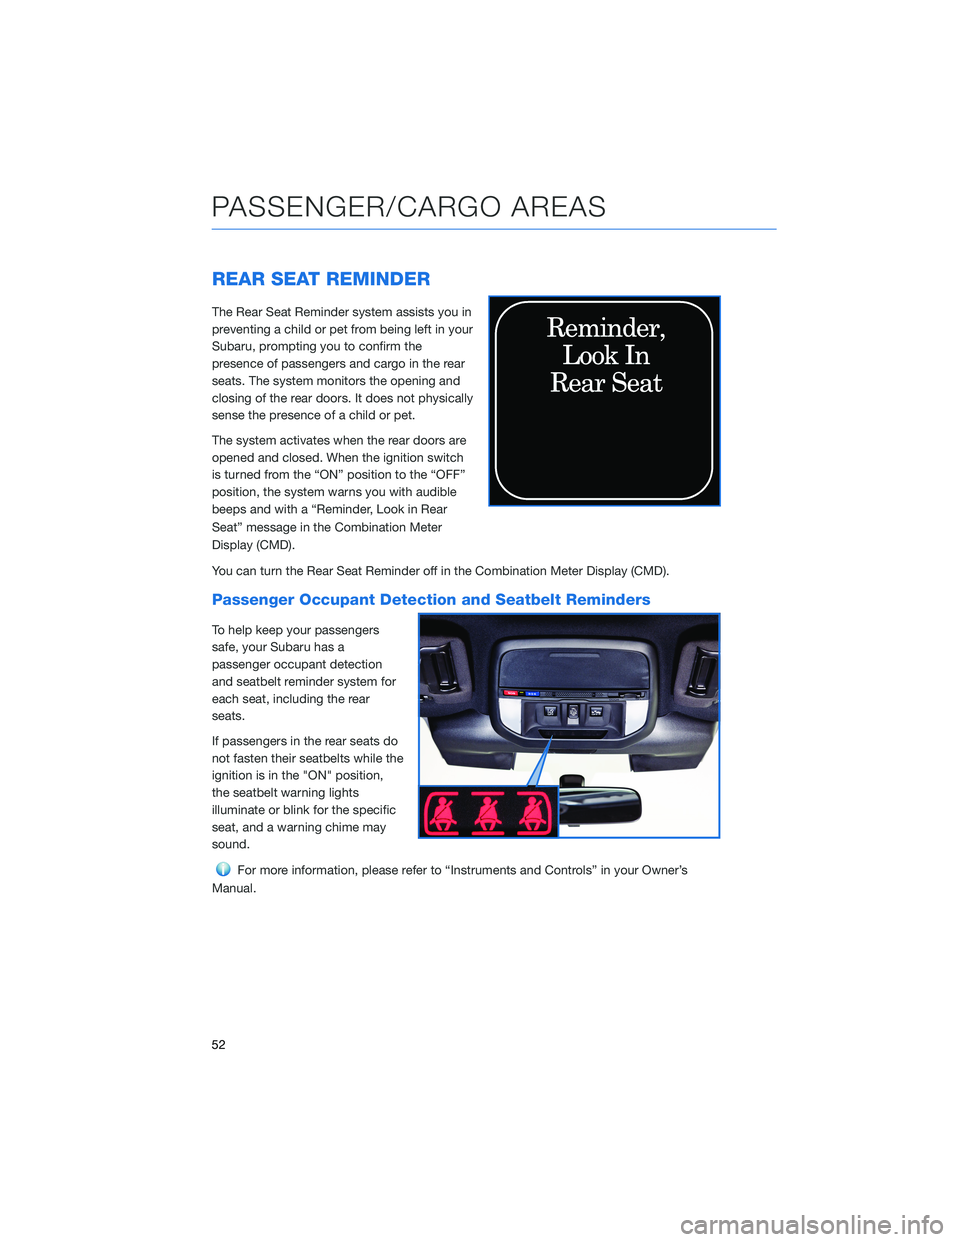
REAR SEAT REMINDER
The Rear Seat Reminder system assists you in
preventing a child or pet from being left in your
Subaru, prompting you to confirm the
presence of passengers and cargo in the rear
seats. The system monitors the opening and
closing of the rear doors. It does not physically
sense the presence of a child or pet.
The system activates when the rear doors are
opened and closed. When the ignition switch
is turned from the “ON” position to the “OFF”
position, the system warns you with audible
beeps and with a “Reminder, Look in Rear
Seat” message in the Combination Meter
Display (CMD).
You can turn the Rear Seat Reminder off in the Combination Meter Display (CMD).
Passenger Occupant Detection and Seatbelt Reminders
To help keep your passengers
safe, your Subaru has a
passenger occupant detection
and seatbelt reminder system for
each seat, including the rear
seats.
If passengers in the rear seats do
not fasten their seatbelts while the
ignition is in the "ON" position,
the seatbelt warning lights
illuminate or blink for the specific
seat, and a warning chime may
sound.
For more information, please refer to “Instruments and Controls” in your Owner’s
Manual.
PASSENGER/CARGO AREAS
52
Page 62 of 156
OVERVIEW OF YOUR MULTIMEDIA SYSTEM
SUBARU STARLINK®Multimedia combines the radio along with the ability to connect your
phone* through Bluetooth®to the multimedia system for making calls, sending text
messages and listening to your favorite songs on your phone.
* Compatible smartphone and application required. For applications to operate, latest version of each application required. Data provided by smartphone is displayed on the Touchscreen. Some state laws
prohibit the operation of handheld electronic devices while operating a vehicle. Smartphone apps
should only be launched when vehicle is safely parked. Your wireless carrier’s rates may apply.
Various Systems
Depending on your model and trim level there are several types of SUBARU STARLINK®
Multimedia systems. Some of the functions described in this guide will vary by system.
• 6.5-inch Multimedia Plus
• 8.0-inch Multimedia Plus
• 8.0-inch Multimedia Navigation
BUTTONS
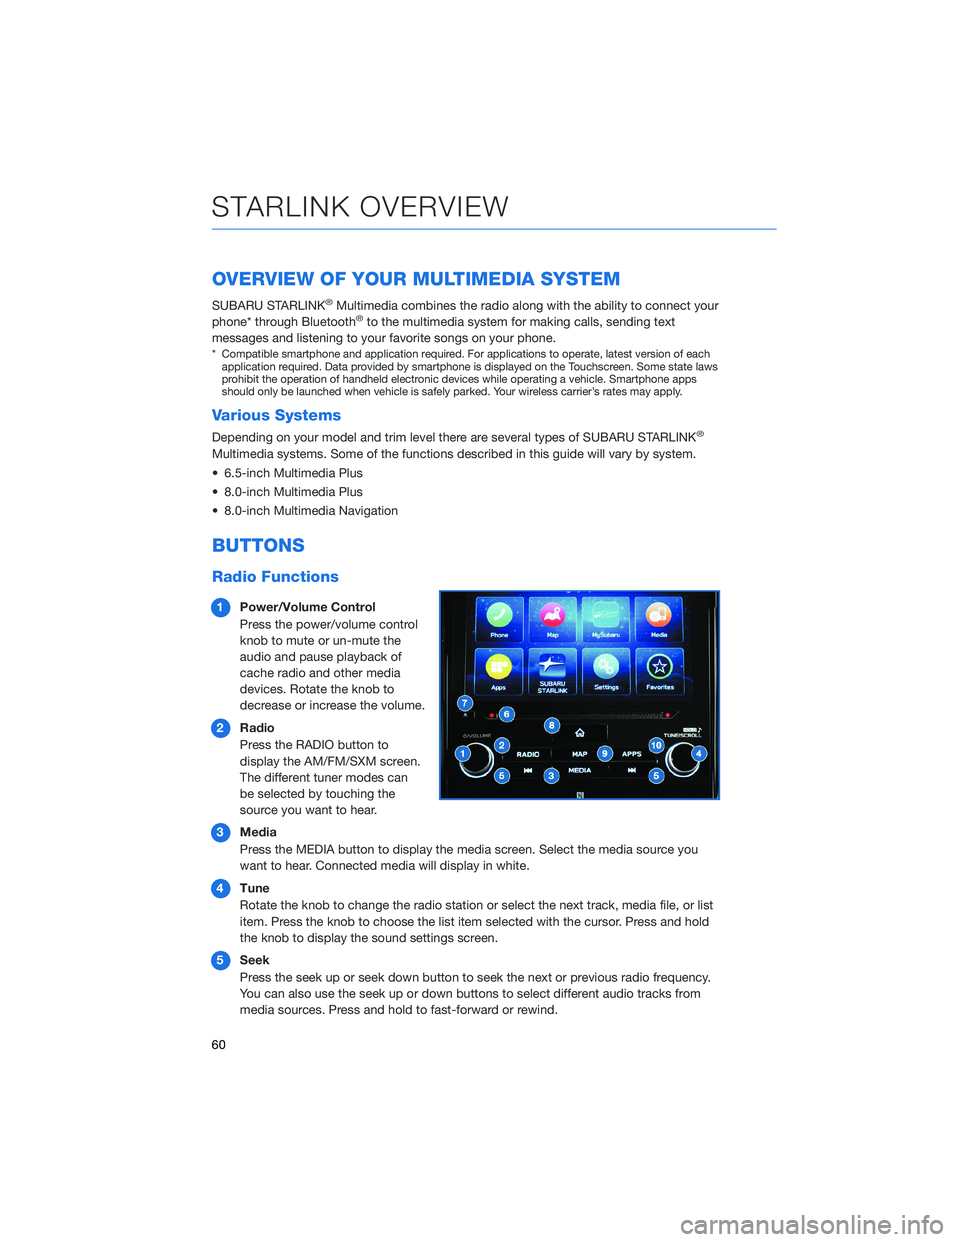
Radio Functions
1 Power/Volume Control
Press the power/volume control
knob to mute or un-mute the
audio and pause playback of
cache radio and other media
devices. Rotate the knob to
decrease or increase the volume.
2 Radio
Press the RADIO button to
display the AM/FM/SXM screen.
The different tuner modes can
be selected by touching the
source you want to hear.
3 Media
Press the MEDIA button to display the media screen. Select the media source you
want to hear. Connected media will display in white.
4 Tune
Rotate the knob to change the radio station or select the next track, media file, or list
item. Press the knob to choose the list item selected with the cursor. Press and hold
the knob to display the sound settings screen.
5 Seek
Press the seek up or seek down button to seek the next or previous radio frequency.
You can also use the seek up or down buttons to select different audio tracks from
media sources. Press and hold to fast-forward or rewind.
STARLINK OVERVIEW
60
Page 70 of 156

CREATING A DRIVER PROFILE
Creating a Driver Profile provides many benefits beyond just pairing a phone. The profile
records and remembers station presets, sound preferences, home and work address (if
equipped with navigation), phone favorites, screen icons and placement, and the
background wallpaper.
To create a driver profile:
1. On the Home screen, select “Settings”.Then, in the General menu, select “Driver
Profile”.
2. Select “Add New Profile”.
3. Select “Enter Name” to display the keyboard screen, and then type your name.
Now select “Next” on this screen and the
following screen.
DRIVER PROFILE
68