Page 22 of 156

INFO SWITCH
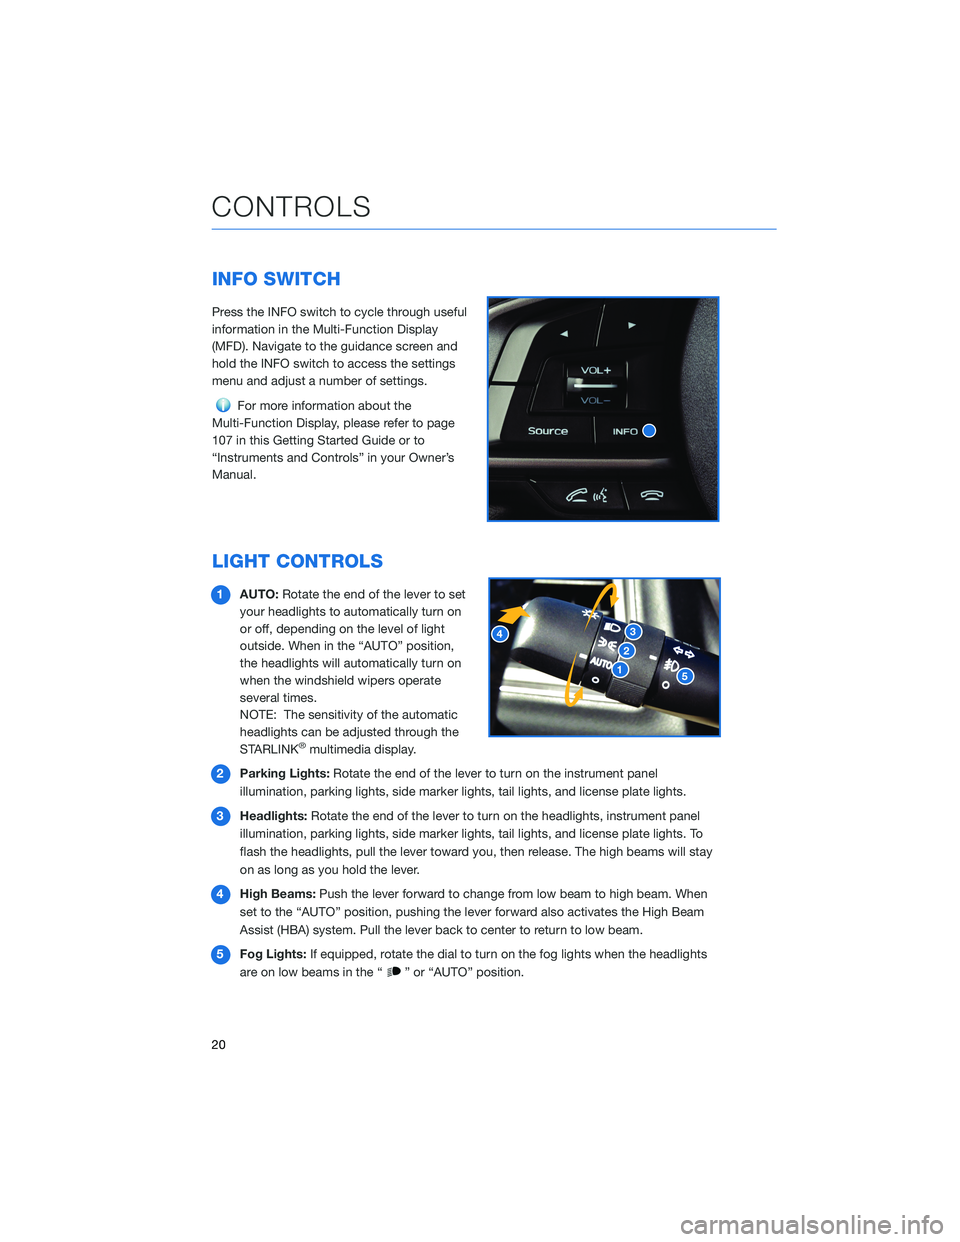
Press the INFO switch to cycle through useful
information in the Multi-Function Display
(MFD). Navigate to the guidance screen and
hold the INFO switch to access the settings
menu and adjust a number of settings.
For more information about the
Multi-Function Display, please refer to page
107 in this Getting Started Guide or to
“Instruments and Controls” in your Owner’s
Manual.
LIGHT CONTROLS
1 AUTO: Rotate the end of the lever to set
your headlights to automatically turn on
or off, depending on the level of light
outside. When in the “AUTO” position,
the headlights will automatically turn on
when the windshield wipers operate
several times.
NOTE: The sensitivity of the automatic
headlights can be adjusted through the
STARLINK
®multimedia display.
2 Parking Lights: Rotate the end of the lever to turn on the instrument panel
illumination, parking lights, side marker lights, tail lights, and license plate lights.
3 Headlights: Rotate the end of the lever to turn on the headlights, instrument panel
illumination, parking lights, side marker lights, tail lights, and license plate lights. To
flash the headlights, pull the lever toward you, then release. The high beams will stay
on as long as you hold the lever.
4 High Beams: Push the lever forward to change from low beam to high beam. When
set to the “AUTO” position, pushing the lever forward also activates the High Beam
Assist (HBA) system. Pull the lever back to center to return to low beam.
5 Fog Lights: If equipped, rotate the dial to turn on the fog lights when the headlights
are on low beams in the “
” or “AUTO” position.
CONTROLS
20
Page 33 of 156

CLIMATE CONTROL
Automatic Climate Control
Set your desired temperature and let the system automatically make the adjustments for
you. At any time, you can manually take control of the climate settings.
Operation in Automatic Mode1 Automatic Control Button: This system automatically controls all of the climate
system except defogging. Press “AUTO” to activate. Press the “ON/OFF” button to
turn off the system.
2 Temperature Control Dial: Turn the dial clockwise to increase the temperature or
counterclockwise to decrease the temperature. The temperature will appear on the
Multi-Function Display (MFD).
When using automatic mode, the fan speed, airflow distribution, air-inlet control and air
conditioning compressor are controlled automatically. To activate:
1. Press the “AUTO” button. The “FULL AUTO” indicator light illuminates on the Multi-Function Display (MFD).
2. Set the preferred temperature using the temperature control dial.
If you operate any of the buttons other than the “ON/OFF” button, rear window defogger
button, or the temperature control dial, the “FULL” indicator light will turn off. The “AUTO”
light will remain illuminated. You can then manually control the system as desired. Press
the “AUTO” button to change back to “FULL AUTO” mode.
GETTING COMFORTABLE
31
Page 36 of 156

Dual—Zone Automatic Climate Control(if equipped)
You can set separate temperatures for the driver and front passenger. Set your desired
temperature and let the system automatically make the adjustments for you. At any time,
you can manually take control of the climate settings.
Operation in Automatic Mode
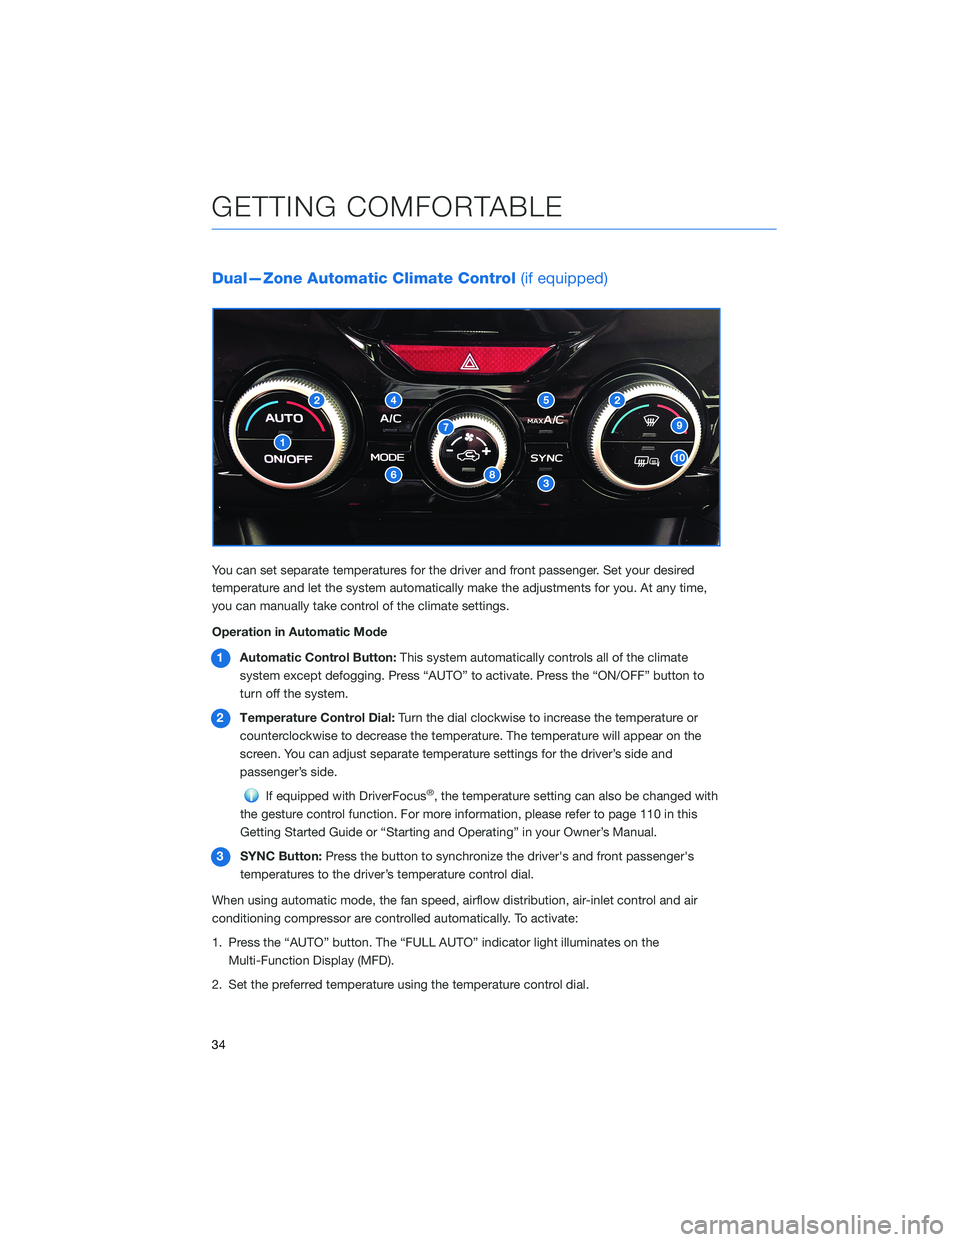
1 Automatic Control Button: This system automatically controls all of the climate
system except defogging. Press “AUTO” to activate. Press the “ON/OFF” button to
turn off the system.
2 Temperature Control Dial: Turn the dial clockwise to increase the temperature or
counterclockwise to decrease the temperature. The temperature will appear on the
screen. You can adjust separate temperature settings for the driver’s side and
passenger’s side.
If equipped with DriverFocus®, the temperature setting can also be changed with
the gesture control function. For more information, please refer to page 110 in this
Getting Started Guide or “Starting and Operating” in your Owner’s Manual.
3 SYNC Button: Press the button to synchronize the driver's and front passenger's
temperatures to the driver’s temperature control dial.
When using automatic mode, the fan speed, airflow distribution, air-inlet control and air
conditioning compressor are controlled automatically. To activate:
1. Press the “AUTO” button. The “FULL AUTO” indicator light illuminates on the Multi-Function Display (MFD).
2. Set the preferred temperature using the temperature control dial.
GETTING COMFORTABLE
34
Page 37 of 156

If you operate any of the buttons other than “ON/OFF”, rear window defogger, “SYNC”, or
the temperature control dial, the “FULL” indicator light will turn off. The “AUTO” light will
remain illuminated. You can then manually control the system as desired. Press the
“AUTO” button to change back to “FULL AUTO” mode.4 Air Conditioner Button: Press this button to activate or deactivate the air
conditioning.
5 MAX A/C Button: Press this button for quickest cooling.
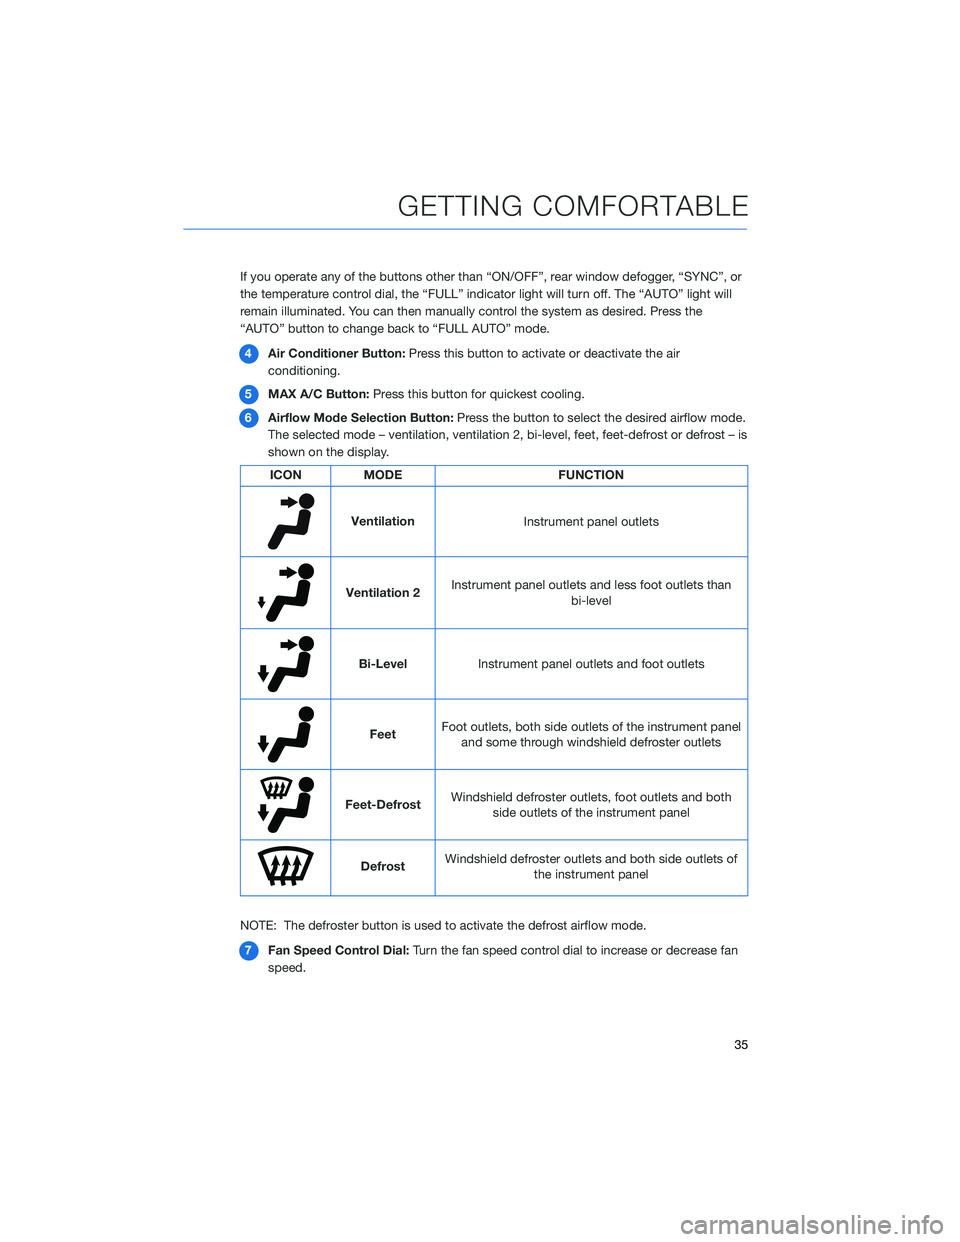
6 Airflow Mode Selection Button: Press the button to select the desired airflow mode.
The selected mode – ventilation, ventilation 2, bi-level, feet, feet-defrost or defrost – is
shown on the display.
ICON MODE FUNCTION
Ventilation
Instrument panel outlets
Ventilation 2Instrument panel outlets and less foot outlets than
bi-level
Bi-LevelInstrument panel outlets and foot outlets
FeetFoot outlets, both side outlets of the instrument panel
and some through windshield defroster outlets
Feet-Defrost Windshield defroster outlets, foot outlets and both
side outlets of the instrument panel
Defrost Windshield defroster outlets and both side outlets of
the instrument panel
NOTE: The defroster button is used to activate the defrost airflow mode. 7 Fan Speed Control Dial: Turn the fan speed control dial to increase or decrease fan
speed.
GETTING COMFORTABLE
35