Page 49 of 156
X-MODE®Dual Mode System
To activate the X-MODE®system, turn the switch to
the left for SNOW/DIRT or to the right for
D.SNOW/MUD. While the system is active, the
X-MODE
®indicator appears, and the Multi-Function
Display shows vehicle posture and function operation
status. To deactivate X-MODE
®, press the X-MODE®
switch.
• SNOW/DIRT is suitable for driving on slippery road surfaces such as snow or gravel, where the points of contact between the tires
and road surface are visible.
• D.SNOW/MUD provides maximum torque from the engine and the optimal amount of slip in the driving wheels, enabling the
vehicle to free itself more effectively. It is suitable for driving on
roads where the tires can become buried, such as deep snow, dry
sand, or muddy roads.
Dual Mode
Snow/DirtIndicator
Deep Snow/Mud Indicator
OPERATING THE VEHICLE
47
Page 54 of 156

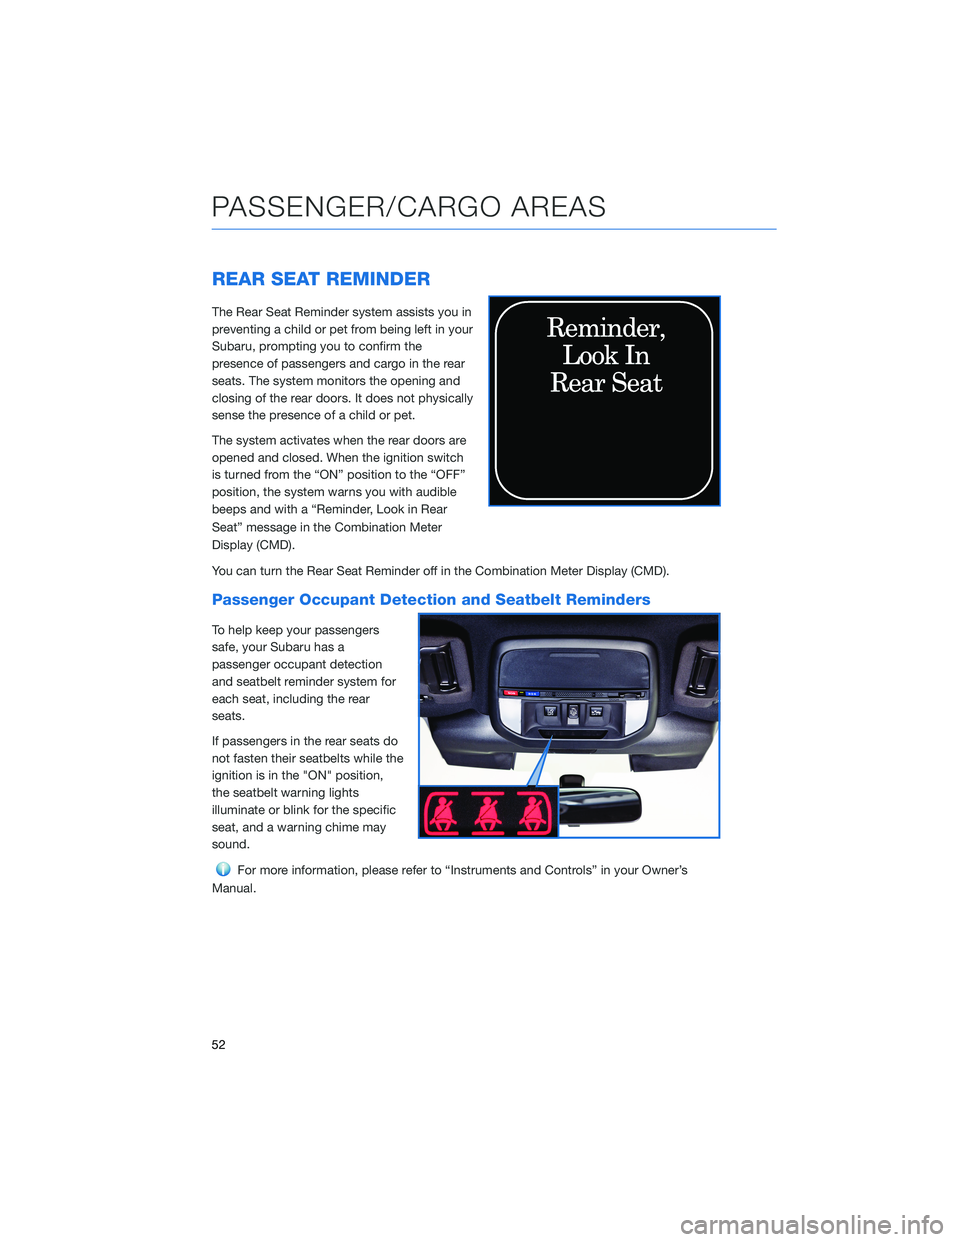
REAR SEAT REMINDER
The Rear Seat Reminder system assists you in
preventing a child or pet from being left in your
Subaru, prompting you to confirm the
presence of passengers and cargo in the rear
seats. The system monitors the opening and
closing of the rear doors. It does not physically
sense the presence of a child or pet.
The system activates when the rear doors are
opened and closed. When the ignition switch
is turned from the “ON” position to the “OFF”
position, the system warns you with audible
beeps and with a “Reminder, Look in Rear
Seat” message in the Combination Meter
Display (CMD).
You can turn the Rear Seat Reminder off in the Combination Meter Display (CMD).
Passenger Occupant Detection and Seatbelt Reminders
To help keep your passengers
safe, your Subaru has a
passenger occupant detection
and seatbelt reminder system for
each seat, including the rear
seats.
If passengers in the rear seats do
not fasten their seatbelts while the
ignition is in the "ON" position,
the seatbelt warning lights
illuminate or blink for the specific
seat, and a warning chime may
sound.
For more information, please refer to “Instruments and Controls” in your Owner’s
Manual.
PASSENGER/CARGO AREAS
52
Page 60 of 156
TIRE PRESSURE MONITORING SYSTEM (TPMS)
Your Subaru has a Tire Pressure Monitoring System (TPMS) that
tracks the pressure of each individual tire. You can learn more by
scanning the QR code to see a video with tips and more information
about your Subaru’s TPMS.
The TPMS screen shows individual tire pressure in the
Combination Meter Display. Use the “i/Set” switch to
display the TPMS screen.
Units for the TPMS can be customized to Psi or KPa in the
Combination Meter Display. Pull and hold the “i/Set” switch on the
Menu Entering Screen, select “Screen Settings,” and then select
“Tire Pressure Units.” Scan the QR code for a helpful “how to”
video on adjusting the settings.
TPMS Screen
ADDITIONAL SPECIFICATIONS
58
Page 62 of 156

OVERVIEW OF YOUR MULTIMEDIA SYSTEM
SUBARU STARLINK®Multimedia combines the radio along with the ability to connect your
phone* through Bluetooth®to the multimedia system for making calls, sending text
messages and listening to your favorite songs on your phone.
* Compatible smartphone and application required. For applications to operate, latest version of each application required. Data provided by smartphone is displayed on the Touchscreen. Some state laws
prohibit the operation of handheld electronic devices while operating a vehicle. Smartphone apps
should only be launched when vehicle is safely parked. Your wireless carrier’s rates may apply.
Various Systems
Depending on your model and trim level there are several types of SUBARU STARLINK®
Multimedia systems. Some of the functions described in this guide will vary by system.
• 6.5-inch Multimedia Plus
• 8.0-inch Multimedia Plus
• 8.0-inch Multimedia Navigation
BUTTONS
Radio Functions
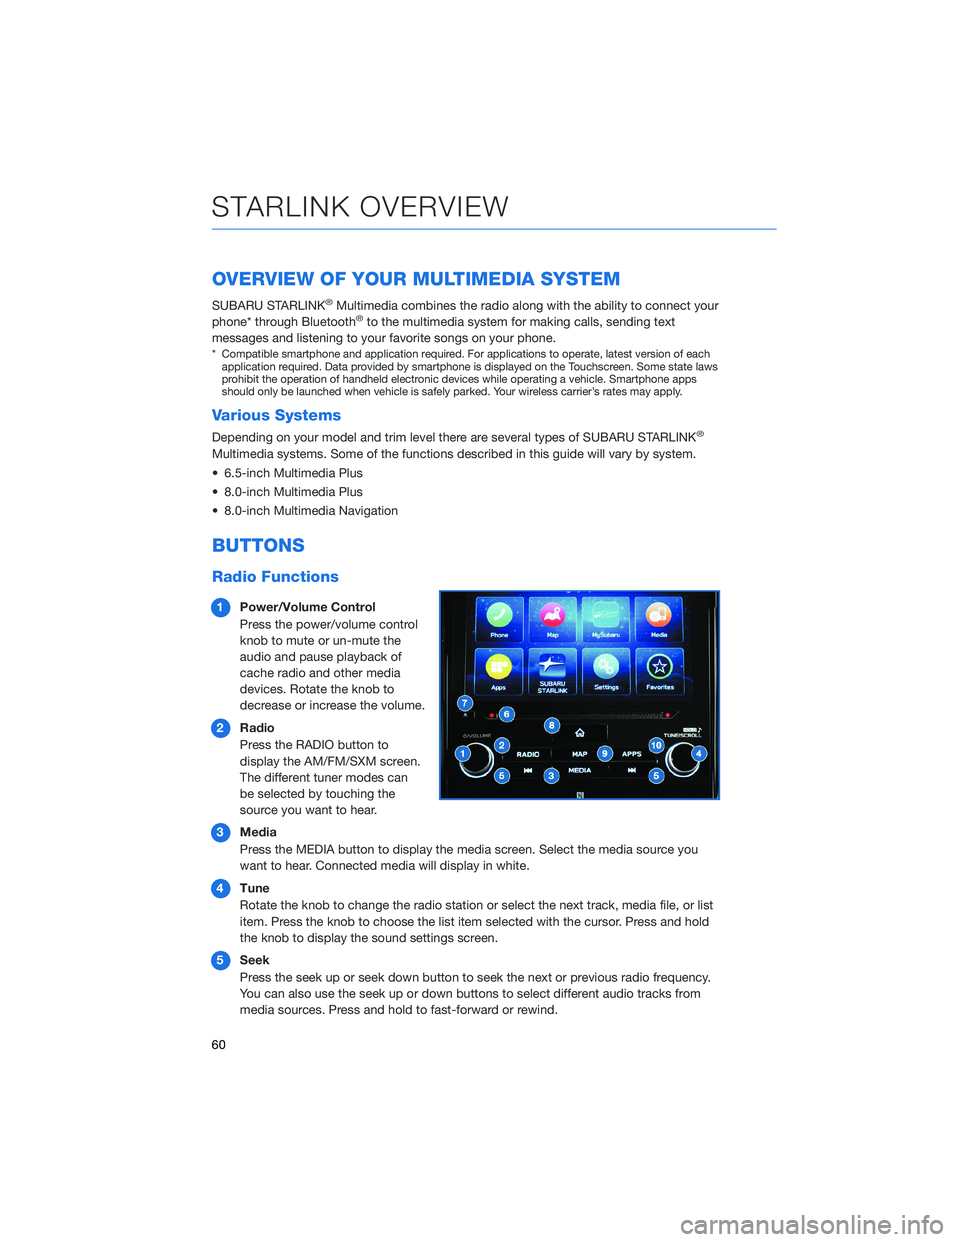
1 Power/Volume Control
Press the power/volume control
knob to mute or un-mute the
audio and pause playback of
cache radio and other media
devices. Rotate the knob to
decrease or increase the volume.
2 Radio
Press the RADIO button to
display the AM/FM/SXM screen.
The different tuner modes can
be selected by touching the
source you want to hear.
3 Media
Press the MEDIA button to display the media screen. Select the media source you
want to hear. Connected media will display in white.
4 Tune
Rotate the knob to change the radio station or select the next track, media file, or list
item. Press the knob to choose the list item selected with the cursor. Press and hold
the knob to display the sound settings screen.
5 Seek
Press the seek up or seek down button to seek the next or previous radio frequency.
You can also use the seek up or down buttons to select different audio tracks from
media sources. Press and hold to fast-forward or rewind.
STARLINK OVERVIEW
60
Page 63 of 156

CD Player Functions
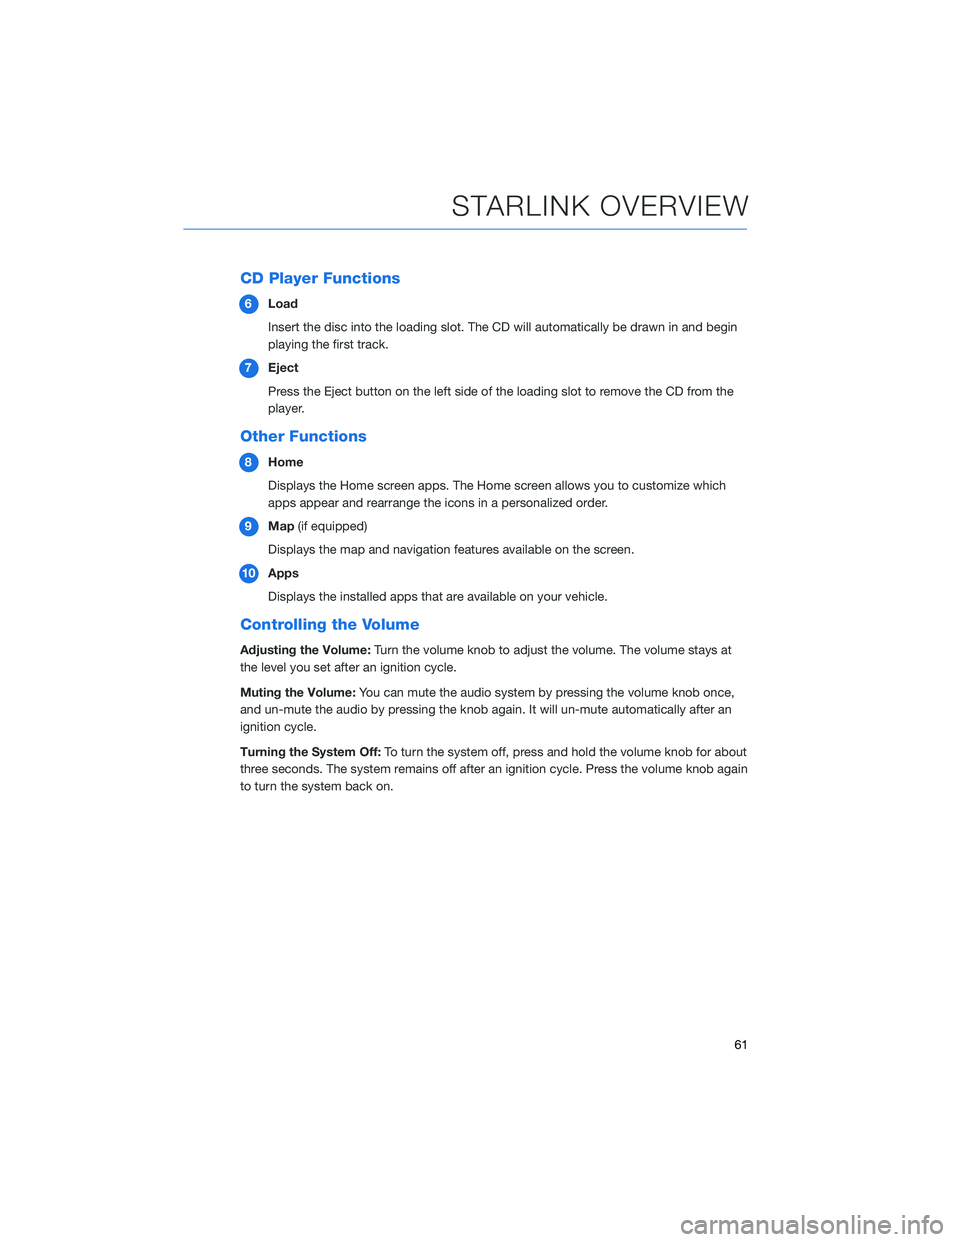
6Load
Insert the disc into the loading slot. The CD will automatically be drawn in and begin
playing the first track.
7 Eject
Press the Eject button on the left side of the loading slot to remove the CD from the
player.
Other Functions
8Home
Displays the Home screen apps. The Home screen allows you to customize which
apps appear and rearrange the icons in a personalized order.
9 Map (if equipped)
Displays the map and navigation features available on the screen.
10 Apps
Displays the installed apps that are available on your vehicle.
Controlling the Volume
Adjusting the Volume: Turn the volume knob to adjust the volume. The volume stays at
the level you set after an ignition cycle.
Muting the Volume: You can mute the audio system by pressing the volume knob once,
and un-mute the audio by pressing the knob again. It will un-mute automatically after an
ignition cycle.
Turning the System Off: To turn the system off, press and hold the volume knob for about
three seconds. The system remains off after an ignition cycle. Press the volume knob again
to turn the system back on.
STARLINK OVERVIEW
61
Page 65 of 156
STEERING WHEEL CONTROLS
1Presets/Skip: Press to toggle through
your preset radio stations or change a
track/media file. Press and hold to scan
radio stations or fast-forward/rewind
media files.
2 Volume: Push the switch up/down to
increase/decrease volume.
3 Source: Press the source button to
change the audio sources between radio
modes and media modes.
4 INFO: Press to operate the Multi Function
Display.
5 Call/Voice Recognition: Press to
receive/end a call without taking your
hands off the steering wheel. Press the talk button to activate the built-in voice
recognition function. Press and hold to activate the Apple CarPlay
®/Android Auto™
voice recognition function.
Starlink Audio Controls
STARLINK OVERVIEW
63
Page 67 of 156

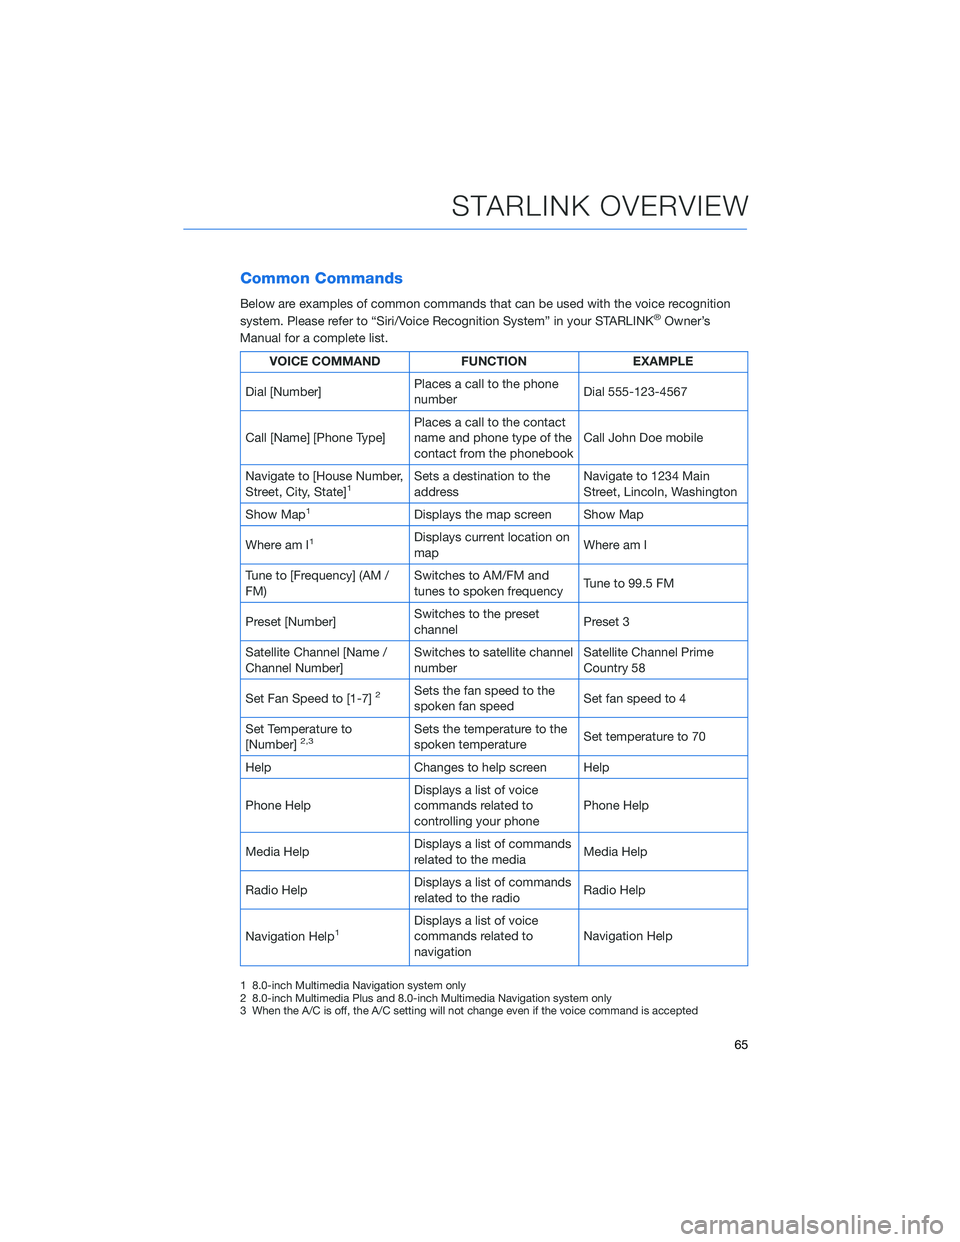
Common Commands
Below are examples of common commands that can be used with the voice recognition
system. Please refer to “Siri/Voice Recognition System” in your STARLINK®Owner’s
Manual for a complete list.
VOICE COMMAND FUNCTIONEXAMPLE
Dial [Number] Places a call to the phone
number Dial 555-123-4567
Call [Name] [Phone Type] Places a call to the contact
name and phone type of the
contact from the phonebook Call John Doe mobile
Navigate to [House Number,
Street, City, State]
1Sets a destination to the
address Navigate to 1234 Main
Street, Lincoln, Washington
Show Map
1Displays the map screen Show Map
Where am I
1Displays current location on
map Where am I
Tune to [Frequency] (AM /
FM) Switches to AM/FM and
tunes to spoken frequency
Tune to 99.5 FM
Preset [Number] Switches to the preset
channel Preset 3
Satellite Channel [Name /
Channel Number] Switches to satellite channel
number Satellite Channel Prime
Country 58
Set Fan Speed to [1-7]
2Sets the fan speed to the
spoken fan speed Set fan speed to 4
Set Temperature to
[Number]
2,3Sets the temperature to the
spoken temperature Set temperature to 70
Help Changes to help screen Help
Phone Help Displays a list of voice
commands related to
controlling your phone Phone Help
Media Help Displays a list of commands
related to the media Media Help
Radio Help Displays a list of commands
related to the radio Radio Help
Navigation Help
1Displays a list of voice
commands related to
navigation Navigation Help
1 8.0-inch Multimedia Navigation system only
2 8.0-inch Multimedia Plus and 8.0-inch Multimedia Navigation system only
3 When the A/C is off, the A/C setting will not change even if the voice command is accepted
STARLINK OVERVIEW
65
Page 69 of 156
ADDING SHORTCUTS
You can add shortcut icons for various functions to the Home Screen when the Home
Screen Shortcut function is turned on. You can turn on the Home Screen Shortcuts
function by selecting “Settings”, then the “General” tab.
To add shortcut icons to the Home Screen, press the "Home" button.
1. Select “Add Shortcut”.
2. Select the desired function.
3. Select the desired shortcut function.
4. Check that the shortcut icon is displayedon the Home screen.
STARLINK HOME
67