2022 SUBARU FORESTER navigation system
[x] Cancel search: navigation systemPage 85 of 156

SETTINGS AND UPDATES OVERVIEW
Many settings can be customized for different features in your Subaru. In this section you
will find examples and instructions for some of the settings you can tailor to fit your
preferences, as well as ways to keep your system updated.
Connect to Home Wi-Fi
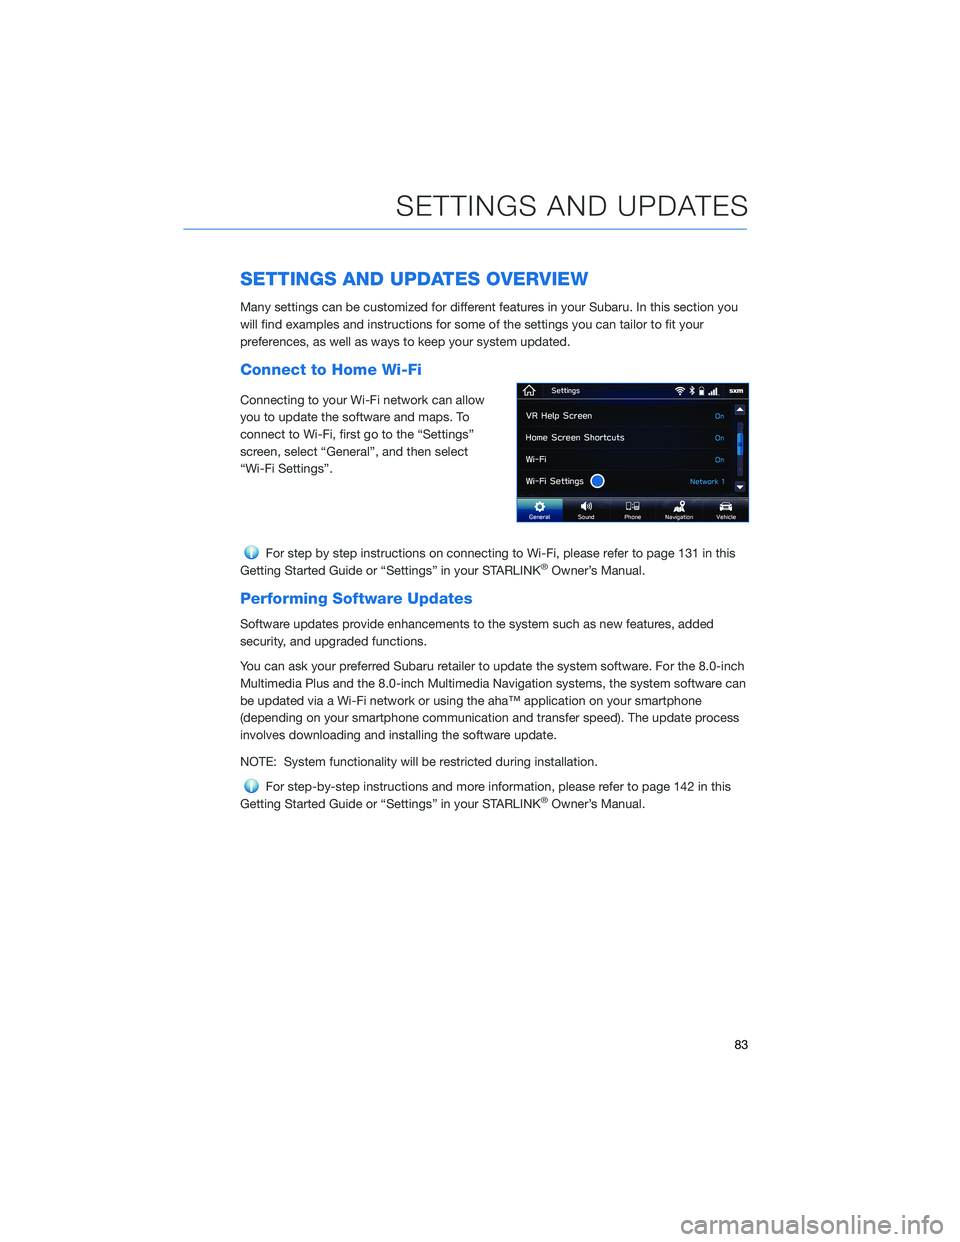
Connecting to your Wi-Fi network can allow
you to update the software and maps. To
connect to Wi-Fi, first go to the “Settings”
screen, select “General”, and then select
“Wi-Fi Settings”.
For step by step instructions on connecting to Wi-Fi, please refer to page 131 in this
Getting Started Guide or “Settings” in your STARLINK®Owner’s Manual.
Performing Software Updates
Software updates provide enhancements to the system such as new features, added
security, and upgraded functions.
You can ask your preferred Subaru retailer to update the system software. For the 8.0-inch
Multimedia Plus and the 8.0-inch Multimedia Navigation systems, the system software can
be updated via a Wi-Fi network or using the aha™ application on your smartphone
(depending on your smartphone communication and transfer speed). The update process
involves downloading and installing the software update.
NOTE: System functionality will be restricted during installation.
For step-by-step instructions and more information, please refer to page 142 in this
Getting Started Guide or “Settings” in your STARLINK®Owner’s Manual.
SETTINGS AND UPDATES
83
Page 86 of 156

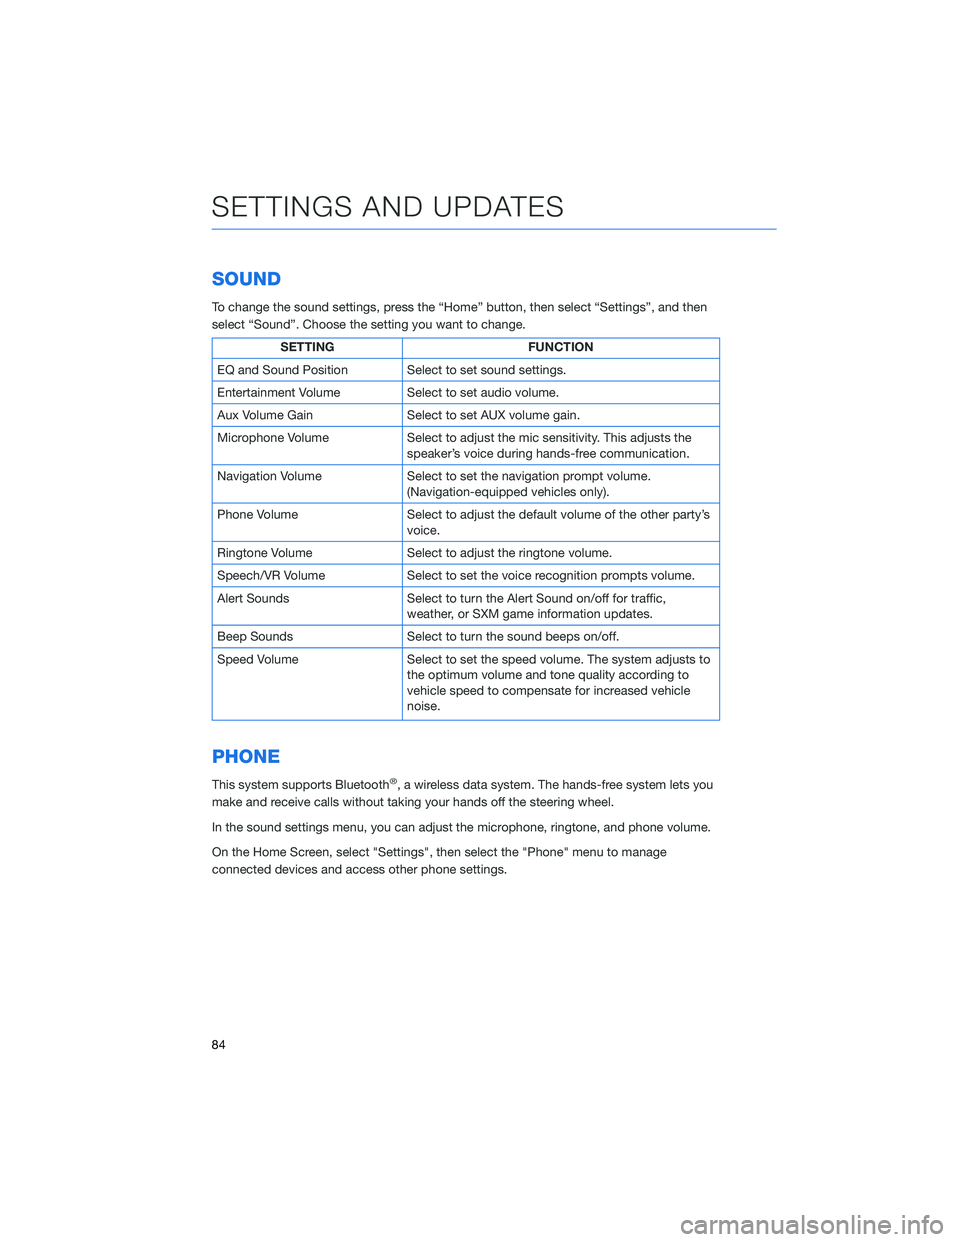
SOUND
To change the sound settings, press the “Home” button, then select “Settings”, and then
select “Sound”. Choose the setting you want to change.
SETTINGFUNCTION
EQ and Sound Position Select to set sound settings.
Entertainment Volume Select to set audio volume.
Aux Volume Gain Select to set AUX volume gain.
Microphone Volume Select to adjust the mic sensitivity. This adjusts the
speaker’s voice during hands-free communication.
Navigation Volume Select to set the navigation prompt volume.
(Navigation-equipped vehicles only).
Phone Volume Select to adjust the default volume of the other party’s
voice.
Ringtone Volume Select to adjust the ringtone volume.
Speech/VR Volume Select to set the voice recognition prompts volume.
Alert Sounds Select to turn the Alert Sound on/off for traffic,
weather, or SXM game information updates.
Beep Sounds Select to turn the sound beeps on/off.
Speed Volume Select to set the speed volume. The system adjusts to
the optimum volume and tone quality according to
vehicle speed to compensate for increased vehicle
noise.
PHONE
This system supports Bluetooth®, a wireless data system. The hands-free system lets you
make and receive calls without taking your hands off the steering wheel.
In the sound settings menu, you can adjust the microphone, ringtone, and phone volume.
On the Home Screen, select "Settings", then select the "Phone" menu to manage
connected devices and access other phone settings.
SETTINGS AND UPDATES
84
Page 89 of 156

CLOCK
You can adjust the clock manually or set the clock to update
automatically. When set to “Auto,” the clock automatically adjusts
when a Bluetooth
®connected phone is paired (vehicles without
navigation), or through the GPS signal (vehicles with navigation
system).
The following sections contain step-by-step instructions for setting
the clock, and you can scan the QR codes for a helpful “how to”
video. Choose the appropriate QR code based on your
Multi-Function Display (Color LCD or Black and White LCD).
Manually
Use the STARLINK®Touchscreen to set the clock:
1 Press the “Home” button.
2 Select “Settings”.
3 Select “Vehicle”.
4 Select “Time/Date”.
5 Select “Mode”.
SETTINGS AND UPDATES
87
Page 91 of 156

6Select “Auto”. Press the “Home” button when
finished.
The clock automatically adjusts as follows:
• Systems with Navigation: Automatically adjusts the clock when a GPS signal is available.
• Systems without Navigation: Automatically adjusts the clock when a phone is paired and connected via
Bluetooth
®. “Phonebook Download” must be enabled in the Phone Settings.
For step-by-step procedures to pair a phone to the SUBARU STARLINK®
Touchscreen, see page 119 for Android devices or page 123 for Apple devices.
SETTINGS AND UPDATES
89
Page 138 of 156

Route Options
You can set the navigation system to avoid
various types of routes:
1. Select “Route Options” on the routecalculation screen.
2. Select the desired item to avoid.
3. Select the check mark in the upper right corner.
NOTE: The avoidance criteria for the route
calculation can also be set from the navigation
settings screen.
Shortest/Fastest/Economic
You can set the route preferences to search for
the shortest, fastest, or most economic route.
To do this:
1. Select “Settings” on the home screen.
2. Select “Navigation”.
3. Select “Route Settings”.
4. Select the preference you would like to use: Shortest, Fastest, or Most Economic.
Saving Destination as a Favorite
Registered points can be set as a destination.
To save a location as a favorite once you have
arrived:
1. Select the current street name.
2. Select “Save”.
3. Select to save as Home, Work, or Favorite.
HOW TO APPENDIX
136
Page 144 of 156

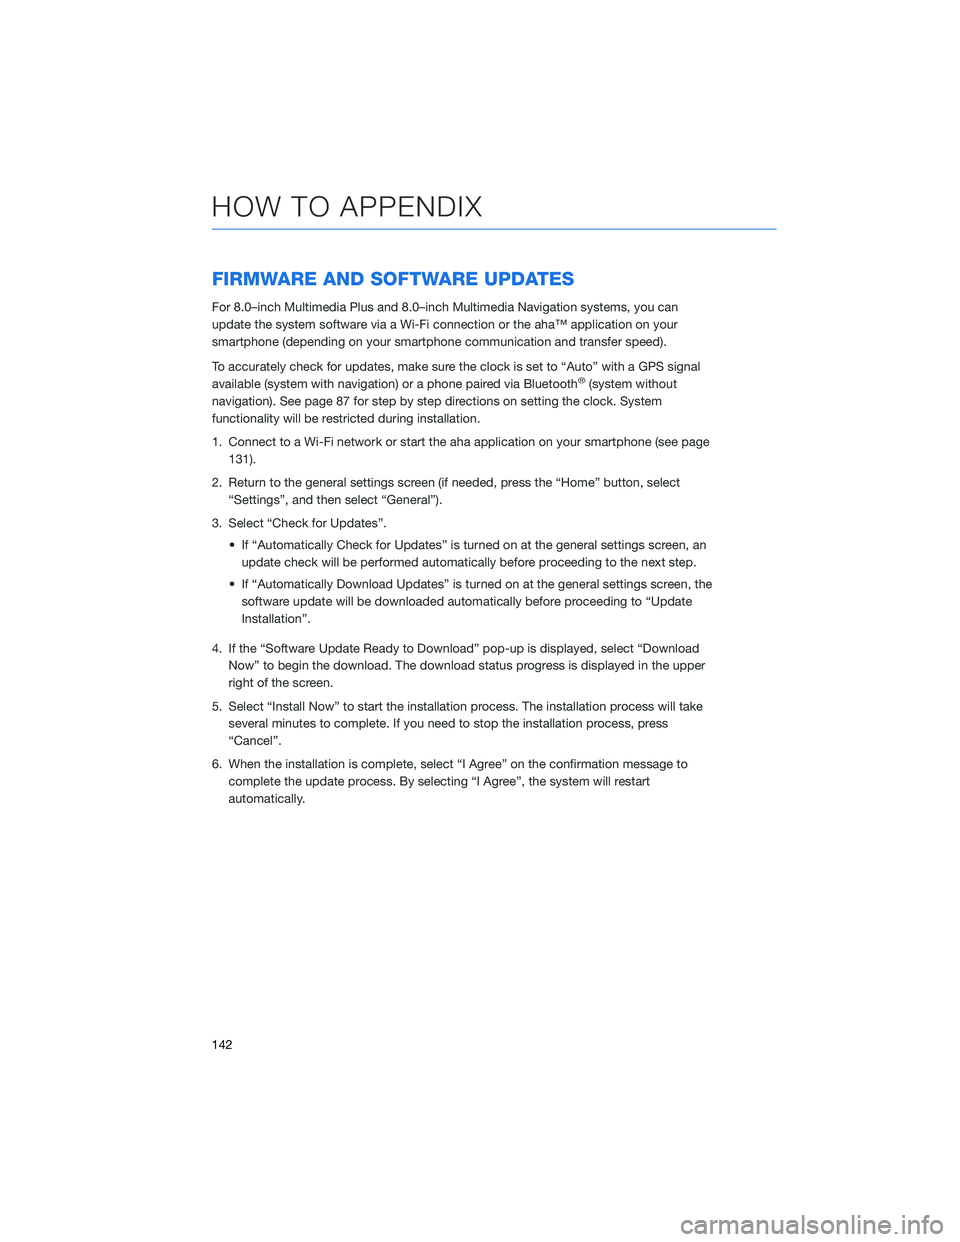
FIRMWARE AND SOFTWARE UPDATES
For 8.0–inch Multimedia Plus and 8.0–inch Multimedia Navigation systems, you can
update the system software via a Wi-Fi connection or the aha™ application on your
smartphone (depending on your smartphone communication and transfer speed).
To accurately check for updates, make sure the clock is set to “Auto” with a GPS signal
available (system with navigation) or a phone paired via Bluetooth
®(system without
navigation). See page 87 for step by step directions on setting the clock. System
functionality will be restricted during installation.
1. Connect to a Wi-Fi network or start the aha application on your smartphone (see page 131).
2. Return to the general settings screen (if needed, press the “Home” button, select “Settings”, and then select “General”).
3. Select “Check for Updates”. • If “Automatically Check for Updates” is turned on at the general settings screen, anupdate check will be performed automatically before proceeding to the next step.
• If “Automatically Download Updates” is turned on at the general settings screen, the software update will be downloaded automatically before proceeding to “Update
Installation”.
4. If the “Software Update Ready to Download” pop-up is displayed, select “Download Now” to begin the download. The download status progress is displayed in the upper
right of the screen.
5. Select “Install Now” to start the installation process. The installation process will take several minutes to complete. If you need to stop the installation process, press
“Cancel”.
6. When the installation is complete, select “I Agree” on the confirmation message to complete the update process. By selecting “I Agree”, the system will restart
automatically.
HOW TO APPENDIX
142
Page 147 of 156

M
MAKING A CALL . . . .......... 72
MAPS . . . . . . . . . . . . . . . . . . . 134 Arrival Time/Distance . . . ......139
Canceling Guidance . . ........139
Finding a Destination by Address . . 134
Finding a Destination by POI .....135
Guidance Screen Icons ........137
Map Updates . . . ..........140
Map View/Perspective . . . . . . . . 138
Map Zoom . . . . . ..........137
Nearest Gas Station ..........138
Route Options . . ...........136
Saving Destination as a Favorite . . 136
Shortest/Fastest/Economic . . . . . 136
Traffic Information . . . . . . . . . . . 138
MAPS/NAVIGATION . . .......... 85
Checking for Map Updates . . . . . . 85
Updating Maps Over-the-Air . ....85
Updating Maps
Using Your PC/MAC.86
MAPS OVERVIEW . . . . . . . . . . . . . 79
MEDIA . . . . . . . . . .......... 71
AUX Input . . . . . . . . . . . . . . . . 71
Bluetooth
®................71
CD ....................71
USB / iPod . . . . . . ..........71
MEMORY DRIVER’S SEAT . ...... 118
MEMORY HEIGHT . . . ........ 116
MYSUBARU . . . . . . .......... 77
Service Appointment Scheduler . . . 78
MYSUBARU INTEGRATION ....... 82
N
NEW VEHICLE BREAK-IN . . . . . . . . 56
O
OPERATION . . . . . ........... 91
OVERHEAD CONSOLE . ......... 23
OVERVIEW OF YOUR MULTIMEDIA SYSTEM . . . . . . . . . . . . . . . . . 60
Various Systems . . ..........60
OWNER’S RESOURCES . . ........ 4 P
PAIRING A PHONE ............ 72
PHONE ................... 84
POWER EXTERIOR MIRRORS . . . . . 28 Auto Tilt-down Mirror . . . . .....28
POWER MOONROOF .......... 30
POWER REAR GATE (PRG) ....... 11
From the Rear of the Vehicle . ....12
Power Rear Gate Button . . . .....11
Power Rear Gate Lock .........13
POWER WINDOWS . . . . . ....... 30
PUSH-BUTTON IGNITION SWITCH . . 39
R
RADIO .................... 70
AM/FM Radio . . . . . . . . . . ....70
Presets . . . . . . . . ..........71
Satellite Radio . . . . . .........70
REARRANGING ICONS .......... 66
REAR SEAT REMINDER . . . . . . . . . 52 Passenger Occupant Detection and
Seatbelt Reminders . . . . .......52
REAR VIEW MIRROR . . . ........ 29
Auto-dimming Mirror . . ........29
HomeLink
®5 Accessory Mirror . . . 29
REAR-VISION CAMERA . . . . ..... 101
Rear-vision Camera Washer .....101
REAR WINDOW WIPER . . . . ..... 22
Rear-vision Camera Washer . . . . . . 22
RECEIVING A CALL . . . . . . . . . . . . 73
REVERSE AUTOMATIC BRAKING (RAB) . . . . . . . .......... 104
Reverse Automatic Braking (RAB)
OFF ...................105
ROOF RAIL CAPACITY .......... 57
INDEX
145